一、Samba简介
1.基础信息
用 Internet 文件系统 CIFS(Common Internet File System)是适用于MicrosoftWindows 服务器和客户端的标准文件和打印机共享系统信息块 (SMB)
Samba 服务可用于将 Linux 文件系统作为 CIFS/SMB 网络文件共享进行共享 , 并将 Linux 打印机作为 CIFS/SMB 打印机共
享进行共享
2.Samba 服务的组成部分
软件包 :
Samba-common – Samba 的支持文件
Samba-client – 客户端应用程序
Samba – 服务器应用程序
服务名称 :
smb 充当SMB文件和打印服务器
nmb 提供NetBIOS命名服务
服务端口 : 通常使用 TCP/445 进行所有连接。还使用UDP137 、 UDP138 和 TCP/139 进行向后兼容
主配置文件 :/etc/samba/smb.conf
二、 安装Samba
客户端client:172.25.254.105 服务端server:172.25.254.205
安装服务端对应软件:
[root@server ~]# yum install samba samba-client samba-common -y安装客户端对应软件:
[root@client ~]# yum install samba-client.x86_64 -y打开服务关闭火墙
[root@server ~]# systemctl start smb
[root@server ~]# systemctl enable smb.service
[root@server ~]# systemctl stop firewalld.service
[root@server ~]# systemctl disable firewalld.service
查看samba的端口
[root@server ~]# netstat -antlpe |grep smb ##samba开启139和445端口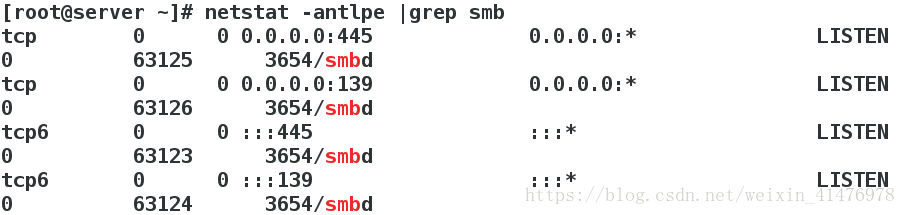
三、Samba用户的管理
1.添加samba用户
给samba添加用户,此用户必须是系统已经存在的用户!
[root@server ~]# smbpasswd -a student ##添加student用户
New SMB password:
Retype new SMB password:
Added user student. ##添加成功
此时若添加系统不存在的用户linux,则添加失败
[root@server ~]# id linux
id: linux: no such user ##系统显示没有linux用户
[root@server ~]# smbpasswd -a linux
New SMB password:
Retype new SMB password:
Failed to add entry for user linux.##添加失败
此时新建用户linux,再次添加
[root@server ~]# useradd  linux  ##重新添加用户之后,添加成功
[root@server ~]# smbpasswd -a linux
New SMB password:
Retype new SMB password:
Added user linux.
2.查看samba的用户
[root@server ~]# pdbedit  -L
student:1000:Student User
linux:1001:
3.删除samba用户
[root@server ~]# pdbedit -x   student ##删除student用户
[root@server ~]# pdbedit  -L  ##只剩linux用户
linux:1001:
四、共享文件存储
1.匿名链接服务端
[root@client ~]# smbclient -L //172.25.254.205 ##-L后接连接的服务器
Enter root's password:
Anonymous login successful
Domain=[MYGROUP] OS=[Unix] Server=[Samba 4.1.1]

    Sharename       Type      Comment
    ---------       ----      -------
    IPC$            IPC       IPC Service (Samba Server Version 4.1.1)
Anonymous login successful
Domain=[MYGROUP] OS=[Unix] Server=[Samba 4.1.1]

    Server               Comment
    ---------            -------

    Workgroup            Master
    ---------            -------
-L 显示服务端所分享出来的所有资源,-U指定用户名称
2.用student用户连接
[root@client ~]# smbclient -L //172.25.254.205  -U student  ##-L后接连接的服务器, -U后接samba用户名
Enter student's password:
Domain=[MYGROUP] OS=[Unix] Server=[Samba 4.1.1]

    Sharename       Type      Comment
    ---------       ----      -------
    IPC$            IPC       IPC Service (Samba Server Version 4.1.1)
    student         Disk      Home Directories
Domain=[MYGROUP] OS=[Unix] Server=[Samba 4.1.1]

    Server               Comment
    ---------            -------

    Workgroup            Master
    ---------            -------
连接服务器的用户家目录:
[root@client ~]# smbclient  //172.25.254.205/student  -U student
Enter student's password:
Domain=[MYGROUP] OS=[Unix] Server=[Samba 4.1.1]
smb: \> ls
NT_STATUS_ACCESS_DENIED listing \*     ##拒绝访问
此时服务被拒绝是因为selinux的原因
服务端修改sebool值:
[root@server student]# getsebool -a |grep samba ##查看samba的sebool值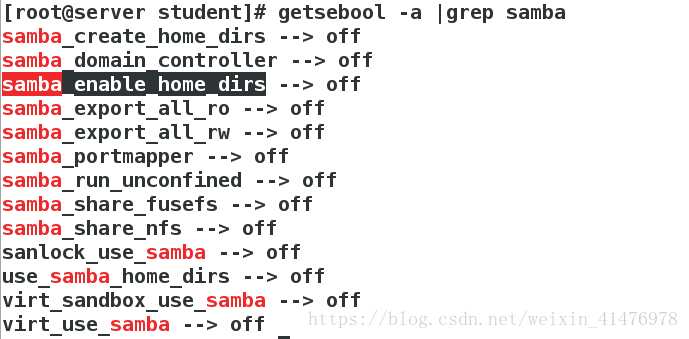
[root@server ~]# setsebool -P samba_enable_home_dirs on ##-p表示永久重新测试
[root@client ~]# smbclient //172.25.254.205/student -U student##重新连接测试,可以查看
3.客户端更新服务端
用户只能上传当前位置的文件到服务端的家目录
[root@client ~]# cd /etc/
[root@client etc]# smbclient //172.25.254.205/student -U student
Enter student's password:
Domain=[MYGROUP] OS=[Unix] Server=[Samba 4.1.1]
smb: \> !ls  ##显示当前位置的所有文件,篇幅过长不予显示
smb: \> put  passwd  ##上传password文件
putting file passwd as \passwd (4.4 kb/s) (average 4.4 kb/s)
这些文件均上传到服务端的student的家目录
[root@server student]# ls
passwd
4.设置挂载
【1】暂时挂载
[root@client bin]# mount  //172.25.254.205/student /mnt/ -o username=student,password=123
[root@client mnt]# touch file{1..3} ##在客户端新建文件
[root@server student]# ls ##同步到服务端
file1  file2  file3  ls  passwd
【2】开机自动挂载
[root@client ~]# vim /etc/fstab
//172.25.254.205/student  /mnt cifs    defaults,username=student,password=123    0       0
[root@client ~]# mount -a ##加载文件/etc/fstab中的内容
[root@client ~]# df ##挂载成功
Filesystem               1K-blocks    Used Available Use% Mounted on
/dev/vda1                 10473900 3182952   7290948  31% /
devtmpfs                    469344       0    469344   0% /dev
tmpfs                       484932     140    484792   1% /dev/shm
tmpfs                       484932   12808    472124   3% /run
tmpfs                       484932       0    484932   0% /sys/fs/cgroup
/dev/mapper/vg0-vo          483670    2339    451840   1% /home
//172.25.254.205/student  10473900 3158308   7315592  31% /mnt
上述方法有一个缺点是如果文件内容修改错误会影响开机启动,于是推荐下述挂载策略
[root@client ~]# vim /etc/rc.d/rc.local
mount -t cifs //172.25.254.205/student /mnt -o username=student,password=123
[root@client ~]# chmod +x /etc/rc.d/rc.local ##增加可执行权限
[root@client ~]# reboot
5.修改工作组名称
配置文件的查找:
[root@client ~]# rpm -qc samba-common

修改配置文件:
[root@server student]# vim /etc/samba/smb.conf
89         workgroup =HELLO
[root@server student]# systemctl restart smb.service 
测试:
[root@client etc]# smbclient -L //172.25.254.205 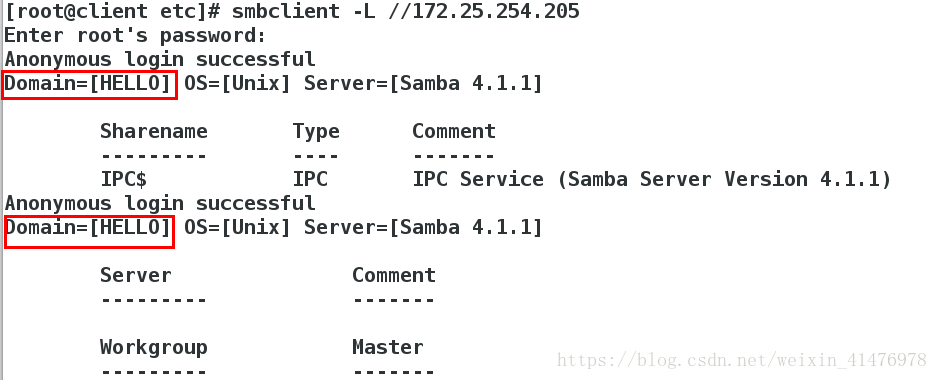
6.访问权限设定
【1】黑名单设定
[root@server student]# vim /etc/samba/smb.conf
98         hosts deny = 172.25.254.105
[root@server student]# systemctl restart smb.service
测试:
[root@client ~]# smbclient -L //172.25.254.205   ##连接失败
Enter root's password:
protocol negotiation failed: NT_STATUS_INVALID_NETWORK_RESPONSE
[root@foundation62 Desktop]# smbclient  -L//172.25.254.205  ##黑名单外的主机连接成功
Enter kiosk's password:
Anonymous login successful
Domain=[HELLO] OS=[Unix] Server=[Samba 4.1.1]

    Sharename       Type      Comment
    ---------       ----      -------
    IPC$            IPC       IPC Service (Samba Server Version 4.1.1)
【2】白名单设定
[root@server student]# vim /etc/samba/smb.conf
98         hosts allow = 172.25.254.105
[root@server student]# systemctl restart smb.service
测试:
[root@client etc]# smbclient -L //172.25.254.205  ##105连接成功
Enter root's password:
Anonymous login successful
Domain=[HELLO] OS=[Unix] Server=[Samba 4.1.1]

    Sharename       Type      Comment
    ---------       ----      -------
    IPC$            IPC       IPC Service (Samba Server Version 4.1.1)
[root@foundation62 Desktop]# smbclient  -L//172.25.254.205 ##白名单外的主机连接失败

Enter kiosk's password:
protocol negotiation failed: NT_STATUS_INVALID_NETWORK_RESPONSE
7.共享指定文件
【1】共享用户自己建立的目录
[root@server ~]# mkdir  /hello ##新建需要共享的目录
[root@server ~]# vim /etc/samba/smb.conf
322         [DIR]          ##名称
323         comment=hello dir ##描述
324         path = /hello  ##路径
[root@server ~]# semanage fcontext -a -t samba_share_t '/hello(/.*)?'  ##修改安全上下文
[root@server ~]# restorecon -RvvF /hello/  ##刷新
restorecon reset /hello context unconfined_u:object_r:default_t:s0->system_u:object_r:samba_share_t:s0
测试:
[root@client ~]# smbclient -L //172.25.254.205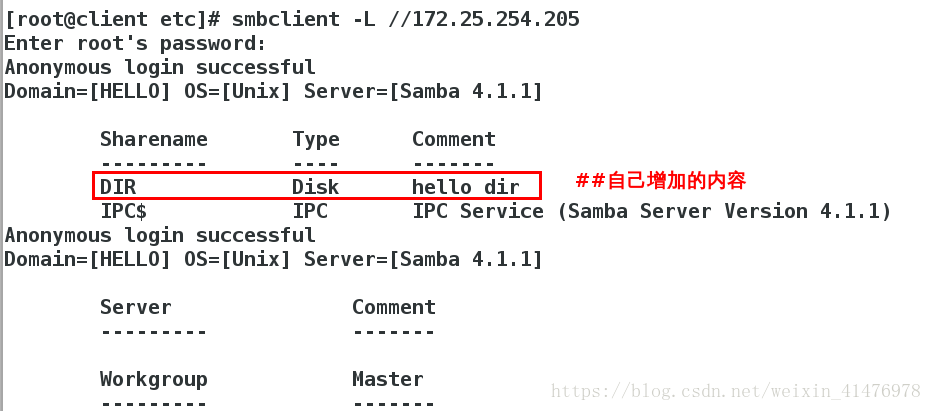
【2】共享系统目录
[root@server ~]# vim /etc/samba/smb.conf
326         [mnt]
327         comment =/mnt dir
328         path=/mnt
[root@server ~]# systemctl restart smb.service
[root@server ~]# touch /mnt/file{1..5}
客户端测试:
[root@client etc]# smbclient //172.25.254.205/mnt -U student
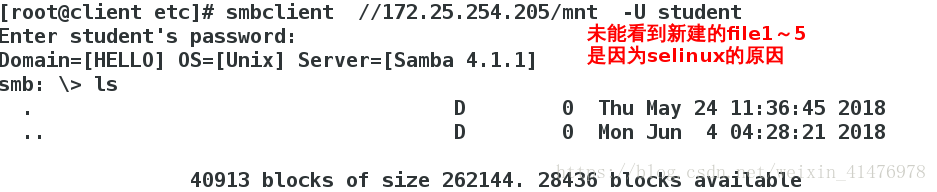
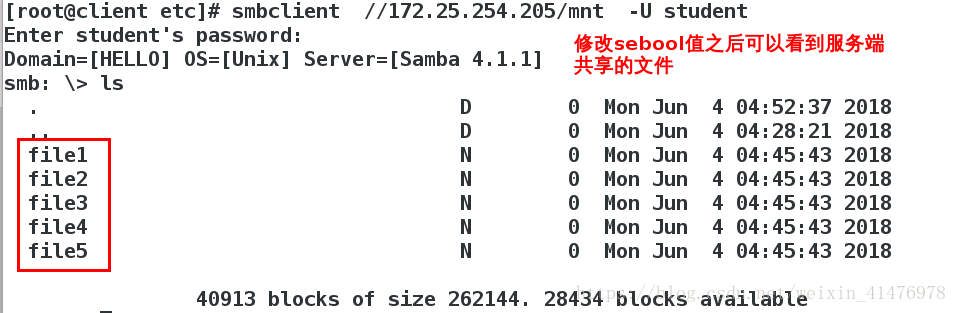
更改selinux:
[root@server ~]# setsebool -P samba_export_all_ro on##此时因为是系统目录还要被其他服务使用,所以不能更改安全上下文,只能修改sebool值
[root@server ~]# systemctl restart smb.service
客户端再次测试:
五、用户权限的设定
1.可浏览权限
[root@server ~]# vim /etc/samba/smb.conf
322         [DIR]
323         comment=hello dir
324         path = /hello
325         browseable =no ##设置为不可浏览,默认是yes
[root@server ~]# systemctl restart smb.service  ##重启服务
测试:
[root@client etc]# smbclient -L //172.25.254.205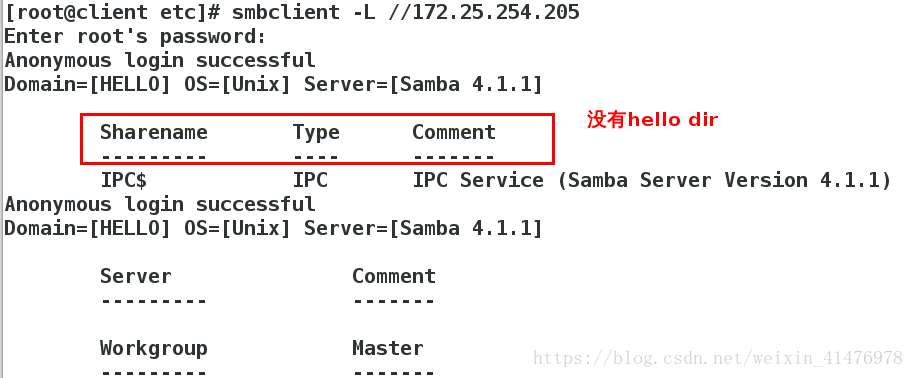
2.可写权限
[root@server ~]# vim /etc/samba/smb.conf
322         [DIR]
323         comment=hello dir
324         path = /hello
325         writable =yes ##对所有人可写
[root@server ~]# systemctl restart smb.service
[root@server hello]# chmod 777 /hello/  ##方便做实验给一个满权限
测试:
[root@client etc]# mount //172.25.254.205/DIR /mnt/ -o username=student,password=123
[root@client etc]# cd /mnt/
[root@client mnt]# touch file
[root@client mnt]# ls
file
3.只对某个用户可写
[root@server hello]# vim /etc/samba/smb.conf
        [DIR]
        comment=hello dir
        path=/hello
;       writable=yes  ##对所有人可写进行注释
        write list=student ##允许student用户可写
[root@server hello]# systemctl restart smb.service
测试:
[root@client ~]# mount //172.25.254.205/DIR /mnt/ -o username=student,password=123  ##student用户可写
[root@client ~]# touch /mnt/hello
[root@client ~]# ls /mnt/
hello
[root@client ~]# mount //172.25.254.205/DIR /mnt/ -o username=linux,password=123  ##linux用户不可写
[root@client ~]# touch /mnt/hello123
touch: cannot touch ‘/mnt/hello123’: Permission denied
4.组成员可写
[root@server hello]# vim /etc/samba/smb.conf
       [DIR]
        comment=hello dir
        path=/hello
;       writable=yes           ##对所有人可写进行注释
        write list=@student    ##对student组的用户可写 (+、@都可以)
[root@server hello]# systemctl restart smb.service
把linux加入student组
[root@server hello]# usermod -G student linux
[root@server hello]# id linux
uid=1001(linux) gid=1001(linux) groups=1001(linux),1000(student)
测试:
[root@client ~]# mount //172.25.254.205/DIR /mnt/ -o username=linux,password=123 ##加入student组之可写!
[root@client ~]# touch /mnt/xixi
[root@client ~]# ls /mnt/
xixi
5.目录的超级用户
[root@server hello]# vim /etc/samba/smb.conf
        [DIR]
        comment=hello dir
        path=/hello
        writable=yes
;       write list=@student ##对组可写进行注释
        admin users=linux   ##linux是DIR的超户
[root@server hello]# systemctl restart smb.service
修改共享目录的权限
[root@server hello]# chmod 755 /hello/
[root@server hello]# ls -ld  /hello/
drwxr-xr-x. 2 root root 18 Jun  4 06:00 /hello/
客户端测试:
[root@client ~]# mount //172.25.254.205/DIR /mnt/ -o username=linux,password=123
[root@client ~]# ls /mnt/
hello  xixi
[root@client ~]# rm -rf /mnt/xixi
六、多用户挂载
客户端:
使用cifs-utils进行加密,在root下新建smbpass以保存用户信息
[root@client ~]# yum  install cifs-utils.x86_64  -y
[root@client ~]# vim /root/smbpass
username=linux
password=123
挂载的同时,以linux身份通过认证
[root@client ~]# mount -o credentials=/root/smbpass,sec=ntlmssp,multiuser //172.25.254.205/DIR /mnt/
切换到test用户,test没有认证即没有权限
[root@client ~]# useradd test
[root@client ~]# su - test
[test@client ~]$ ls /mnt
ls: cannot access /mnt: Permission denied
加认证
[test@client ~]$ cifscreds add -u linux 172.25.254.205
Password:
[test@client ~]$ ls /mnt
hello
七、匿名用户登录
[root@server ~]# vim /etc/samba/smb.conf
126         map to guest=bad user ##这个配置的意思是将所有samba系统主机所不能正确识别的用户都映射成guest用户,这样其他主机访问目录时就不再需要用户名和密码了
328         guest ok=yes    ##匿名用户可以登录
[root@server ~]# systemctl restart smb.service
测试:
[root@client ~]# smbclient //172.25.254.205/DIR
Enter root's password:
Anonymous login successful
Domain=[HELLO] OS=[Unix] Server=[Samba 4.1.1]
smb: \> ls
  .                                   D        0  Mon Jun  4 06:34:13 2018
  ..                                  D        0  Mon Jun  4 04:28:21 2018
  hello                               N        0  Mon Jun  4 05:42:48 2018
  file1                               N        0  Mon Jun  4 06:42:48 2018
进行挂载
[root@client ~]# mount //172.25.254.205/DIR /mnt/ -o username=guest,password=" "
[root@client ~]# df
Filesystem           1K-blocks    Used Available Use% Mounted on
/dev/vda1             10473900 3219168   7254732  31% /
devtmpfs                469344       0    469344   0% /dev
tmpfs                   484932      84    484848   1% /dev/shm
tmpfs                   484932   12796    472136   3% /run
tmpfs                   484932       0    484932   0% /sys/fs/cgroup
/dev/mapper/vg0-vo      483670    2355    451824   1% /home
//172.25.254.205/DIR  10473900 3195636   7278264  31% /mnt