文章目录
链接:https://www.behaviortree.dev/docs/3.8/tutorial-advanced/asynchronous_nodes
原文链接:https://github.com/BehaviorTree/BehaviorTree.CPP/tree/3.8.0
一、前置理解
1)行为树介绍
2)主要概念介绍
3)XML主题介绍
二、基础篇教程
1)建立第一个行为树
- 先做一个顺序节点的行为树,结构图如下

(1)三种方式创建行为树节点(继承、依赖注入、定义类)
- (1)默认常规方法:
继承去做
// Example of custom SyncActionNode (synchronous action)
// without ports.(port表示的意思是节点的传入、传出参数,这个ApproachObject节点没有传入传出参数)
class ApproachObject : public BT::SyncActionNode
{


public:
	//构造函数,传入行为树节点名字
  ApproachObject(const std::string& name) :
      BT::SyncActionNode(name, {

    })
  {

    }

  // You must override the virtual function tick()
  //需要重写tick虚函数,返回对应的节点状态(必须返回RUNNING, SUCCESS or FAILURE 这几个状态)
  BT::NodeStatus tick() override
  {


    std::cout << "ApproachObject: " << this->name() << std::endl;
    return BT::NodeStatus::SUCCESS;
  }
};
- (2)第二种方法:
依赖注入
BT::NodeStatus myFunction()
BT::NodeStatus myFunction(BT::TreeNode& self)
- 举例
using namespace BT;

// Simple function that return a NodeStatus
BT::NodeStatus CheckBattery()
{


  std::cout << "[ Battery: OK ]" << std::endl;
  return BT::NodeStatus::SUCCESS;
}
- (3)第三种方法:定义类方法来定义行为树节点(这里可以调用这个类的open和close)
// We want to wrap into an ActionNode the methods open() and close()
class GripperInterface
{


public:
  GripperInterface(): _open(true) {

    }

  NodeStatus open()
  {


    _open = true;
    std::cout << "GripperInterface::open" << std::endl;
    return NodeStatus::SUCCESS;
  }

  NodeStatus close()
  {


    std::cout << "GripperInterface::close" << std::endl;
    _open = false;
    return NodeStatus::SUCCESS;
  }

private:
  bool _open; // shared information
};
(2)主main函数调用行为树节点(链接静态库用于调试,链接动态库用用于实际使用)
- 链接静态库方式调用节点(registering all the nodes one by one.)
int main()
{


  //1、 We use the BehaviorTreeFactory to register our custom nodes
  BehaviorTreeFactory factory;//这个是用来注册节点的

	//2、
  // Note: the name used to register should be the same used in the XML.
  // Note that the same operations could be done using DummyNodes::RegisterNodes(factory)

  using namespace DummyNodes;

  // The recommended way to create a Node is through inheritance.
  // Even if it requires more boilerplate, it allows you to use more functionalities
  // like ports (we will discuss this in future tutorials).
  factory.registerNodeType<ApproachObject>("ApproachObject");

  // Registering a SimpleActionNode using a function pointer.
  // you may also use C++11 lambdas instead of std::bind
  factory.registerSimpleCondition("CheckBattery", std::bind(CheckBattery));

  //You can also create SimpleActionNodes using methods of a class
  GripperInterface gripper;
  factory.registerSimpleAction("OpenGripper",
                               std::bind(&GripperInterface::open, &gripper));
  factory.registerSimpleAction("CloseGripper",
                               std::bind(&GripperInterface::close, &gripper));

	//3、跑行为树逻辑
  // Trees are created at deployment-time (i.e. at run-time, but only once at the beginning).
  // The currently supported format is XML.
  // IMPORTANT: when the object "tree" goes out of scope, all the TreeNodes are destroyed
  auto tree = factory.createTreeFromText(xml_text);

  // To "execute" a Tree you need to "tick" it.
  // The tick is propagated to the children based on the logic of the tree.
  // In this case, the entire sequence is executed, because all the children
  // of the Sequence return SUCCESS.
  tree.tickRootWhileRunning();

}
- 链接动态库方式调用节点
int main()
{


  //1、 We use the BehaviorTreeFactory to register our custom nodes
  BehaviorTreeFactory factory;//这个是用来注册节点的

	//2、
  // Load dynamically a plugin and register the TreeNodes it contains
  // it automated the registering step.
  factory.registerFromPlugin("./libdummy_nodes_dyn.so");//(源码宏定义已经注册)

	//3、跑行为树逻辑
  // Trees are created at deployment-time (i.e. at run-time, but only once at the beginning).
  // The currently supported format is XML.
  // IMPORTANT: when the object "tree" goes out of scope, all the TreeNodes are destroyed
  auto tree = factory.createTreeFromText(xml_text);

  // To "execute" a Tree you need to "tick" it.
  // The tick is propagated to the children based on the logic of the tree.
  // In this case, the entire sequence is executed, because all the children
  // of the Sequence return SUCCESS.
  tree.tickRootWhileRunning();

}
(3)xml解析
 <root main_tree_to_execute = "MainTree" >

     <BehaviorTree ID="MainTree">
        <Sequence name="root_sequence">
            <CheckBattery   name="battery_ok"/>
            <OpenGripper    name="open_gripper"/>
            <ApproachObject name="approach_object"/>
            <CloseGripper   name="close_gripper"/>
        </Sequence>
     </BehaviorTree>

 </root>
- 注释
1)
BehaviorTree ID的作用是标识行为树的根节点,以便在执行行为树时从正确的节点开始执行。
2)Sequence表示顺序节点
3)root main_tree_to_execute表示tickRootWhileRunning()被调用的时候,执行BehaviorTree ID为MainTree的树逻辑,MainTree为根节点
- 原来的字符串
static const char* xml_text = R"(

 <root main_tree_to_execute = "MainTree" >

     <BehaviorTree ID="MainTree">
        <Sequence name="root_sequence">
            <CheckBattery   name="battery_ok"/>
            <OpenGripper    name="open_gripper"/>
            <ApproachObject name="approach_object"/>
            <CloseGripper   name="close_gripper"/>
        </Sequence>
     </BehaviorTree>

 </root>
 )";
这里的R表示:
xml_text 变量中括号前的 R 是原始字符串字面量的前缀,它表示字符串中的任何转义序列(例如 \n 表示换行符)都被视为字面字符而不是它们的特殊含义。在这种情况下,它允许将 XML 文本写成单个多行字符串,而无需转义任何字符。
(4)输出结果
- 注意
原来原来是链接linux动态库,这里需要改成链接win动态库,win的动态库需要和执行文件放一起
2)黑板数据和port
(1)黑板存在的作用(通过port来实现)
①给节点传递参数
②获得节点的输出信息
③把某个节点的输出信息作为输入信息传递给另外一个节点
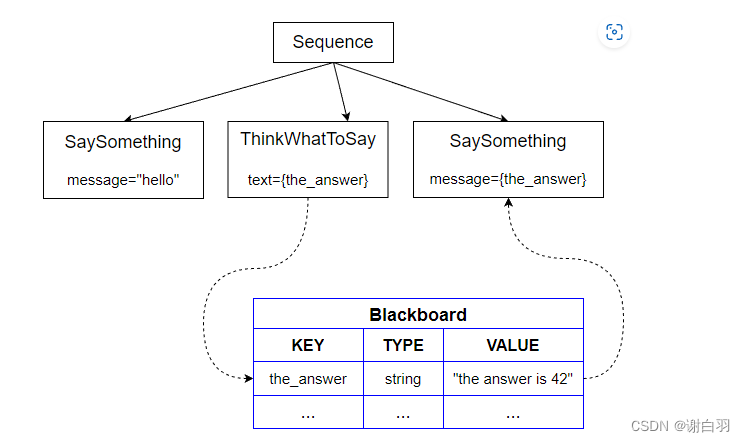
(2)黑板的测试案例思维导图(这个黑板只存储了简单键值对)
(3)Input输入参数的ports举例使用
- 举例
1)main函数注册SaySomething函数
  factory.registerNodeType<SaySomething>("SaySomething");
2)SaySomething这个类
class SaySomething : public BT::SyncActionNode
{


  public:
    SaySomething(const std::string& name, const BT::NodeConfiguration& config)
      : BT::SyncActionNode(name, config)
    {


    }

    // You must override the virtual function tick()
    NodeStatus tick() override;

    // It is mandatory to define this static method.
    static BT::PortsList providedPorts()
    {


        return{

     BT::InputPort<std::string>("message") };
    }
};
这里的static BT::PortsList providedPorts()是强制性要求写成静态方式的;而且必须重写虚函数NodeStatus tick() override;
(4)输出参数的ports举例使用
- 原版xml
 <root main_tree_to_execute = "MainTree" >

     <BehaviorTree ID="MainTree">
        <Sequence name="root">
            <SaySomething     message="hello" />
            <SaySomething2    message="this works too" />
            <ThinkWhatToSay   text="{the_answer}"/>
            <SaySomething2    message="{the_answer}" />
        </Sequence>
     </BehaviorTree>

 </root>
- 这里的ThinkWhatToSay修改了text对应的the_answer的值,导致下面的the_answer也跟着变化
class ThinkWhatToSay : public BT::SyncActionNode
{


public:
  ThinkWhatToSay(const std::string& name, const BT::NodeConfiguration& config) :
    BT::SyncActionNode(name, config)
  {

    }

  // This Action simply write a value in the port "text"
  BT::NodeStatus tick() override
  {


    setOutput("text", "The answer is 42");
    return BT::NodeStatus::SUCCESS;
  }

  // A node having ports MUST implement this STATIC method
  static BT::PortsList providedPorts()
  {


    return {

    BT::OutputPort<std::string>("text")};
  }
};
(5)t02_basic_ports项目讲解
1)SaySomething在tick里面打印了hello
2)ThinkWhatToSay输出参数port到the_answer
3)这里由于SaySomething2之前对应了this works too,但是又因为ThinkWhatToSay修改了the_answer值,所以,SaySomething2的message会对应两个,打印(注意这里两个ThinkWhatToSay节点都是唯一的,所以都会被打印两次)
        Robot says: this works too
        Robot says: The answer is 42
3)黑板传递通用参数-port with generic types
4)反射性行为
5)利用子树
6)port remapping
7)use multiple xml files
8)传递额外参数
三、进阶篇教程(异步流程)
四、Nodes Library
1)装饰器
2)回调函数
3)顺序节点
- 行为树节点分类
1)序列Sequence节点:
顺序执行所有子节点,若都成功则返回成功,若有一个失败则返回失败
2)循环Loop节点
循环执行子节点到指定次数后返回成功,如果循环次数为"-1",则无限循环
3)条件Condition节点
根据条件的比较结果,返回成功或失败
4)动作Action节点
根据动作结果返回”成功“、”失败“或”运行“
5)等待Wait节点
返回"运行",一直到指定的时间过去后返回”成功"