概述
如有不明白的可以加QQ:2781128388
源码获取: https://mbd.pub/o/bread/Y5uck5hq
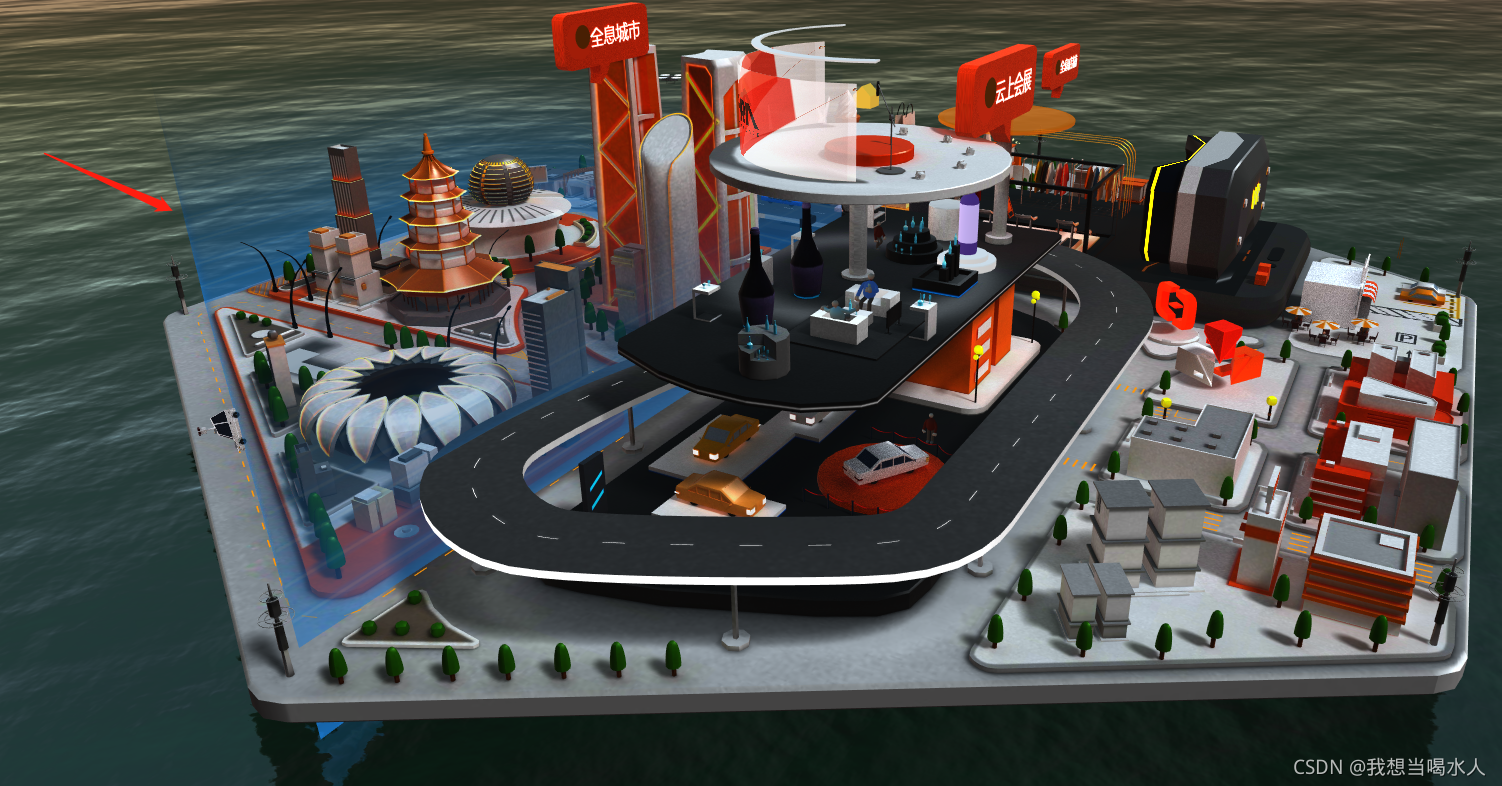
开发了一个Three.js 使用烘培模型的demo,先看视频效果,整体的效果有水面,太阳,倒影,模型动画,围栏特效,相机动画
three.js 云上城市
创建场景
创建渲染器,灯光,相机,控制器和以前的智慧城市项目一样,从那边照抄过来即可,调用方式如下
	  app = new ZThree("screen");
      app.initThree();
      // app.initHelper();
      app.initOrbitControls();
      light = app.initLight();

      // stats = app.initStatus();
      selectObj = app.initRaycaster();
      window.app = app;
      camera = app.camera;
      // bloomComposer = app.bloomComposer();
      camera.position.set(...this.cameraPosition);
      scene = app.scene;
      renderer = app.renderer;
      renderer.logarithmicDepthBuffer = true;
      renderer.autoClear = false;

      controls = app.controls;
      controls.target.set(...this.target);
      controls.maxDistance = 2000;
      controls.maxPolarAngle = Math.PI / 2.2;
      clock = new THREE.Clock();
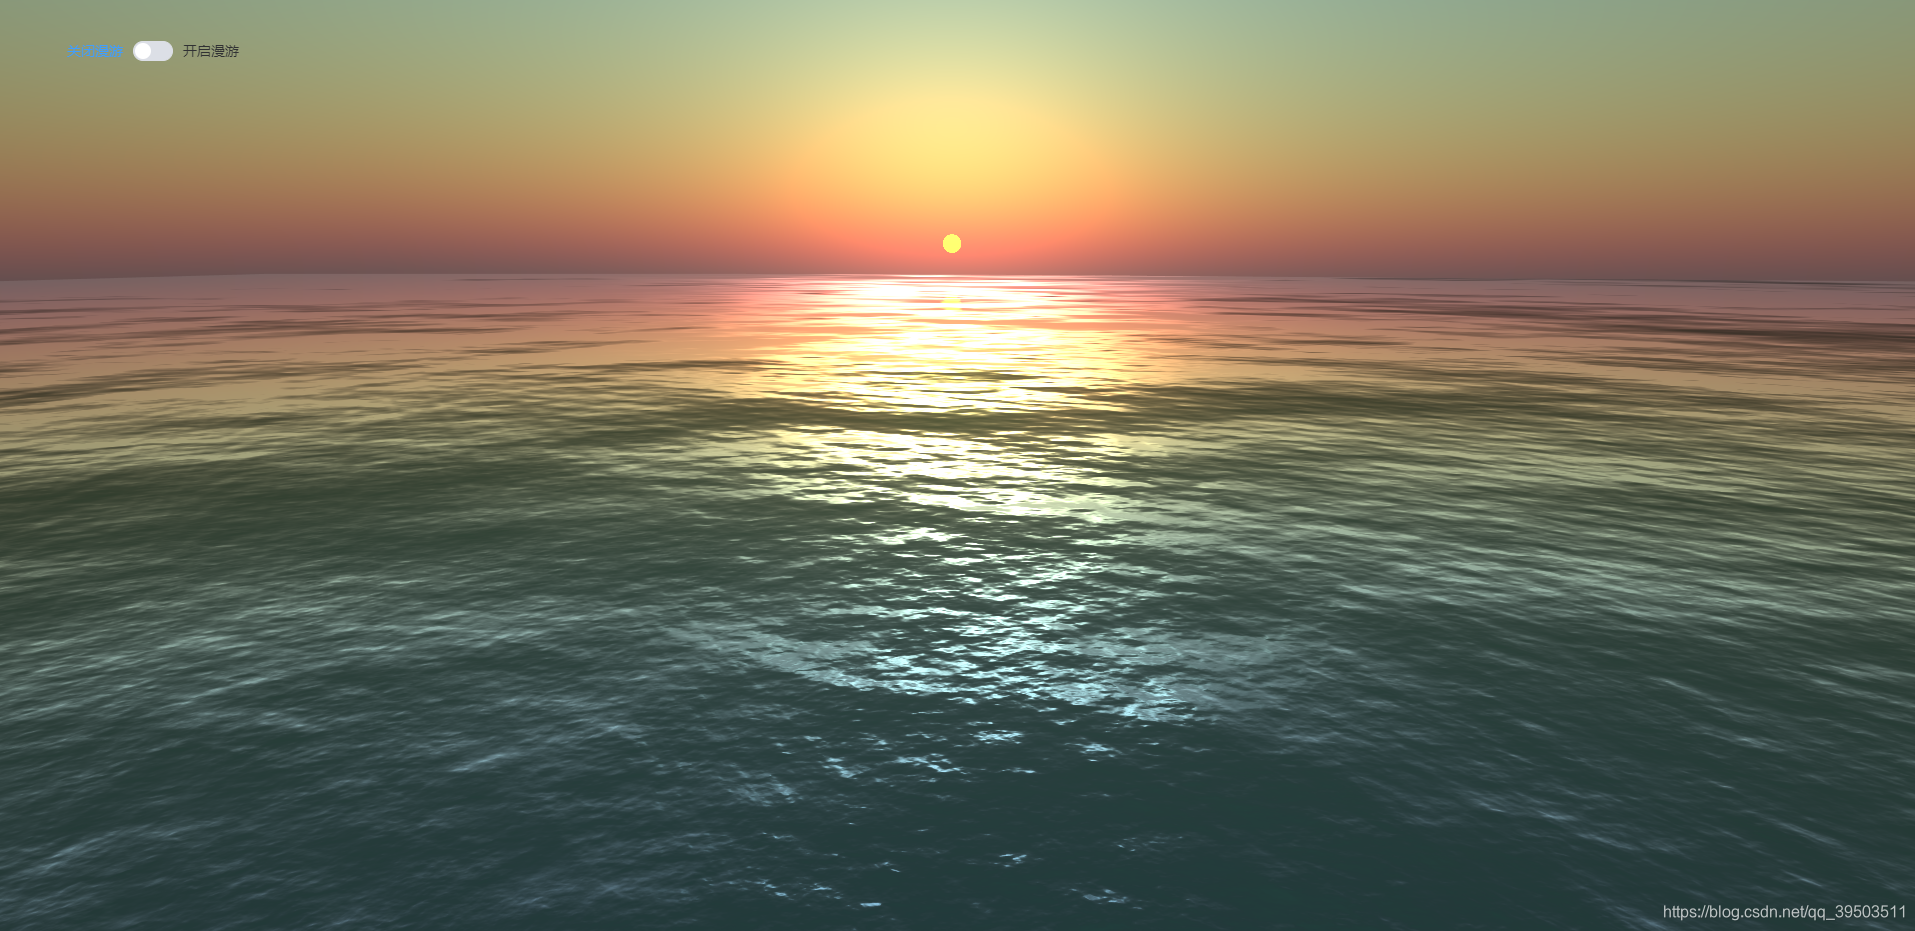
创建天空
export function loaderSky(app, water) {


  return new Promise(resolve => {


    let sky = new Sky();
    sky.scale.setScalar(10000);
    app.scene.add(sky);
    let skyUniforms = sky.material.uniforms;

    skyUniforms['turbidity'].value = 1;
    skyUniforms['rayleigh'].value = 3;
    skyUniforms['mieCoefficient'].value = 0.005;
    skyUniforms['mieDirectionalG'].value = 0.8;

    let parameters = {


      inclination: 0.49,
      azimuth: 0.205
    };

    let pmremGenerator = new THREE.PMREMGenerator(app.renderer);

    let sun = new THREE.Vector3();

    let theta = Math.PI * (parameters.inclination - 0.5);
    let phi = 2 * Math.PI * (parameters.azimuth - 0.5);

    sun.x = Math.cos(phi);
    sun.y = Math.sin(phi) * Math.sin(theta);
    sun.z = Math.sin(phi) * Math.cos(theta);

    sky.material.uniforms['sunPosition'].value.copy(sun);
    water.material.uniforms['sunDirection'].value.copy(sun).normalize();

    app.scene.environment = pmremGenerator.fromScene(sky).texture;

    resolve(sky);
  })
}
创建水面
创建一个平面然后加上调用水面的材质就好,很简单
export function loaderWater(app) {


  return new Promise(resolve => {


    let waterGeometry = new THREE.PlaneGeometry(10000, 10000);

    let water = new Water(
      waterGeometry, {


        textureWidth: 512,
        textureHeight: 512,
        waterNormals: new THREE.TextureLoader().load('texture/waternormals.jpg', function (texture) {


          texture.wrapS = texture.wrapT = THREE.RepeatWrapping;
        }),
        alpha: 1.0,
        sunDirection: new THREE.Vector3(),
        sunColor: 0xffffff,
        waterColor: 0x001e0f,
        distortionScale: 3.7,
        fog: app.scene.fog !== undefined
      }
    );

    water.rotation.x = -Math.PI / 2;

    app.scene.add(water);

    resolve(water);
  })
}
此时我们看到的效果是
创建模型
export async function loaderShop(app) {


  return new Promise(async resolve => {


    let gltf = await app.loaderGltfDracoModel('model/', 'yun.glb');
    let model = gltf.scene;
    model.getObjectByName('cloud').visible = false;
    const s = 0.1;
    model.scale.set(s, s, s);
    model.position.set(0, -80, 0);
    let allModel = [];
    let mixer = new THREE.AnimationMixer( model );
		mixer.clipAction( gltf.animations[ 0 ] ).play();
    let clickTextObj = [model.getObjectByName('全息店铺标签'), model.getObjectByName('全息城市标签'), model.getObjectByName('云展标签')];
    // loaderRipple();
    app.scene.add(model);
    resolve({


      model,
      allModel,
      clickTextObj,
      mixer
    });
  })
}
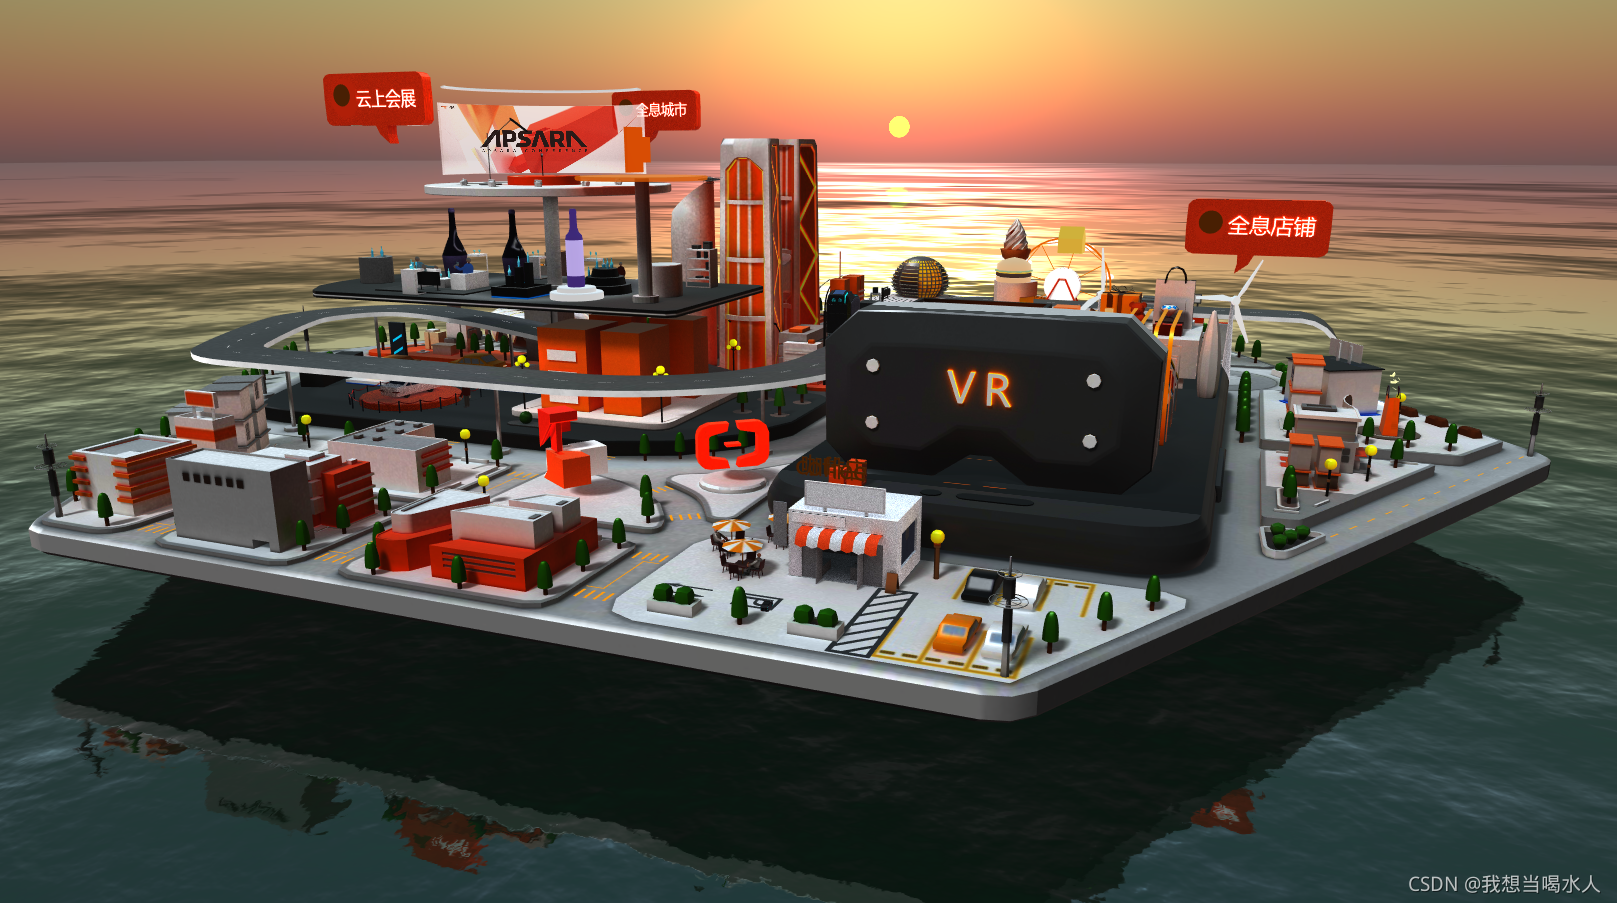
开启模型动画
loaderModel.js 文件代码:
let mixer = new THREE.AnimationMixer( model );
mixer.clipAction( gltf.animations[ 0 ] ).play();
渲染模块代码:
const delta = clock.getDelta();
if (model.mixer) {


          model.mixer.update( delta );
 }
此时我们就可以看到模型的动画了。
栅栏动画
生成栅栏的mesh
let ripple;
export function loaderRipple(pos) {


  if (ripple) {


    app.scene.remove(ripple);
    ripple.geometry.dispose();
    ripple.material.dispose();
    ripple = null;
  }
  let vector3s = [];
  for (let i = 0; i < pos.length; i++) {


    vector3s.push(new THREE.Vector3(...pos[i]));
  }
  // 围栏
  let rippleGeometry = getRippleGeometry(vector3s, 60);

  let rippleMaterial = new THREE.ShaderMaterial({


    vertexShader: rippleShader.vs,
    fragmentShader: rippleShader.fs,
    uniforms: rippleShader.uniform,
    side: THREE.DoubleSide,
    transparent: true,
    depthWrite: false
  })

  ripple = new THREE.Mesh(rippleGeometry, rippleMaterial);
  app.scene.add(ripple);
}
生成栅栏的geometry
function getRippleGeometry(points = [], height = 10) {


  let positions = []
  let uvs = []
  for (let i = 0, j = positions.length, t = uvs.length; i < points.length - 1; i++) {


    let vUvyMax = 1
    let left = points[i]
    let right = points[i + 1]
    positions[j++] = left.x
    positions[j++] = 0
    positions[j++] = left.y
    uvs[t++] = 0
    uvs[t++] = 0

    positions[j++] = right.x
    positions[j++] = 0
    positions[j++] = right.y
    uvs[t++] = 1
    uvs[t++] = 0

    positions[j++] = left.x
    positions[j++] = height
    positions[j++] = left.y
    uvs[t++] = 0
    uvs[t++] = vUvyMax

    positions[j++] = left.x
    positions[j++] = height
    positions[j++] = left.y
    uvs[t++] = 0
    uvs[t++] = vUvyMax

    positions[j++] = right.x
    positions[j++] = 0
    positions[j++] = right.y
    uvs[t++] = 1
    uvs[t++] = 0

    positions[j++] = right.x
    positions[j++] = height
    positions[j++] = right.y
    uvs[t++] = 1
    uvs[t++] = vUvyMax
  }
  let geometry = new THREE.BufferGeometry()
  geometry.addAttribute('position', new THREE.BufferAttribute(new Float32Array(positions), 3))
  geometry.addAttribute('uv', new THREE.BufferAttribute(new Float32Array(uvs), 2))
  return geometry;
}
使用的shader:
export const rippleShader = {


  vs:"\n  precision lowp float;\n  precision lowp int;\n  ".concat(THREE.ShaderChunk.fog_pars_vertex, "\n  varying vec2 vUv;\n  void main() {\n    vec4 mvPosition = modelViewMatrix * vec4( position, 1.0 );\n    vUv = uv;\n    gl_Position = projectionMatrix * modelViewMatrix * vec4(position, 1.0);\n    ").concat(THREE.ShaderChunk.fog_vertex, "\n  }\n"),
  fs: "\n  precision lowp float;\n  precision lowp int;\n  uniform float time;\n  uniform float opacity;\n  uniform vec3 color;\n  uniform float num;\n  uniform float hiz;\n\n  varying vec2 vUv;\n\n  void main() {\n    vec4 fragColor = vec4(0.);\n    float sin = sin((vUv.y - time * hiz) * 10. * num);\n    float high = 0.92;\n    float medium = 0.4;\n    if (sin > high) {\n      fragColor = vec4(mix(vec3(.8, 1., 1.), color, (1. - sin) / (1. - high)), 1.);\n    } else if(sin > medium) {\n      fragColor = vec4(color, mix(1., 0., 1.-(sin - medium) / (high - medium)));\n    } else {\n      fragColor = vec4(color, 0.);\n    }\n\n    vec3 fade = mix(color, vec3(0., 0., 0.), vUv.y);\n    fragColor = mix(fragColor, vec4(fade, 1.), 0.85);\n    gl_FragColor = vec4(fragColor.rgb, fragColor.a * opacity * (1. - vUv.y));\n  }\n",
  uniform:{


    time: {


      type: "pv2",
      value: 0
  },
  color: {


      type: "uvs",
      value: new THREE.Color('#1E90FF')
  },
  opacity: {


      type: "pv2",
      value: 0.8
  },
  num: {


      type: "pv2",
      value: 8
  },
  hiz: {


      type: "pv2",
      value: 0.15
  }
  }
}
此时在调用相机的飞行函数,此函数在智慧城市项目中也有详细介绍,在调用相机的飞行函数后执行生成栅栏的函数即可
app.initRaycaster('click', (selectObj) => {


        if (selectObj) {


          console.log(selectObj);
          // return;
          let object = selectObj.object;
          app.flyTo({


            position: textPos[object.name].position
          })
          loaderRipple(textPos[object.name].rippleVec)
        }
      }, model.clickTextObj);
最后我们就可以看到,在点击了店铺标签后生成一个个栅栏了