用Python开发图形界面和程序时,经常会对图形界面的搭建感到失望,或许是由于对图形界面不熟悉的原因吧,总之一想到图形界面,就感觉会很费时、费力,编程的积极性大幅下降。最近,尝试用Tkinter创建了一个简便的图形界面,这个过程果然和原先想的不差多少,搭建窗口界面,调整位置布局,确实很费时费力,与其它可视化编程工具的差距实在太过悬殊。但是既然已经开始了,就尝试把这个界面做成一个简单的模板吧,以后如果遇到有类似的窗口应用需要开发,也好直接拿来就用,减少启动阻力。如果你也正好有这样的困惑,参考本文中的程序代码或许可以让你省点心力。
空谈无益,上图 show 代码:
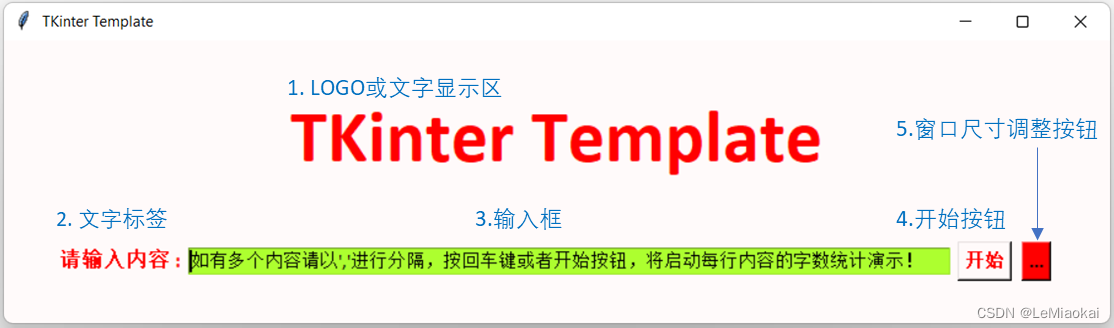 TKinter图形界面简易窗口
上面的图片是启动后的初始窗口界面,用于显示LOGO或者文字内容(序号1),这个窗口适合处理一些简单的功能,本案例中的功能设定是,往输入框(序号3)中输入一段文字,点击[开始](序号4),或按回车后,功能函数会根据 ', '对输入的文字内容进行分割并保存到列表框中,之后可以在展开的窗口界面中点击[处理选中内容],或者[处理全部内容]按钮,就可以调用多进程执行字数统计的函数。当然这里只是一个最简单的示例演示,你也完全可以用于处理更多的场景,比如说,你可以在输入框输入需要搜索的文字,或者需要下载的网址等内容。
输入框右侧的开始按钮(序号4)绑定了相应函数的调用,表示对这个内容进行处理; 如果这一个简单的窗口不能满足你的需求,还有更多的内容需要操作,可以点击旁边的红色小按钮(序号5),就可以展开这个窗口,展开后的内容如下图所示:
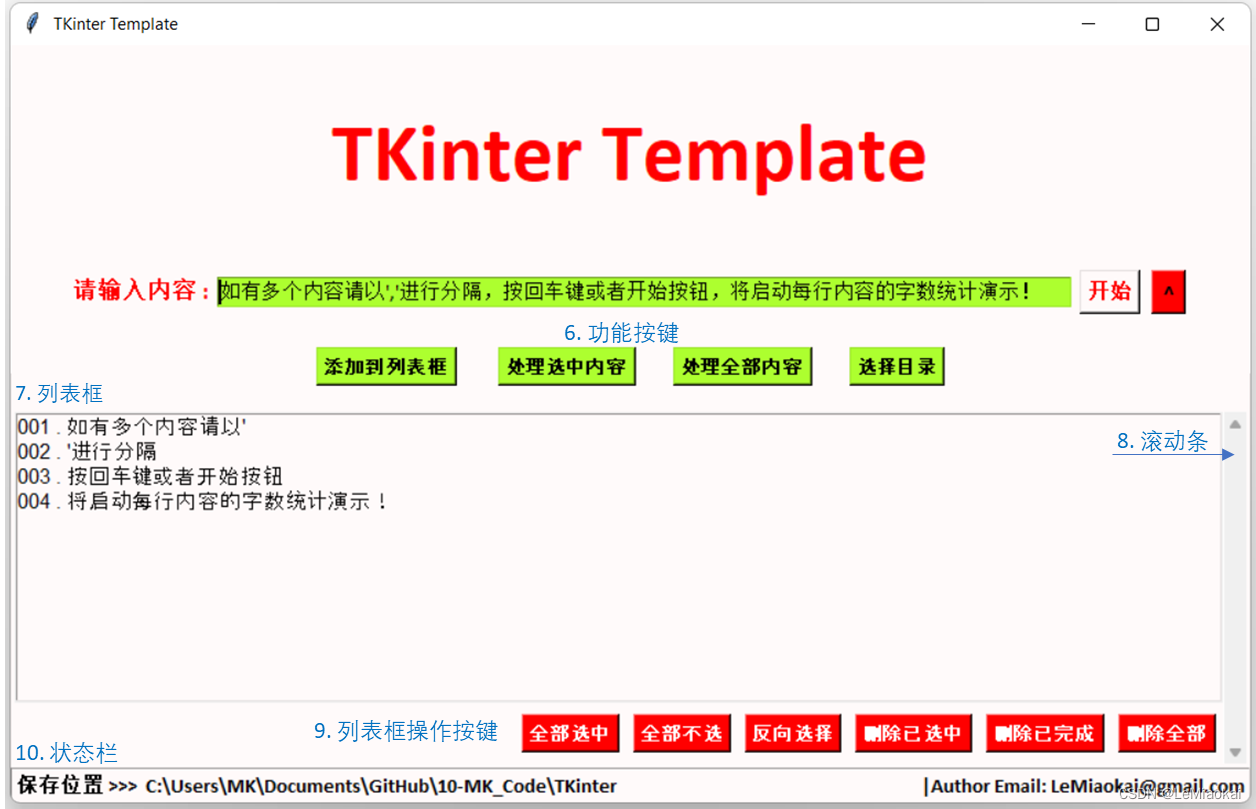 TKinter图形界面展开窗口
输入框的下方,添加了一排功能按钮(序号6),可以设定调用不同的函数,以实现程序的相应功能,你可以通过复制源代码,重新设定变量名,等一些简单的操作,达到增加或者减少按钮的效果,也可以调整按钮的间距和字体等显示效果,使用起来会比重头开始搭建要方便不少。
功能按钮下方是一个显示详细内容的列表框(序号7),这个列表框也已经绑定了滚动条(序号8),这里可以用于显示正在处理的内容,比如说可以作为播放列表,显示即将播放的歌曲和状态,或者也可以作为下载列表,用于显示目前各内容的下载以及完成情况等,本文的末尾附有一个根据这个模板进行完善的Youtube视频下载程序,列表框中,各行内容的显示效果可以在程序中通过调整文字内容,以及设定不同的颜色加以完善。
接下来,在列表框的下方,也有一排操作按键(序号9)专门用于对列表框中的内容进行操作,比如说,选中,反向选择,删除等,本案例中已经设定了与相关列表框操作函数的调用,你可以通过简单的调整,就可以完成相应功能的设定。
最后,是状态栏(序号10),用于显示各个功能执行过程中的状态,完全可以通过非常容易的变量替换,再结合你的实际需要进行调整。
除此之外,本案例中还添加了键盘事件与功能函数的绑定,当焦点落在输入框的时候,按下control键会自动清空内容,可以更方便的让你在按下control+v 粘贴快捷键之前,不需要对输入框的内容进行删除操作 , 另外回车键也已经和开始按钮的功能联动,当你输入内容,并按下回车键的时候,会自动执行开始任务。
完整的代码如下:
"""
Title : TKinter Template with Thread and Multiprocessing
Author: Le Miaokai
Date  : 2022-10-21
Email : [email protected]
"""

# 导入基本模块
import os, sys

# 调用tkinter模块
from tkinter import *
from tkinter import messagebox, filedialog

# 调用多线程模块
from threading import Thread

# 调用多进程模块
from multiprocessing import Pool, freeze_support

# 调用ctypes模块,以便在运行时隐藏控制窗口,但是在启动的时候,会有控制框闪过。
# 如果用auto_py_to_exe  可完全解决起动时控制框闪过的问题。
import ctypes
# 运行程序的时候,隐藏控制窗口
whnd = ctypes.windll.kernel32.GetConsoleWindow()
if whnd != 0:
    ctypes.windll.user32.ShowWindow(whnd, 0)
    ctypes.windll.kernel32.CloseHandle(whnd)


#  通过多线程添加内容到列表框中
def put_item_to_list(event=''):
	# 启用多线程,将内容添加到列表中
    t_1 = Thread(target=append_to_list)
    t_1.start()

	# 只要调用了添加到列表中的功能,就将窗口放大。
    root.geometry('900x550')
    more_BT["text"]=' ^ '

# 添加内容到列表中
def append_to_list():
	text = input_text.get()
	if len(text) == 0:
		messagebox.showinfo("提示:", "请检查输入框中的内容,多个信息请以 ,分隔!")
	else:
		# 将输入的内容,去除空格后,以 , 进行分割,并存入到列表中。
		text = text.strip().replace(',', ',').split(',')

	# 循环添加内容到列表框
	for item_id, item in enumerate(text):
		add_link_to_listbox(item_id, item)

	# 添加内容完成后恢复窗口中的按钮状态
	button_state(state = "normal")

# 添加单个项目到listbox中
def add_link_to_listbox(item_id, item):
	global g_ytlink_dict

	# 本案例中item_id对应列表框中的序号,作为索引
	item_id = list_box.size()

	# 如果索引内容已经添加,则在状态栏显示,当前item的状态参数,
	if item_id in g_info_dict and g_info_dict[item_id]!=[]:
		status_info["text"] = f"| {

      g_info_dict[item_id][3]}"
	else:
		# item_id, 作为内容的索引号, 每个索引号对应的内容为 [列表框中的显示位置序号,项目内容,是否已经完成,以及当前状态] 等
		g_info_dict[item_id] = [list_box.size(), item, False, '']

		# 将当前信息,添加到列表框中, 输出的序号,需要 list_box.size() + 1, 未尾添加可以直接用END
		list_box.insert(END, f"{

      str(list_box.size()+1).zfill(3)} . {

      item}")


# 回调函数,返回结果, 在用多进程任务完成后,自动调用本函数
def collectMyResult(result):
	global g_info_dict, g_count
	item_id = result[1]
	# 显示多进程中已经完成任务所返回的结果信息
	if result[0] == True:
		# 处理成功后,更新状态:
		g_info_dict[item_id][2] = True
		g_info_dict[item_id][3] = '处理完成,总字数为{}个。'.format(result[2])
		# 处理完成后,变更列表框中的状态
		tasks_status(item_id)

	else:
		g_info_dict[item_id][3] = "处理失败!"
		tasks_status(item_id)

	# 在状态样栏中显示目前已经处理完成的计数
	g_count += 1
	status_info["text"] = f"|总计完成数量 : {

      g_count}"

# 处理全部列表框中的内容
def threading_all_tasks():
	# 先全部选中
	select_all()
	# 调用处理选中内容的函数
	threading_tasks()

# 设定并启用进程池处理需要执行的任务
def threading_tasks():
	# 调用处理列表中选中内容的函数,需要创建一个多线程,否则窗口会无响应
	v_l = Thread(target=multiprocess_pool)
	v_l.start()

# 设定函数,通过多进程池,分配添加多进程任务
def multiprocess_pool():
	global g_info_dict

	list_selected = list_box.curselection()
	# 如果没有内容被选中,则显示提示框
	if len(list_selected)==0:
		messagebox.showinfo("提示:", "请选择需要处理的任务 !")
	else:
		# 定义多进程池,默认为CPU的核数, 也可以在括号中输入指定的数量,比如同时启用6个进程
		pool = Pool()  #Pool(6)
		# 设定循环范围为列表框中已经选择的内容
		for curr_id in list_selected:
			# 如果信息字典中的处理标志为True,则提示该内容已经处理完成
			if g_info_dict.get(curr_id)[2]:
				# 在状态栏显示当前状态
				status_info["text"] = f"| {

      g_info_dict[curr_id][3]}"
			else:
				item = g_info_dict[curr_id][1]
				g_info_dict[curr_id][3] = "正在处理......"
				# 设定列表中的显示状态, status将由g_info_dict中的状态信息替代
				tasks_status(curr_id)
				# 添加多进程的参数,多个参数用 ,分隔
				save_args = [curr_id, item]
				pool.apply_async(multiprocess_task, args=save_args, callback=collectMyResult)

		# 关闭进程池,并等待进程执行完成
		pool.close()
		pool.join()

	# 处理完成后恢复窗口中的按钮状态
	button_state(state = "normal")
	# messagebox.showinfo("提示", "已经成功处理!")

# 设定多进程任务,也就是通过进程池调用的任务
def multiprocess_task(item_id, item):
	result = 0
	try:
		# 假设任务为统计当前内容的字数,
		result = len(item)

		return [True,  item_id, result]
	except:
		return [False, item_id, result]


# 通过status 来设置并显示,当前的程序进展状态
def tasks_status(item_id):
	global g_info_dict
	if item_id=='':
		status_info["text"] = f"| 请检查当前内容 ! "
	else:
		# 根据item_id获取当前列表框中的序号id
		curr_id = g_info_dict[item_id][0]
		# 根据item_id获取当前文件的标题
		title   = g_info_dict[item_id][1]
		# 根据item_id获取当前的处理状态
		status  = g_info_dict[item_id][3]

		# 更新状态,先删除当前行,再添加更新后的内容
		list_box.delete(curr_id)
		# 如果状态为空,则不显示状态情况,否则显示当前状态
		if status =='':
			list_box.insert(curr_id, f"{

      str(curr_id+1).zfill(3)} . {

      title}")
		else:
			list_box.insert(curr_id, f"{

      str(curr_id+1).zfill(3)} . {

      title} | {

      status}")

		# 根据序号和状态信息,更新列表框中的显示内容,设定当前行的颜色
		list_box_color_set(curr_id, status)

		# 在状态栏显示,当前的状态信息
		status_info["text"] = f"|{

      status}"


# 点击“开始”按钮或者回车确认后,将内容添加到列表框中。
def d_threading(event=''):
	# 开始之后,先将内容添加到列表框中。
	put_item_to_list()


# 弹出目录选择框
def choose_savepath():
    global download_Path
    download_Directory = filedialog.askdirectory(initialdir=download_Path.get(), title="Select Save Folder")
	# 设置选中的目录位置,如果没有选择,则保持原样
    if download_Directory =='':
        pass
    else:
        download_Path.set(download_Directory)


# 删除列表中的全部内容
def clean_listbox():
	global g_info_dict, g_count
	list_box.delete(0, 'end')
	# 清空链接字典
	g_info_dict  ={

    }

	# 在状态样栏中显示目前已经完成的数量
	status_info["text"] = f"|Downloaded Count : {

      g_count}"

	download_video_BT.config(state=DISABLED)
	download_audio_BT.config(state=DISABLED)


# 选中列表中的全部
def select_all():
	# 选中全部列表中的内容
	list_box.select_set(0,END)


# 清空所有选中的项目
def select_none():
	# 清空选中的列表中的内容
	list_box.selection_clear(0,END)


# 对列表中的内容进行反向选择
def list_box_inverse():
	# 先将当前选中的内容保存
	selected_list  = list_box.curselection()
	# 选择全部列表
	select_all()
	# 将之前选中过的内容清空
	for i in selected_list:
		list_box.selection_clear(i,i)

# 删除选中的项目
def delete_selected():
	global g_info_dict
	select_list = list(list_box.curselection())
	# 为了避免删除后序号的重复,这里需要反向删除,也就是从后往前删除
	select_list.sort(reverse=True)
	for curr_id in select_list:
		# 删除列表框中的信息
		list_box.delete(curr_id)
		# 删除字典中的链接信息。
		if curr_id in g_info_dict:
			del g_info_dict[curr_id]

	# 删除后,对列表中的内容重新排序号
	list_box_sort()

	# 在状态样栏中显示目前已经完成的数量
	status_info["text"] = f"|Downloaded Count : {

      g_count}"


# 删除已经完成的项目
def delete_finished():
	global g_info_dict
	# 获取列表框中的所有内容的总数
	list_size = list_box.size()

	# 对每一行的内容按反向顺序进行排列,并更新序号, 从总数量开始,每次-1, 到0为止, 所以需要设定为-1.
	for curr_id in range(list_size-1, -1,-1):
		item_id = get_listbox_id(curr_id)
		# 如果是已经完成的内容,则删除
		if g_info_dict.get(item_id)[2]:
			# 删除列表中的相应内容
			list_box.delete(item_id)
			del g_info_dict[item_id]
		else:
			pass

	# 删除后,对列表中的内容重新排序, 同时删除字典中已经清空的内容
	list_box_sort()
	# 在状态样栏中显示目前已经完成的数量
	status_info["text"] = f"|总完成数 : {

      g_count}"


# 设置列表框中第i行信息内容的显示颜色
def list_box_color_set(i,status):
	if "完成" in status:
		list_box.itemconfigure(i, background="yellowgreen", fg="white")
	elif "正在处理" in status:
		list_box.itemconfigure(i, background="greenyellow")
	elif "失败" in status:
		list_box.itemconfigure(i, background="red", fg="white")


# 根据id序号,获取列表框中,当前id号项目的文字内容
def get_listbox_title(curr_id):
	title = list_box.get(curr_id)
	if '|' in title:
		# 获取标题内容的时候,要注意|的前面有个空格,否则会出现字典关键字无法读取的问题。
		title = title[title.find('.')+2:title.rfind(' |')]
	else:
		title = title[title.find('.')+2:]
	return title


# 根据序号,获取列表框中,当前行因列表内容删减而改变了位置,通过文字获取原来的id号
def get_listbox_id(curr_id):
	title = list_box.get(curr_id)
	item_id = int(title[:title.find(' .')]) - 1
	return item_id


# 对列表中的序号进行重新排序号
def list_box_sort():
	global g_info_dict

	# 获取列表框中的所有内容的总数
	list_size = list_box.size()

	# 对每一行的内容按顺序进行排列,并更新序号
	for curr_id in range(list_size):
		item_id = get_listbox_id(curr_id)
		# 更新状态, 如果当前序号与字典中的序号一致,则变更序号,否则重新生成新的字典内容,并删除当前字典中的内容
		if curr_id == item_id:
			g_info_dict[curr_id][0]=curr_id
		else:
			g_info_dict[curr_id] = g_info_dict[item_id]
			g_info_dict[curr_id][0]=curr_id
			del g_info_dict[item_id]

		tasks_status(curr_id)
		# 根据状态值,设置列表框中第 i 行的信息内容显示颜色
		list_box_color_set(curr_id, g_info_dict[curr_id][3])


# 设置按钮状态
def button_state(state = "disabled"):
	download_video_BT.config(state=state)
	download_audio_BT.config(state=state)
	get_videos_BT.config(state=state)
	clean_list_BT.config(state=state)


# 设置窗口尺寸
def root_size():
	if root.winfo_height() >230 :
		root.geometry('900x230')
		more_BT["text"]='...'
	else:
		root.geometry('900x550')
		more_BT["text"]=' ^ '


# 创建窗口
root = Tk()

# 设置窗口尺寸,标题以及颜色等相关信息
root.geometry('900x230')
root.title(" TKinter Template ")
bg_color='snow'#'lemon chiffon' #"white"  #"whitesmoke"  # "floralwhite"
fg_color="red"
root.configure(background=bg_color)

# 全局变量设定:
# 获取当前程序所在的目录,
g_curr_path = os.path.dirname(os.path.realpath(sys.argv[0]))

# download_path 用于存储保存路径,
download_Path = StringVar()
download_Path.set(g_curr_path)


# 全局变量,链接字典,保存具体链接对应的内容,对应内容是字典格式,包括列表框中的序号,标题,是否已经处理,以及状态等
g_info_dict = {

    }

# 初始化任务完成数量统计变量
g_count = 0

# 根据 auto-py-to-exe 对添加图片文件的说明, 设定图片文件的目录, 引用自,以下URL:
# https://stackoverflow.com/questions/7674790/bundling-data-files-with-pyinstaller-onefile/7675014#7675014
def resource_path(relative_path):
    """ Get absolute path to resource, works for dev and for PyInstaller """
    try:
        # PyInstaller creates a temp folder and stores path in _MEIPASS
		# 会在程序运行的时候建立一个临时目录,用于存放内容
        base_path = sys._MEIPASS
    except Exception:
        base_path = os.path.abspath(".")
    return os.path.join(base_path, relative_path)

# LOGO处的图片文件,相对路径
logo_path = resource_path("logo.png")

if os.path.exists(logo_path):
	# 如果LOGO图片存在,则显示图片,
	photo=PhotoImage(file=logo_path)
	Label(root, image=photo, bg=bg_color).pack(padx=0, pady=10)
else:
	# 否则就显示文字
	Label(root, text="TKinter Template", font="Calibri 45 bold", bg=bg_color, fg="red").pack(padx=0, pady=38)

# 添加窗口中组件:

# 添加输入框
inputframe = Frame(root, bg=bg_color)
inputframe.pack(pady=0)

# 添加提示标签
Label(inputframe, text="请输入内容 :", font="Calibri 13 bold", bg=bg_color, fg=fg_color).pack(side = LEFT)

url_entry = StringVar()
url_entry.set(r"如有多个内容请以','进行分隔,按回车键或者开始按钮,将启动每行内容的字数统计演示!")

# 清空输入框中的内容
def clean_url_entry(event=''):
	url_entry.set('')


# 添加输入框
input_text = Entry(inputframe, textvariable = url_entry, width=88, font="Calibri 11", bg="greenyellow")
input_text.bind("<Return>", d_threading)
input_text.bind("<Control_L>", clean_url_entry)
input_text.pack(side = LEFT, padx=3, pady=8)

# 设定程序起动后的焦点为输入框
input_text.focus_set()

# 添加开始按钮,并指定调用的功能函数
download_BT = Button(inputframe, text="开始", font="Calibri 11 bold", command=d_threading, bg=bg_color, fg=fg_color)
download_BT.pack(side = LEFT, padx=3, pady=8)

more_BT = Button(inputframe, text="...", font="Calibri 11 bold", command=root_size, bg="red")
more_BT.pack(side = LEFT, padx=5, pady=8)

# 添加按钮框
buttonframe = Frame(root,bg=bg_color)
buttonframe.pack(pady=8)

# 添加内容到列表框中
get_videos_BT = Button(buttonframe, text="添加到列表框", command=put_item_to_list, bg="greenyellow", font="Arial 10 bold")
get_videos_BT.pack(side = LEFT, padx=15, pady=8)


# 处理选中内容
download_video_BT = Button(buttonframe, text="处理选中内容", command=threading_tasks, state=DISABLED, bg="greenyellow", font="Arial 10 bold")
download_video_BT.pack(side = LEFT, padx=15, pady=8)

# 处理全部内容
download_audio_BT = Button(buttonframe, text="处理全部内容", command=threading_all_tasks, state=DISABLED, bg="greenyellow", font="Arial 10 bold")
download_audio_BT.pack(side = LEFT, padx=12, pady=8)


# 选择目录
save_path_BT = Button(buttonframe, text="选择目录", command=choose_savepath, bg="greenyellow", font="Arial 10 bold")
save_path_BT.pack(side = LEFT, padx=15, pady=8)

# 状态栏设定
statusframe = Frame(root, bd =1 ,relief = SUNKEN,bg=bg_color)
statusframe.pack(side = BOTTOM, fill = X)

status_label = Label(statusframe, text='保存位置 >>>', anchor =W, bg=bg_color, font="Calibri 11 bold")
status_label.pack(side = LEFT)

status_savepath = Label(statusframe, textvariable = download_Path, anchor =W, bg=bg_color, font="Calibri 11 bold")
status_savepath.pack(side = LEFT, fill = X)
status_info = Label(statusframe, text='|Author Email: [email protected]', anchor =W, bg=bg_color, font="Calibri 11 bold")
status_info.pack(side = RIGHT)

# 滚动条和列表框设定
listboxframe = Frame(root, bg=bg_color,bd =1)
listboxframe.pack(expand=YES, fill=BOTH, padx=2, pady=2)

scrollbar = Scrollbar(listboxframe, bg=bg_color)
scrollbar.pack(side=RIGHT, fill=BOTH)
list_box = Listbox(listboxframe, selectmode="multiple", font="Arial 11", bg=bg_color)
list_box.pack(expand=YES, fill="both")
list_box.config(yscrollcommand=scrollbar.set)
scrollbar.config(command=list_box.yview)


# 删除列表中的内容
clean_list_BT = Button(listboxframe, text="删除全部", 	command=clean_listbox,  	background="red", fg="white", font="Arial 10 bold")
clean_list_BT.pack(side = RIGHT, padx=5, pady=8)

# 删除已经完成的内容
select_all_BT = Button(listboxframe, text="删除已完成", command=delete_finished,  	background="red", fg="white", font="Arial 10 bold")
select_all_BT.pack(side = RIGHT, padx=5, pady=8)

# 删除选中的内容
select_all_BT = Button(listboxframe, text="删除已选中", command=delete_selected,  	background="red", fg="white", font="Arial 10 bold")
select_all_BT.pack(side = RIGHT, padx=5, pady=8)

# 反向选择
sort_list_BT = Button(listboxframe, text="反向选择",command=list_box_inverse,  	background="red", fg="white", font="Arial 10 bold")
sort_list_BT.pack(side = RIGHT, padx=5, pady=8)

# 全部不选
select_all_BT = Button(listboxframe, text="全部不选",	command=select_none,  		background="red", fg="white", font="Arial 10 bold")
select_all_BT.pack(side = RIGHT, padx=5, pady=8)

# 全部选中
select_all_BT = Button(listboxframe, text="全部选中", 	command=select_all,  		background="red", fg="white", font="Arial 10 bold")
select_all_BT.pack(side = RIGHT, padx=5, pady=8)


def main():
	# 打开TK窗口显示
	root.mainloop()

if __name__ == '__main__':
	# 多进程运行需要此函数支持。
    freeze_support()
    main()

"""
Reference:
# 更多关于TKinter的内容,详见以下参考内容
TKinter:https://www.runoob.com/python/python-gui-tkinter.html
"""
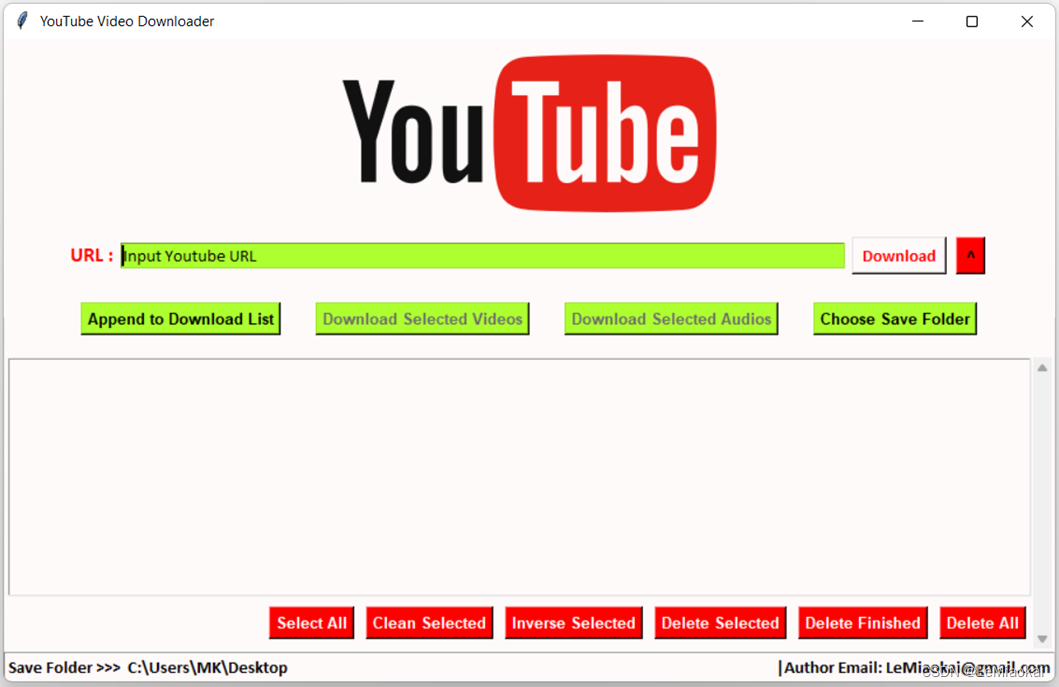
以上代码中也包含了程序启动后,关于如何隐藏控制窗口的说明,如果你还需要了解如何更方便的将python打包成Exe文件,可以参考我之前写过的文章 用 auto-py-to-exe 将 python 代码打包为exe可执行文件过程中的遇到的问题及解决方案。如果有兴趣更进一步的了解这个窗口界面的实际案例, 可以下载下图所展示的应用程序,这个程序是在上述这个窗口界面的基础上进一步完善功能后,编译而成的一款多进程YouTube视频下载工具,仅供参考学习之用:
以上就是关于Python如何用TKinter搭建图形界面窗口,并通过多进程的方式调用功能函数的全部内容,希望对你有所启发,如有不足之处请指出,大家共同学习,谢谢!