目录
5.1下载完成上传至服务器的 /usr/atlassian/ 目录下
5.2安装atlassian-bitbucket-7.21.0
1.安装前准备
- 首先查看操作系统是否有jdk环境,bitbucket的安装需要jdk(java)环境,这是必须的。
- 最好是Oracle的Java JDK8, 如果安装了其他版本的JDK,建议卸载掉。
- bitbucket要求git的版本在2.19以上。
- bitbucket 要求mysql版本在5.6.16以上。
以下是我的操作系统以及jdk信息
#操作系统
[root@wpl /]# cat /etc/centos-release
CentOS Linux release 7.9.2009 (Core)

[root@wpl /]# uname -a
Linux wpl.com 3.10.0-1160.81.1.el7.x86_64 #1 SMP Fri Dec 16 17:29:43 UTC 2022 x86_64 x86_64 x86_64 GNU/Linux

#jdk版本
[root@wpl /]# java -version
openjdk version "1.8.0_352"
OpenJDK Runtime Environment (build 1.8.0_352-b08)
OpenJDK 64-Bit Server VM (build 25.352-b08, mixed mode)

#因为centos7操作系统默认安装的git1.8,下面我还要卸载git1.8安装git2.9以上版本
[root@wpl ~]# git --version
git version 1.8.3.1
如果需要下载jdk,点击下方链接,进入官网下载。
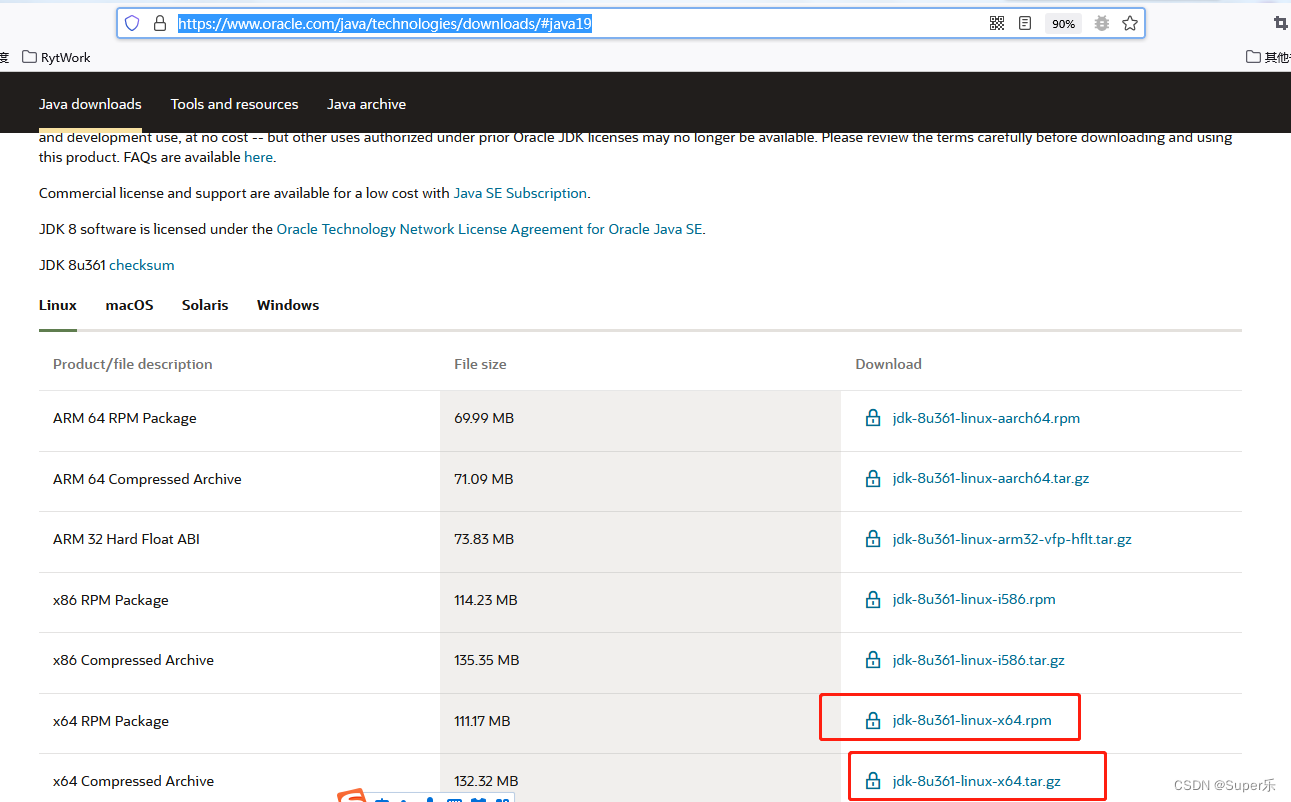
2.jdk安装
2.1.rpm安装方式:
- 如果采用rpm方式安装(不用配置环境变量)把下载好的文件放在
/usr/lib/java中(第一次安装需要新建java这一级目录)
- 执行命令:
rpm -ivhjdk-8u361-linux-x64.rpm- 执行命令:java -version 查看是否安装成功即可
- 如果采用压缩包的方式安装,把现在好的文件放到一个自定义目录中。
- 执行命令:tar -zxvf jdk-8u361-linux-x64.tar.gz
- 修改 environment 文件,配置环境变量
- 执行命令:vim /etc/environment 打开文件
- 将以下内容覆盖原内容即可(汉字描述部分记得改成自己的路径和目录名)
修改完environment 文件,执行命令:source /etc/environment 让文件生效JAVA_HOME=/自定义的安装目录路径/解压出来的jdk目录名 PATH="/usr/local/sbin:/usr/local/bin:/usr/sbin:/usr/bin:/sbin:/bin:/usr/games:/usr/local/games:$JAVA_HOME:$JAVA_HOME/bin"
3.创建bitbucket数据库
- bitbucket要求使用utf8编码, utf8mb4编码数据库测试会无法通过。
create database bitbucket_db default character set utf8 collate utf8_bin;
- 创建单独的bitbucket用户来管理数据库, 并允许远程登录,执行已下操作。
.#MySQL创建用户与授权的语句格式 CREATE USER 'username'@'host' IDENTIFIED BY 'password'; username:你将创建的用户名 host:指定该用户在哪个主机上可以登陆,如果是本地用户可用localhost,如果想让该用户可以从任意远程主机登陆,可以使用通配符% password:该用户的登陆密码,密码可以为空,如果为空则该用户可以不需要密码登陆服务器 mysql> CREATE DATABASE bitbucket CHARACTER SET utf8 COLLATE utf8_bin; Query OK, 1 row affected (0.01 sec) mysql> CREATE USER 'bitbucket'@'10.10.10.86' IDENTIFIED BY 'root@aA123'; Query OK, 0 rows affected (0.01 sec) mysql> GRANT ALL PRIVILEGES ON bitbucket.* TO 'bitbucket'@'10.10.10.86'; Query OK, 0 rows affected (0.00 sec) mysql> FLUSH PRIVILEGES; Query OK, 0 rows affected (0.00 sec) mysql> QUIT
4.安装Git
- 如果服务器上已安装过Git,且Git版本在2.19以上,则无需再次安装。
- 如果Git版本小于2.19,卸载重新安装Git。卸载步骤如下:
#使用yum卸载,中间提示的地方,输入 y 按 Enter 键继续。
[root@wpl ~]# yum remove git

#出现以下提示,说明卸载完成。
Removed:
  git.x86_64 0:1.8.3.1-23.el7_8

Dependency Removed:
  perl-Git.noarch 0:1.8.3.1-23.el7_8

Complete!

#或者使用命令再次查看Git
[root@wpl ~]# git --version
-bash: /usr/bin/git: No such file or directory
- 安装Git所需软件包
[root@wpl ~]# yum install curl-devel expat-devel gettext-devel openssl-devel zlib-devel gcc perl-ExtUtils-MakeMaker
- 下载对应版本的Git 点击查看Git各个版本地址
#进入到 opt目录
[root@wpl ~]# cd /opt/

#下载Git
[root@wpl opt]# wget https://www.kernel.org/pub/software/scm/git/git-2.30.1.tar.xz

#移动压缩包
[root@wpl opt]# cp git-2.30.1.tar.xz /usr/local/

#进入到 /usr/local/ 目录
[root@wpl ~]# cd /usr/local/

#解压下载好的Git包
[root@wpl local]# tar -vxf git-2.30.1.tar.xz

#删除压缩包
[root@wpl local]# rm -rf git-2.30.1.tar.xz

#进入到Git目录
[root@wpl local]# cd git-2.30.1/

#编译
[root@wpl git-2.30.1]# make prefix=/usr/local/git all

#编译之后安装Git
[root@wpl git-2.30.1]# make prefix=/usr/local/git install

#加入环境变量
[root@wpl git-2.30.1]# vim /etc/profile

#将配置放到profile文件的最后一行
export PATH=/usr/local/sbin:/usr/local/bin:/usr/sbin:/usr/bin:/root/bin:/usr/local/git/bin:$PATH

#使文件永久生效
[root@wpl git-2.30.1]# source /etc/profile

#检查版本
[root@wpl /]# git --version
git version 2.30.1
.
5.安装bitbucket
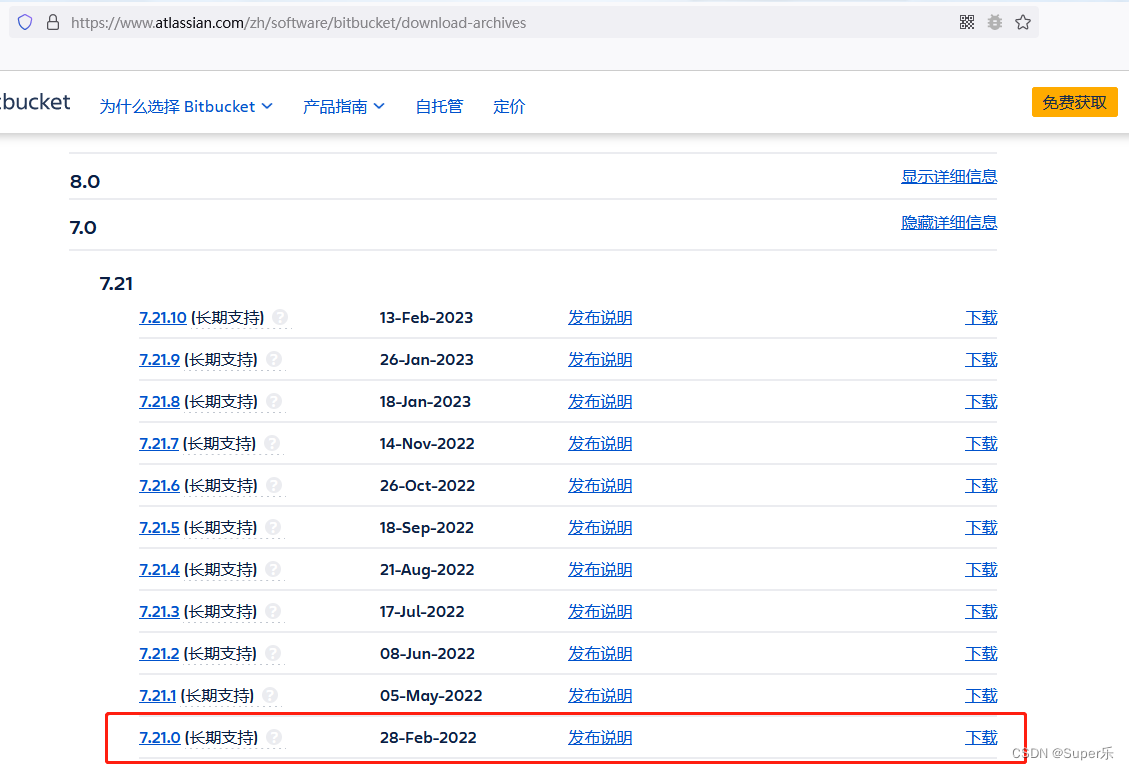
- 我下载的是7.21.0版本

-
5.1下载完成上传至服务器的 /usr/atlassian/ 目录下
- atlassian 目录是我自己创建(可根据自己需要自定义目录)。
-
5.2安装atlassian-bitbucket-7.21.0
- 执行命令如下:
#进入.bin执行文件所在目录
[root@wpl /]# cd /usr/atlassian/

[root@wpl atlassian]# ll
total 508592
-rwxr-xr-x. 1 root root 520795153 Feb 16 18:39 atlassian-bitbucket-7.21.0-x64.bin

#执行安装
[root@wpl atlassian]# ./atlassian-bitbucket-7.21.0-x64.bin
Starting Installer ...
2023-02-17 09:37:01,844 WARN  [main]  c.a.s.i.s.g.b.DefaultGitBinaryHelper /usr/local/git/bin/git is version 2.30.1. The next major Bitbucket version will require Git 2.31.0 or higher.
#选择1并按Enter继续
Install a new instance [1, Enter], Upgrade an existing instance [2]
1
#选择1并按Enter继续
Install Bitbucket 7.21.0
What type of instance are you looking to install?
Install a Server instance [1, Enter], Install a Data Center instance [2], Install a Smart Mirroring instance [3]
1
#选择你想安装Bitbucket 7.21.0的文件夹,默认即可。按Enter继续
Where should Bitbucket be installed?
Select the folder where you would like Bitbucket 7.21.0 to be installed,
then click Next.
[/opt/atlassian/bitbucket/7.21.0]
#Bitbucket主目录的默认位置,默认即可。按Enter继续
Default location for Bitbucket home directory
The location for Bitbucket data.
This will be the default location for repositories, plugins, and other data.
Ensure that this location is not used by another Bitbucket installation.
[/var/atlassian/application-data/bitbucket]
#配置Bitbucket将使用哪些端口。默认即可,按Enter继续
Configure which ports Bitbucket will use.
Configure TCP Ports
Bitbucket requires a TCP port that isn't being used by other applications.
The HTTP port is where users access Bitbucket through their browsers.
Bitbucket also requires ports 7992 and 7993 are available to run the bundled
search server that provides search functionality to Bitbucket.
HTTP Port Number
[7990]

#是否安装bitbucket服务,输入y,按Enter继续
Install Bitbucket as a service?
Yes [y, Enter], No [n]
y

#安装提示,安装目录、主目录、端口号
Installation Directory: /opt/atlassian/bitbucket/7.21.0
Home Directory: /var/atlassian/application-data/bitbucket
HTTP Port: 7990
Install as a service: Yes

#输入i,按Enter继续
Install [i, Enter], Exit [e]
i
#Bitbucket安装完成你想上线Bitbucket吗? 输入y按Enter继续
Installation of Bitbucket is complete
Would you like to launch Bitbucket?
Yes [y, Enter], No [n]
y

#安装完成
Installation of Bitbucket 7.21.0 is complete
Your installation of Bitbucket 7.21.0 is now ready and can be accessed via
your browser.
Bitbucket 7.21.0 can be accessed at http://localhost:7990
Launch Bitbucket 7.21.0 in browser?
Yes [y, Enter], No [n]
y
Finishing installation ...
- 安装完成可通过 http://服务器ip:7990 测试访问
..

-
5.3安装MySQL驱动
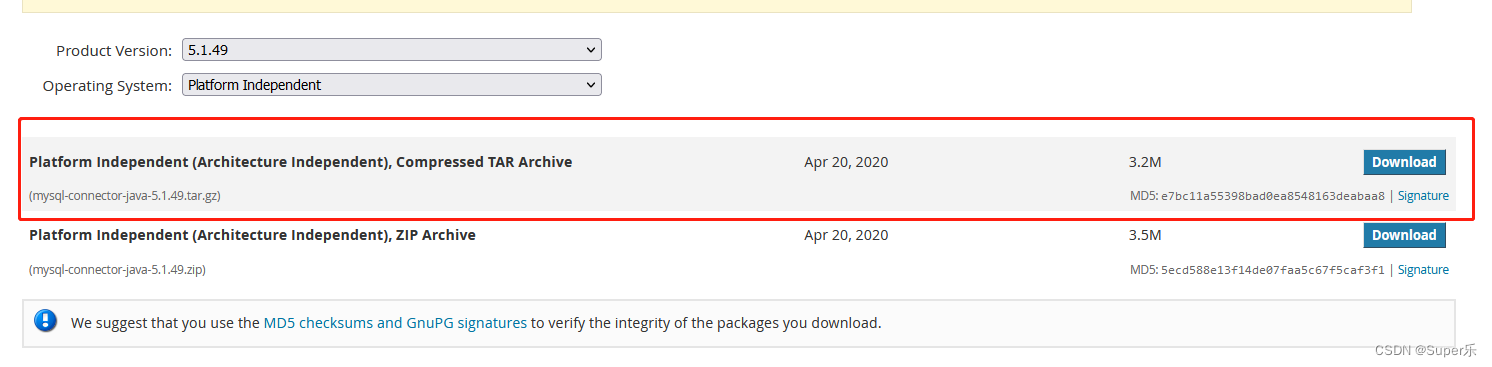
- 5.3.1:bitbucket仅支持5.1版本的驱动
- 5.3.2:将下载的压缩包,通过 rz 命令上传至服务器
- 5.3.3:解压压缩包:tar -zxvf mysql-connector-java-5.1.49.tar.gz
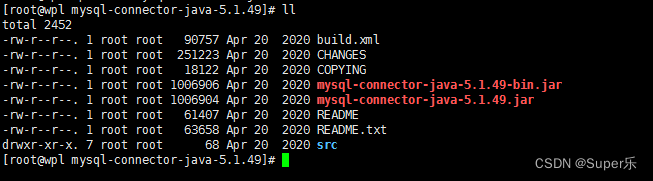
- 5.3.4:mysql-connector-java-5.1.49.tar.gz解压后的内容如下图
- 5.3.5:将mysql-connector-java-5.1.49-bin.jar文件复制到 /opt/atlassian/bitbucket/7.21.0/app/WEB-INF/lib 目录下
#复制MySQL驱动文件
cp mysql-connector-java-5.1.49-bin.jar /opt/atlassian/bitbucket/7.21.0/app/WEB-INF/lib
cp mysql-connector-java-5.1.49.jar /opt/atlassian/bitbucket/7.21.0/app/WEB-INF/lib

#修改文件所属组和所属用户
[root@wpl lib]# pwd
/opt/atlassian/bitbucket/7.21.0/app/WEB-INF/lib
[root@wpl lib]# chown -R atlbitbucket:atlbitbucket mysql-connector-java-5.1.49-bin.jar
[root@wpl lib]# chown -R atlbitbucket:atlbitbucket mysql-connector-java-5.1.49.jar
- 5.3.6:重启atlassian(使其MySQL驱动生效)
# 停止和启动的shell脚本所在路径
[root@wpl bin]# pwd
/opt/atlassian/bitbucket/7.21.0/bin
[root@wpl bin]# ll
start-bitbucket.bat  start-bitbucket.sh   stop-bitbucket.sh
# 停止
[root@wpl bin]# sh stop-bitbucket.sh
# 启动
[root@wpl bin]# sh start-bitbucket.sh
- 5.3.7:数据库配置与连接测试(测试连接成功,点击“Next”继续即可)
- 5.3.8:点击“Next”之后等待一会儿,会进入如下图界面
..

-
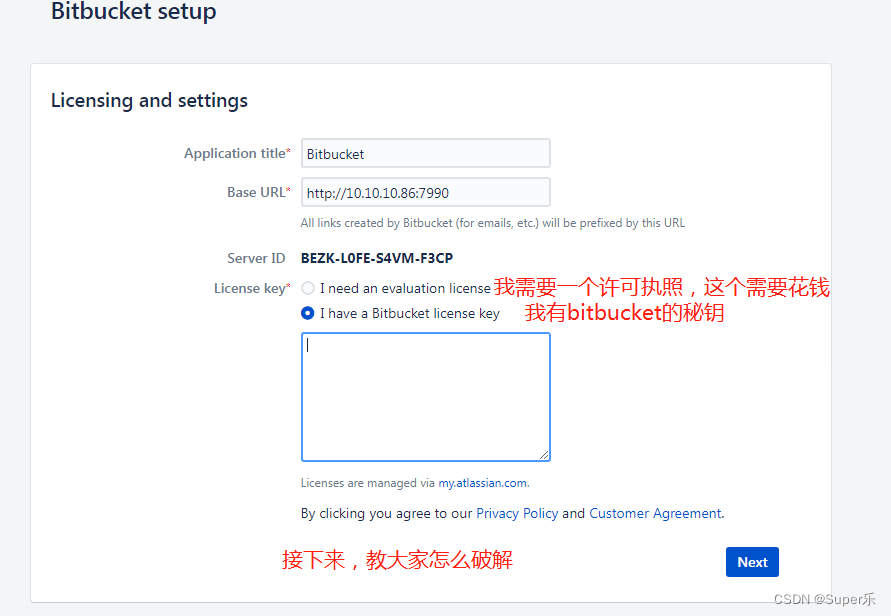
5.4破解激活bitbucket
- 使用atlassian-agent.jar进行激活
- 记下Server ID,进行激活时要用到(BEZK-L0FE-S4VM-F3CP)
- 点击查看atlassian-agent下载地址