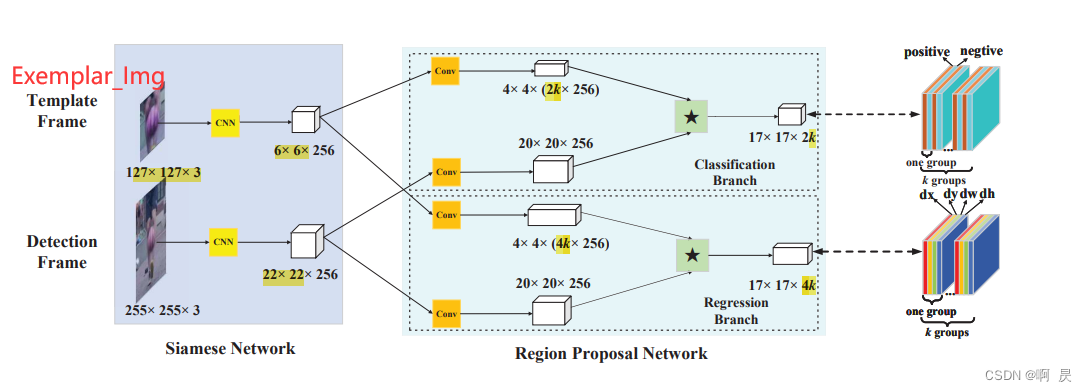
siamRPN论文:High Performance Visual Tracking with Siamese Region Proposal Network
gitHub代码:https://github.com/HonglinChu/SiamTrackers/tree/master/SiamRPN/SiamRPN
论文模型架构:
上一篇文章:SiamRPN代码讲解,推理测试讲解
此篇是: 训练过程代码讲解
siamrpn训练的大致过程:
> 1. 获取图片,真实框路径;;用于后续创建dataset
> 2. 生成SiamRPN模型
> 3. 生成dataset(关键,后续会详解)
>      get_item函数大致过程:
>      生成exemplar_img, detection_img (经过前处理)
>      生成anchors(与测试,推理的内容一致)
>      根据anchors和groundtruth反计算得到offset_target
>      根据anchors和groundtruth计算iou,并令iou>阈值为正样本,以此生成conf_target(正样本则lable=1,负样本则label=0)。
>      get_item函数返回: exemplar_img,detection_img; conf_target, offset_target
> 4.  初始化
>     模型加载;;优化器创建;;LOSS(并未指定loss类,后续会知道)
> 5. 取样,训练
>          conf_pred,offset_pred=model.train(exemplar_pic,detection_pic)
>          修正shape
>          **计算loss**(关键,后续会详解)
>          loss反传
> 6. 训练结果输出
训练时loss的大致计算过程:
  1.分类loss
	  参数传入conf_pred, conf_target参数 (batch个 5*19*19组值)
	  循环batch
	  正样本loss计算
	  	  得到子batch中所有正样本(conf_target=1)index(index_pos)
	  	  确定X
	  	  随机打乱index_pos并抽取X组数据(pos_loss_index)
	  	  pos_loss= 交叉熵(conf_pred[子batch][pos_loss_index], conf_target[子batch][pos_loss_index])
	  负样本loss计算同理
	  对所有loss取平均为最终conf_loss
  2.回归loss
	  传入 offset_pred,offset_target, conf_target
	  (ps: 只用计算正样本的回归loss)
	  循环batch
	  	  得到子batch中所有正样本(conf_target=1)index(index_pos)
	  	  确定X
	  	  随机打乱index并抽取X组数据(loss_index)
	  	  loss= L1_Loss(offset_pred[子batch][loss_index], offset_target[子batch][loss_index])
	  	  loss取平均为最终regression_loss
最终loss= conf_loss*a + regression_loss*b  (a,b为各自loss的权重)
代码阅读大致顺序:
|—./bin/train.py
|——GOT10K类
|——GOT10kDataset类创建dataset
|——TranckerSiamRPN类
|——model.forward()函数
|——rpn_cross_entropy_balance函数
|——rpn_smoothL1函数
|——计算最终loss
|——出loss结果
|——模型结果保存
GOT10K类
my_train.py:中,看到line 50
参考siamFC相关说明
GOT10kDataset类
回到my_train.py中,看到Line71
注意: 此处代码比较复杂,嵌套。如要细读,可以多看几遍!
注意: 此处代码比较复杂,嵌套。如要细读,可以多看几遍!
注意: 此处代码比较复杂,嵌套。如要细读,可以多看几遍!
代码详解(注释):
功能:创建dataset,方便后续创建dataloader
|—大致过程:
|——生成exemplar_img, detection_img (经过前处理)
|——生成anchors(与测试,推理的内容一致)
|——根据anchors和groundtruth反计算得到offset_target(
|——根据anchors和groundtruth计算iou,并令iou>阈值为正样本,以此生成conf_target。
|——函数返回: exemplar_img,detection_img; conf_target, offset_target;供后续采样训练使用
SiamRPNNet类
回到my_train.py中,看到Line99
与推理,测试过程类似:
代码详解(注释)
在训练的时候,会使用model.forward函数
model = SiamRPNNet()
...
pred_score, pred_regression = model(exemplar_imgs.cuda(), instance_imgs.cuda())
###shape : 1,N*10,19,19  1,N*20,19,19
训练过程代码
回到my_train.py中,看到Line172行,通过for循环进行模型训练
        for i, data in enumerate(tqdm(trainloader)):
            exemplar_imgs, instance_imgs, regression_target, conf_target = data
            # conf_target (8,1125) (8,225x5)
            regression_target, conf_target = regression_target.cuda(), conf_target.cuda()
            #pre_score=64,10,19,19 ; pre_regression=[64,20,19,19]
            pred_score, pred_regression = model(exemplar_imgs.cuda(), instance_imgs.cuda())
代码详解(注释):
功能:训练,得到Loss,梯度反传
————————————————————————————————————
代码解析
GOT10kDataset类的init函数
./siamRPN/dataset.py
ps:后续取样训练时会调用里面的get_item函数
|—__getitem__函数大致过程:
|——生成exemplar_img, detection_img (经过前处理)
|——生成anchors(与测试,推理的内容一致)
|——根据anchors和groundtruth反计算得到offset_target(
|——根据anchors和groundtruth计算iou,并令iou>阈值为正样本,以此生成conf_target。
|——get_item函数返回: exemplar_img,detection_img; conf_target, offset_target
    def __init__(self, seq_dataset, z_transforms, x_transforms, name = 'GOT-10k'):

        self.max_inter     = config.frame_range_got #
        self.z_transforms  = z_transforms		##exemplar_img
        self.x_transforms  = x_transforms		##detection_img
        self.sub_class_dir = seq_dataset
        self.ret           = {

    }
        self.count         = 0
        self.index         = 3000
        self.name          = name
        self.anchors       = generate_anchors( config.total_stride,			##创建基本框
                                                    config.anchor_base_size,
                                                    config.anchor_scales,
                                                    config.anchor_ratios,
                                                    config.score_size)
GOT10kDataset类的__getitem__函数
在这里插入代码片 def __getitem__(self, index):
        index = random.choice(range(len(self.sub_class_dir))) ###随机打乱下标


        self._pick_img_pairs(index)  ##根据Index挑选两个图片,;;保存如下信息: exemplar_img,detection_img,exemplar_gt, detection_gt
        ##生成exemplar_img, detection_img (经过前处理)
        self.open()
        self._tranform()
        regression_target, conf_target = self._target()
        self.count += 1

        return self.ret['train_z_transforms'], self.ret['train_x_transforms'], regression_target, conf_target.astype(np.int64)
        ## exemplar_img ,detection_img , target_offset, conf_target(shape== len(anchors))
对应代码补充:
generate_anchors()
self._pick_img_pairs(index)
self.open()
self._tranform() ##tansform变化,在此不做赘述
self._target()
SiamRPNNet类forward函数
模型运算的时候会自动执行forward函数 有关此代码中的组卷积可以参考: def forward(self, template, detection):
N = template.size(0) # N=32 batch==32
template_feature = self.featureExtract(template) # [N,256,6,6] ###exemplar_frame--->exemplar_feature
detection_feature = self.featureExtract(detection) # [N,256,24,24] ##detection_frame--->detection_feature
##self.anchor_num==5
kernel_score = self.conv_cls1(template_feature).view(N, 2 * self.anchor_num, 256, 4, 4) # N,2*5,256,4,4
kernel_regression = self.conv_r1(template_feature).view(N, 4 * self.anchor_num, 256, 4, 4) # N,4*5,256,4,4
conv_score = self.conv_cls2(detection_feature) # N,256,22,22#对齐操作
conv_regression = self.conv_r2(detection_feature) # N,256,22,22
##组卷积 类别分支 互相关操作
conv_scores = conv_score.reshape(1, -1, self.score_displacement + 4, self.score_displacement + 4) # 1,Nx256,22,22
score_filters = kernel_score.reshape(-1, 256, 4, 4) # Nx10,256,4,4
pred_score = F.conv2d(conv_scores, score_filters, groups=N).reshape(N, 10, self.score_displacement + 1,
self.score_displacement + 1) ##groups=N result.shape==1,32*10,19,19
##组卷积 线性回归分支 互相关操作
conv_reg = conv_regression.reshape(1, -1, self.score_displacement + 4,
self.score_displacement + 4) ##N,256,22,22-->1,32*256,22,22
reg_filters = kernel_regression.reshape(-1, 256, 4, 4) ##N,4*5,256,4,4--->N*20,256,4,4
pred_regression = self.regress_adjust(
F.conv2d(conv_reg, reg_filters, groups=N).reshape(N, 20, self.score_displacement + 1,
self.score_displacement + 1)) ### result.shape==1,32*20,19,19
return pred_score, pred_regression### shape : 1,N*10,19,19 1,N*20,19,19
my_train.py的训练部分代码
        for i, data in enumerate(tqdm(trainloader)):
            exemplar_imgs, instance_imgs, regression_target, conf_target = data

            regression_target, conf_target = regression_target.cuda(), conf_target.cuda()

            pred_score, pred_regression = model(exemplar_imgs.cuda(), instance_imgs.cuda())
            ###shape : 1,N*10,19,19  1,N*20,19,19
            pred_conf = pred_score.reshape(-1, 2, config.anchor_num * config.score_size * config.score_size).permute(0,2,1)
            ##=---->N,5*19*19,2

            pred_offset = pred_regression.reshape(-1, 4,config.anchor_num * config.score_size * config.score_size).permute(0,2,1)
            ##---->N,5*19*19,4

            cls_loss = rpn_cross_entropy_balance(pred_conf, conf_target, config.num_pos, config.num_neg, anchors, ##config.num_pos=16  config.num_neg=48
                                                 ohem_pos=config.ohem_pos, ohem_neg=config.ohem_neg)    ## false  false


            reg_loss = rpn_smoothL1(pred_offset, regression_target, conf_target, config.num_pos, ohem=config.ohem_reg)


            loss = cls_loss + config.lamb * reg_loss #分类权重和回归权重
            ##config.lamb = 5
            optimizer.zero_grad()#梯度
            loss.backward()
对应代码补充:
rpn_cross_entropy_balance损失函数
rpn_smoothL1损失函数
————————————————————————————————————
额外补充
GOT10kDataset类的_pick_img_pairs
功能:生成exemplar_img, detection_img (经过前处理);;并通过字典保存其他信息
视频前半段为exemplar_img,后半段为detection_img
  def _pick_img_pairs(self, index_of_subclass):

        assert index_of_subclass < len(self.sub_class_dir), 'index_of_subclass should less than total classes'
        video_name = self.sub_class_dir[index_of_subclass][0]  ##list of string ;;所有图片的名字

        video_num  = len(video_name)	##总图片个数
        video_gt   = self.sub_class_dir[index_of_subclass][1]  ##list of string ;;对应的gt

        status = True
        while status:
            if self.max_inter >= video_num-1:
                self.max_inter = video_num//2

            template_index = np.clip(random.choice(range(0, max(1, video_num - self.max_inter))), 0, video_num-1)    ###视频前半段为exemplar_img
            detection_index= np.clip(random.choice(range(1, max(2, self.max_inter))) + template_index, 0, video_num-1) ###后半段为detection_img

            template_img_path, detection_img_path  = video_name[template_index], video_name[detection_index]	##得到对应图片

            template_gt  = video_gt[template_index]	##得到对应gt

            detection_gt = video_gt[detection_index]

            if template_gt[2]*template_gt[3]*detection_gt[2]*detection_gt[3] != 0:
                status = False
            else:
                #print('Warning : Encounter object missing, reinitializing ...')
                print(  'index_of_subclass:', index_of_subclass, '\n',
                        'template_index:', template_index, '\n',
                        'template_gt:', template_gt, '\n',
                        'detection_index:', detection_index, '\n',
                        'detection_gt:', detection_gt, '\n')

        # load infomation of template and detection
        ##通过字典map 保存信息
        self.ret['template_img_path']      = template_img_path
        self.ret['detection_img_path']     = detection_img_path
        self.ret['template_target_x1y1wh'] = template_gt
        self.ret['detection_target_x1y1wh']= detection_gt
        t1, t2 = self.ret['template_target_x1y1wh'].copy(), self.ret['detection_target_x1y1wh'].copy()
        self.ret['template_target_xywh']   = np.array([t1[0]+t1[2]//2, t1[1]+t1[3]//2, t1[2], t1[3]], np.float32)## cx,cy,w,h
        self.ret['detection_target_xywh']  = np.array([t2[0]+t2[2]//2, t2[1]+t2[3]//2, t2[2], t2[3]], np.float32)## cx,cy,w,h
        self.ret['anchors'] = self.anchors
        #self._average()
GOT10kDataset类的open函数
功能:获取最终exemplar和detection的截取图片,并得到detection的框坐标 def open(self):
'''template'''
template_img = Image.open(self.ret['template_img_path'])
template_img = np.array(template_img)
detection_img = Image.open(self.ret['detection_img_path'])
detection_img = np.array(detection_img)
if np.random.rand(1) < config.gray_ratio:
template_img = cv2.cvtColor(template_img, cv2.COLOR_RGB2GRAY)
template_img = cv2.cvtColor(template_img, cv2.COLOR_GRAY2RGB)
detection_img = cv2.cvtColor(detection_img, cv2.COLOR_RGB2GRAY)
detection_img = cv2.cvtColor(detection_img, cv2.COLOR_GRAY2RGB)
img_mean = np.mean(template_img, axis=(0, 1))
exemplar_img, scale_z, s_z, w_x, h_x = self.get_exemplar_image( template_img,
self.ret['template_target_xywh'],
config.exemplar_size,
config.context_amount, img_mean )
size_x = config.exemplar_size
x1, y1 = int((size_x + 1) / 2 - w_x / 2), int((size_x + 1) / 2 - h_x / 2)
x2, y2 = int((size_x + 1) / 2 + w_x / 2), int((size_x + 1) / 2 + h_x / 2)
#frame = cv2.rectangle(exemplar_img, (x1,y1), (x2,y2), (0, 255, 0), 1)
#cv2.imwrite('exemplar_img.png',frame)
#cv2.waitKey(0)
self.ret['exemplar_img'] = exemplar_img ##通过字典保存exemplar_img
'''detection'''
##相关操作
#detection_img = cv2.imread(self.ret['detection_img_path'])
d = self.ret['detection_target_xywh']
cx, cy, w, h = d # float type
##detection的图像扩充
wc_z = w + 0.5 * (w + h)
hc_z = h + 0.5 * (w + h)
s_z = np.sqrt(wc_z * hc_z) ##detection的图像扩充
s_x = s_z / (config.instance_size//2) ##config.instance_size==271
img_mean_d = tuple(map(int, detection_img.mean(axis=(0, 1))))
a_x_ = np.random.choice(range(-12,12))
a_x = a_x_ * s_x
b_y_ = np.random.choice(range(-12,12))
b_y = b_y_ * s_x
instance_img, a_x, b_y, w_x, h_x, scale_x = self.get_instance_image( detection_img, d,
config.exemplar_size, # 127
config.instance_size,# 255
config.context_amount, # 0.5
a_x, b_y,
img_mean_d )
size_x = config.instance_size ###271
##获得detection的裁剪图片的 cx,cy,w,h
x1, y1 = int((size_x + 1) / 2 - w_x / 2), int((size_x + 1) / 2 - h_x / 2)
x2, y2 = int((size_x + 1) / 2 + w_x / 2), int((size_x + 1) / 2 + h_x / 2)
##x1,y1 左上, x2,y2 右下
w = x2 - x1
h = y2 - y1
cx = x1 + w/2
cy = y1 + h/2
self.ret['instance_img'] = instance_img
#self.ret['cx, cy, w, h'] = [int(a_x_*0.16), int(b_y_*0.16), w, h]
self.ret['cx, cy, w, h'] = [int(a_x_), int(b_y_), w, h]
GOT10kDataset类的_target函数
功能:获得conf_target和regression_target;;获得正,负样本对应下标
    def _target(self):

        regression_target, conf_target = self.compute_target(self.anchors,
                                                             np.array(list(map(round, self.ret['cx, cy, w, h']))))
    def compute_target(self, anchors, box):
        #box = [-(box[0]), -(box[1]), box[2], box[3]]
        regression_target = self.box_transform(anchors, box)	##(详见下文跳转)

        iou = self.compute_iou(anchors, box).flatten()  ##所有框对应的iou ,shape== len(anchors,1)---->shape=len(anchors)
        #print(np.max(iou))
        pos_index = np.where(iou > config.pos_threshold)[0] ## iou重合度高认为是正样本
        neg_index = np.where(iou < config.neg_threshold)[0]
        label = np.ones_like(iou) * -1##全是-1.和Iou的shape一致
        """
        np.ones_like
        返回一个用1填充的跟输入 形状和类型 一致的数组。
        e.g.
            >>> x = np.arange(6)
            >>> x = x.reshape((2, 3))
            >>> x
            array([[0, 1, 2],
                   [3, 4, 5]])
            >>> np.ones_like(x)
            array([[1, 1, 1],
                   [1, 1, 1]])
        """

        label[pos_index] = 1			##创建正样本
        label[neg_index] = 0
        '''print(len(neg_index))
        for i, neg_ind in enumerate(neg_index):
            if i % 40 == 0:
                label[neg_ind] = 0'''
        return regression_target, label
    def box_transform(self, anchors, gt_box):
    ##offset_target的创建
        anchor_xctr = anchors[:, :1]
        anchor_yctr = anchors[:, 1:2]
        anchor_w = anchors[:, 2:3]
        anchor_h = anchors[:, 3:]
        gt_cx, gt_cy, gt_w, gt_h = gt_box

		##逆变换,公式详见 siamrpn的推理过程或者论文4.2--(12)
        target_x = (gt_cx - anchor_xctr) / anchor_w
        target_y = (gt_cy - anchor_yctr) / anchor_h
        target_w = np.log(gt_w / anchor_w)
        target_h = np.log(gt_h / anchor_h)
        regression_target = np.hstack((target_x, target_y, target_w, target_h))  ###所有anchors对应gt的 offset
        return regression_target
rpn_cross_entropy_balance损失函数
分类损失def rpn_cross_entropy_balance(input, target, num_pos, num_neg, anchors, ohem_pos=None, ohem_neg=None):
"""
:param input: (N,5*19*19,2)
:param target: (N,5*19*19,)
:return:
"""
# if ohem:
# final_loss = rpn_cross_entropy_balance_parallel(input, target, num_pos, num_neg, anchors, ohem=True,
# num_threads=4)
# else:
loss_all = []
for batch_id in range(target.shape[0]): #计算每个图片的损失,batch=64 ,target对应gt anchors
min_pos = min(len(np.where(target[batch_id].cpu() == 1)[0]), num_pos) #num_pos=16 获得多少个正样本来计算分类Loss
min_neg = int(min(len(np.where(target[batch_id].cpu() == 1)[0]) * num_neg / num_pos, num_neg))##num_neg==48 获得多少个负样本来计算分类Loss
pos_index = np.where(target[batch_id].cpu() == 1)[0].tolist() #所有正样本的下标
neg_index = np.where(target[batch_id].cpu() == 0)[0].tolist() #所有负样本的下标
if ohem_pos: #default==false
if len(pos_index) > 0:
pos_loss_bid = F.cross_entropy(input=input[batch_id][pos_index],
target=target[batch_id][pos_index], reduction='none')
selected_pos_index = nms(anchors[pos_index], pos_loss_bid.cpu().detach().numpy(), min_pos)
pos_loss_bid_final = pos_loss_bid[selected_pos_index]
else:
pos_loss_bid = torch.FloatTensor([0]).cuda()
pos_loss_bid_final = pos_loss_bid
else:
pos_index_random = random.sample(pos_index, min_pos)
### 对pos_index中随机打乱并从中挑选min_pos个不重复的数
if len(pos_index) > 0:
pos_loss_bid_final = F.cross_entropy(input=input[batch_id][pos_index_random],
target=target[batch_id][pos_index_random], reduction='none')
##计算正类的 分类损失
else: ### 全是负标签
pos_loss_bid_final = torch.FloatTensor([0]).cuda()
if ohem_neg:##default==false
if len(neg_index) > 0: #https://blog.csdn.net/goodxin_ie/article/details/89645358 关于cross—entropy的reduction的用法
neg_loss_bid = F.cross_entropy(input=input[batch_id][neg_index],
target=target[batch_id][neg_index], reduction='none')
selected_neg_index = nms(anchors[neg_index], neg_loss_bid.cpu().detach().numpy(), min_neg)
neg_loss_bid_final = neg_loss_bid[selected_neg_index]
else:
neg_loss_bid = torch.FloatTensor([0]).cuda()
neg_loss_bid_final = neg_loss_bid
else:
neg_index_random = random.sample(neg_index, min_neg)
### 对neg_index中随机打乱并挑选min_neg个不重复的数
if len(neg_index) > 0:
neg_loss_bid_final = F.cross_entropy(input=input[batch_id][neg_index_random],
target=target[batch_id][neg_index_random], reduction='none')
else:
neg_loss_bid_final = torch.FloatTensor([0]).cuda()
loss_bid = (pos_loss_bid_final.mean() + neg_loss_bid_final.mean()) / 2 ##所有loss取平均
loss_all.append(loss_bid)
final_loss = torch.stack(loss_all).mean()##所有loss取平均
return final_loss
rpn_smoothL1损失函数
回归损失
def rpn_smoothL1(input, target, label, num_pos=16, ohem=None):
        ##注意回归损失只用考虑正样本情况,其实和分类损失类似
    r'''
    :param input: torch.Size([1, 1125, 4])
    :param target: torch.Size([1, 1125, 4])
            label: (torch.Size([1, 1125]) pos neg or ignore
    :return:
    '''
    loss_all = []
    for batch_id in range(target.shape[0]): #target=[64,1805,4], label=64,1805
        min_pos = min(len(np.where(label[batch_id].cpu() == 1)[0]), num_pos###num_pos=16  获得多少个正样本来计算回归Loss
        ##注意回归损失只用考虑正样本情况
        if ohem:	##default==false
            pos_index = np.where(label[batch_id].cpu() == 1)[0]
            if len(pos_index) > 0:
                loss_bid = F.smooth_l1_loss(input[batch_id][pos_index], target[batch_id][pos_index], reduction='none')
                sort_index = torch.argsort(loss_bid.mean(1))
                loss_bid_ohem = loss_bid[sort_index[-num_pos:]]
            else:
                loss_bid_ohem = torch.FloatTensor([0]).cuda()[0]
            loss_all.append(loss_bid_ohem.mean())
        else:
            pos_index = np.where(label[batch_id].cpu() == 1)[0]
            pos_index = random.sample(pos_index.tolist(), min_pos)#随机采样
            if len(pos_index) > 0:
                loss_bid = F.smooth_l1_loss(input[batch_id][pos_index], target[batch_id][pos_index])
            else:
                loss_bid = torch.FloatTensor([0]).cuda()[0]  ##没有正样本,不去计算loss
            loss_all.append(loss_bid.mean())
    final_loss = torch.stack(loss_all).mean()##所有loss取平均
    return final_loss
回顾
siamrpn训练的大致过程:
> 1. 获取图片,真实框路径;;用于后续创建dataset
> 2. 生成SiamRPN模型
> 3. 生成dataset(关键,后续会详解)
>      get_item函数大致过程:
>      生成exemplar_img, detection_img (经过前处理)
>      生成anchors(与测试,推理的内容一致)
>      根据anchors和groundtruth反计算得到offset_target
>      根据anchors和groundtruth计算iou,并令iou>阈值为正样本,以此生成conf_target(正样本则lable=1,负样本则label=0)。
>      get_item函数返回: exemplar_img,detection_img; conf_target, offset_target
> 4.  初始化
>     模型加载;;优化器创建;;LOSS(并未指定loss类,后续会知道)
> 5. 取样,训练
>          conf_pred,offset_pred=model.train(exemplar_pic,detection_pic)
>          修正shape
>          **计算loss**(关键,后续会详解)
>          loss反传
> 6. 训练结果输出
训练时loss的大致计算过程:
  1.分类loss
	  参数传入conf_pred, conf_target参数 (batch个 5*19*19组值)
	  循环batch
	  正样本loss计算
	  	  得到子batch中所有正样本(conf_target=1)index(index_pos)
	  	  确定X
	  	  随机打乱index_pos并抽取X组数据(pos_loss_index)
	  	  pos_loss= 交叉熵(conf_pred[子batch][pos_loss_index], conf_target[子batch][pos_loss_index])
	  负样本loss计算同理
	  对所有loss取平均为最终conf_loss
  2.回归loss
	  传入 offset_pred,offset_target, conf_target
	  (ps: 只用计算正样本的回归loss)
	  循环batch
	  	  得到子batch中所有正样本(conf_target=1)index(index_pos)
	  	  确定X
	  	  随机打乱index并抽取X组数据(loss_index)
	  	  loss= L1_Loss(offset_pred[子batch][loss_index], offset_target[子batch][loss_index])
	  	  loss取平均为最终regression_loss
最终loss= conf_loss*a + regression_loss*b  (a,b为各自loss的权重)
欢迎指正
因为本文主要是本人用来做的笔记,顺便进行知识巩固。如果本文对你有所帮助,那么本博客的目的就已经超额完成了。
本人英语水平、阅读论文能力、读写代码能力较为有限。有错误,恳请大佬指正,感谢。
欢迎交流
邮箱:[email protected]