Three.js动画系统(Animation system)
让模型实现动画效果,需要使用Three动画系统,动画系统官方文档链接,这里稍作了修改。
动画系统(Animation system)概述:
在three.js动画系统中,您可以为模型的各种属性设置动画: SkinnedMesh(蒙皮和装配模型)的骨骼,morph targets(变形目标), 不同的材料属性(颜色,不透明度,布尔运算),可见性和变换。动画属性可以淡入、淡出、交叉淡化和扭曲。 在相同或不同物体上同时发生的动画的权重和时间比例的变化可以独立地进行。 相同或不同物体的动画也可以同步发生。
| 组件 | 作用 |
|---|---|
| 动画片段(Animation Clips) | 成功导入3D动画对象的响应字段中包含一个名为“animations”的数组, 其中包含此模型的AnimationClips(请参阅下面可用的加载器列表)。 每个AnimationClip通常保存对象某个活动的数据, 举个例子,假如mesh是一个角色,可能有一个AnimationClip实现步行循环, 第二个AnimationClip实现跳跃,第三个AnimationClip实现闪避等等。 |
| 关键帧轨道(Keyframe Tracks) | 在AnimationClip中,每个动画属性的数据都存储在一个单独的KeyframeTrack中。 假设一个角色对象有Skeleton(骨架), 一个关键帧轨道可以存储下臂骨骼位置随时间变化的数据, 另一个轨道追踪同一块骨骼的旋转变化,第三个追踪另外一块骨骼的位置、转角和尺寸,等等。 AnimationClip可以由许多这样的轨道组成。假设模型具有morph Targets(变形目标)—— 例如一个变形目标显示一个笑脸,另一个显示愤怒的脸 —— 每个轨道都持有某个变形目标在AnimationClip运行期间产生的Mesh.morphTargetInfluences(变形目标影响)如何变化的信息。 |
| 动画混合器(Animation Mixer) | 存储的数据仅构成动画的基础 —— 实际播放由AnimationMixer控制。可以同时控制和混合若干动画。 |
| 动画行为(Animation Actions) | AnimationMixer本身只有很少的(大体上)属性和方法, 因为它可以通过AnimationActions来控制。 通过配置AnimationAction,您可以决定何时播放、暂停或停止其中一个混合器中的某个AnimationClip, 这个AnimationClip是否需要重复播放以及重复的频率, 是否需要使用淡入淡出或时间缩放,以及一些其他内容(例如交叉渐变和同步)。 |
| 动画对象组(Animation Object Groups) | 当需要一组对象接收共享的动画状态时,可以使用AnimationObjectGroup。 |
| 支持的格式和加载器(Supported Formats and Loaders) | 请注意,并非所有模型格式都包含动画(尤其是OBJ,没有), 而且只有某些three.js加载器支持AnimationClip序列。 支持此动画类型加载器: THREE.ObjectLoader、THREE.BVHLoader、THREE.ColladaLoader、THREE.FBXLoader、THREE.GLTFLoader、THREE.MMDLoader 3ds max和Maya当前无法直接导出多个动画(这意味着动画不是在同一时间线上)到一个文件中。 |
官方文档范例
let mesh;// 在传入后续代码中需要提前赋值才有意义,可由外部导入的模型数据进行赋值

// 新建一个AnimationMixer, 并取得AnimationClip实例列表
const mixer = new THREE.AnimationMixer( mesh );
const clips = mesh.animations;

// 在每一帧中更新mixer
function update () {


	mixer.update( deltaSeconds );
}

// 播放一个特定的动画
const clip = THREE.AnimationClip.findByName( clips, 'dance' );
const action = mixer.clipAction( clip );
action.play();

// 播放所有动画
clips.forEach( function ( clip ) {


	mixer.clipAction( clip ).play();
} );
实现流程
基本流程
1、添加模型
2、模型动画
工程文件
工程文件结构如下图:
static:存放静态资源文件
three.js-master:为官网下载的代码包,包含所有需要用到的资源包,链接:https://github.com/mrdoob/three.js/archive/master.zip
index.html:页面代码
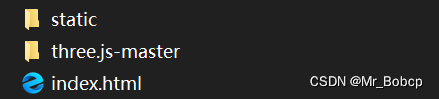
模型使用的是官方示例中的Soldier模型,文件位置:three.js-master\examples\models\gltf\Soldier.glb
为了方便操作我们将文件拷出来放在上图static\3dmod\gltf文件夹下,static与three.js-master同级
index.html单页代码组成
<!DOCTYPE html>
<html>

<head>
	<meta charset="utf-8">
	<title>My first three.js app</title>
	<style>
		body {


			margin: 0;
		}
	</style>
</head>

<body>
	<script type="importmap">
			{


				"imports": {


					"three": "./three.js-master/build/three.module.js"
				}
			}
		</script>
	<script type="module">
		// 下文JS代码位置
		// ...
	</script>
</body>

</html>
参照官网例子:https://threejs.org/examples/#webgl_animation_skinning_blending中的场景和模型
场景搭建
搭建场景环境
import * as THREE from "three";
import {

     OrbitControls } from "./three.js-master/examples/jsm/controls/OrbitControls.js";

let scene, camera, renderer;

// 渲染器开启阴影渲染:renderer.shadowMapEnabled = true;
// 灯光需要开启“引起阴影”:light.castShadow = true;
// 物体需要开启“引起阴影”和“接收阴影”:mesh.castShadow = mesh.receiveShadow = true;

function init() {


	scene = new THREE.Scene();
	camera = new THREE.PerspectiveCamera(75, window.innerWidth / window.innerHeight, 0.1, 1000);
	renderer = new THREE.WebGLRenderer();
	// position and point the camera to the center of the scene
	camera.position.set(5, 5, 5);
	camera.lookAt(scene.position);

	// 增加坐标系红色代表 X 轴. 绿色代表 Y 轴. 蓝色代表 Z 轴.
	// 添加坐标系到场景中
	const axes = new THREE.AxesHelper(20);
	scene.add(axes);

	// 调整背景颜色,边界雾化
	scene.background = new THREE.Color(0xa0a0a0);
	scene.fog = new THREE.Fog(0xa0a0a0, 10, 30);

	// 半球形光源
	const hemiLight = new THREE.HemisphereLight(0xffffff, 0x444444);
	hemiLight.position.set(0, 10, 0);
	scene.add(hemiLight);

	// 创建一个虚拟的球形网格 Mesh 的辅助对象来模拟 半球形光源 HemisphereLight.
	const hemiLighthelper = new THREE.HemisphereLightHelper(hemiLight, 5);
	scene.add(hemiLighthelper);

	// 地面
	const mesh = new THREE.Mesh(new THREE.PlaneGeometry(100, 100), new THREE.MeshPhongMaterial({

     color: 0x999999, depthWrite: false }));
	mesh.rotation.x = - Math.PI / 2;
	mesh.receiveShadow = true;
	scene.add(mesh);

	// 平行光
	const directionalLight = new THREE.DirectionalLight(0xFFFFFF);
	directionalLight.castShadow = true;
	directionalLight.shadow.camera.near = 0.5;
	directionalLight.shadow.camera.far = 50;
	directionalLight.shadow.camera.left = -10;
	directionalLight.shadow.camera.right = 10;
	directionalLight.shadow.camera.top = 10;
	directionalLight.shadow.camera.bottom = -10;
	directionalLight.position.set(0, 5, 5);
	scene.add(directionalLight);

	// 用于模拟场景中平行光 DirectionalLight 的辅助对象. 其中包含了表示光位置的平面和表示光方向的线段.
	const directionalLightHelper = new THREE.DirectionalLightHelper(directionalLight, 5);
	scene.add(directionalLightHelper);

	renderer.shadowMap.enabled = true;
	renderer.setSize(window.innerWidth, window.innerHeight);
	document.body.appendChild(renderer.domElement);

	// 控制器
	const controls = new OrbitControls(camera, renderer.domElement);
}
// 渲染
function animate() {


	requestAnimationFrame(animate);
	renderer.render(scene, camera);
};
添加模型
导入模型,在《Three.js学习四——模型导入》中有相对详细的介绍。
let model = null;
function loadModel() {


	// 加载模型并开启阴影和接受阴影
	const gltfLoader = new GLTFLoader();
	gltfLoader.setPath('./static/3dmod/gltf/')
		.load('Soldier.glb', function (gltf) {


			gltf.scene.rotation.y = Math.PI;
			// console.log("gltf", gltf)
			gltf.scene.scale.set(1, 1, 1)
			gltf.scene.traverse(function (object) {


				if (object.isMesh) {


					object.castShadow = true; //阴影
					object.receiveShadow = true; //接受别人投的阴影
				}
			});
			scene.add(gltf.scene);
			model = gltf.scene;

		}, function (res) {


			// console.log(res.total, res.loaded)
		});
}
模型动画
动画实现的基本流程
- 使用加载器导入模型后,在加载成功后调用的函数中设置动画
- 新建一个AnimationMixer(动画混合器)
- 获取AnimationClip(动画)实例列表
- 设置播放动画,并在每一帧中更新mixer
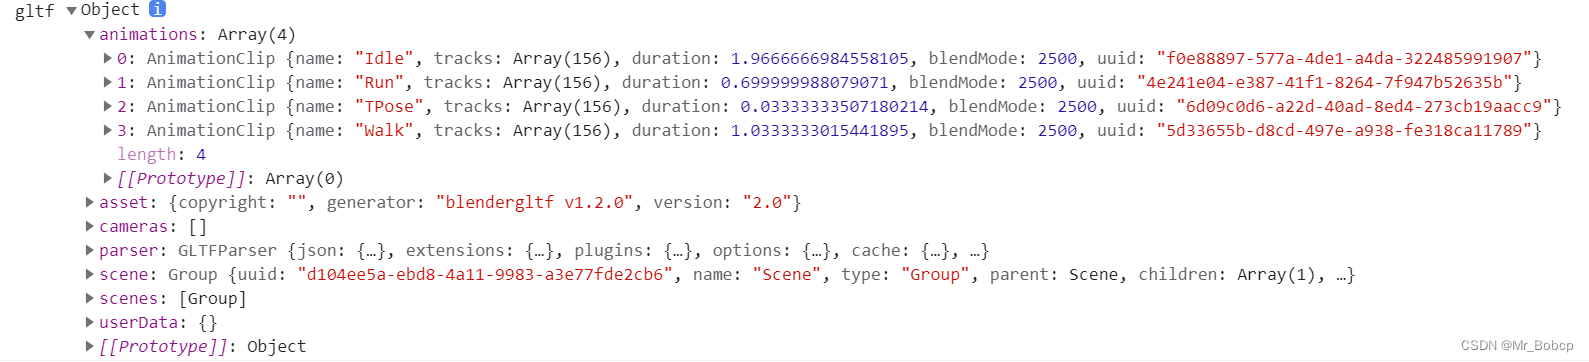
以文中使用的GLTF加载器(GLTFLoader)为例,其解析基于glTF的ArrayBuffer或JSON字符串,并在完成后触发onLoad回调。onLoad的参数将是一个包含有已加载部分的Object:.scene、 .scenes、 .cameras、 .animations 和 .asset。
其中.scene为AnimationMixer新建时需要传入的内容,.animations 则为AnimationClip(动画)实例列表
相关对象方法和代码
在设置动画中使用的相关对象及方法:
AnimationMixer( rootObject : Object3D ) —— rootObject - 混合器播放的动画所属的对象。
AnimationClip( name : String, duration : Number, tracks : Array ) —— name - 此剪辑的名。duration - 持续时间 (单位秒). 如果传入负数, 持续时间将会从传入的数组中计算得到。tracks - 一个由关键帧轨道(KeyframeTracks)组成的数组。
AnimationAction( mixer : AnimationMixer, clip : AnimationClip, localRoot : Object3D ) —— mixer - 被此动作控制的 动画混合器。clip - 动画剪辑 保存了此动作当中的动画数据。localRoot - 动作执行的根对象`
animationClip.findByName ( objectOrClipArray : Object, name : String ) : AnimationClip ——
根据名称搜索动画剪辑(AnimationClip), 接收一个动画剪辑数组或者一个包含名为"animation"的数组的网格(或几何体)作为第一个参数。
animationMixer.clipAction (clip : AnimationClip, optionalRoot : Object3D) : AnimationAction ——
返回所传入的剪辑参数的AnimationAction, 根对象参数可选,默认值为混合器的默认根对象。第一个参数可以是动画剪辑(AnimationClip)对象或者动画剪辑的名称。
animationAction.play () : this —— 让混合器激活动作。此方法可链式调用。
animationMixer.update (deltaTimeInSeconds : Number) : this —— 推进混合器时间并更新动画,通常在渲染循环中完成, 传入按照混合器的时间比例(timeScale)缩放过的clock.getDelta
let clock = new THREE.Clock(); // 用于clock.getDelta()
let mixer;
// 加载器加载完成后添加了动画设置
function loadModel() {


	// 加载模型并开启阴影和接受阴影
	const gltfLoader = new GLTFLoader();
	gltfLoader.setPath('./static/3dmod/gltf/')
		.load('Soldier.glb', function (gltf) {


			gltf.scene.rotation.y = Math.PI;
			console.log("gltf", gltf)
			gltf.scene.scale.set(1, 1, 1)
			gltf.scene.traverse(function (object) {


				if (object.isMesh) {


					object.castShadow = true; //阴影
					object.receiveShadow = true; //接受别人投的阴影
				}
			});

            // 使用动画混合器及配置
			mixer = startAnimation(
				gltf.scene,
				gltf.animations,
				gltf.animations[1].name // animationName,这里是"Run"
			);

			scene.add(gltf.scene);
			model = gltf.scene;

		}, function (res) {


			// console.log(res.total, res.loaded)
		});

};

/**
 * 启动特定网格对象的动画。在三维模型的动画数组中按名称查找动画
 * @param skinnedMesh {THREE.SkinnedMesh} 要设置动画的网格
 * @param animations {Array} 数组,包含此模型的所有动画
 * @param animationName {string} 要启动的动画的名称
 * @return {THREE.AnimationMixer} 要在渲染循环中使用的混合器
 */
function startAnimation(skinnedMesh, animations, animationName) {


	const m_mixer = new THREE.AnimationMixer(skinnedMesh);
	const clip = THREE.AnimationClip.findByName(animations, animationName);
	if (clip) {


		const action = m_mixer.clipAction(clip);
		action.play();
	}
	return m_mixer;
};

function animate() {


	requestAnimationFrame(animate);
	// 更新动画帧
          if(mixer){


              mixer.update(clock.getDelta());
          }

	renderer.render(scene, camera);
};
完整代码和实现效果
完整代码
<!DOCTYPE html>
<html>

<head>
	<meta charset="utf-8">
	<title>My first three.js app</title>
	<style>
		body {


			margin: 0;
		}
	</style>
</head>

<body>
	<script type="importmap">
			{


				"imports": {


					"three": "./three.js-master/build/three.module.js"
				}
			}
		</script>
	<script type="module">
		import * as THREE from "three";
		import {

     OrbitControls } from "./three.js-master/examples/jsm/controls/OrbitControls.js";
		import {

     GLTFLoader } from "./three.js-master/examples/jsm/loaders/GLTFLoader.js";

		let scene, camera, renderer;
		let model = null;
        let clock = new THREE.Clock();
        let mixer;

		// 渲染器开启阴影渲染:renderer.shadowMapEnabled = true;
		// 灯光需要开启“引起阴影”:light.castShadow = true;
		// 物体需要开启“引起阴影”和“接收阴影”:mesh.castShadow = mesh.receiveShadow = true;

		function init() {


			scene = new THREE.Scene();
			camera = new THREE.PerspectiveCamera(75, window.innerWidth / window.innerHeight, 0.1, 1000);
			renderer = new THREE.WebGLRenderer();
			// position and point the camera to the center of the scene
			camera.position.set(5, 5, 5);
			camera.lookAt(scene.position);

			// 增加坐标系红色代表 X 轴. 绿色代表 Y 轴. 蓝色代表 Z 轴.
			// 添加坐标系到场景中
			const axes = new THREE.AxesHelper(20);
			scene.add(axes);

			// 调整背景颜色,边界雾化
			scene.background = new THREE.Color(0xa0a0a0);
			scene.fog = new THREE.Fog(0xa0a0a0, 10, 30);

			// 半球形光源
			const hemiLight = new THREE.HemisphereLight(0xffffff, 0x444444);
			hemiLight.position.set(0, 10, 0);
			scene.add(hemiLight);

			// 创建一个虚拟的球形网格 Mesh 的辅助对象来模拟 半球形光源 HemisphereLight.
			const hemiLighthelper = new THREE.HemisphereLightHelper(hemiLight, 5);
			scene.add(hemiLighthelper);

			// 地面
			const mesh = new THREE.Mesh(new THREE.PlaneGeometry(100, 100), new THREE.MeshPhongMaterial({

     color: 0x999999, depthWrite: false }));
			mesh.rotation.x = - Math.PI / 2;
			mesh.receiveShadow = true;
			scene.add(mesh);

			// 平行光
			const directionalLight = new THREE.DirectionalLight(0xFFFFFF);
			directionalLight.castShadow = true;
			directionalLight.shadow.camera.near = 0.5;
			directionalLight.shadow.camera.far = 50;
			directionalLight.shadow.camera.left = -10;
			directionalLight.shadow.camera.right = 10;
			directionalLight.shadow.camera.top = 10;
			directionalLight.shadow.camera.bottom = -10;
			directionalLight.position.set(0, 5, 5);
			scene.add(directionalLight);

			// 用于模拟场景中平行光 DirectionalLight 的辅助对象. 其中包含了表示光位置的平面和表示光方向的线段.
			const directionalLightHelper = new THREE.DirectionalLightHelper(directionalLight, 5);
			scene.add(directionalLightHelper);

			renderer.shadowMap.enabled = true;
			renderer.setSize(window.innerWidth, window.innerHeight);
			document.body.appendChild(renderer.domElement);

			// 控制器
			const controls = new OrbitControls(camera, renderer.domElement);
		};

		function loadModel() {


			// 加载模型并开启阴影和接受阴影
			const gltfLoader = new GLTFLoader();
			gltfLoader.setPath('./static/3dmod/gltf/')
				.load('Soldier.glb', function (gltf) {


					gltf.scene.rotation.y = Math.PI;
					console.log("gltf\ngltf", gltf)
					gltf.scene.scale.set(1, 1, 1)
					gltf.scene.traverse(function (object) {


						if (object.isMesh) {


							object.castShadow = true; //阴影
							object.receiveShadow = true; //接受别人投的阴影
						}
					});

                    // 使用动画混合器及配置
					mixer = startAnimation(
						gltf.scene,
						gltf.animations,
						gltf.animations[1].name // animationName,这里是"Run"
					);

					scene.add(gltf.scene);
					model = gltf.scene;

				}, function (res) {


					// console.log(res.total, res.loaded)
				});

		};

		/**
		 * 启动特定网格对象的动画。在三维模型的动画数组中按名称查找动画
		 * @param skinnedMesh {THREE.SkinnedMesh} 要设置动画的网格
		 * @param animations {Array} 数组,包含此模型的所有动画
		 * @param animationName {string} 要启动的动画的名称
		 * @return {THREE.AnimationMixer} 要在渲染循环中使用的混合器
		 */
		function startAnimation(skinnedMesh, animations, animationName) {


			const m_mixer = new THREE.AnimationMixer(skinnedMesh);
			const clip = THREE.AnimationClip.findByName(animations, animationName);

			if (clip) {


				const action = m_mixer.clipAction(clip);
				action.play();
			}

			return m_mixer;
		};

		function animate() {


			requestAnimationFrame(animate);

			// 更新动画帧
            if(mixer){


                mixer.update(clock.getDelta());
            }

			renderer.render(scene, camera);
		};

		init();
		loadModel();
		animate();
	</script>
</body>

</html>
实现效果
