欢迎关注公众号:
01
效果对比
默认启动页:

自定义启动页:

02
启动页存在的意义
我们在 creator 中的开发的游戏都是基于 cocos engine,所以在展示我们的游戏之前,是必须要先加载 cocos engine,然后才是我们自己的业务代码
流程图如下:
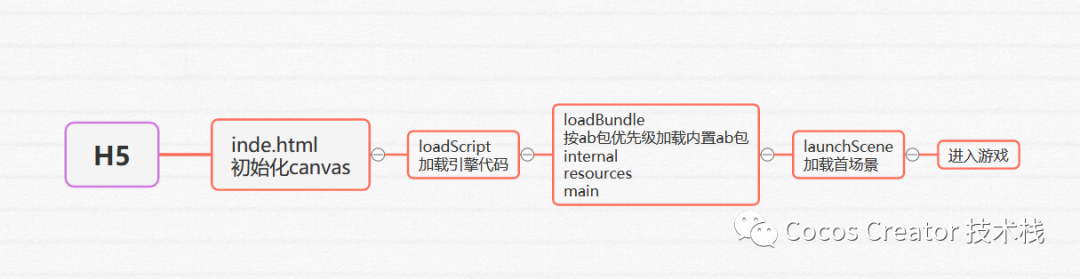
而构建完成后未精简的 cocos engine 代码为 1.9M

如果再加上物理相关代码的话,一共是2M

别忘了,我们自己的首场景也要加载过程哦
所以,从游戏启动,到真正进入游戏场景这段时间内,我们看到的,就是默认的启动页
如果是原生平台的话,连启动页也没有,所以会有3秒左右的黑屏
这时候,增加一个启动页的话,就会在体验上好很多,不过由于是在原生平台上增加启动页,所以需要掌握一点原生平台的知识
03
实现步骤
了解了流程之后,同学们可以随意定制自己想要的启动页
需要修改的文件的路径如下:
project-folder|--assets|--build|--web-mobile|--index.html|--main.js|--style-mobile.css
1修改 index.html
注释默认启动页 div:
<canvas id="GameCanvas" oncontextmenu="event.preventDefault()" tabindex="0"></canvas><!-- <div id="splash"><div class="progress-bar stripes"><span style="width: 0%"></span></div></div> -->
其中的 GameCanvas 也就是 cocos 的 GameContainer
增加自定义启动页 div:
<div id="preload" style="background-image: url(images/background.jpg); background-repeat: no-repeat; background-size:100%;"><div class="circle"><div id="con"></div><div class="pie_left"><div class="left" id="left"></div></div><div class="pie_right"><div class="right" id="right"></div></div><div class="mask"><img src="images/splash.gif"></div></div></div>
注释默认启动页相关设置:
var debug = window._CCSettings.debug;// var splash = document.getElementById('splash');// splash.style.display = 'block';
2修改 style-mobile.css
#preload {position: absolute;margin: auto;left: 0;right: 0;top: 0;bottom: 0;display: flex;align-items: center;justify-content: center;text-align: center;opacity: 1;transition: all 0.3s;}.circle {width: 100px;height: 100px;position: absolute;border-radius: 50%;background: #00aacc;}.pie_left, .pie_right {width: 100px;height: 100px;position: absolute;top: 0;left: 0;}.left, .right {display: block;width: 100px;height: 100px;background: #bdbdbd;border-radius: 50%;position: absolute;top: 0;left: 0;transform: rotate(0deg);}.pie_right, .right {clip: rect(0, auto, auto, 50px);}.pie_left, .left {clip: rect(0, 50px, auto, 0);}.mask {width: 90px;height: 90px;border-radius: 50%;left: 5px;top: 5px;background: #FFF;position: absolute;}img {width: 64px;height: 80px;}#con {position: absolute;width: 2px;height: 10px;bottom: 0px;left: 48px;background-color: #bdbdbd;}
3修改 main.js
function setLoadingDisplay () {// Loading splash scene// var splash = document.getElementById('splash');// var progressBar = splash.querySelector('.progress-bar span');// onProgress = function (finish, total) {// var percent = 100 * finish / total;// if (progressBar) {// progressBar.style.width = percent.toFixed(2) + '%';// }// };// splash.style.display = 'block';// progressBar.style.width = '0%';// 获取相关elementlet preload = document.getElementById('preload');let left = document.getElementById('left');let right = document.getElementById('right');// 加载首场景进度回调onProgress = function (completedCount, totalCount, item) {if (totalCount == 1) {return;}// 计算百分比,设置进度let percent = 100 * completedCount / totalCount;let progress = percent * 3.6;if (progress <= 180) {right.style.transform = "rotate(" + progress + "deg)";} else {document.getElementById("con").style.display = "none";right.style.transform = "rotate(180deg)";left.style.transform = "rotate(" + (progress - 180) + "deg)";}};// 监听一次首场景运行后触发的事件cc.director.once(cc.Director.EVENT_AFTER_SCENE_LAUNCH, function () {// splash.style.display = 'none';// 隐藏启动页divpreload.style.display = 'none';});}
4build-templates
因为上述文件在 build 目录中,每次构建,都会被删除重新创建,所以,我们需要把文件放到 build-templates 目录中
关于 build-templates 目录:
官方文档:
https://docs.cocos.com/creator/manual/zh/publish/custom-project-build-template.html
Creator 支持对每个项目分别定制发布模板,用户如果需要新增或者替换文件只需要在项目路径下添加一个 build-templates 目录,里面按照平台路径划分子目录
在构建结束的时候,build-templates 目录下所有的文件都会自动按照对应的目录结构复制到构建生成的工程里
结构类似:
project-folder|--assets|--build|--build-templates|--web-mobile// 用户需要添加的文件,如 index.html|--index.html|--jsb-link// 用户需要添加的文件,如 main.js|--main.js|--jsb-default// 用户需要添加的文件,如 main.js|--main.js
这样如果当前构建的平台是 web-mobile 的话,那么 build-templates/web-mobile/index.html 就会在构建后被拷贝到 build/web-mobile/index.html
如果当前构建的是 Android 平台 jsb-link 模版的话,那么 build-templates/jsb-link/main.js 就会在构建后被拷贝到 build/jsb-link/main.js
· preview-templates
额外介绍下 preview-templates
官方文档:
https://docs.cocos.com/creator/manual/zh/advanced-topics/custom-preview-template.html
和 build-templates 类似,这里可以自定义网页预览
结构类似:
project-folder|--assets|--build|--preview-templates// 必须的入口文件|--index.html// 其他文件可根据想要实现的预览效果进行添加
自定义网页预览,可以参考编辑器内置的 preview-templates 文件
自定义完成后需要 重启编辑器,然后在编辑器上方选择 浏览器,点击 预览 按钮即可查看效果

编辑器内置 preview-templates 存放位置如下:
Mac:CocosCreator.app/Contents/Resources/static/preview-templates
Windows:CocosCreator/resources/static/preview-templates

获取源码请在公众号回复:
H5自定义启动页