通过哈希查找重复和类似的图像
0. 前言
在本节中,我们将讨论图像搜索中的两个相关问题,即使用基于哈希函数的方法来解决问题图像搜索问题,包括查找重复图像和查找类似图像,但要解决这两个问题所用的哈希函数在本质上是截然不同的:
- 第一个问题是在给定的图像集合中找到重复图像,我们将学习如何使用
MD5加密哈希函数来解决该问题 - 第二个问题是如何查找与给定图像相似图像,我们将学习如何使用感知哈希函数来解决此问题
1. 哈希函数
哈希函数 (Hash Function) 可以将任意长度的数据字符串映射到固定长度的输出,哈希函数本身具有确定性和公开性,但是映射结果应该看起来似乎是“随机”的,函数表达式为 y=hash(key)。在实践中,哈希函通常用于压缩输入数据。哈希函数应当具有抗碰撞性,也就是说,对于两个输入 M1 和 M2,设计良好的哈希函数应当满足 h ( M 1 ) ≠ h ( M 2 ) h(M1)≠h(M2) h(M1)=h(M2)。
MD5 (Message Digest 5) 是一种广泛使用的哈希函数,该函数可以生成 128 位哈希值。即该算法可以接受任意长度的输入,并得到长度为 128 位的输入结果。尽管 MD5 最初设计用作加密哈希函数,现在已证明它具有脆弱性,但该算法仍被用于验证文件的完整性和真实性。MD5 相较于其他加密哈希函数的优势在于,它的执行更为高效。在下一小节中,我们将介绍如何使用 hashlib 检测重复图像。
2. 使用哈希函数查找重复图像
我们使用图像内容作为 MD5 哈希函数的键 (key),然后计算图像集合中所有图像的十六进制哈希值( 128 位)。如果集合中存在彼此相同的图像,它们将具有相同的十六进制哈希值。通过比较哈希值,我们可以判断两张图像的内容是否相同。
但是,MD5 容易受到碰撞性的影响,这意味着有可能即使两个图像并不相同,它仍然有可能会产生相同的哈希值,但这种情况在哈希空间较大时极为罕见。
(1) 首先,导入所需的库:
import hashlib, os
from glob import glob
import matplotlib.pylab as plt
from skimage.io import imread
hashlib 模块实现了 RSA 的 MD5 哈希算法接口,其使用方法如下,创建以图像内容作为 MD5 对象的键,并计算哈希值。给定一个任意长度(即,对于任何大小的图像)的键,MD5 哈希函数将返回具有固定长度( 128 位)的哈希值。
(2) 计算图像的十六进制哈希值,然后计算位长度:
hex_digest = hashlib.md5(open('1.png', 'rb').read()).hexdigest()
bin_digest = format(int(str(hex_digest), 16), "040b")
print('MD5 digest = {} ({})'.format(hex_digest, bin_digest) )
print('length of hex digest = {} bytes'.format(len(hex_digest)))
print('length of bin digest = {} bits'.format(len(bin_digest)))
# MD5 digest = 284e09c26262ba709b9c54016c3ee197 (101000010011100000100111000010011000100110001010111010011100001001101110011100010101000000000101101100001111101110000110010111)
# length of hex digest = 32 bytes
# length of bin digest = 126 bits
从以上输出可以看出,哈希值的长度为 128 位。
(3) 接下来,我们实现函数 find_duplicates,该函数以目录名称作为输入,获取目录下的所有图像(带有 .jpg 和 .png 扩展名),然后返回找到的重复图像列表,每个列表包含两个或多个内容相同的图像名:
def find_duplicates(dir_name):
    def is_image(file_name):
        f = file_name.lower()
        return f.endswith(".png") or f.endswith(".jpg")

    hash_keys = dict()
    for file_name in glob(dir_name):
        if os.path.isfile(file_name) and is_image(file_name):
            with open(file_name, 'rb') as f:
                file_hash = hashlib.md5(f.read()).hexdigest()
            if file_hash not in hash_keys:
                hash_keys[file_hash] = [file_name]
            else:
                hash_keys[file_hash].append(file_name)
    return [hash_keys[file_hash] for file_hash in hash_keys if len(hash_keys[file_hash]) > 1]
在函数 find_duplicates() 中,计算所有图像的十六进制哈希值,使用 Python 词典将重复的项目插入其中,字典的键是计算出的十六进制摘要,其值是具有给定的十六进制哈希值的文件名列表。如果字典中已经存在一个具有相同的十六进制键,则表示它是一个重复的图像,我们将文件名添加到该键的相应列表中。最后,返回具有多个文件名的键值对列表作为重复图像
(4) 定义函数 show_duplicates 显示所有重复的图像,函数在 find_duplicates 返回的列表上迭代,在同一行上打印重复图像,并计算重复的次数:
def show_duplicates(duplicates):
    for duplicated in duplicates:
        try:
            plt.figure(figsize=(20,10))
            plt.subplots_adjust(0,0,1,0.9,0.05,0.05)
            for (i, file_name) in enumerate(duplicated):
                plt.subplot(1, len(duplicated), i+1)
                plt.imshow(imread(file_name))
                plt.title(file_name, size=10)
                plt.axis('off')
            plt.suptitle('{} duplicate images found with MD5 hash'.format(len(duplicated)), size=15)
            plt.show()
        except OSError as e:
            continue
(5) 最后,调用以上函数查找重复图像,并进行显示:
duplicates = find_duplicates('images/*.*')
print(duplicates)
show_duplicates(duplicates)


3. 使用感知哈希函数查找相似图像
在本节中,我们将学习如何通过使用图像哈希查找与给定图像相似的图像,我们使用感知哈希函数 (perceptual Hash function, pHash) 来实现此目的。
3.1 感知哈希函数
传统加密哈希算法(例如 MD5 )的关键特征抗碰撞性,即使输入有一点变化也会显着改变输出结果。使用加密哈希,哈希值是随机的(通常也可以认为是伪随机的),用于生成哈希值的数据可以视为随机种子,因此,相同的输入数据可以生成相同哈希值,但是不同的数据将会产生完全不同的哈希值。
因此,如果对图像执行了某些操作(例如压缩、裁剪和缩放),哈希值将变得完全不同,即使这些图像在视觉上具有相似的显示效果。为了查找内容相似的的图像,图像哈希函数应考虑图像视觉变化,并根据图像的视觉效果生成哈希值,这种类型的哈希函数可以用于识别集合中是否存在与给定图像相似的的图像。
感知哈希算法是一类可比的哈希函数,使用图像中的特征生成不同的(但不唯一的)指纹,这些指纹具有可比性。换句话说,如果特征相似,则感知哈希函数值也是类似的,而密码哈希函数对于输入值的微小变化极为敏感(会导致输出值的剧烈变化)。pHash 使用一种鲁棒性算法,即离散余弦变换来降低频率。
3.2 查找相似图像
在本节中,使用 imagehash 库的 pHash 算法计算相似图像,我们使用数据集 caltech-101。为了使用 pHash 函数,需要首先安装第三方库 imagehash:
$ pip install imagehash
(1) 首先导入所需的库:
from PIL import Image
import imagehash
from time import time
import os
from glob import glob
import matplotlib.pylab as plt
import numpy as np
(2) 实现函数 plot_images_to_compare(),其接受两个输入图像和一个哈希函数(默认为 pHash )作为参数,使用哈希函数计算每个输入图像的 64 位指纹,并绘制相似图像;最后,计算图像的指纹之间的汉明距离:
def plot_images_to_compare(imfile1, imfile2, hashfunc = imagehash.phash):
    img1, img2 = Image.open(imfile1), Image.open(imfile2)
    print('sizes of images = {}, {}'.format(img1.size, img2.size))
    hash1 = hashfunc(img1)
    hash2 = hashfunc(img2)
    plt.figure(figsize=(20,10))
    plt.subplots_adjust(0,0,1,0.95,0.01,0.01)
    plt.subplot(121), plt.imshow(img1), plt.title(str(hash1), size=10), plt.axis('off')
    plt.subplot(122), plt.imshow(img2), plt.title(str(hash2), size=10), plt.axis('off')
    plt.show()
    print('hash1 = {} ({}), length = {} bits'.format(format(int(str(hash1), 16), "040b"), str(hash1),                                                      len(format(int(str(hash1), 16), "040b"))))
    print('hash2 = {} ({}), length = {} bits'.format(format(int(str(hash2), 16), "040b"), str(hash2),                                                      len(format(int(str(hash2), 16), "040b"))))
    print('hamming distance =', hash1 - hash2)
(3) 调用函数 plot_images_to_compare() 比较两个不同的图像,其中第二张图像可以通过在第一个中添加一些随机笔画创建:
plot_images_to_compare('bird_01.jpg', 'bird_02.jpg')
# sizes of images = (300, 258), (300, 258)
# hash1 = 1001101101001000011001110110011010010100100110011011001101100011 (9b4867669499b363), length = 64 bits
# hash2 = 1001101101001000011001110110011010010100100110011011001101100011 (9b4867669499b363), length = 64 bits
# hamming distance = 0

根据输出可以看出图像非常相似,两者会返回完全相同的 pHash指纹,它们之间的汉明距离为 0。
(4) 接下来,我们计算原始输入图像与使用图像增强后的 pHash 值:
plot_images_to_compare('bird_01.jpg', 'bird_03.png')
# sizes of images = (300, 258), (300, 258)
# hash1 = 1001101101001000011001110110011010010100100110011011001101100011 (9b4867669499b363), length = 64 bits
# hash2 = 1001101101001000011001110110011010010100100110011101001101100011 (9b4867669499d363), length = 64 bits
# hamming distance = 2

可以看出,两张图像同样非常相似,汉明距离为 2,即 pHash 指纹仅有 2 位不同。
(5) 对比原始图像与添加水印后图像(图像的大小尺寸不同)的 pHash 指纹:
plot_images_to_compare('img_with_logo.jpg', 'img_with_no_logo.png')
# sizes of images = (1024, 683), (574, 383)
# hash1 = 1001010110000001011010111101001010010000111100100111001001111110 (95816bd290f2727e), length = 64 bits
# hash2 = 1001010110000001011010101101001010010010111100100111001001111110 (95816ad292f2727e), length = 64 bits
# hamming distance = 2

从以上输出可以看出中,指纹同样仅有 2 位不同。
(6) 最后,我们比较两个完全不同图像的 pHash 指纹:
plot_images_to_compare('bird_01.jpg', 'img_with_no_logo.png')
# sizes of images = (300, 258), (574, 383)
# hash1 = 1001101101001000011001110110011010010100100110011011001101100011 (9b4867669499b363), length = 64 bits
# hash2 = 1001010110000001011010101101001010010010111100100111001001111110 (95816ad292f2727e), length = 64 bits
# hamming distance = 28

可以看到,两张图像的指纹差异较大,大约有一半左右的位上值并不相同。
4.3 查找指定目录中的相似图像
(1) 实现函数 preprocess_images(),以处理指定目录中的图像,为每一图像生成 pHash 指纹:
def preprocess_images(dir_name, hashfunc = imagehash.phash):
    image_filenames = sorted(glob(dir_name))
    print('number of images to process = {}'.format(len(image_filenames)))
    images = {

    }
    for img_file in sorted(image_filenames):
        hash = hashfunc(Image.open(img_file))
        images[hash] = images.get(hash, []) + [img_file]
    for hash in images:
        images[hash] = np.array(images[hash])
    return images
在函数 preprocess_images() 中,创建一个字典,其每一个键都对应于唯一的指纹(哈希值),相应的值是具有相同指纹值的图像列表,函数返回图像指纹字典。
(2) 实现函数 query_k_similar_images(),其接受待查询的图像文件名、要搜索的图像指纹字典、希望获取的与待查询图像最相似的图像数量K以及要使用的哈希函数(默认为 pHash):
def query_k_similar_images(image_file, images, k=3, hashfunc = imagehash.phash):
    hash = hashfunc(Image.open(image_file))
    hamming_dists = np.zeros(len(images))
    image_files = np.array(list(images.values()))
    hash_values = list(images.keys())
    for i in range(len(image_files)):
        hamming_dists[i] = hash - hash_values[i]
    indices = np.argsort(hamming_dists)
    return np.hstack(image_files[indices][:k]), hamming_dists[indices][:k]
函数 query_k_similar_images() 首先计算待查询图像的指纹,然后计算待查询图像的指纹与集合中其他指纹之间的汉明距离;最后,按照汉明距离递增顺序对图像进行排序,并返回前 K 张最相似的图像。
(3) 预处理所有输入图像,并计算图像预处理所需时间:
start = time()
images = preprocess_images('lamp/*.*')
end = time()
print('processing time = {} seconds'.format(end-start))
(3) 定义函数 plot_query_returned_images() 以绘制待查询图像以及函数返回的相似图像:
def plot_query_returned_images(query, returned):
    n = 1 + len(returned)
    plt.figure(figsize=(20,8))
    plt.subplots_adjust(0,0,1,0.95,0.05,0.05)
    plt.subplot(1,n,1), plt.imshow(Image.open(query)), plt.title('query image', size=20), plt.axis('off')
    for i in range(len(returned)):
        plt.subplot(1,n,i+2), plt.imshow(Image.open(returned[i])), plt.title('returned image {}'.format(i+1), size=10)
        plt.axis('off')
    plt.show()
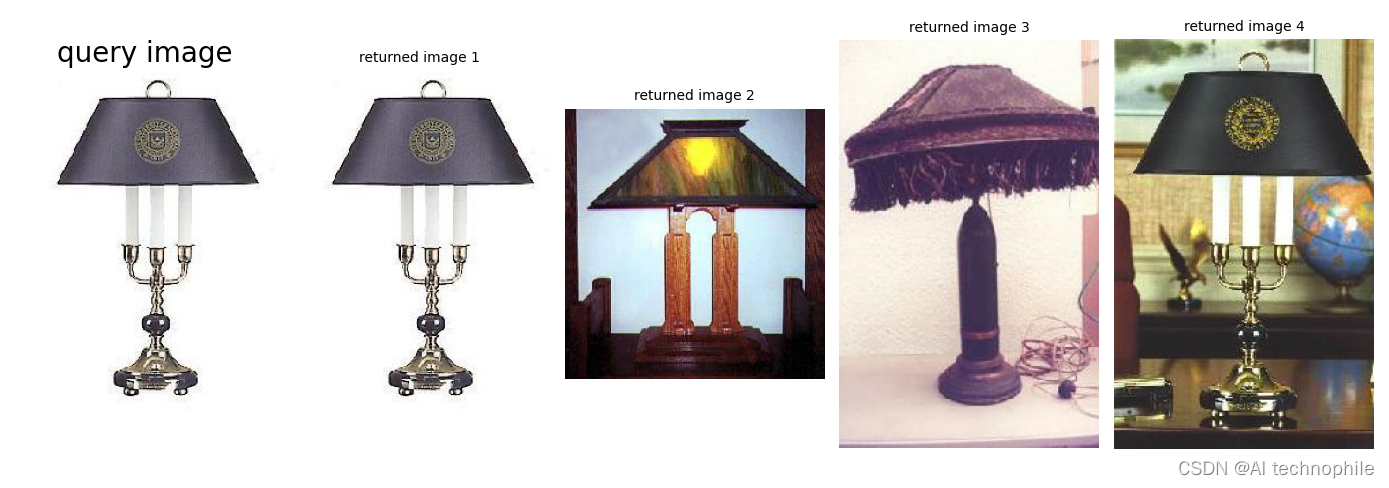
(4) 查找与待查询图像的前四个最相似图像进行绘制,并返回图像指纹之间的汉明距离:
query = 'lamp/image_0001.jpg'
found, dists = query_k_similar_images(query, images, k=4)

plot_query_returned_images(query, found)
小结
哈希函数 (Hash Function) 可以将任意长度的数据字符串映射到固定长度的输出。在本节中,我们利用哈希函数学习了图像搜索中的两个相关问题,即使用基于哈希函数的方法查找重复图像和查找类似图像,对于第一个问题,我们学习了使用 MD5 加密哈希函数来解决,对于第二个问题,我们介绍了感知哈希函数来解决。
系列链接
Python图像处理【1】图像与视频处理基础
Python图像处理【2】探索Python图像处理库
Python图像处理【3】Python图像处理库应用
Python图像处理【4】图像线性变换
Python图像处理【5】图像扭曲与逆扭曲详解