同态滤波基础
同态滤波是一种去除图像中乘性噪声的技术,常用于校正图像中的不均匀照明。根据图像形成的光照反射模型,图像 f ( x , y ) f(x,y) f(x,y) 可以由以下两个分量表征:
- 入射到场景中的光源量
- 场景中对象反射的光量
根据光照反射模型模型,图像中像素的强度(即对象上的点反射的光)是场景照明和场景中对象反射的结果。傅立叶变换在加法下是线性关联的,但在乘法下并不关联。因此,傅立叶方法仅在将噪声作为原始图像的附加项建模时,才适合从图像中去除噪声。
但是,如果图像的缺陷(例如,不均匀的照明)必须建模为乘法而非加法,则直接应用傅立叶变换并不合适。此时,我们便需要使用同态滤波:首先,通过使用对数将乘法转换为加法;然后,使用对数域中的 HPF 来删除低频照明分量,同时保留高频反射率分量。
同态滤波的基本步骤如下,输入图像为 f ( x , y ) f(x,y) f(x,y),滤波器的输出为 g ( x , y ) g(x,y) g(x,y):

实现同态滤波
在本节中,我们将学习如何使用 Butterworth HPF 实现同态滤波器。
(1) 首先,导入所需 Python 库,并定义相关函数:
import cv2
import numpy as np
import matplotlib.pyplot as plt
from skimage.color import rgb2gray
from skimage.filters import sobel, threshold_otsu

def dft2(im):
    freq = cv2.dft(np.float32(im), flags = cv2.DFT_COMPLEX_OUTPUT)
    freq_shift = np.fft.fftshift(freq)
    mag, phase = freq_shift[:,:,0], freq_shift[:,:,1]
    return mag + 1j*phase

def idft2(freq):
    real, imag = freq.real, freq.imag
    back = cv2.merge([real, imag])
    back_ishift = np.fft.ifftshift(back)
    im = cv2.idft(back_ishift, flags=cv2.DFT_SCALE)
    im = cv2.magnitude(im[:,:,0], im[:,:,1])
    return im

def butterworth(sz, D0, n=1):
    h, w = sz
    u, v = np.meshgrid(range(-w//2,w//2), range(-h//2,h//2)) #, sparse=True)
    return 1 / (1 + (D0/(0.01+np.sqrt(u**2 + v**2)))**(2*n))
(2) 定义同态滤波函数,频域 H ( u , v ) H(u,v) H(u,v) 中的同态滤波器如下所示:
H ( u , v ) = ( γ H − γ L ) ( 1 1 + ( D 0 D ( u , v ) ) 2 n ) + γ L H(u,v)=(\gamma_H-\gamma_L)(\frac 1 {1+(\frac {D_0} {D(u,v)})^{2n}})+\gamma_L H(u,v)=(γH−γL)(1+(D(u,v)D0)2n1)+γL
为了避免对数域中错误操作,在输入中添加常数 1,以确保对数的输入始终 ≥1,最后,从输出中减去 1:
def homomorphic_filter(im, D0, g_l=0, g_h=1, n=1):
    im_log = np.log(im.astype(np.float)+1)
    im_fft = dft2(im_log)
    H = (g_h - g_l) * butterworth(im.shape, D0, n) + g_l
    #H = np.fft.ifftshift(H)
    im_fft_filt = H*im_fft
    #im_fft_filt = np.fft.ifftshift(im_fft_filt)
    im_filt = idft2(im_fft_filt)
    im = np.exp(im_filt.real)-1
    im = np.uint8(255*im/im.max())
    return im
(3) 读取输入图像(带有不均匀照明),将其转换为灰度图像(确保像素值在 0-255 范围内),然后通过调函数 homomorphic_filter() 应用同态滤波器。
其中,Butterworth 滤波器 n=2 阶的截止频率为 30, γ L \gamma_L γL 和 γ H \gamma_H γH 参数分别设置为 0.3 和 1:
image = rgb2gray(plt.imread('1.png'))
image_filtered = homomorphic_filter(image, D0=30, n=2, g_l=0.3, g_h=1)
(4) 使用 sobel 滤波器从原始图像中提取边缘,使用 OTSU 最佳阈值创建二值图像如下:
image_edges = sobel(image)
image_edges = image_edges <= threshold_otsu(image_edges)
(5) 使用 sobel 滤波器通过从同态滤波器转换的图像中提取边缘:
image_filtered_edges = sobel(image_filtered)
image_filtered_edges = image_filtered_edges <= threshold_otsu(image_filtered_edges)
(6) 最后,绘制输入图像和使用同态滤波器获得的输出图像,以及提取的边缘:
plt.figure(figsize=(21,17))
plt.gray()
plt.subplots_adjust(0,0,1,0.95,0.01,0.05)
plt.subplot(221), plt.imshow(image), plt.axis('off'), plt.title('original image', size=10)
plt.subplot(222), plt.imshow(image_filtered), plt.axis('off'), plt.title('filtered image', size=10)
plt.subplot(223), plt.imshow(image_edges), plt.axis('off'), plt.title('original image edges', size=10)
plt.subplot(224), plt.imshow(image_filtered_edges), plt.axis('off'), plt.title('filtered image edges', size=10)
plt.show()
输出结果如下所示:
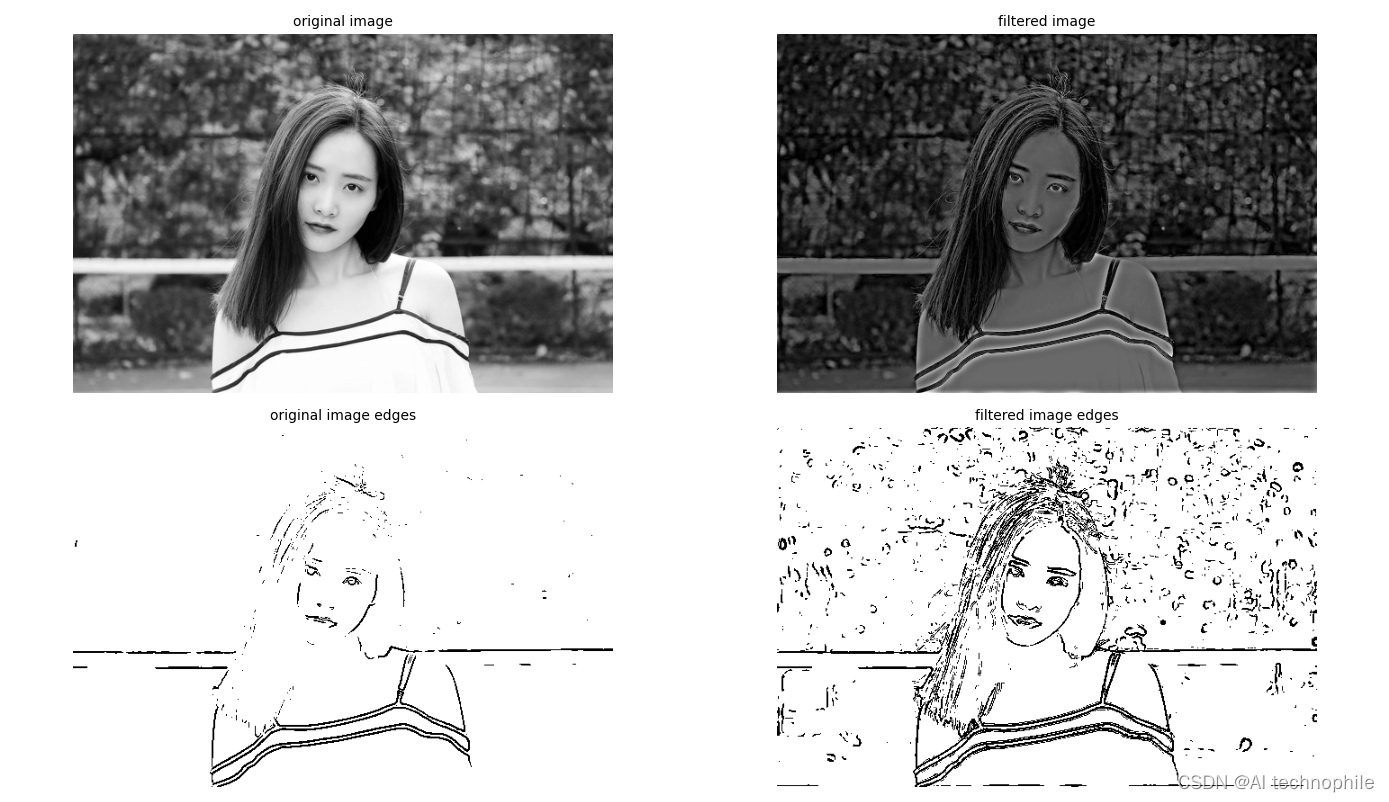
从上图中可以看出,所获得的输出图像中的光照更加均匀,从而可以看清楚原始图像中黑暗区域的细节/边缘。
相关链接
Python图像处理【1】图像与视频处理基础
Python图像处理【2】探索Python图像处理库
Python图像处理【3】Python图像处理库应用
Python图像处理【4】图像线性变换
Python图像处理【5】图像扭曲/逆扭曲
Python图像处理【7】采样、卷积与离散傅里叶变换