Vue
一、介绍
Vue.js(读⾳ /vjuː/, 类似于 view) 是⼀套构建⽤户界⾯的渐进式框架。Vue 只关注视图层, 采⽤⾃底向上增量开发的设计。
Vue 的⽬标是通过尽可能简单的 API 实现响应的数据绑定和组合的视图组件。
Vue.JS是优秀的前端 JavaScript 框架
二、作用
- 随着项⽬业务场景的复杂,传统模式(html+jquery)已⽆法满⾜需求,就出现了Angular/React/Vue等框架
企业需求、主流框架之⼀、易⽤、灵活、⾼效
最⼤程度上解放了 DOM 操作
单⻚web项⽬开发
传统⽹站开发
三、核心特征
① 解耦视图与数据
② M-V-VM模型 关注模型和视图
M:即Model,模型,包括数据和⼀些基本操作。
V:即View,视图,⻚⾯渲染结果
VM:即View-Model,模型和视图间的双向操作
③ 双向数据绑定
3.1、MVVM之前
开发⼈员从后端获取需要的数据模型,然后要通过DOM操作Model渲染到View中。⽽后当⽤户操作视图,我们还需要通过DOM获取View中的数据,然后同步到Model中
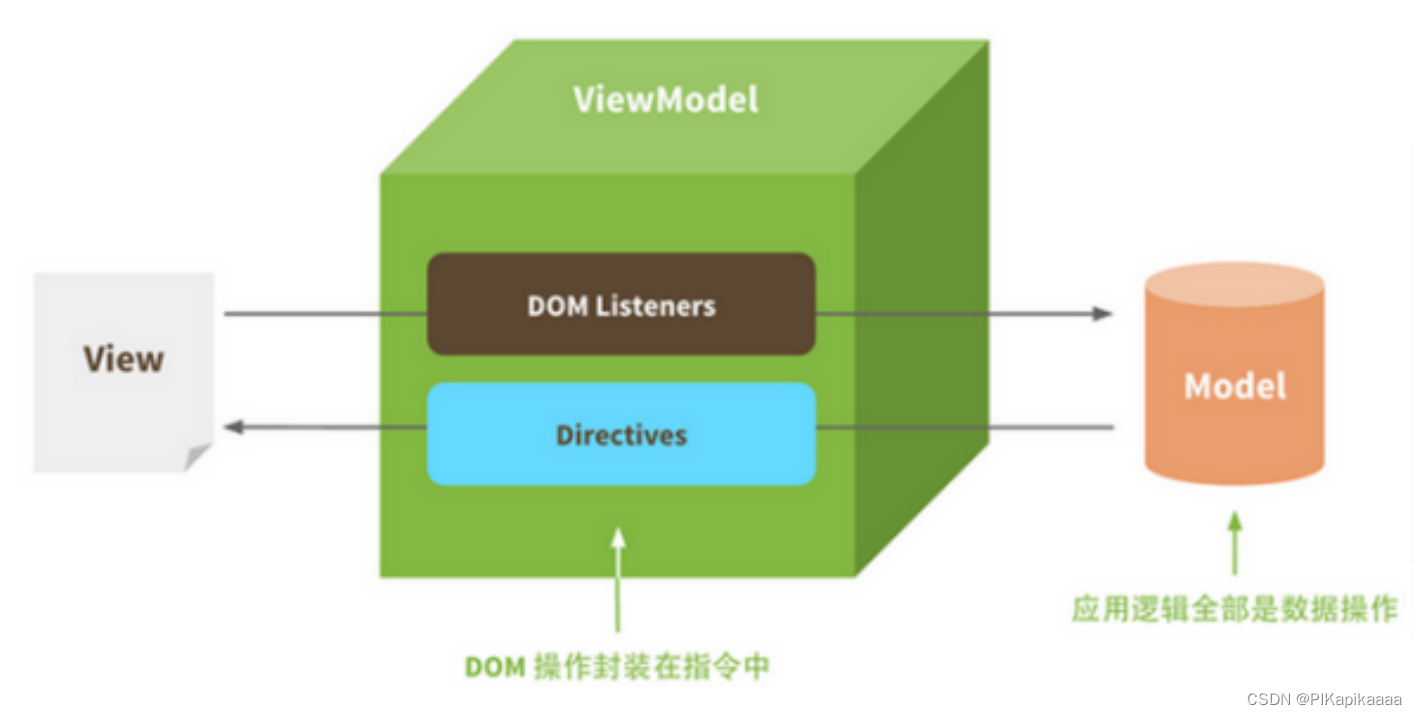
3.2、MVVM之后
⽽MVVM中的VM要做的事情就是把DOM操作完全封装起来,开发⼈员不⽤再关⼼Model和View之间是如何互相影响的:
- 只要我们Model发⽣了改变,View上⾃然就会表现出来。
- 当⽤户修改了View,Model中的数据也会跟着改变把开发⼈员从繁琐的DOM操作中解放出来,把关注点放在如何操作Model上
四、使用
4.1、下载安装
vue是⼀个前端框架,也是其实是⼀个js⽂件,下载vue.js⽂件并在⻚⾯中引⼊
vue.js的下载⽅式:
① 可以引⼊在线的vue.js(公共的CDN服务)
② 可以离线下载vue.js
开发版本: https://cdn.jsdelivr.net/npm/vue@2/dist/vue.js
⽣产版本: https://cdn.jsdelivr.net/npm/vue@2
③ npm包资源管理器,可以下载vue.js
初始化:npm init -y
安装vue:npm install vue --save
注:切记重启计算机
注意:
NPM是Node提供的模块管理⼯具,可以⾮常⽅便的下载安装很多前端框架,包括Jquery、AngularJS、
VueJs都有。为了后⾯学习⽅便,我们先安装node及NPM⼯具
node.js下载地址:https://nodejs.org/en/download/,安装完成Node应该⾃带了NPM了,在控制台
输⼊npm -v查看
注:
① 在v12.16.2以上版本就不在⽀持window7系统。
② npm默认的仓库地址是在国外⽹站,速度较慢,建议⼤家设置到淘宝镜像。但是切换镜像是⽐较麻烦
的。推荐⼀款切换镜像的⼯具:nrm
安装命令:npm install nrm -g 这⾥-g代表全局安装
查看npm的仓库列表:nrm ls
指定镜像源:nrm use taobao
测试速度:nrm test npm
4.2、实现
<!DOCTYPE html>
<html lang="en"> <head> <meta charset="UTF-8"> <title>Title</title>
    </head> <body>
    <div id="app">
        <h2>{

   {name}},欢迎你!</h2>
    </div>
    <script src="https://cdn.jsdelivr.net/npm/vue"></script>
    <script type="text/javascript">
        //⽣成⼀个Vue实例
        var app=new Vue({
            el:"#app",//el ,即是element。要渲染的⻚⾯元素
            data:{//数据
                name:"优就业"
            }
        })
    </script>
    </body>
</html>
Vue参数详解:
- body中,设置Vue管理的视图
- 引⼊vue.js
- 实例化Vue对象 new Vue();
- 设置Vue实例的选项:如el、data…
new Vue({选项:值});- 在 中通过{ { }}使⽤data中的数据
五、常见指令
指令 (Directives) 是带有 v- 前缀的特殊attribute。是Vue框架提供的语法,扩展了html标签的功能、⼤部分的指令的值是js的表达式。⽤于取代DOM操作
5.1、 v-text 和 v-html
类似innerText和innerHTML
① v-text:更新标签中的内容
② v-html:更新标签中的内容/标签
<!DOCTYPE html>
<html lang="en"> <head> <meta charset="UTF-8"> <meta name="viewport" content="width=device-width, initial-scale=1.0"> <title>Vue⼊⻔</title>
    </head> <body> <div id="app">
    <p v-text="t">这是啥</p>
    <p v-html="h">你猜</p>
    </div> <script src="./node_modules/vue/dist/vue.js"></script> <script type="text/javascript">
    const v = new Vue({


        el:"#app",
        data:{


            t:"<i>哈哈</i>",
            h:"<i>嘿嘿</i>"
        }
    })
    </script>
    </body>
</html>
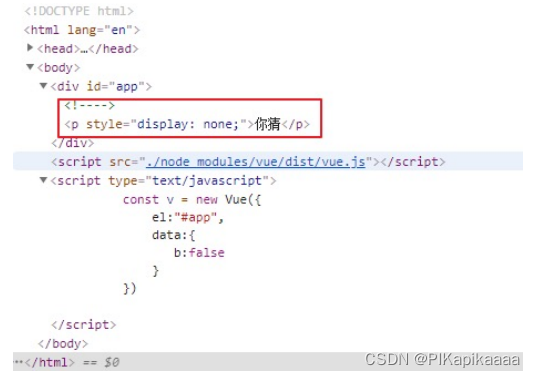
5.2、v-if 和 v-show
根据表达式的boolean值进⾏判断是否渲染该元素
<!DOCTYPE html>
<html lang="en"> <head> <meta charset="UTF-8"> <meta name="viewport" content="width=device-width, initial-scale=1.0"> <title>Vue⼊⻔</title>
    </head> <body> <div id="app">
    <p v-if="b">这是啥</p>
    <p v-show="b">你猜</p>
    </div> <script src="./node_modules/vue/dist/vue.js"></script> <script type="text/javascript">
    const v = new Vue({


        el:"#app",
        data:{


            b:false
        }
    })
    </script>
    </body>
</html>
- 效果:
5.3、v-on
① 作⽤:使⽤ v-on 指令绑定 DOM 事件,并在事件被触发时执⾏⼀些 JavaScript 代码。
② 语法:
v-on:事件名.修饰符 = “methods中的⽅法名”;
v-on的简写⽅法: @事件名.修饰符 = “methods中的⽅法名”;
<!DOCTYPE html>
<html lang="en"> <head> <meta charset="UTF-8"> <meta name="viewport" content="width=device-width, initial-scale=1.0"> <title>Vue⼊⻔</title>
    </head> <body> <div id="app">
    <button v-on:click="num++">按钮01</button><br />{

   {num}}
    <hr>
    <button @click="fn1()">按钮02</button>
    <button @click="fn2(num)">按钮03</button>
    <button @click="fn3">按钮04</button>
    </div> <script src="./node_modules/vue/dist/vue.js"></script> <script type="text/javascript">
    const v = new Vue({


        el:"#app",
        data:{


            num:0
        },
        methods:{


            fn1:function(){


                console.info("fn1 调⽤了。。。"+this.num);
                this.num++;
            },
            fn2:function(n){


                console.info("fn2 调⽤了...."+n);
            },
            fn3:function(){


                console.info("fn3 调⽤了....");
            }
        }
    })
    </script>
    </body>
</html>
5.4、v-for
① 作⽤:列表渲染,当遇到相似的标签结构时,就⽤v-for去渲染
② 格式:
【1】(item,index) in 数组或集合
参数item:数组中的每个元素
参数index:数组中元素的下标
【2】(value, key, index) in 对象
参数index:对象中每对key-value的索引 从0开始
参数key:键
参数value:值
<!DOCTYPE html>
<html lang="en"> <head> <meta charset="UTF-8"> <meta name="viewport" content="width=device-width, initial-scale=1.0"> <title>Vue⼊⻔</title>
    </head> <body> <div id="app">
    <!-- 遍历数组 -->
    <table border="1">
        <!-- <tr v-for="item in userList"></tr> -->
        <tr v-for="(item, index) in userList">
            <td>{

   {index}}</td>
            <td>{

   {item.id}}</td>
            <td>{

   {item.username}}</td>
            <td>{

   {item.age}}</td>
        </tr>
    </table>
    <!-- 遍历对象 -->
    <!-- 直接访问 -->
    <form action="">
        <p><label>id:<input type="text" v-model="user.id"></label></p>
        <p><label>⽤户名:<input type="text" v-model="user.username"></label></p>
        <p><label>年龄:<input type="text" v-model="user.age"></label></p>
    </form>
    <!-- 遍历 -->
    <form action="">
        <!-- <p v-for="value in user"> -->
        <p v-for="(value, key, index) in user">
            <label>{

   {index}}-{

   {key}}:<input type="text" v-model="user[key]">
            </label>
        </p>
    </form>
    </div> <script src="./node_modules/vue/dist/vue.js"></script> <script type="text/javascript">
    const v = new Vue({


        el:"#app",
        data: {


            userList: [
                {

       id: 1, username: 'helen', age: 18 },
                {

       id: 2, username: 'peter', age: 28 },
                {

       id: 3, username: 'andy', age: 38 }
            ],
            user:{


                id: 1,
                username: 'helen',
                age: 18
            }
        }
    })
    </script>
    </body>
</html>
5.5、v-bind
① 作⽤: 可以绑定标签上的任何属性
② 格式:v-bind:属性=“值”
③ 简写格式::属性=“值”
④ 属性值⼀部分进⾏替换的格式::属性=“‘常量值’ + vue对象data中的数据”
<!DOCTYPE html>
<html lang="en"> <head> <meta charset="UTF-8"> <meta name="viewport" content="width=device-width, initial-scale=1.0"> <title>Vue⼊⻔</title>
    </head> <body> <div id="app">
    <font v-bind:color="v1">有就业</font>
    <font :color="v2">这是v-bind</font>
    <a :href="'http://'+u">百度</a>
    </div> <script src="./node_modules/vue/dist/vue.js"></script> <script type="text/javascript">
    const v = new Vue({


        el:"#app",
        data:{


            v1:"red",
            v2:"yellow",
            u:"www.baidu.com"
        }
    })
    </script>
    </body>
</html>
5.6、v-model
① 作⽤:表单元素的绑定
② 特点:双向数据绑定
(1)vue对象中的数据发⽣变化可以更新到界⾯
(2)通过界⾯可以更改vue对象中数据
(3)v-model 会忽略所有表单元素的 value、 checked 、 selected 特性的初始值⽽总是将 Vue 实
例的数据作为数据来源。应该在data选项中声明初始值。
<!DOCTYPE html>
<html lang="en"> <head> <meta charset="UTF-8"> <meta name="viewport" content="width=device-width, initial-scale=1.0"> <title>Vue⼊⻔</title>
    </head> <body> <div id="app">
    <form>
        ⽤户名:<input type="text" v-model="user.name"><br>
        ⽤户名:<input type="text" v-model="v"><br>
        密码:<input type="password" v-model="user.password"><br>
        <input type="button" @click="fun1" value="获取">
        <input type="button" @click="fun2" value="修改">
    </form>
    </div> <script src="./node_modules/vue/dist/vue.js"></script> <script type="text/javascript">
    const v = new Vue({


        el:"#app",
        data:{


            user:{

      name:"root",password:"1234"},
            v:"hehe"
        },
        methods:{


            fun1:function(){


                console.info(this.user.name);
                console.info(this.user.password);
            },
            fun2:function(){


                this.user.name="admin";
                this.user.password="111";
            }
        }
    })
    </script>
    </body>
</html>
5.7、计算属性
在插值表达式中使⽤js表达式是⾮常⽅便的,⽽且也经常被⽤到。
但是如果表达式的内容很⻓,就会显得不够优雅,⽽且后期维护起来也不⽅便
<!DOCTYPE html>
<html lang="en"> <head> <meta charset="UTF-8"> <meta name="viewport" content="width=device-width, initial-scale=1.0"> <title>Vue⼊⻔</title>
    </head> <body> <div id="app">
    {

   {message}}
    <p>{

   {birthday}}</p>
    没计算属性:<p>{

   {new Date(birthday).getFullYear() + '-'+ new
    Date(birthday).getMonth()+1+ '-' + new Date(birthday).getDate()}}</p>
    计算属性:<p>{

   {getBirth}}</p>
    </div> <script src="./node_modules/vue/dist/vue.js"></script> <script type="text/javascript">
    const v = new Vue({


        el:"#app",
        data:{


            message:"",
            birthday:1610669793429
        },
        created(){


            this.message = "创建啦.....";
            console.info(this);
        },
        computed:{


            getBirth(){


                const d = new Date(this.birthday);
                return d.getFullYear() + "-" + d.getMonth()+1 + "-" + d.getDate();
            }
        }
    })
    </script>
    </body>
</html>
5.8、watch
watch可以让我们监控⼀个值的变化。从⽽做出相应的反应。
<!DOCTYPE html>
<html lang="en"> <head> <meta charset="UTF-8"> <meta name="viewport" content="width=device-width, initial-scale=1.0"> <title>Vue⼊⻔</title>
    </head> <body> <div id="app">
    <input type="text" v-model="hello">
    </div> <script src="./node_modules/vue/dist/vue.js"></script> <script type="text/javascript">
    const v = new Vue({


        el:"#app",
        data:{


            hello:""
        },
        watch:{


            hello(newVal, oldVal){


                console.log(newVal, oldVal);
            }
        }
    })
    </script>
    </body>
</html>
查看控制台
六、生命周期
6.1、概念
每个 Vue 实例在被创建时都要经过⼀系列的初始化过程 :创建实例,装载模板,渲染模板等等。Vue为⽣命周期中的每个状态都设置了钩⼦函数(监听函数)。每当Vue实例处于不同的⽣命周期时,对应的函数就会被触发调⽤。
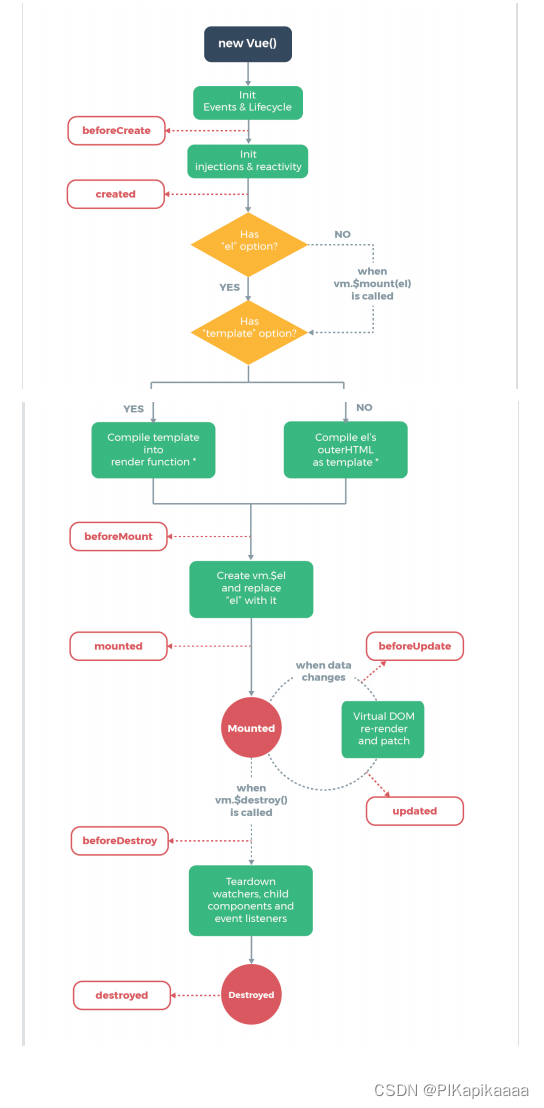
6.2、钩子函数
如:created代表在vue实例创建后;我们可以在Vue中定义⼀个created函数,代表这个时期的构造函数:
<!DOCTYPE html>
<html lang="en"> <head> <meta charset="UTF-8"> <meta name="viewport" content="width=device-width, initial-scale=1.0"> <title>Vue⼊⻔</title>
    </head> <body> <div id="app">
    {

   {message}}
    </div> <script src="./node_modules/vue/dist/vue.js"></script> <script type="text/javascript">
    const v = new Vue({


        el:"#app",
        data:{


            message:""
        },
        created(){


            this.message = "创建啦.....";
        }
    })
    </script>
    </body>
</html>
七、组件
7.1、定义全局组件
我们通过Vue的component⽅法来定义⼀个全局组件。
<!DOCTYPE html>
<html lang="en"> <head> <meta charset="UTF-8"> <meta name="viewport" content="width=device-width, initial-scale=1.0"> <title>Vue⼊⻔</title>
    </head> <body> <div id="app">
    <!--使⽤定义好的组件-->
    <con></con>
    </div> <script src="./node_modules/vue/dist/vue.js"></script> <script type="text/javascript">
    // 参数1:组件名 参数2:组件参数
    Vue.component("con",{


        template:"<button @click='count++'>点我啊--{

      {count}}</button>",
        data(){


            return {


                count:0
            }
        }
    })
    const v = new Vue({


        el:"#app"
    })
    </script>
    </body>
</html>
特点:
组件其实也是⼀个Vue实例,因此它在定义时也会接收:data、methods、⽣命周期函数等
不同的是组件不会与⻚⾯的元素绑定,否则就⽆法复⽤了,因此没有el属性。
但是组件渲染需要html模板,所以增加了template属性,值就是HTML模板
全局组件定义完毕,任何vue实例都可以直接在HTML中通过组件名称来使⽤组件了。
data的定义⽅式⽐较特殊,必须是⼀个函数。
注:定义组件要在Vue对象之前声明
7.2、定义局部组件
⼀旦全局注册,就意味着即便以后你不再使⽤这个组件,它依然会随着Vue的加载⽽加载。因此,对于⼀些并
不频繁使⽤的组件,我们会采⽤局部注册。
<!DOCTYPE html>
<html lang="en"> <head> <meta charset="UTF-8"> <meta name="viewport" content="width=device-width, initial-scale=1.0"> <title>Vue⼊⻔</title>
    </head> <body> <div id="app">
    <conn></conn>
    </div> <script src="./node_modules/vue/dist/vue.js"></script> <script type="text/javascript">
    // 局部组件
    const conn = {


        template:"<button @click='count1++'>点我⼲啥 都{

      {count1}}次了</button>",
        data(){


            return {


                count1:0
            }
        }
    }
    const v = new Vue({


        el:"#app",
        components:{


            conn:conn //
        }
    })
    </script>
    </body>
</html>
- components就是当前vue对象⼦组件集合。
其key就是⼦组件名称
其值就是组件对象的属性
效果与刚才的全局注册是类似的,不同的是,这个conn组件只能在当前的Vue实例中使⽤
注:定义组件要在Vue对象之前声明
八、Vue的Ajax(axios)
在Vue.js中发送⽹络请求本质还是ajax,我们可以使⽤插件⽅便操作。
1、vue-resource: Vue.js的插件,已经不维护,不推荐使⽤
2、 axios :不是vue的插件,可以在任何地⽅使⽤,推荐
3、通过Http请求的不同类型(POST/DELETE/PUT/GET)来判断是什么业务操作(CRUD ) HTTP⽅法规则举例
说明:
① POST Create 新增⼀个没有id的资源
② GET Read 取得⼀个资源
③ PUT Update 更新⼀个资源。或新增⼀个含 id 资源(如果 id 不存在)
④ DELETE Delete 删除⼀个资源
8.1、安装
⽅式1:使⽤npm安装
命令:npm install axios
⽅式2:使⽤cdn链接axios
8.2、axios请求
axios({


    // 请求⽅式
    method: 'post',
    url: 'api',
    // 传递参数
    data: obj, // URLSearchParam()
    // 设置请求头信息
    headers: {


        key: value
    },
    responseType: 'json'
}).then(response => {


    // 请求成功
    let res = response.data;
    console.log(res);
}).catch(error => {


    // 请求失败,
    console.log(error);
});
8.3、Get请求
axios.get('/user?id=12345')
    .then(response => {


    console.log(response.data);
})
    .catch(error => {


    console.dir(error)
});
8.4、Post请求
axios.post('/user', "URLSearchParams") .then(response => {


    console.log(response.data);
})
    .catch(error => {


    console.dir(err)
});
补充
为⽅便起⻅,为所有⽀持的请求⽅法提供了别名
- axios.request(confifig)
- axios.get(url[, confifig])
- axios.delete(url[, confifig])
- axios.head(url[, confifig])
- axios.post(url[, data[, confifig]])
- axios.put(url[, data[, confifig]])
- axios.patch(url[, data[, confifig]])
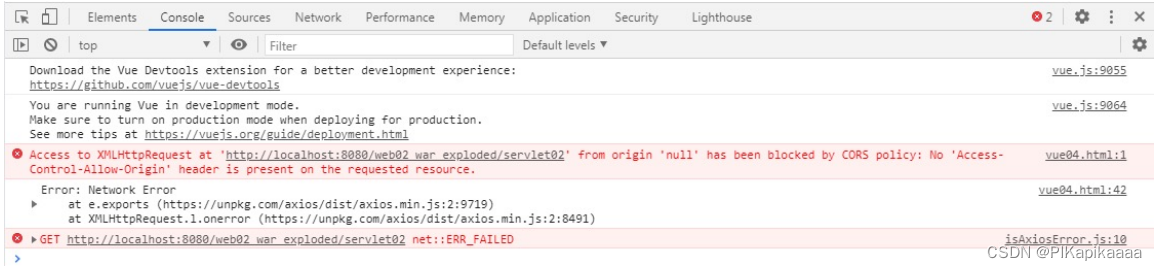
8.5、跨域问题
- 什么是跨域?
指的是浏览器不能执⾏其他⽹站的脚本。它是由浏览器的同源策略造成的,是浏览器对javascript施加的安全限制。
- 什么是同源策略?
是指协议,域名,端⼝都要相同,其中有⼀个不同都会产⽣跨域,在请求数据时,浏览器会在控制台中报一个异常,提示拒绝访问。
- 跨域问题怎么出现的?
开发⼀些前后端分离的项⽬,⽐如使⽤ Servlet + Vue 开发时,后台代码在⼀台服务器上启动,前台代码在另外⼀台电脑上启动,此时就会出现问题。
⽐如:
后台 地址为 http://192.168.70.77:8081
前台 地址为 http://192.168.70.88:8080
此时 ip 与 端⼝号不⼀致, 不符合同源策略,造成跨域问题。
跨域前端错误演示
解决方法
- 后端解决(自定义过滤器)
⽅式1:后台解决(⾃定义过滤器)
 HttpServletResponse response = (HttpServletResponse) resp;
 HttpServletRequest request = (HttpServletRequest) req;
 // 不使⽤*,⾃动适配跨域域名,避免携带Cookie时失效
 String origin = request.getHeader("Origin");
 response.setHeader("Access-Control-Allow-Origin", origin);
 // ⾃适应所有⾃定义头
 String headers = request.getHeader("Access-Control-Request-Headers");
 response.setHeader("Access-Control-Allow-Headers", headers);
 response.setHeader("Access-Control-Expose-Headers", headers);
 // 允许跨域的请求⽅法类型
 response.setHeader("Access-Control-Allow-Methods", "*");
 // 预检命令(OPTIONS)缓存时间,单位:秒
 response.setHeader("Access-Control-Max-Age", "3600");
 // 明确许可客户端发送Cookie,不允许删除字段即可
 response.setHeader("Access-Control-Allow-Credentials", "true");
 chain.doFilter(request, response);
- 前端解决
① ⾸先npm安装好axios,其次在main.js中引⼊
import axios from 'axios'
//把axios挂载到vue的原型中,在vue中每个组件都可以使⽤axios发送请求
Vue.prototype.$axios = axios
//重要在于这⾥,Vue.prototype.HOME = '/api'是⼀个定值,默认指向localhost,所有修改
指向路径为'/api',配置⽂件index.js定义的可跨域路径
Vue.prototype.HOME = '/api'
② 修改上述所说的config>index.js配置⽂件
module.exports = {


    dev: {


        // Paths
        assetsSubDirectory: 'static',
        assetsPublicPath: '/',
        proxyTable: {

     //axios跨域处理
            '/api': {

     //此处并⾮和url⼀致
                target:'http://192.168.2.80:8081/',
                changeOrigin:true, //允许跨域
                pathRewrite:{


                    '^/api': ''
                }
            }
        }
    }
    ③ 在⽂件中发送axios
    <template>
    <div id="app">
    <button @click="fn">点击发送axios</button>
    <router-view/>
    </div>
    </template>
    <script>
    export default {


    name: 'App',
    methods:{


    fn:function(){


        this.$axios.get(this.HOME+'/web02_war_exploded/servlet02')
            .then(response => {


            console.log(response.data);
        })
            .catch(error => {


            console.dir(error)
        });
    }
}
}
    </script>