本文通过Stateflow对LKA系统状态机进行建模,从而学习更复杂的Stateflow建模方法。
文章目录
1 LKA系统功能
LKA(车道保持辅助)是博主最喜欢的ADAS功能。在高速上车速超过60km/h就可以激活LKA功能,辅助驾驶员对车辆进行横向控制。本文以LKA的系统功能为例,研究Stateflow的更加复杂的建模方法。由于实际开发中需要考虑的因素很多,博主在本文中将LKA状态的跳转条件做一定的简化,只为了达到学习的效果即可。
在GB/T 39323-2020<乘用车车道保持辅助(LKA)系统性能要求及试验方法>中可以找到以下一张图片。
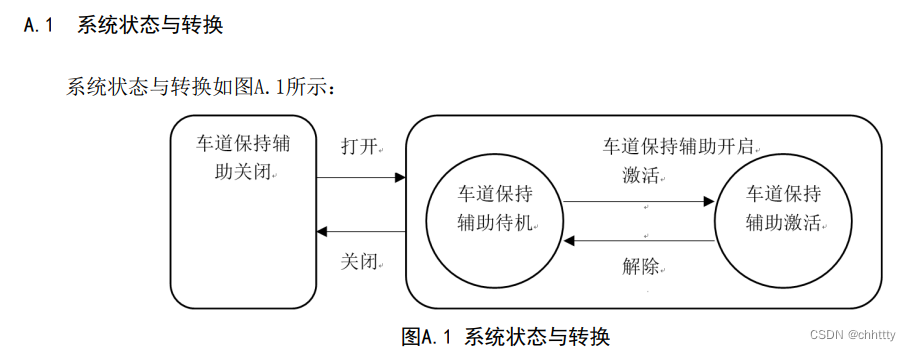
该图片表明了LKA的系统状态与转换的过程,其中包含两个主状态:关闭状态和开启状态。在开启状态中,又包含了两个子状态:待机状态和激活状态。接下来会以这张图为依据进行状态机建模。
注意:实际工作中应该按照客户的系统功能规范进行建模。
2 状态跳转条件
2.1 主状态跳转条件
在外层主状态的关闭和开启状态的跳转条件应该是由用户在中控屏上开启或关闭LKA开关来决定,然后HMI节点通过CAN信号发送到ADAS控制器节点上。
1)关闭 —> 开启
CAN_LKASwitch = True;
2)开启 —> 关闭
CAN_LKASwitch = False;
2.2 子状态跳转条件
在子状态中,待机状态和激活状态之间的跳转条件比较复杂,在实际工作中可能会由十几种因素来决定。这里博主对细分条件做一点简化处理。
1)待机 —> 激活
- 车速大于60km/h
- 未打开转向灯
- 制动踏板未踩下
同时满足以上三个条件(AND关系),并保持1s,由待机进入激活状态。
CAN_VehicleSpeed >= single(60) &&
CAN_TurnSignal == OFF &&
CAN_BrakePedal == OFF
2)激活 —> 待机
- 车速小于60km/h
- 打开转向灯
- 制动踏板踩下
满足以上三个条件任意一个(OR关系),并保持1s,由激活进入待机状态。
CAN_VehicleSpeed < single(60) ||
CAN_TurnSignal == ON ||
CAN_BrakePedal == ON
注意1:待机和激活切换过程中,要求保持1秒是因为防止条件不断变化而导致的状态频繁切换,例如车速在60km/h附近抖动,状态机就会反复输出Standby和Active。
注意2:实际开发中,制动踏板和转向灯条件属于超控状态的条件,这里把它们作为激活条件是为了学习建模方法。
3 Simulink建模
3.1 模型架构
分析了LKA系统状态和跳转条件后,就可以着手用Simulink/Stateflow对状态机进行建模。
首先模型最顶层封装成一个子系统,方便直观地看到输入输出信息,也方便后续对子系统进行单元测试。
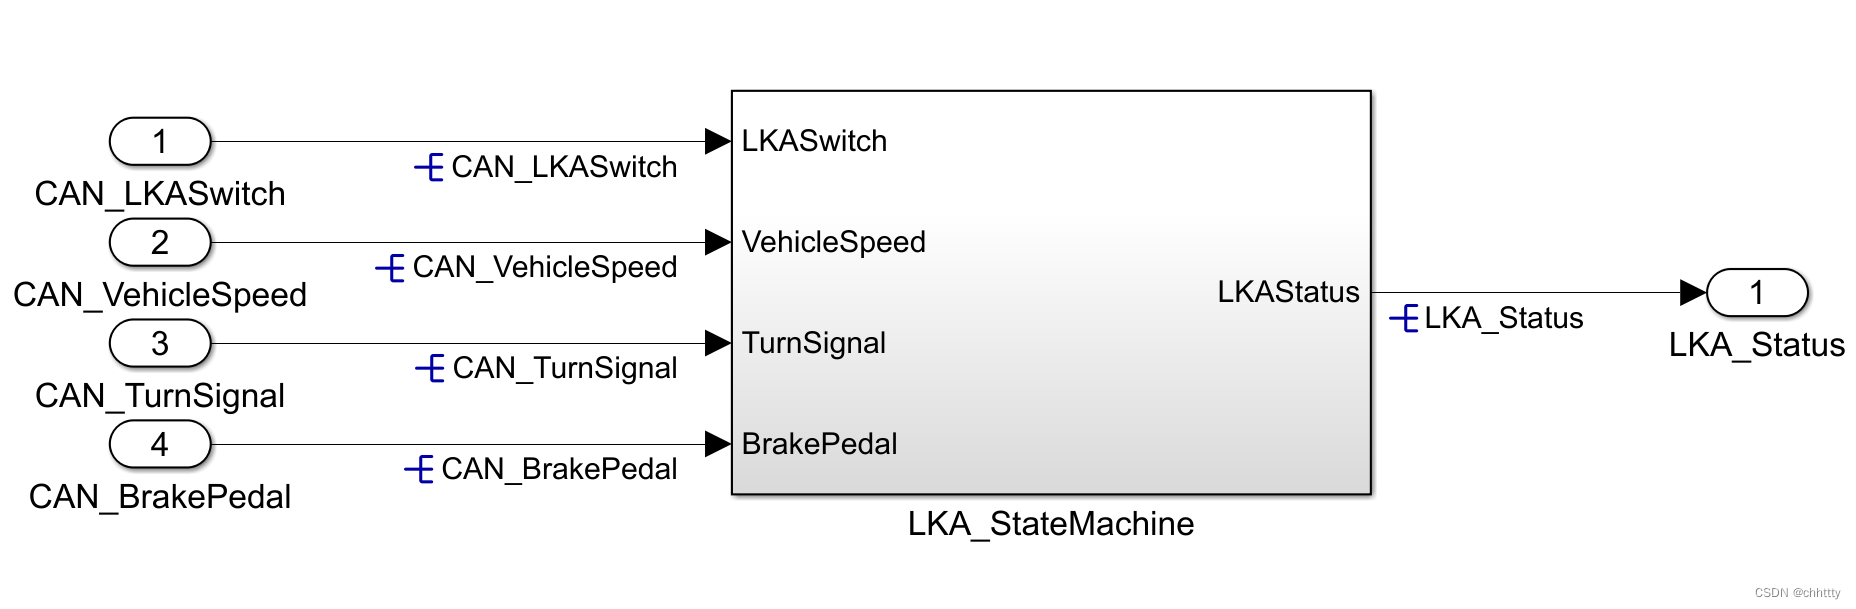
顶层的子系统中划分成一个条件判断子系统和一个状态机如下。
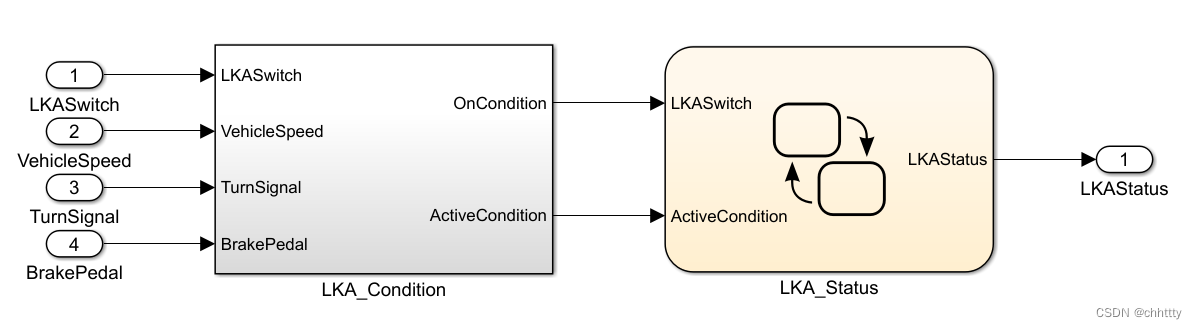
其中,LKA_Condition子系统用于接收车辆信号来判断LKA的开关条件和激活条件。LKA_Status状态机用来输出LKA状态,包含关闭、待机和激活状态。
其实,LKA_Condition的过程也可以合并到后面的LKA_Status状态机中一起实现,但是由于实际过程中Active条件会很复杂,所以单独拿出来会使后面的状态机比较简洁。
3.2 LKA_Condition
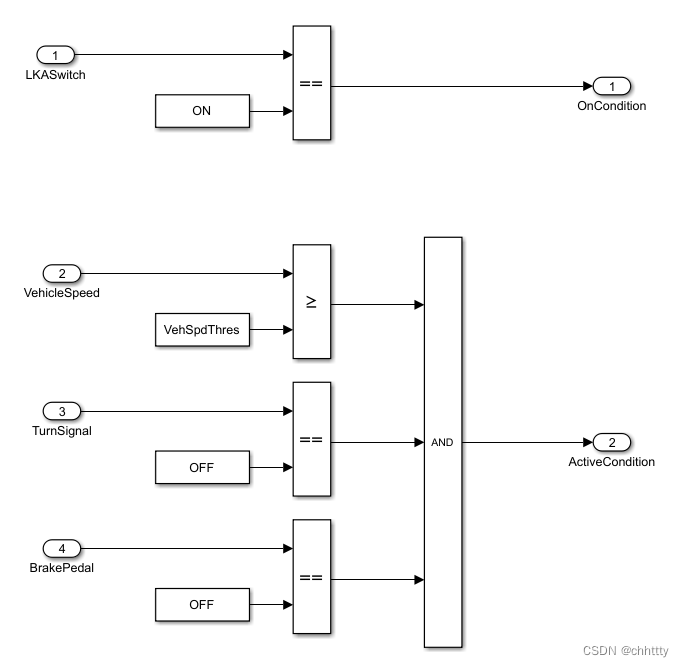
在LKA_Condition模块中接收4个信号,通过关系判断和逻辑判断,从而输出OnCondition和ActiveCondition为True还是False。
逻辑很简单,解释如下:
- 当 LKASwitch等于ON时,OnCondition输出为 TRUE;
- 当 (VehicleSpeed大于VehSpdThres)且(TurnSignal等于OFF)且(BrakePedal等于OFF)时,ActiveCondition输出为TRUE;
3.3 LKA_Status
在LKA_Status模块中,就对应了图A.1的状态转换,实现方式如下:
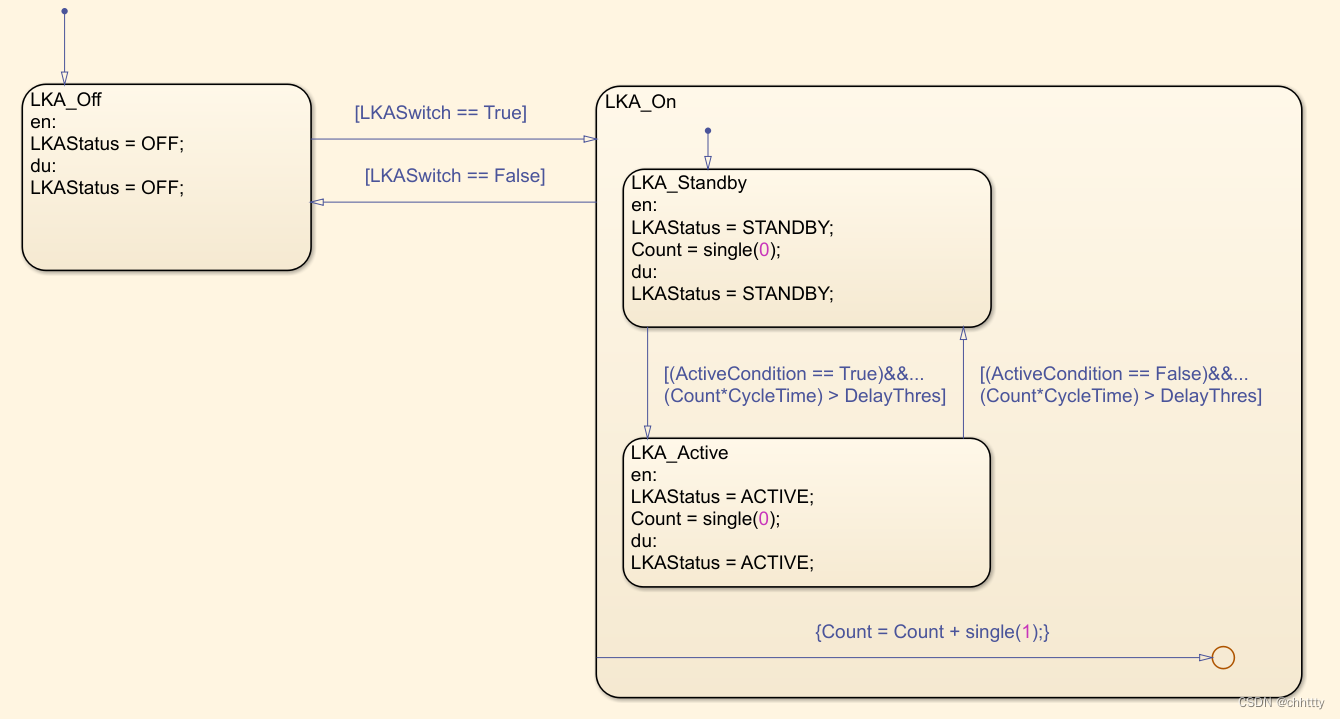
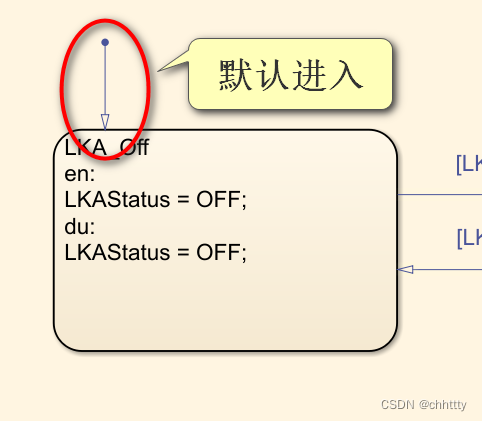
1)首先,默认进入LKA_Off状态中,输出OFF;
2)当LKASwitch == True条件满足时,从OFF状态跳转到On状态,并默认进入子状态Standby;
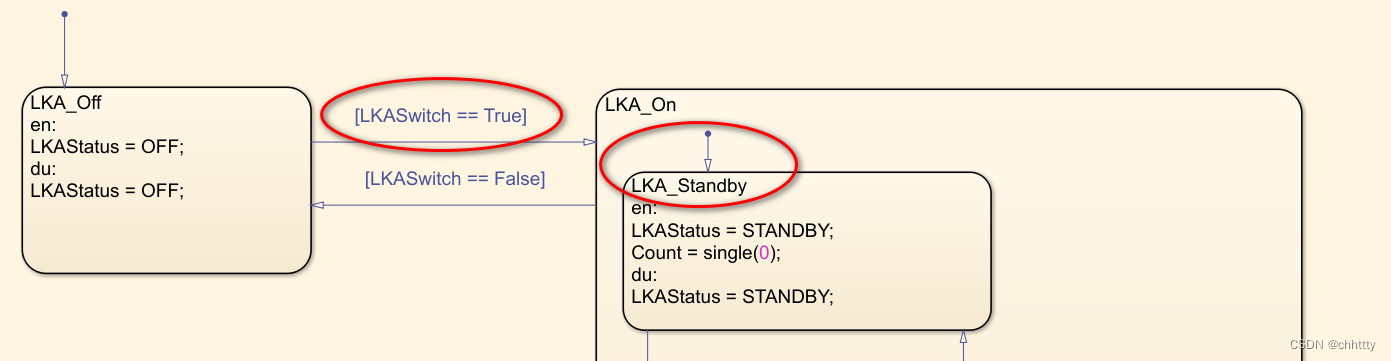
此时输出STANDBY;
3)通过Standby状态跳转到Active状态需要满足ActiveCondition == True并保持1s;

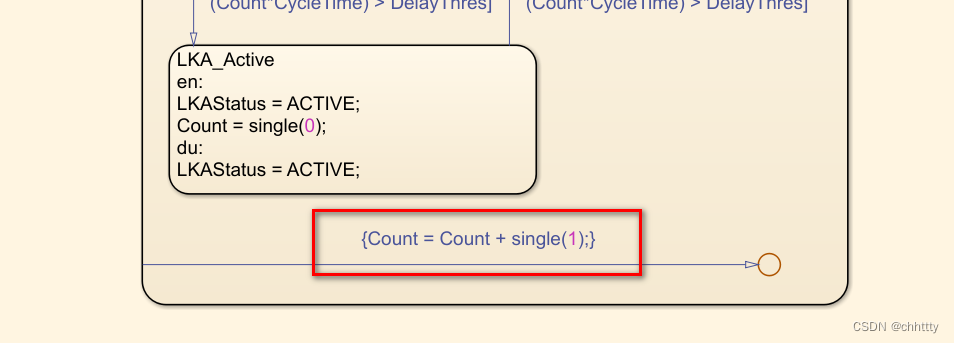
其中的Count变量是一个本地变量,是每个周期加1的计数器。当进入Standby或Active状态时都会将其清零,从而通过Count变量可以体现出在当前的状态中持续了多少个周期。
这样就简单地实现了LKA系统状态机的功能。
4 数据字典
上文用到的数据字典,包括观测量、常量、标定量等都由下面的脚本定义。
ACTIVE = Simulink.Parameter;
ACTIVE.Value = 2;
ACTIVE.CoderInfo.StorageClass = 'Custom';
ACTIVE.CoderInfo.Alias = '';
ACTIVE.CoderInfo.Alignment = -1;
ACTIVE.CoderInfo.CustomStorageClass = 'Define';
ACTIVE.CoderInfo.CustomAttributes.HeaderFile = '';
ACTIVE.Description = '';
ACTIVE.DataType = 'uint8';
ACTIVE.Min = [];
ACTIVE.Max = [];
ACTIVE.DocUnits = '';

CAN_BrakePedal = Simulink.Signal;
CAN_BrakePedal.CoderInfo.StorageClass = 'ImportedExtern';
CAN_BrakePedal.CoderInfo.Alias = '';
CAN_BrakePedal.CoderInfo.Alignment = -1;
CAN_BrakePedal.Description = '';
CAN_BrakePedal.DataType = 'boolean';
CAN_BrakePedal.Min = [];
CAN_BrakePedal.Max = [];
CAN_BrakePedal.DocUnits = '';
CAN_BrakePedal.Dimensions = -1;
CAN_BrakePedal.DimensionsMode = 'auto';
CAN_BrakePedal.Complexity = 'auto';
CAN_BrakePedal.SampleTime = -1;
CAN_BrakePedal.InitialValue = '';

CAN_LKASwitch = Simulink.Signal;
CAN_LKASwitch.CoderInfo.StorageClass = 'ImportedExtern';
CAN_LKASwitch.CoderInfo.Alias = '';
CAN_LKASwitch.CoderInfo.Alignment = -1;
CAN_LKASwitch.Description = '';
CAN_LKASwitch.DataType = 'boolean';
CAN_LKASwitch.Min = [];
CAN_LKASwitch.Max = [];
CAN_LKASwitch.DocUnits = '';
CAN_LKASwitch.Dimensions = -1;
CAN_LKASwitch.DimensionsMode = 'auto';
CAN_LKASwitch.Complexity = 'auto';
CAN_LKASwitch.SampleTime = -1;
CAN_LKASwitch.InitialValue = '';

CAN_TurnSignal = Simulink.Signal;
CAN_TurnSignal.CoderInfo.StorageClass = 'ImportedExtern';
CAN_TurnSignal.CoderInfo.Alias = '';
CAN_TurnSignal.CoderInfo.Alignment = -1;
CAN_TurnSignal.Description = '';
CAN_TurnSignal.DataType = 'boolean';
CAN_TurnSignal.Min = [];
CAN_TurnSignal.Max = [];
CAN_TurnSignal.DocUnits = '';
CAN_TurnSignal.Dimensions = -1;
CAN_TurnSignal.DimensionsMode = 'auto';
CAN_TurnSignal.Complexity = 'auto';
CAN_TurnSignal.SampleTime = -1;
CAN_TurnSignal.InitialValue = '';

CAN_VehicleSpeed = Simulink.Signal;
CAN_VehicleSpeed.CoderInfo.StorageClass = 'ImportedExtern';
CAN_VehicleSpeed.CoderInfo.Alias = '';
CAN_VehicleSpeed.CoderInfo.Alignment = -1;
CAN_VehicleSpeed.Description = '';
CAN_VehicleSpeed.DataType = 'single';
CAN_VehicleSpeed.Min = [];
CAN_VehicleSpeed.Max = [];
CAN_VehicleSpeed.DocUnits = '';
CAN_VehicleSpeed.Dimensions = -1;
CAN_VehicleSpeed.DimensionsMode = 'auto';
CAN_VehicleSpeed.Complexity = 'auto';
CAN_VehicleSpeed.SampleTime = -1;
CAN_VehicleSpeed.InitialValue = '';

CycleTime = Simulink.Parameter;
CycleTime.Value = 0.05;
CycleTime.CoderInfo.StorageClass = 'Custom';
CycleTime.CoderInfo.Alias = '';
CycleTime.CoderInfo.Alignment = -1;
CycleTime.CoderInfo.CustomStorageClass = 'Define';
CycleTime.CoderInfo.CustomAttributes.HeaderFile = '';
CycleTime.Description = '';
CycleTime.DataType = 'single';
CycleTime.Min = [];
CycleTime.Max = [];
CycleTime.DocUnits = '';

DelayThres = Simulink.Parameter;
DelayThres.Value = 1;
DelayThres.CoderInfo.StorageClass = 'Custom';
DelayThres.CoderInfo.Alias = '';
DelayThres.CoderInfo.Alignment = -1;
DelayThres.CoderInfo.CustomStorageClass = 'Define';
DelayThres.CoderInfo.CustomAttributes.HeaderFile = '';
DelayThres.Description = '';
DelayThres.DataType = 'single';
DelayThres.Min = [];
DelayThres.Max = [];
DelayThres.DocUnits = '';

False = Simulink.Parameter;
False.Value = 0;
False.CoderInfo.StorageClass = 'Custom';
False.CoderInfo.Alias = '';
False.CoderInfo.Alignment = -1;
False.CoderInfo.CustomStorageClass = 'Define';
False.CoderInfo.CustomAttributes.HeaderFile = '';
False.Description = '';
False.DataType = 'boolean';
False.Min = [];
False.Max = [];
False.DocUnits = '';

LKA_Status = Simulink.Signal;
LKA_Status.CoderInfo.StorageClass = 'ExportedGlobal';
LKA_Status.CoderInfo.Alias = '';
LKA_Status.CoderInfo.Alignment = -1;
LKA_Status.Description = '';
LKA_Status.DataType = 'uint8';
LKA_Status.Min = [];
LKA_Status.Max = [];
LKA_Status.DocUnits = '';
LKA_Status.Dimensions = -1;
LKA_Status.DimensionsMode = 'auto';
LKA_Status.Complexity = 'auto';
LKA_Status.SampleTime = -1;
LKA_Status.InitialValue = '';

OFF = Simulink.Parameter;
OFF.Value = 0;
OFF.CoderInfo.StorageClass = 'Custom';
OFF.CoderInfo.Alias = '';
OFF.CoderInfo.Alignment = -1;
OFF.CoderInfo.CustomStorageClass = 'Define';
OFF.CoderInfo.CustomAttributes.HeaderFile = '';
OFF.Description = '';
OFF.DataType = 'boolean';
OFF.Min = [];
OFF.Max = [];
OFF.DocUnits = '';

ON = Simulink.Parameter;
ON.Value = 1;
ON.CoderInfo.StorageClass = 'Custom';
ON.CoderInfo.Alias = '';
ON.CoderInfo.Alignment = -1;
ON.CoderInfo.CustomStorageClass = 'Define';
ON.CoderInfo.CustomAttributes.HeaderFile = '';
ON.Description = '';
ON.DataType = 'boolean';
ON.Min = [];
ON.Max = [];
ON.DocUnits = '';

STANDBY = Simulink.Parameter;
STANDBY.Value = 1;
STANDBY.CoderInfo.StorageClass = 'Custom';
STANDBY.CoderInfo.Alias = '';
STANDBY.CoderInfo.Alignment = -1;
STANDBY.CoderInfo.CustomStorageClass = 'Define';
STANDBY.CoderInfo.CustomAttributes.HeaderFile = '';
STANDBY.Description = '';
STANDBY.DataType = 'uint8';
STANDBY.Min = [];
STANDBY.Max = [];
STANDBY.DocUnits = '';

True = Simulink.Parameter;
True.Value = 1;
True.CoderInfo.StorageClass = 'Custom';
True.CoderInfo.Alias = '';
True.CoderInfo.Alignment = -1;
True.CoderInfo.CustomStorageClass = 'Define';
True.CoderInfo.CustomAttributes.HeaderFile = '';
True.Description = '';
True.DataType = 'uint8';
True.Min = [];
True.Max = [];
True.DocUnits = '';

VehSpdThres = Simulink.Parameter;
VehSpdThres.Value = 60;
VehSpdThres.CoderInfo.StorageClass = 'Custom';
VehSpdThres.CoderInfo.Alias = '';
VehSpdThres.CoderInfo.Alignment = -1;
VehSpdThres.CoderInfo.CustomStorageClass = 'Define';
VehSpdThres.CoderInfo.CustomAttributes.HeaderFile = '';
VehSpdThres.Description = '';
VehSpdThres.DataType = 'single';
VehSpdThres.Min = [];
VehSpdThres.Max = [];
VehSpdThres.DocUnits = '';
5 总结
本文通过LKA状态转移,研究了Stateflow稍微复杂地用法,但相比实际工作依然是很简单的。本文建模后博主也没有做过验证,可能会由隐藏的bug在其中,后续会写一些关于单元测试的博客,来测试一下这个模块。