前言
今天给大家带来详细的智能合约投票
一、开发环境
- Ubuntu18.04
- npm
- node111.10.0
- ganache
- metamask
二、开发步骤
1.合约编写
不管创建什么project,都想考虑清楚这个project的需求!
这里编写Voting.sol
// SPDX-License-Identifier: MIT
pragma solidity >=0.4.21 <0.7.0;

contract Voting {


    bytes32[] public candidateList; // 候选人地址
    mapping(bytes32 => uint8) public votesReceived; //投票数
	//注意这个,需要传参,传进去的名字就等同于候选人
    constructor(bytes32[] memory candidateListName) public  {


        candidateList = candidateListName;
    }
    // 这个构造一个验证候选人函数
    function validateCanditate(bytes32 candidateName)internal view returns(bool) {


        for (uint8 i =0; i < candidateList.length; i++) {


            if (candidateName == candidateList[i])
                return true;
        }
        return false;

    }
    // 投票函数
    function voteForCandidate(bytes32 candidateName) public {


        require(validateCanditate(candidateName));
        votesReceived[candidateName] += 1;
    }
    // 投票总数
    function totalVotesFor(bytes32 candidateName) view public returns(uint8) {


        require(validateCanditate(candidateName));
        return votesReceived[candidateName];
    }
}
2.工程创建
2.1使用truffle框架创建一个新工程
truffle unbox webpack
truffle compile
truffle migrate //注意修改truffle.js文件网络配置文件
cd app
npm run dev
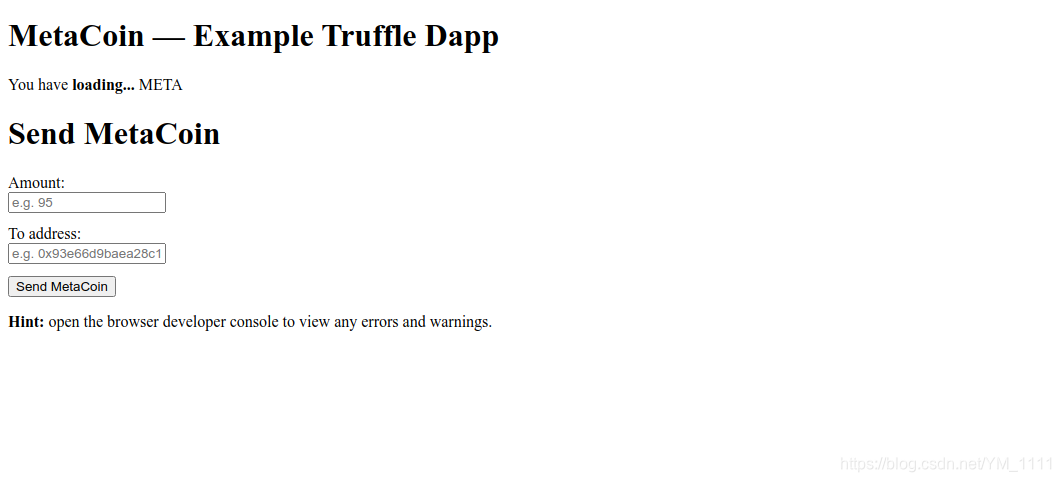
执行以上步骤,出现下图,代表你的环境和工程都没有问题,就可以进行开发了。
声明一下 ,这个地方需要配置truffle-config.js文件,根据你启动ganache设置端口号进行相应设置,不然会报错!
2.2项目搭建
- 首先把你写的合约Voting.sol拷贝到contracts文件下,并修改migrations文件夹下的_deploy_contracts.js文件
- 其次修改index.html和ndex.js文件
index.html文件涉及到前端知识,大家可以随意修改。我就搭建个简单的
<!DOCTYPE html>
<html>
  <head>
    <title>Vote Demo</title>
  </head>
  <body>
    <h1>Voting App</h1>
    <p>小明: <strong id="xiaoming">loading...</strong> votes </p>
    <p>小红: <strong id="xiaohong">loading...</strong> votes </p>
    <label for="vote">VoteFor:</label>
    <input type="text" id="candidate"/>
    <button onclick="App.voteForCandidate()">vote</button>
    <script src="index.js"></script>
  </body>
</html>
关于index.js文件,中间会增加几个函数,大家看不懂的可以留言,实际truffle框架基本上都搭建好了,只需大家修改参数。
import Web3 from 'web3';
import votingArtifact from '../../build/contracts/Voting.json';

const aInBytes32 = "0x4100000000000000000000000000000000000000000000000000000000000000";
const bInBytes32 = "0x4200000000000000000000000000000000000000000000000000000000000000";

const App = {


  web3: null,
  account: null,
  voting: null,

  start: async function() {


    const {

     web3 } = this;

    try {


      // get contract instance
      const networkId = await web3.eth.net.getId();
      const deployedNetwork = votingArtifact.networks[networkId];
      this.voting = new web3.eth.Contract(
        votingArtifact.abi,
        deployedNetwork.address,
      );

      // get accounts
      const accounts = await web3.eth.getAccounts();
      console.log(accounts);
      this.account = accounts[0];
      // console.log("will ready +++++++ ");
      this.ready();
    } catch (error) {


      console.error("Could not connect to contract or chain.");
    }
  },

  refresh: async function(id, nameInBytes32) {


    const {

     totalVotesFor } = this.voting.methods;
    const tickets = await totalVotesFor(nameInBytes32).call();
    const element = document.getElementById(id);
    element.innerHTML = tickets.toString();
  },

  ready: async function() {


    try {


      this.refresh("alice", aInBytes32);
      this.refresh("bob", bInBytes32);
    } catch (err) {


      console.log(err);
    }
  },

  voteForCandidate: async function() {


    try {


      const {

     voteForCandidate } = this.voting.methods;

      const candidateName = document.getElementById("candidate").value;
      console.log(candidateName);
      if (candidateName == "Alice") {


        console.log("vote Alice");
        await voteForCandidate(aInBytes32).send({

     from: this.account });;
        this.refresh("alice", aInBytes32);
      } else if (candidateName == "Bob") {


        await voteForCandidate(bInBytes32).send({

     from: this.account });;
        this.refresh("bob", bInBytes32);
      }
    } catch (err) {


      console.log(err);
    }
  },
}

window.App = App;

window.addEventListener("load", function() {


  // console.log("load+++++");
  if (window.ethereum) {


    // use MetaMask's provider
    App.web3 = new Web3(window.ethereum);
    window.ethereum.enable(); // get permission to access accounts
  } else {


    console.warn(
      "No web3 detected. Falling back to http://127.0.0.1:8545. You should remove this fallback when you deploy live",
    );
    // fallback - use your fallback strategy (local node / hosted node + in-dapp id mgmt / fail)
    App.web3 = new Web3(
      new Web3.providers.HttpProvider("http://127.0.0.1:8545"),
    );
  }

  App.start();
});
3.运行
cd app //必须切换到这个文件夹运行
npm run dev
打开Chrome浏览器输入127.0.0.1:8080就能成功显示。这里需要说明一下我遇到的问题:我打开后发现投票投不了,打开控制台提示:
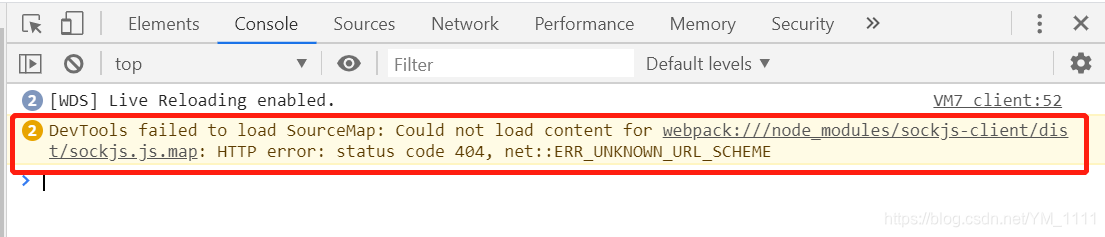
解决办法:
在项目文件夹找到webpack.config.js这个文件打开,module.exports = {} 中加入对于配置解决问题。
devtool: 'inline-source-map', // 加上对应的配置
总结
一枚区块链的学习小白,希望与大家共勉!请多多留言
提示 :如果有错误或者侵权请联系我!谢谢