一、线程的理解
1.1 概念:进程
正常解释:进程是程序运行资源分配的最小单位。
进程是操作系统进行资源分配的最小单位,其中资源包括:CPU、内存空间、磁盘 IO 等,同一进程中的多条线程共享该进程中的全部系统资源,而进程和进程之间是相互独立的。进程是具有一定独立功能的程序关于某个数据集合上的一次运行活动,进程是系统进行资源分配和调度的一个独立单位
白话:你启动一个程序,就启 动了一个进程,不信查看任务管理器。来,上图,证明一下:嘿嘿

1.2 概念2:线程
正常解释:线程是 CPU 调度的最小单位, 必须依赖于进程而存在。
线程是进程的一个实体,是 CPU 调度和分派的基本单位,它是比进程更小的、
能独立运行的基本单位。线程自己基本上不拥有系统资源,只拥有一点在运行中
必不可少的资源(如程序计数器,一组寄存器和栈),但是它可与同属一个进程的其
他的线程共享进程所拥有的全部资源。
白话: 一个时间点,一个cpu运行一个线程。
问题1
你的电脑同时处理多少个线程数呢?
目前主流 CPU 都是多核的。增加核心数目就是为了增加线程数,因为操作系统是通过线程来执行任务的,一般情况下它们是 1:1 对应关系,也就是说2核 CPU 一般同时处理2个线程。引入超线程技术后,可以做到4个逻辑处理器,那就可以同时处理4个线程。
问题2
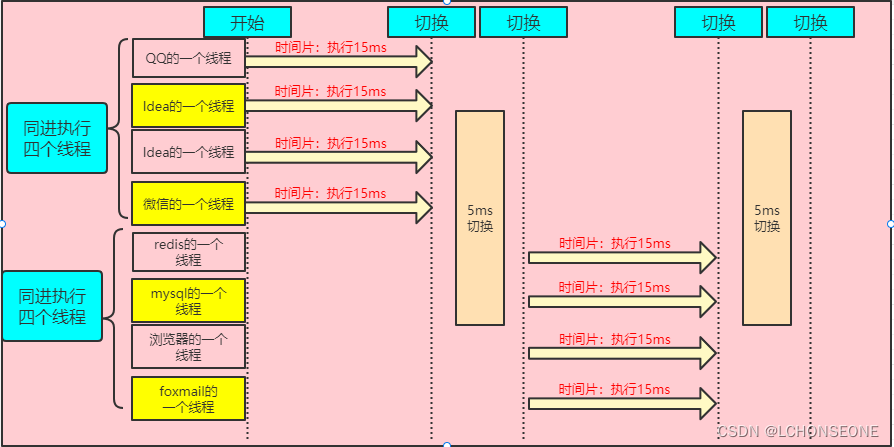
依据标题3的理论,一次可以执行4个线程,但一个QQ就75个线程 ,并且我打开浏览器,打开其它软件也都能同时运行啊?为什么?

别急,慢慢听我说: 这就涉及到 CPU 时间片轮转机制
假如进程切换(process switch) - 有时称为上下文切换(context switch),需要5毫秒,再假设时间片设为15毫秒,则在做完15毫秒有用的工作之后,CPU将花费5毫秒来进行进程切换。
白话:CPU单个线程执行的时间短,CPU来回切换快,欺骗了你的眼睛。 但是程序多了会卡。
1s = 1000ms 毫秒
1.3 概念:并行和并发
并行 : 同一时间,可执行的数量。
比如: 以下有四个车道,同时可以并行四输车。(不要占应急道哈!)

比如: 你大学餐厅有四个窗口,四人可以同 时打饭。(不要插队哈!)
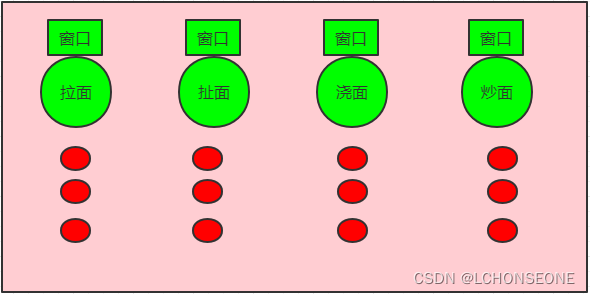
或者你带女朋友买电影票的窗口同时四人可以买票;
或者你一个人过年在火车站取票的8台取票机,可以同时8人取票。
并行线程: 指同时可以执行的线程数据,一般和cpu挂钩。
并发:单位时间内执行的数量 。
比如: 4条公路1分钟驶过 10辆车。
比如: 4个打饭窗口 1分钟给20个学生打了饭。
比如: 4个售票窗口 1分钟卖出100张票。
比如; 你的电脑,1分钟处理过50个线程。
1.4 多线程注意事项
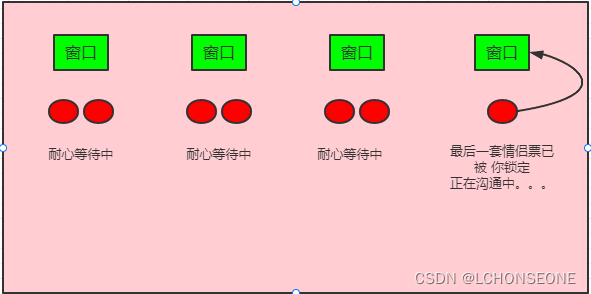
说明: 前三个窗口是三对情况排队中。最后一个是单身小明。
大家争抢的情侣电影票,只剩下一套。
-
这个电影票只能被一个窗口最后 售卖。 不可能出现,一票两卖的情况。所以有线程安全性问题。
-
当小明先人一步,在4窗口买票时, 窗口 小姐姐操作,把这张票锁定,其它窗口 就不能卖这张票了。但小明不确定女朋友会不会来,所以一直再犹豫,其它三个窗口咬牙等待中。 锁定资源长期不放手,就是线程的死锁问题。
-
小明迟迟不给答复,其它三个窗口一直在不停的试,看能不能进去,试多了可 能机器和等的人都会受不了。
还有不知情况的小伙伴,可能还会来排队,都在不停的试。可能会造成大厅拥堵。就是线程的资源会耗尽,造成死机。
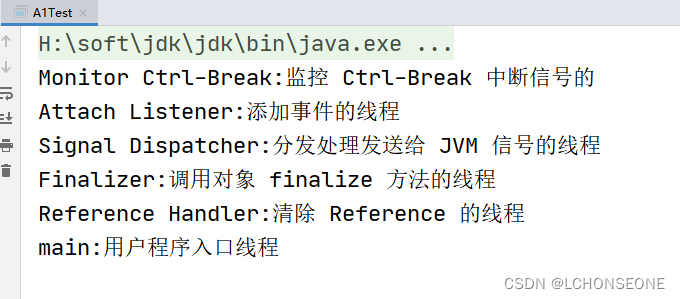
1.5 java main方法是多线程的
public class A1Test {


    public static void main(String[] args) {


        //线程管理接口中
        ThreadMXBean threadMXBean = ManagementFactory.getThreadMXBean();

        ThreadInfo[] threadInfos = threadMXBean.dumpAllThreads(false, false);

        for (ThreadInfo threadInfo : threadInfos) {


            System.out.println(threadInfo.getThreadName());
        }

    }
}
执行结果如下:
二、进程和线程
2.1 进程
进程:程序是静止的,只有真正运行时的程序,才被称为进程。
特点:
- 单核CPU在任何时间点上。
- 只能运行一个进程。
- 宏观并行、微观串行。
2.2 线程
线程:又称轻量级进程(Light Weight Process)。
- 程序中的一个顺序控制流程,同时也是CPU的基本调度单位。
- 进程由多个线程组成,彼此间完成不同的工作,交替执行,称为多线程。
比如:
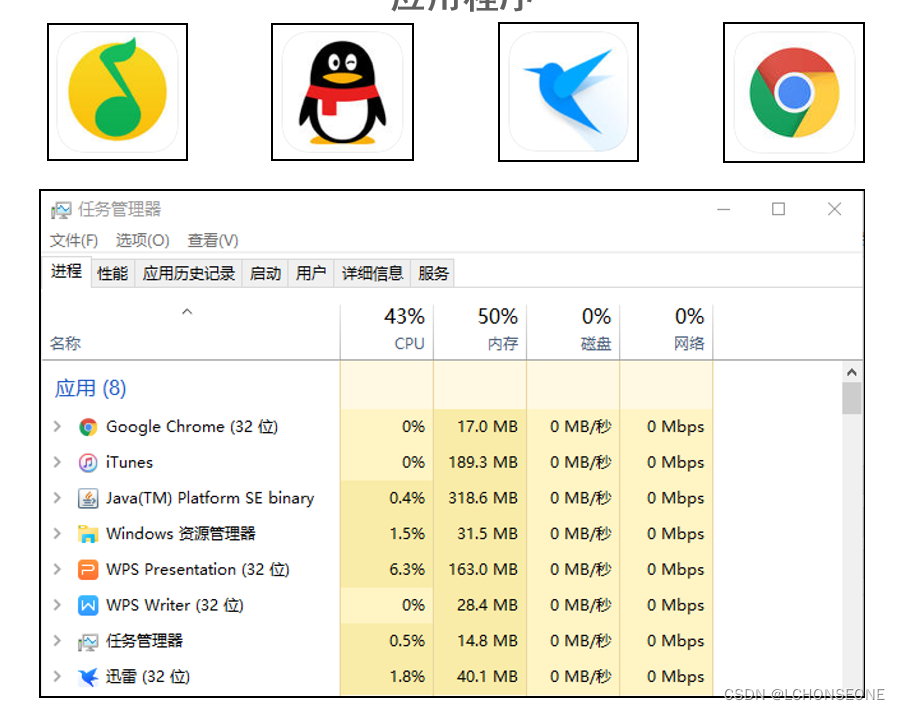
- 迅雷是一个进程,当中的多个下载任务即是多个线程。
- Java虚拟机是一个进程,默认包含主线程(main),通过代码创建多个独立线程,与main并发执行。
2.3 进程和线程区别
- 进程是操作系统资源分配的基本单位,而线程是CPU的基本调度单位。
- 一个程序运行后至少有一个进程。
- 一个进程可以包含多个线程,但是至少需要有一个线程。
- 进程间不能共享数据段地址,但同进程的线程之间可以。
2.4 线程组成
任何一个线程都具有基本的组成部分:
- CPU时间片:操作系统(OS)会为每个线程分配执行时间。
- 运行数据:
堆空间:存储线程需使用的对象,多个线程可以共享堆中的对象。
栈空间:存储线程需使用的局部变量,每个线程都拥有独立的栈。- 线程的逻辑代码。
三、创建线程【重点】
证明java 天生多线程:
public class Test1 {


    public static void main(String[] args) {


        //1工具获取当前 线程管理对象
        ThreadMXBean threadMXBean = ManagementFactory.getThreadMXBean();

        //2. 获取 thread 线程的数组
        ThreadInfo[] threadInfos = threadMXBean.dumpAllThreads(false, false);

        //3.循环  一下
        for (ThreadInfo threadInfo : threadInfos) {


            System.out.println(threadInfo.getThreadName());
        }

    }

}
Java中创建线程主要有两种方式:
- 继承Thread类。
- 实现Runnable接口。
3.1 继承Thread类
步骤:
- 编写类、继承Thread。
- 重写run方法。
- 创建线程对象。
- 调用start方法启动线程。
案例演示:
Test2MyThread类:
package com.qfedu.test03;
//线程实现
//第一种实现线程的方式:     extends  Thread
public class Test02  extends  Thread {


    @Override
    public void run() {


       //代码
       for(int i=0; i<=10000000; i++){


           //获取当前线程的信息 Thread.currentThread()
           String name = Thread.currentThread().getName();
           System.out.println(name);
       }
    }
}
Test测试方式类:
package com.qfedu.test03;

public class Test02Main {


    public static void main(String[] args) {


        //1.创建线程对象
        Thread t1 = new Test02();
        Thread t2 = new Test02();
        Thread t3 = new Test02();

        //2.调用方法
        t1.start(); //启动方法
        t2.start(); //启动方法
        t3.start(); //启动方法

        for (int i=0; i<1000000; i++) {


            System.out.println(Thread.currentThread().getName());
        }
    }
}
说明: run和start
package com.qfedu;

/**
 * 本测试案例
 *  run和start
 *  1. 证明 start 是启动线程: 不调用start  直接调用 run 是主线程在调用
 *  2. run方法写是 线程的逻辑代码
 *  3. 启动过程 : new 线程对象 ==》 start(真正意义上的启动线程) ==> 就绪状态(准备)  ==> cpu分配 时间==> run
 */
public class Test3MyThread extends  Thread {


    //线程的逻辑代码
    @Override
    public void run() {


        System.out.println("调用了MyThread方法");
        for(int i=0; i<100; i++) {


            //System.out.println(this.getId()+" "+this.getName() +"     " +i);
            System.out.println(Thread.currentThread().getId()+" "+Thread.currentThread().getName() +" i=" +i);

        }

    }
}
package com.qfedu;

//启动线程用的是start 方法,不是 run方法

public class Test3 {


    public static void main(String[] args) {


        Test3MyThread myThread = new Test3MyThread();

        myThread.run();
    }
}
3.2 案例
实现四个窗口各卖100张票
TicketWin类
package com.qfedu.test03;

//四个窗口各卖100

public class Test03  extends  Thread{


    //在构造器中指定 线程的名字
    public Test03(String name) {


        super(name);
    }

    private  int ticket = 100;
    @Override
    public void run() {


        while (true) {


            //打印票的剩余信息
            System.out.println(Thread.currentThread().getName()+"还剩余"+ticket);
            //结束条件是票<=0
            if(ticket<=0) {


                break;
            }
            ticket--;
        }
    }
}
TestWin类:
package com.qfedu.test03;

public class Test03Main {


    public static void main(String[] args) {


        Thread t1 = new Test03("==窗口1");
        Thread t2 = new Test03("==窗口2");
        Thread t3 = new Test03("==窗口3");
        Thread t4 = new Test03("==窗口4");
        Thread t5 = new Test03("==窗口5");
        Thread t6 = new Test03("==窗口6");
        Thread t7 = new Test03("==窗口7");
        Thread t8 = new Test03("==窗口8");

        t1.start();
        t2.start();
        t3.start();
        t4.start();
        t5.start();
        t6.start();
        t7.start();
        t8.start();
    }
}
3.3 实现Runnable接口
步骤:
- 编写类实现Runnable接口、并实现run方法。
- 创建Runnable实现类对象。
- 创建线程对象,传递实现类对象。
- 启动线程。
案例演示:
Test5Runnable类:
package com.qfedu;

//创建线程的第二种方式: implements Runnable

public class Test5Runnable implements Runnable {


    @Override
    public void run() {


        for(int i=0; i<=100; i++) {


            System.out.println(Thread.currentThread().getName()+" "+i);
        }
    }
}
Test5类:
package com.qfedu;

//测试Runnable

public class Test5 {


    public static void main(String[] args) {


        //1. new
        Test5Runnable runnable = new Test5Runnable();
        //2. new Thread
        Thread  thread = new Thread(runnable);
        //Thread thread1 = new Thread(runnable,"线程的名字");
        //3 启动
        thread.start();

        //4. 因为是一个接口,可以不写实现类: 用匿名内部类
        Runnable runnable1 = new Runnable() {


            @Override
            public void run() {


                System.out.println("线程");
            }
        };
        Thread thread1 = new Thread(runnable1);
        thread1.start();
    }
}
3.4 案例
实现四个窗口共卖100张票。
Test6RunnableTicket类:
package com.qfedu;

//卖票

public class Test6RunnableTicket implements  Runnable {


    private int ticket=100;//100张票

    @Override
    public void run() {


        while(true) {


            if(ticket<=0) {


                break;
            }
            System.out.println(Thread.currentThread().getName()+" 卖了第"+ticket+"张票");
            ticket--;
        }
    }
}
Test6类:
package com.qfedu;

测试: 实现四个窗口共卖100张票。

public class Test6 {


    public static void main(String[] args) {


        //1. 实例
        Test6RunnableTicket ticket = new Test6RunnableTicket();

        //2 thread
        Thread thread1 = new Thread(ticket,"窗口1");
        Thread thread2 = new Thread(ticket,"窗口2");
        Thread thread3 = new Thread(ticket,"窗口3");
        Thread thread4 = new Thread(ticket,"窗口4");

        //3. 启动
        thread1.start();
        thread2.start();
        thread3.start();
        thread4.start();
    }
}
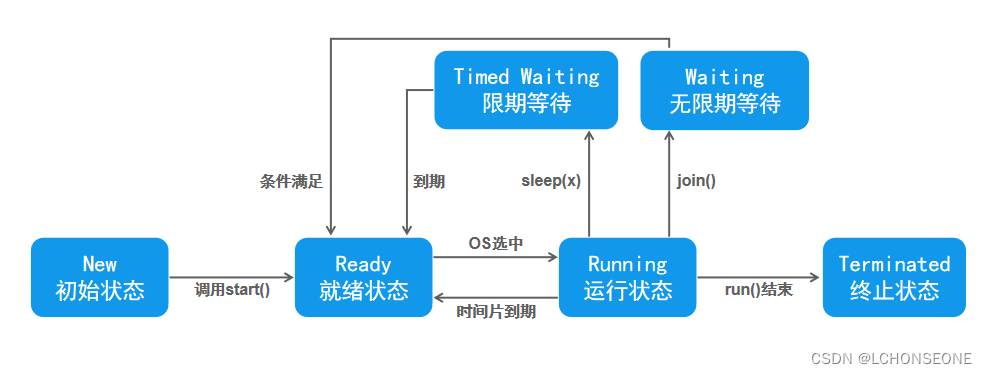
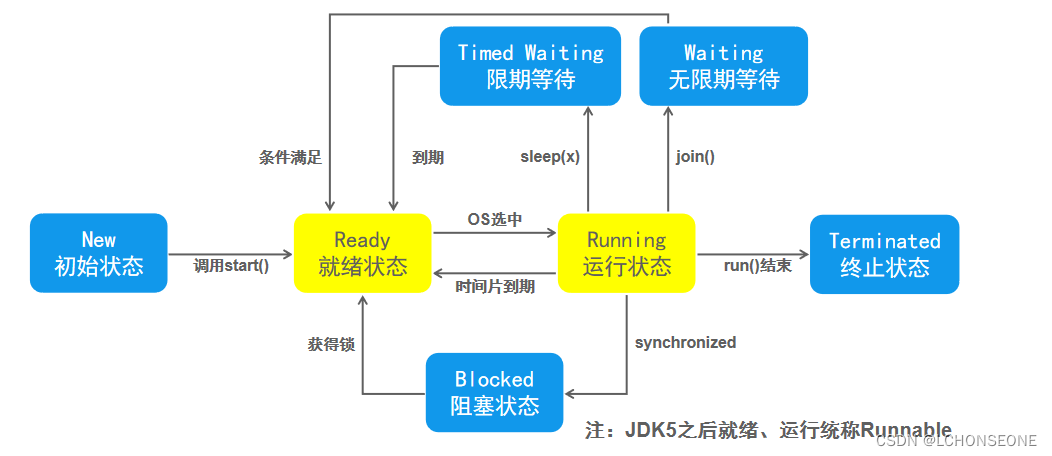
四、线程状态
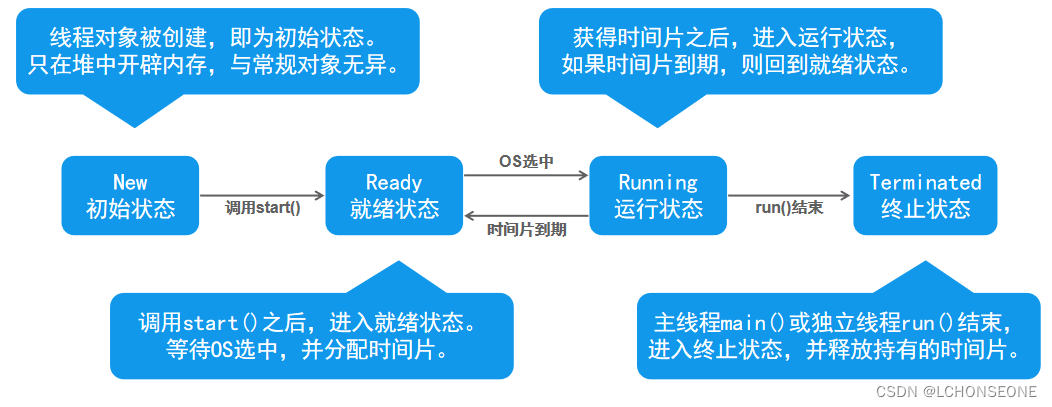
4.1 线程状态(基本)
线程状态:新建、就绪、运行、终止。
4.2 常见方法
| 方法名 | 说明 |
|---|---|
| public static void sleep(long millis) | 当前线程主动休眠 millis 毫秒。 |
| public static void yield() | 当前线程主动放弃时间片,回到就绪状态,竞争下一次时间片。 |
| public final void join() | 允许其他线程加入到当前线程中。 // |
| public void setPriority(int) | 线程优先级为1-10,默认为5,优先级越高,表示获取CPU机会越多。 |
| public void setDaemon(boolean) | 设置为守护线程线程有两类:用户线程(前台线程)、守护线程(后台线程) |
4.2.1 sleep yield:
package com.qfedu;

public class Test7Sleep extends  Thread {


    public Test7Sleep() {


    }

    public Test7Sleep(String name) {


        super(name);
    }

    @Override
    public void run() {


        try {


            for(int i=0; i<100; i++) {


                System.out.println(Thread.currentThread().getName()+" "+i);

                // i==50 sleep
                if(i==50) {


                    // Thread
                    System.out.println("睡吧睡吧。。。。。。");
                    Thread.sleep(100);
                    // THread.yield();
                }
            }
        } catch (InterruptedException e) {

     // 中断异常
            e.printStackTrace();
        }
    }
}
package com.qfedu;

public class Test7 {


    public static void main(String[] args) {


        Test7Sleep test7Sleep = new Test7Sleep("sleep线程");
        test7Sleep.start();

        for(int i = 0; i<100; i++) {


            System.out.println(Thread.currentThread().getName()+" "+i);
        }
    }
}
4.2.2 Join
package com.qfedu;

public class Test8Join1 extends  Thread {


    private  Thread thread2;

    public Test8Join1() {


    }

    //利用构造器的方式,把线程传入
    public Test8Join1(String name,Thread thread2) {


        super(name);
        this.thread2 = thread2;
    }

    @Override
    public void run() {


        try {


            // 线程 对象.join();
            for(int i=0; i<100; i++ ) {


                System.out.println(Thread.currentThread().getName());
                thread2.join();
            }
        } catch (InterruptedException e) {


            e.printStackTrace();
        }
    }
}
package com.qfedu;

public class Test8Join2 extends  Thread {


    public Test8Join2() {


    }

    public Test8Join2(String name) {


        super(name);
    }

    @Override
    public void run() {


        for(int i=0; i<100; i++ ) {


            System.out.println(Thread.currentThread().getName());
        }
    }
}
package com.qfedu;

public class Test8 {


    public static void main(String[] args) {


        Test8Join2 join2 = new Test8Join2("线程2");
        Test8Join1 join1 = new Test8Join1("线程1",join2);

        join1.start();
        join2.start();
    }
}
4.3.3 join:实现线程排序功能:
package com.qfedu;

public class Test8Join1 extends Thread {


    private Thread thread2;

    public Test8Join1() {


    }

    //利用构造器的方式,把线程传入
    public Test8Join1(String name, Thread thread2) {


        super(name);
        this.thread2 = thread2;
    }

    @Override
    public void run() {


        try {


            thread2.join();

            // 线程 对象.join();
            for (int i = 0; i < 100; i++) {


                System.out.println(Thread.currentThread().getName()+ " "+i);
            }
        } catch (InterruptedException e) {


            e.printStackTrace();
        }
    }
}
package com.qfedu;

public class Test8Join2 extends  Thread {


    public Test8Join2() {


    }

    private Thread thread3;

    public Test8Join2(String name,Thread thread3) {


        super(name);
        this.thread3 =thread3;
    }

    @Override
    public void run() {


        try {


            thread3.join();
            for(int i=0; i<100; i++ ) {


                System.out.println(Thread.currentThread().getName() +" "+i);
            }
        } catch (InterruptedException e) {


            e.printStackTrace();
        }
    }
}
package com.qfedu;

public class Test8Join3 extends  Thread {


    public Test8Join3() {


    }

    public Test8Join3(String name) {


        super(name);
    }

    @Override
    public void run() {


        for(int i=0; i<100; i++ ) {


            System.out.println(Thread.currentThread().getName() +" "+i);
        }
    }
}
package com.qfedu;

//thread 3  ==> thread2  ==> thread1

public class Test8 {


    public static void main(String[] args) {


        Test8Join3 join3 = new Test8Join3("线程3");
        Test8Join2 join2 = new Test8Join2("线程2",join3);
        Test8Join1 join1 = new Test8Join1("线程1",join2);

        join1.start();
        join2.start();
        join3.start();
    }
}
4.3.4 优先级别
线程优先级为1-10,默认为5,优先级越高,表示获取CPU机会越多。
4.3 线程状态(等待)
线程状态:新建、就绪、运行、等待、终止。
五、线程安全【重点】
为什么会出现线程安全问题?
- 需求:对一个对象的count 启动两个线
- 线程不安全:
- 当多线程并发访问临界资源时,如果破坏原子操作,可能会造成数据不一致。
- 临界资源:共享资源(同一对象),一次仅允许一个线程使用,才可保证其正确性。
- 原子操作:不可分割的多步操作,被视作一个整体,其顺序和步骤不可打乱或缺省。
5.1 同步代码块
语法:
synchronized(临界资源对象){ //对临界资源对象加锁
//代码(原子操作)
}
示例:
package com.qfedu;

public class Test10Syn1  extends  Thread{


    private  Test10 test10;

    //传入对象
    public Test10Syn1( Test10 test10) {


        this.test10 = test10;
    }

    @Override
    public void run() {


        //调用对象的方法,对count++
        for(int i=0; i<100000; i++) {


            //test10.addCount1();
            test10.addCount2();

        }
    }
}
package com.qfedu;

public class Test10Syn2 extends  Thread{


    private  Test10 test10;

    //传入对象
    public Test10Syn2(Test10 test10) {


        this.test10 = test10;
    }

    @Override
    public void run() {


        //调用对象的方法,对count++
        for(int i=0; i<100000; i++) {


            //test10.addCount1();
            test10.addCount2();
        }
    }
}
package com.qfedu;

/**
 * 线程安全问题
 *
 *  * 1. 操作共享资源:  访问的是同一资源 ,多线程情况下: 数据会有不一致的情况   ==> 线程不安全
 *  * 2. 原子性: 不可分割,是一个整体!  要么全部执行!要么不要执行
 *  * 3. 解决线程不安全:   锁 synchronized
 *
 * //1 可以锁的代码块 和 方法上
 *
 * //2. 注意:
 * 每个对象都有一个互斥锁的标记
 * 线程执行完毕! 锁会释放
 */
public class Test10 {


    private     int count =0;

    private Object obj = new Object();  //锁的对象

    //原始方法
    public  void addCount1() {


        count++;
    }

    public  void addCount2() {


        //锁代码块:
        //synchronized (this) {


        synchronized (obj) {


            //逻辑代码
            count++;
        }
    }
    //锁到方法上
    public synchronized void addCount3() {


            //逻辑代码
            count++;
    }

    public static void main(String[] args) throws InterruptedException {


        Test10 test10 = new Test10();

        Test10Syn1 t1 = new Test10Syn1(test10);
        Test10Syn2 t2 = new Test10Syn2(test10);
        t1.start();
        t2.start();

        Thread.sleep(100);

        System.out.println(test10.count);

    }
}
演示案例:
Ticket类:
public class Ticket implements Runnable{


	private int ticket=100;
	//创建锁
	//private Object obj=new Object();

	@Override
	public void run() {


		while(true) {


			synchronized (this) {

    //this ---当前对象
				if(ticket<=0) {


					break;
				}
				System.out.println(Thread.currentThread().getName()+"卖了第"+ticket+"票");
				ticket--;
			}
		}
	}
}
5.2 线程状态(阻塞)
线程状态:新建、就绪、运行、阻塞、终止。
5.3 同步方法
语法:
synchronized 返回值类型 方法名称(形参列表){ //对当前对象(this)加锁
// 代码(原子操作)
}
5.4 同步规则
- 只有在调用包含同步代码块的方法,或者同步方法时,才需要对象的锁标记。
- 如调用不包含同步代码块的方法,或普通方法时,则不需要锁标记,可直接调用。
JDK中线程安全的类:
- StringBuffer
- Vector
- Hashtable
以上类中的公开方法,均为synchonized修饰的同步方法。
六、死锁
6.1 什么是死锁?
- 当第一个线程拥有A对象锁标记,并等待B对象锁标记,同时第二个线程拥有B对象锁标记,并等待A对象锁标记时,产生死锁。
- 一个线程可以同时拥有多个对象的锁标记,当线程阻塞时,不会释放已经拥有的锁标记,由此可能造成死锁。
6.2 死锁案例
MyLock类:
public class MyLock {


	//两个锁(两个筷子)
	public static Object a=new Object();
	public static Object b=new Object();
}
BoyThread类:
public class Boy extends Thread{


	@Override
	public void run() {


		synchronized (MyLock.a) {


			System.out.println("男孩拿到了a");
			synchronized (MyLock.b) {


				System.out.println("男孩拿到了b");
				System.out.println("男孩可以吃东西了...");
			}
		}
	}
}
GirlThread类:
public class Girl extends Thread {


	@Override
	public void run() {


		synchronized (MyLock.b) {


			System.out.println("女孩拿到了b");
			synchronized (MyLock.a) {


				System.out.println("女孩拿到了a");
				System.out.println("女孩可以吃东西了...");
			}
		}
	}
}
TestDeadLock类:
public class TestDeadLock {


	public static void main(String[] args) {


		Boy boy=new Boy();
		Girl girl=new Girl();
		girl.start();
		try {


			Thread.sleep(100);
		} catch (InterruptedException e) {


			// TODO Auto-generated catch block
			e.printStackTrace();
		}

		boy.start();
	}
}
七、线程通信
7.1 线程通信方法
| 方法 | 说明 |
|---|---|
| public final void wait() | 释放锁,进入等待队列 |
| public final void wait(long timeout) | 在超过指定的时间前,释放锁,进入等待队列 |
| public final void notify() | 随机唤醒、通知一个线程 |
| public final void notifyAll() | 唤醒、通知所有线程 |
7.2 生产者消费者
若干个生产者在生产产品,这些产品将提供给若干个消费者去消费,为了使生产者和消费者能并发执行,在两者之间设置一个能存储多个产品的缓冲区,生产者将生产的产品放入缓冲区中,消费者从缓冲区中取走产品进行消费,显然生产者和消费者之间必须保持同步,即不允许消费者到一个空的缓冲区中取产品,也不允许生产者向一个满的缓冲区中放入产品。
Bread类:
package com.qfedu;

//面包

public class Test3Bread {

    private  int id;
    private  String productName;

    public Test3Bread() {
    }

    public Test3Bread(int id, String productName) {
        this.id = id;
        this.productName = productName;
    }

    public int getId() {
        return id;
    }

    public void setId(int id) {
        this.id = id;
    }

    public String getProductName() {
        return productName;
    }

    public void setProductName(String productName) {
        this.productName = productName;
    }

    @Override
    public String toString() {
        return "Test3Bread{" +
                "id=" + id +
                ", productName='" + productName + '\'' +
                '}';
    }
}
BreadCon类:
package com.qfedu;

//bread操作类

public class Test3BreadCon {


    //1. 固定 面包盒只能装 6 个
    private  Test3Bread[]  breads = new Test3Bread[6];

    // 2. 定义 index    用来计当前面包的个数
    private  int index = 0;


    // 1.  生产者生产面包
    public synchronized   void  inputBread(Test3Bread bread) throws InterruptedException {


        // 如果盒子满了,那么wait()  白:  等消费面包,空出空间,就可以放面包了
        while (index>=6) {


            this.wait();
        }
        // 如果盒子没有满 : 继续放   往数组里装
        breads[index]= bread;
        index++;  //表示放的个数

        Thread.sleep(100);

        System.out.println(Thread.currentThread().getName()+" 生产了"+ bread.getId());

        //通知消费面包的人:有面包了,可以消费了
        this.notifyAll();

    }
    // 2.  消费面包(
    public synchronized   void  getBreand() throws InterruptedException {


        //如果没有面包: wait; 等生产者放面包
        while (index<=0) {


            this.wait();
        }
        //如果有面包  :index 是面包的数量: 获取数据的下标!

        Thread.sleep(100);

        index = index -1;
        Test3Bread bread = breads[index];
        breads[index] = null;


        System.out.println(Thread.currentThread().getName()+" 消费了"+bread.getId()+" "+bread.getProductName());

        // 通知一下:面包盒有空位,可以继续生产面包
        this.notifyAll();
    }
}
Consume类:
package com.qfedu;

//消费面包的线程

public class Test3Consumer  implements   Runnable{


    private   Test3BreadCon  breadCon;

    public Test3Consumer(Test3BreadCon breadCon) {


        this.breadCon = breadCon;
    }

    @Override
    public void run() {


        try {


            for(int i=0; i<30; i++) {


                breadCon.getBreand();
            }
        } catch (InterruptedException e) {


            e.printStackTrace();
        }
    }
}
Produce类:
package com.qfedu;

public class Test3Product implements   Runnable {


    private  Test3BreadCon  breadCon;

    public Test3Product(Test3BreadCon breadCon) {


        this.breadCon = breadCon;
    }

    @Override
    public void run() {


        try {


            // 生产者这条线程生产了 30个包
            for(int i=0; i<30; i++) {


                breadCon.inputBread(new Test3Bread(i,Thread.currentThread().getName()));
            }
        } catch (InterruptedException e) {


            e.printStackTrace();
        }
    }
}
Test类:
package com.qfedu;

public class Test3 {


    public static void main(String[] args) {


        //面包容器:
        Test3BreadCon  breadCon = new Test3BreadCon();

        // 生产者和消费者
        Test3Product product = new Test3Product(breadCon);
        Test3Consumer consumer = new Test3Consumer(breadCon);

        Thread pThread1  = new Thread(product,"生产者1");
        Thread pThread2  = new Thread(product,"生产者2");

        Thread cThread1  = new Thread(consumer,"消费者1");
        Thread cThread2  = new Thread(consumer,"消费者2");

        pThread1.start();
        pThread2.start();
        cThread1.start();
        cThread2.start();
    }
}
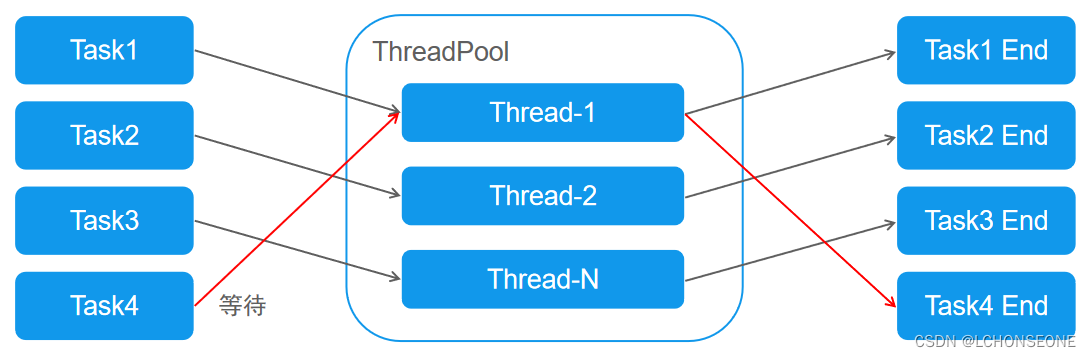
八、线程池
8.1 为什么需要线程池?
- 如果有非常的多的任务需要多线程来完成,且每个线程执行时间不会太长,这样频繁的创建和销毁线程。
- 频繁创建和销毁线程会比较耗性能。有了线程池就不要创建更多的线程来完成任务,因为线程可以重用。
8.2 线程池原理
线程池用维护者一个队列,队列中保存着处于等待(空闲)状态的线程。不用每次都创建新的线程。
8.3 线程池API
常用的线程池接口和类(所在包java.util.concurrent)。
Executor:线程池的顶级接口。
ExecutorService:线程池接口,可通过submit(Runnable task) 提交任务代码。
Executors工厂类:通过此类可以获得一个线程池。
| 方法名 | 描述 |
|---|---|
| newFixedThreadPool(int nThreads) | 获取固定数量的线程池。参数:指定线程池中线程的数量。 |
| newCachedThreadPool() | 获得动态数量的线程池,如不够则创建新的,无上限。 |
| newSingleThreadExecutor() | 创建单个线程的线程池,只有一个线程。 |
| newScheduledThreadPool() | 创建固定大小的线程池,可以延迟或定时执行任务。 |
案例演示:测试线程池。
package com.qfedu;

import java.util.concurrent.Executor;
import java.util.concurrent.ExecutorService;
import java.util.concurrent.Executors;
import java.util.concurrent.ScheduledExecutorService;

public class Test4 {


    public static void main(String[] args) {


        // 线程池的工厂类
        //获取固定数量的线程池。参数:指定线程池中线程的数量。 固定连接数
        ExecutorService es = Executors.newFixedThreadPool(10);
        //获得动态数量的线程池,如不够则创建新的,无上限。
        ExecutorService executorService = Executors.newCachedThreadPool();
        //创建单个线程的线程池,只有一个线程。
        ExecutorService executorService1 = Executors.newSingleThreadExecutor();
        //创建固定大小的线程池,可以延迟或定时执行任务。
        ScheduledExecutorService scheduledExecutorService = Executors.newScheduledThreadPool(10);

        //2. 准备 runnable
        Runnable runnable = new Runnable() {


            @Override
            public void run() {


                for(int i=0; i<10; i++) {


                    System.out.println(Thread.currentThread().getName()+" "+i);
                }
            }
        };

        // 4. runnable 提交到连接池
        for(int i=0; i<5; i++) {


            es.submit(runnable);
        }

        try {


            Thread.sleep(100);
        } catch (InterruptedException e) {


            e.printStackTrace();
        }

        //5.用完后进行释放,
        es.shutdown();
    }
}
8.4 Callable接口
public interface Callable< V >{
public V call() throws Exception;
}
案例演示:Callable接口的使用。
package com.qfedu;

import java.util.concurrent.Callable;
import java.util.concurrent.ExecutionException;
import java.util.concurrent.FutureTask;

//线程运行可以有返回值:
//创建线程有几种方式:2 种

public class Test5Callable {


    public static void main(String[] args) {


        try {


            //1. 创建Callable的匿名内部类,指定线程方法的返回值类型
            Callable<Integer> callable = new Callable<Integer>() {


                // 回调方法: 线程执行的方法
                @Override
                public Integer call() throws Exception {


                    int sum = 0;
                    for (int i = 0; i <= 100; i++) {


                        sum += i;
                    }
                    return sum;
                }
            };

            // 2. 把callable 包装成 runnable
            FutureTask<Integer> task = new FutureTask<Integer>(callable);

            // 3. 创建线程和启动
            Thread thread = new Thread(task);
            thread.start();

            // 4.获取线程的返回值  get方法 阻塞方法,等call方法执行完毕!
            Integer integer = task.get();

            System.out.println(integer);

        } catch (InterruptedException e) {


            e.printStackTrace();
        } catch (ExecutionException e) {


            e.printStackTrace();
        }
    }
}
Runnable接口和Callable接口的区别:
- Callable接口中call方法有返回值,Runnable接口中run方法没有返回值。
- Callable接口中call方法有声明异常,Runnable接口中run方法没有异常。
8.5 Future接口
- Future接口表示将要执行完任务的结果。
- get()以阻塞形式等待Future中的异步处理结果(call()的返回值)。
案例演示:计算1-100的和。
package com.qfedu;

import java.util.concurrent.*;

public class Test7Future {


    public static void main(String[] args) {


        try {


            //1 .创建线程池
            ExecutorService es = Executors.newFixedThreadPool(10);

            //2. 定义cllable
            Callable<Integer> callable = new Callable<Integer>() {


                @Override
                public Integer call() throws Exception {


                    int sum = 0;
                    for (int i = 0; i <= 100; i++) {


                        sum += i;
                    }

                    return sum;
                }
            };

            //4.调用的是sumit(new Callable)
            Future<Integer> future = es.submit(callable);

            Integer integer = future.get();

            System.out.println(integer);
        } catch (InterruptedException e) {


            e.printStackTrace();
        } catch (ExecutionException e) {


            e.printStackTrace();
        }
    }
}
8.6 案例
需求:使用两个线程,并发计算150、51100的和,再进行汇总统计。
package com.qfedu;

import java.util.concurrent.*;

//两个线程:  1-50    51-100 把结果合并一下

public class Test8Future {


    public static void main(String[] args) {


        try {


            //1 线程池
            ExecutorService es = Executors.newFixedThreadPool(2);

            //2 两个回调方法
            Callable<Integer> callable1 = new Callable<Integer>() {


                @Override
                public Integer call() throws Exception {


                    int sum = 0;
                    for (int i = 1; i <= 50; i++) {


                        sum += i;
                    }
                    return sum;
                }
            };

            Callable<Integer> callable2 = new Callable<Integer>() {


                @Override
                public Integer call() throws Exception {


                    int sum = 0;
                    for (int i = 51; i <= 100; i++) {


                        sum += i;
                    }
                    return sum;
                }
            };

            // 3.加入提交线程池
            Future<Integer> future1 = es.submit(callable1);
            Future<Integer> future2 = es.submit(callable2);

            int sum = future1.get() + future2.get();

            System.out.println(sum);

            es.shutdown();

        } catch (InterruptedException e) {


            e.printStackTrace();
        } catch (ExecutionException e) {


            e.printStackTrace();
        }
    }
}
九、Lock接口
9.1 Lock
- JDK5加入,与synchronized比较,显示定义,结构更灵活。
- 提供更多实用性方法,功能更强大、性能更优越。
常用方法:
| 方法名 | 描述 |
|---|---|
| void lock() | 获取锁,如锁被占用,则等待。 |
| boolean tryLock() | 尝试获取锁(成功返回true。失败返回false,不阻塞)。 |
| void unlock() | 释放锁。 |
9.2 重入锁
- Lock接口的实现类,与synchronized一样具有互斥锁功能。
可重入锁: 比如在锁的方法中 调用自己的方法(可能是递归 ) ,如果锁是可重入锁,表示当前自己可重入!
锁的可重入
简单地讲就是:“同一个线程对于已经获得到的锁,可以多次继续申请到该
锁的使用权”。而 synchronized 关键字隐式的支持重进入,比如一个 synchronized
修饰的递归方法,在方法执行时,执行线程在获取了锁之后仍能连续多次地获得
该锁。ReentrantLock 在调用 lock()方法时,已经获取到锁的线程,能够再次调用
lock()方法获取锁而不被阻塞。
package com.qfedu;

import java.util.concurrent.locks.Lock;
import java.util.concurrent.locks.ReentrantLock;

public class Test9SetValue {


    //1.定义一个互斥锁
    private Lock  lock = new ReentrantLock();

    private String[] strArr = {

    "小乔","老乔","貂蝉","","",""};

    private   int index = 3;

    // 功能是往数组添加一下值
    public  void add(String value) {


        lock.lock();

        try {


            //逻辑代码
            strArr[index] = value;
            index++;

        }finally {


            lock.unlock();
        }
    }

    public String[] getStrArr() {


        return strArr;
    }

    public void setStrArr(String[] strArr) {


        this.strArr = strArr;
    }
}
package com.qfedu;

import java.util.Arrays;
import java.util.concurrent.ExecutorService;
import java.util.concurrent.Executors;
import java.util.concurrent.locks.Lock;

/**
 * Lock
 *
 *  lock();
 *
 *  try {
 *      //逻辑代码
 *  }finally{
 *      unlock();
 *  }
 */
public class Test9Lock  {


    public static void main(String[] args) {


        //1.创建出线程池
        ExecutorService es = Executors.newFixedThreadPool(2);

        Test9SetValue test9SetValue = new Test9SetValue();

        Runnable runnable = new Runnable() {


            @Override
            public void run() {


                test9SetValue.add(Thread.currentThread().getName());
            }
        };

        for(int i=0; i<2; i++) {


            es.submit(runnable);
        }

        es.shutdown();

        //打印出数据
        System.out.println(Arrays.toString(test9SetValue.getStrArr()));
    }
}
9.3 读写锁
ReentrantReadWriteLock:
- 一种支持一写多读的同步锁,读写分离,可分别分配读锁、写锁。
- 读锁: 共享锁 写锁: 排它锁或者互斥锁
- 支持多次分配读锁,使多个读操作可以并发执行。
互斥规则:
- 写-写:互斥,阻塞。
- 读-写:互斥,读阻塞写、写阻塞读。
- 读-读:不互斥、不阻塞。
- 在读操作远远高于写操作的环境中,可在保障线程安全的情况下,提高运行效率。
写锁 互斥锁 , 排安锁
读锁: 共享锁
ReadWriteDemo类:
public class ReadWriteDemo {


	//创建读写锁
	private ReentrantReadWriteLock rrl=new ReentrantReadWriteLock();
	//获取读锁
	private ReadLock readLock=rrl.readLock();
	//获取写锁
	private WriteLock writeLock=rrl.writeLock();

	//互斥锁
	private ReentrantLock lock=new ReentrantLock();

	private String value;

	//读取
	public String getValue() {


		//使用读锁上锁
		lock.lock();
		try {


			try {


				Thread.sleep(1000);
			} catch (InterruptedException e) {


				// TODO Auto-generated catch block
				e.printStackTrace();
			}
			System.out.println("读取:"+this.value);
			return this.value;
		}finally {


			lock.unlock();
		}
	}
	//写入
	public void setValue(String value) {


		lock.lock();
		try {


			try {


				Thread.sleep(1000);
			} catch (InterruptedException e) {


				// TODO Auto-generated catch block
				e.printStackTrace();
			}
			System.out.println("写入:"+value);
			this.value=value;
		}finally {


			lock.unlock();
		}
	}
}
TestReadWriteLock类:
public class TestReadWriteLock {


	public static void main(String[] args) {


		ReadWriteDemo readWriteDemo=new ReadWriteDemo();
		//创建线程池
		ExecutorService es=Executors.newFixedThreadPool(20);

		Runnable read=new Runnable() {


			@Override
			public void run() {


				readWriteDemo.getValue();
			}
		};
		Runnable write=new Runnable() {


			@Override
			public void run() {


				readWriteDemo.setValue("张三:"+new Random().nextInt(100));
			}
		};
		long start=System.currentTimeMillis();
		//分配2个写的任务
		for(int i=0;i<2;i++) {


			es.submit(write);
		}

		//分配18读取任务
		for(int i=0;i<18;i++) {


			es.submit(read);
		}

		es.shutdown();//关闭
		while(!es.isTerminated()) {

    //空转
			//如果任务都完成,es.isTerminated() 返回true  这个写法,保证了主线程不会提前结束!
		}
		long end=System.currentTimeMillis();
		System.out.println("用时:"+(end-start));
	}
}
十、线程安全集合
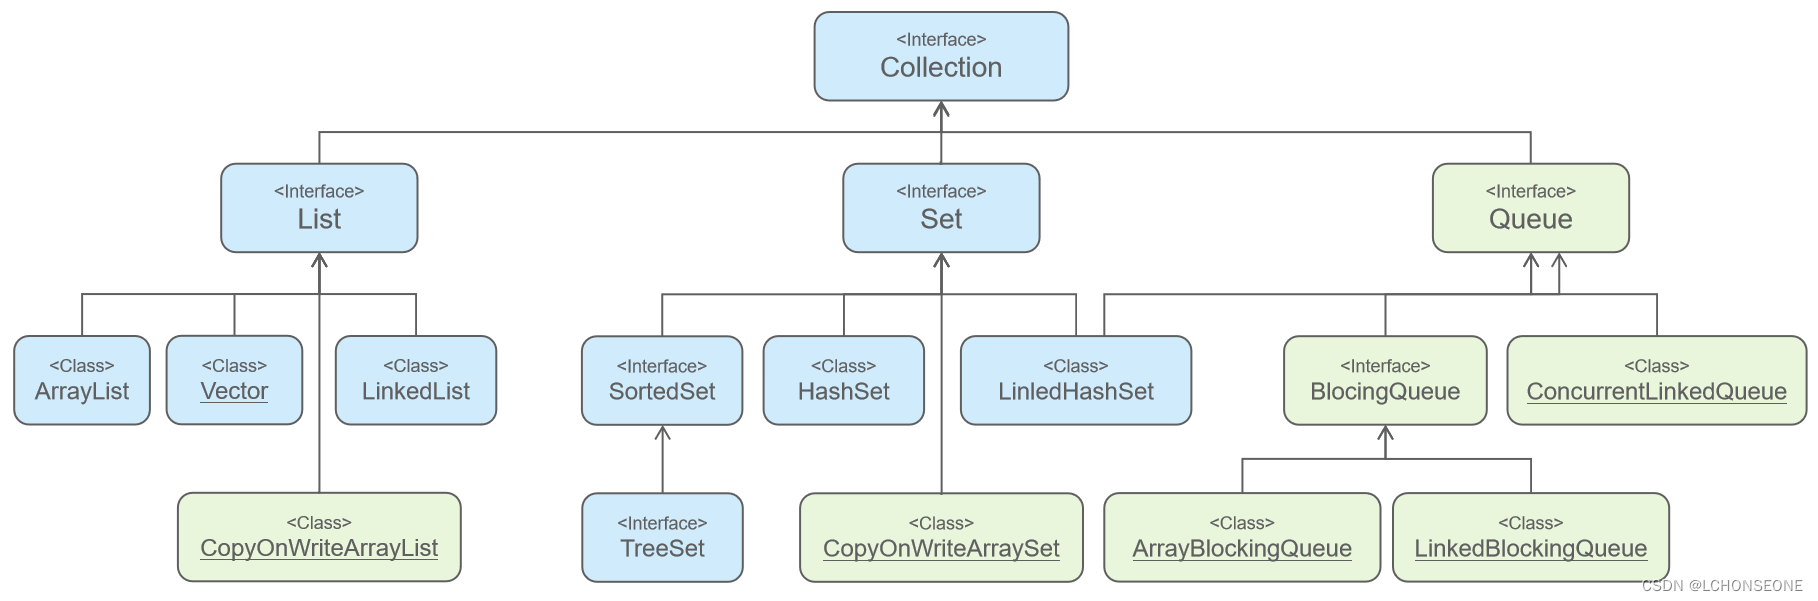
Collections工具类中提供了多个可以获得线程安全集合的方法。
| 方法名 |
|---|
| public static Collection synchronizedCollection(Collection c) |
| public static List synchronizedList(List list) |
| public static Set synchronizedSet(Set s) |
| public static <K,V> Map<K,V> synchronizedMap(Map<K,V> m) |
| public static SortedSet synchronizedSortedSet(SortedSet s) |
| public static <K,V> SortedMap<K,V> synchronizedSortedMap(SortedMap<K,V> m) |
注:JDK1.2提供,接口统一、维护性高,但性能没有提升,均以synchonized实现。
10.1 CopyOnWriteArrayList
- 线程安全的ArrayList,加强版读写分离。
- 写时复制: 写的时候会复制一个容器,完成 写的操作,写完后,把引用指向新的容器
- 写有锁,读无锁,读写之间不阻塞,优于读写锁。
- 写入时,先copy一个容器副本、再添加新元素,最后替换引用。
- 使用方式与ArrayList无异。
public class TestCopyOnWriteArrayList {


	public static void main(String[] args) {


		//1创建集合
		CopyOnWriteArrayList<String> list=new CopyOnWriteArrayList<>();
		//2使用多线程操作
		ExecutorService es=Executors.newFixedThreadPool(5);
		//3提交任务
		for(int i=0;i<5;i++) {


			es.submit(new Runnable() {


				@Override
				public void run() {


					for(int j=0;j<10;j++) {


						list.add(Thread.currentThread().getName()+"...."+new Random().nextInt(1000));
					}
				}
			});
		}
		//4关闭线程池
		es.shutdown();
		while(!es.isTerminated()) {

    }
		//5打印结果
		System.out.println("元素个数:"+list.size());
		for (String string : list) {


			System.out.println(string);
		}
	}
}
10.2 CopyOnWriteArraySet
- 线程安全的Set,底层使用CopyOnWriteArrayList实现。
- 唯一不同在于,使用addIfAbsent()添加元素,会遍历数组。
- 如存在元素,则不添加(扔掉副本)。
public class TestCopyOnWriteArraySet {


	public static void main(String[] args) {


		//1创建集合
		CopyOnWriteArraySet<String> set=new CopyOnWriteArraySet<>();
		//2添加元素
		set.add("pingguo");
		set.add("huawei");
		set.add("xiaomi");
		set.add("lianxiang");
		set.add("pingguo");
		//3打印
		System.out.println("元素个数:"+set.size());
		System.out.println(set.toString());
	}
}
10.3 ConcurrentHashMap
- 初始容量默认为16段(Segment),使用分段锁设计。
- 不对整个Map加锁,而是为每个Segment加锁。
- 当多个对象存入同一个Segment时,才需要互斥。
- 最理想状态为16个对象分别存入16个Segment,并行数量16。
- 使用方式与HashMap无异。
public class TestConcurrentHashMap {


	public static void main(String[] args) {


		//1创建集合
		ConcurrentHashMap<String, String> hashMap=new ConcurrentHashMap<String, String>();
		//2使用多线程添加数据
		for(int i=0;i<5;i++) {


			new Thread(new Runnable() {


				@Override
				public void run() {


					for(int k=0;k<10;k++) {


						hashMap.put(Thread.currentThread().getName()+"--"+k, k+"");
						System.out.println(hashMap);
					}
				}
			}).start();
		}
	}
}
10.4 Queue
- Collection的子接口,表示队列FIFO(First In First Out)。
推荐方法:
| 方法名 | 描述 |
|---|---|
| boolean offer(E e) | 顺序添加一个元素 (到达上限后,再添加则会返回false)。 |
| E poll() | 获得第一个元素并移除 (如果队列没有元素时,则返回null)。 |
| E peek() | 获得第一个元素但不移除 (如果队列没有元素时,则返回null)。 |
public class TestQueue {


	public static void main(String[] args) {


		//1创建队列
		Queue<String> queue=new LinkedList<>();
		//2入队
		queue.offer("苹果");
		queue.offer("橘子");
		queue.offer("葡萄");
		queue.offer("西瓜");
		queue.offer("榴莲");
		//3出队
		System.out.println(queue.peek());
		System.out.println("----------------");
		System.out.println("元素个数:"+queue.size());
		int size=queue.size();
		for(int i=0;i<size;i++) {


			System.out.println(queue.poll());
		}
		System.out.println("出队完毕:"+queue.size());

	}
}
10.5 ConcurrentLinkedQueue
线程安全、可高效读写的队列,高并发下性能最好的队列。
无界非阻塞队列,它是一个基于链表的无界线程安全队列。该队列的元素
遵循先进先出的原则。头是最先加入的,尾是最近加入的。插入元素是追加到
尾上。提取一个元素是从头提取。concurrentLinkedQueue.offer(“d”); // 将指定元素插入到此队列的尾部。
concurrentLinkedQueue.peek(); // 检索并不移除此队列的头,如果此队列为
空,则返回 null。
concurrentLinkedQueue.poll(); // 检索并移除此队列的头,如果此队列为空,
则返回 null。
public class TestConcsurrentLinkedQueue {


	public static void main(String[] args) throws Exception {


		//1创建安全队列
		ConcurrentLinkedQueue<Integer> queue=new ConcurrentLinkedQueue<>();
		//2入队操作
		Thread t1=new Thread(new Runnable() {


			@Override
			public void run() {


				for(int i=1;i<=5;i++) {


					queue.offer(i);
				}
			}
		});
		Thread t2=new Thread(new Runnable() {


			@Override
			public void run() {


				for(int i=6;i<=10;i++) {


					queue.offer(i);
				}
			}
		});
		//3启动线程
		t1.start();
		t2.start();

		t1.join();
		t2.join();
		System.out.println("-------------出队-------------");
		//4出队操作
		int size=queue.size();
		for(int i=0;i<size;i++) {


			System.out.println(queue.poll());
		}
	}
}
10.6 BlockingQueue
- Queue的子接口,阻塞的队列,增加了两个线程状态为无限期等待的方法。
- 可用于解决生产生、消费者问题。
推荐方法:
| 方法名 | 描述 |
|---|---|
| void put(E e) | 将指定元素插入此队列中,如果没有可用空间,则等待。 |
| E take() | 获取并移除此队列头部元素,如果没有可用元素,则等待。 |
用这个东西,进行改bread
10.6.1 ArrayBlockingQueue
- 数组结构实现,有界队列。
- 手工固定上限。
public class TestArrayBlockingQueue {


	public static void main(String[] args) throws Exception{


		//创建一个有界队列,添加数据
		ArrayBlockingQueue<String> queue=new ArrayBlockingQueue<>(5);
		//添加元素
		queue.put("aaa");
		queue.put("bbb");
		queue.put("ccc");
		queue.put("ddd");
		queue.put("eee");
		//删除元素
		queue.take();
		System.out.println("已经添加了5个元素");
		queue.put("xyz");
		System.out.println("已经添加了6个元素");
		System.out.println(queue.toString());
	}
}
10.6.2 LinkedBlockingQueue
- 链表结构实现,无界队列。
- 默认上限Integer.MAX_VALUE。
- 使用方法和ArrayBlockingQueue相同。
10.6.3 案例
使用阻塞队列实现生产者和消费者。
public class Demo7 {


	public static void main(String[] args) {


		//1创建队列
		ArrayBlockingQueue<Integer> queue=new ArrayBlockingQueue<>(6);
		//2创建两个线程
		Thread t1=new Thread(new Runnable() {


			@Override
			public void run() {


				for(int i=0;i<30;i++) {


					try {


						queue.put(i);
						System.out.println(Thread.currentThread().getName()+"生产了第"+i+"号面包");
					} catch (InterruptedException e) {


						// TODO Auto-generated catch block
						e.printStackTrace();
					}

				}
			}
		}, "晨晨");

		Thread t2=new Thread(new Runnable() {


			@Override
			public void run() {


				for(int i=0;i<30;i++) {


					try {


						Integer num=queue.take();
						System.out.println(Thread.currentThread().getName()+"消费了第"+i+"号面包");
					} catch (InterruptedException e) {


						// TODO Auto-generated catch block
						e.printStackTrace();
					}

				}
			}
		}, "冰冰");

		//启动线程
		t1.start();
		t2.start();
	}
}
public class Work5WriteRunnable implements  Runnable {


    //文件 名
    private  String fileName;
    //写的流
    FileOutputStream fis = null; //写入字节流
    OutputStreamWriter w = null; //字符转换流
    BufferedWriter bw = null; // 字符 缓冲流

    //用构造器传入要操作的文件
    public Work5WriteRunnable(String fileName) {


        this.fileName = fileName;
    }

    // 重写线程方法
    @Override
    public void run() {


        try {


            //1.初始化流的操作对象
            fis = new FileOutputStream(fileName);
            w = new OutputStreamWriter(fis,"utf8");
            bw = new BufferedWriter(w);

            //2写一些数据
            System.out.println("============"+Thread.currentThread().getName()+"开始写数据");
            for (int i = 0; i < 100; i++) {


                bw.write("小乔--"+i);
                bw.flush();  //只要有数据就往里放,以便read线程及时读取
            }
            //3.把缓总
            bw.flush();
            System.out.println("============"+Thread.currentThread().getName()+"结束写数据");


        } catch (FileNotFoundException e) {


            e.printStackTrace();
        } catch (UnsupportedEncodingException e) {


            e.printStackTrace();
        } catch (IOException e) {


            e.printStackTrace();
        } finally {


            //关闭流
            try {


                bw.close();
                w.close();
                fis.close();
            } catch (IOException e) {


                e.printStackTrace();
            }
        }
    }
}
package com.qfedu.work;

public class Work5Main {


    public static void main(String[] args) {


        Runnable rr  = new Work5ReaderRunnable("D:\\aa.txt");
        Runnable rw  = new Work5WriteRunnable("D:\\aa.txt");

        Thread t1 = new Thread(rr," 读线程 ");
        Thread t2 = new Thread(rw," 写线程 ");

        t2.start();
        t1.start();
    }
}