1.热部署
1.1 手动启动热部署
使用图书管理项目(springboot_books)
修改books.html的修改方法
//修改
handleEdit() {


    axios.put("/books",this.formData).then((res)=>{


        //判断当前操作是否成功
        if(res.data.flag){


            //1.关闭弹层
            this.dialogFormVisible4Edit = false;
            this.$message.success(res.data.msg);
        }else{


            this.$message.error(es.data.msg);
        }
    }).finally(()=>{


        //2.重新加载数据
        this.getAll();
    });
}
① 添加开发者工具的依赖坐标
<dependency>
    <groupId>org.springframework.boot</groupId>
    <artifactId>spring-boot-devtools</artifactId>
</dependency>
② 激活热部署:Ctrl + F9
也就是build ==> build poject
关于热部署
重启(Restart):自定义开发代码,包含类、页面、配置文件等,加载位置restart类加载器
重载(ReLoad):jar包,加载位置base类加载器
1.2 自动启动热部署
开启自动激活部署
设置自动构建项目
第一步:

第二步:
旧版是:ctrl+shift+Alt+/ 快捷键弹出窗口选择Registry,然后勾选compiler.automake.allow.when.app.running
新版设置如下:
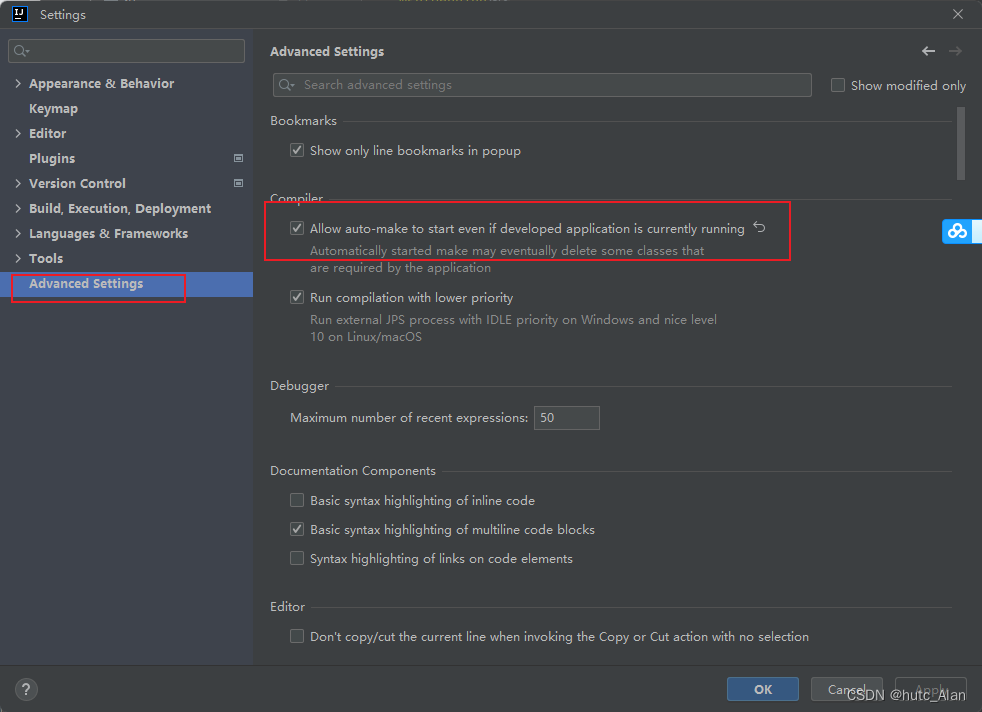
激活方式:idea失去焦点5秒后启动热部署
1.3 热部署范围配置
默认不触发启动的目录列表
/META-INF/maven
/META-INF/resources
/resources
/static
/public
/templates
自定义不参与重启排除项
spring:
  devtools:
    restart:
      #设置不参与热部署的文件或文件夹
      exclude: public/**,static/**
1.4 关闭热部署
关闭热部署
方式一:
spring:
  devtools:
    restart:
      enabled: false
方式二:
设置高优先级属性禁用热部署

package com.example;

import org.springframework.boot.SpringApplication;
import org.springframework.boot.autoconfigure.SpringBootApplication;

@SpringBootApplication
public class SpringbootBooksApplication {


    public static void main(String[] args) {


        System.setProperty("spring.devtools.restart.enabled","false");
        SpringApplication.run(SpringbootBooksApplication.class, args);
    }

}
2.配置高级
创建一个新的springboot项目,不使用web
springboot使用2.5.4版本
2.1 @ConfigurationPoperties
属性绑定
① 添加lombok依赖
<dependency>
    <groupId>org.projectlombok</groupId>
    <artifactId>lombok</artifactId>
</dependency>
② 添加配置
servers:
  ipAddress: 192.168.0.1
  port: 1234
  timeout: -1
③ 添加ServersConfig类
package com.example.config;

import lombok.Data;
import org.springframework.boot.context.properties.ConfigurationProperties;
import org.springframework.stereotype.Component;

@Data
@Component
@ConfigurationProperties(prefix = "servers")
public class ServersConfig {


    private String ipAddress;
    private int port;
    private long timeout;
}
④ 测试
package com.example;

import com.example.config.ServersConfig;
import org.springframework.boot.SpringApplication;
import org.springframework.boot.autoconfigure.SpringBootApplication;
import org.springframework.context.ConfigurableApplicationContext;

@SpringBootApplication
public class Spingboot03Application {


    public static void main(String[] args) {


        ConfigurableApplicationContext ctx = SpringApplication.run(Spingboot03Application.class, args);
        ServersConfig bean = ctx.getBean(ServersConfig.class);
        System.out.println(bean);
    }

}
使用@ConfigurationPoperties为第三方bean绑定属性
① 添加druid依赖
<dependency>
    <groupId>com.alibaba</groupId>
    <artifactId>druid</artifactId>
    <version>1.1.16</version>
</dependency>
② 在配置文件中添加
datasource:
  driverClassName: com.mysql.jc.jdbc.Driver456789
③ 测试
package com.example;

import com.alibaba.druid.pool.DruidDataSource;
import com.example.config.ServersConfig;
import org.springframework.boot.SpringApplication;
import org.springframework.boot.autoconfigure.SpringBootApplication;
import org.springframework.boot.context.properties.ConfigurationProperties;
import org.springframework.context.ConfigurableApplicationContext;
import org.springframework.context.annotation.Bean;

@SpringBootApplication
public class Spingboot03Application {


    @Bean
    @ConfigurationProperties(prefix = "datasource")
    public DruidDataSource datasource(){


        DruidDataSource ds = new DruidDataSource();
        return ds;
    }

    public static void main(String[] args) {


        ConfigurableApplicationContext ctx = SpringApplication.run(Spingboot03Application.class, args);
        ServersConfig bean = ctx.getBean(ServersConfig.class);
        System.out.println(bean);
        DruidDataSource ds = ctx.getBean(DruidDataSource.class);
        System.out.println(ds.getDriverClassName());
    }

}
注解:@EnableConfigurationProperties
@EnableConfigurationProperties注解可以将使用@ConfigurationProperties注解对应的类加入Spring容器
@SpringBootApplication
@EnableConfigurationProperties(ServerConfig.class)
public class DemoApplication {


}
//@Component
@Data
@ConfigurationProperties(prefix = "servers")
public class ServerConfig {


}
注意事项:@EnableConfigurationProperties与@Component不能同时使用
解除使用@ConfigurationProperties注释警告
<dependency>
    <groupId>org.springframework.boot</groupId>
    <artifactId>spring-boot-configuration-processor</artifactId>
</dependency>
2.2 宽松绑定/松散绑定
@ConfigurationProperties绑定属性支持属性名宽松绑定
@Data
@Component
@ConfigurationProperties(prefix = "servers")
public class ServersConfig {


    private String ipAddress;
    private int port;
    private long timeout;
}
servers:
#  ipAddress: 192.168.0.1   # 驼峰
#  ipaddress: 192.168.0.2
#  ip_address: 192.168.0.3  # unline
  ip-address: 192.168.0.4   # 烤肉串模式:0-0-0-0
#  IPADDRESS: 192.168.0.5
#  IP_ADDRESS: 192.168.0.6  #常量
#  IP_ADD_R-ES_S: 192.168.0.7
  port: 1234
  timeout: -1
注意事项:
宽松绑定不支持注解@Value引用单个属性的方式
绑定前缀名命名规范:仅能使用纯小写字母、数字、下划线作为合法的字符
2.3 常用计量单位绑定
SpringBoot支持JDK8提供的时间与空间计量单位
package com.example.config;

import lombok.Data;
import org.springframework.boot.context.properties.ConfigurationProperties;
import org.springframework.boot.convert.DataSizeUnit;
import org.springframework.boot.convert.DurationUnit;
import org.springframework.stereotype.Component;
import org.springframework.util.unit.DataSize;
import org.springframework.util.unit.DataUnit;

import java.time.Duration;
import java.time.temporal.ChronoUnit;

@Data
@Component
@ConfigurationProperties(prefix = "servers")
public class ServersConfig {


    private String ipAddress;
    private int port;
    private long timeout;
    @DurationUnit(ChronoUnit.HOURS)
    private Duration serverTimeOut;
    @DataSizeUnit(DataUnit.MEGABYTES)
    private DataSize dataSize;
}
配置文件
servers:
  ip-address: 192.168.0.4
  port: 1234
  timeout: -1
  serverTimeOut: 3
#  dataSize: 10MB
  dataSize: 10
2.4 数据校验
开启数据校验有助于系统安全性,J2EE规范中JSR303规范定义了一组有关数据校验的API
实验
1.导入JSR303规范坐标与Hibernate校验框架对应坐标
<!--导入JSR303规范-->
<dependency>
    <groupId>javax.validation</groupId>
    <artifactId>validation-api</artifactId>
</dependency>

<!--使用hibernate框架提供的校验器做实现类-->
<dependency>
    <groupId>org.hibernate.validator</groupId>
    <artifactId>hibernate-validator</artifactId>
</dependency>
2.对bean开启校验功能及设置效验规则
package com.example.config;

import lombok.Data;
import org.springframework.boot.context.properties.ConfigurationProperties;
import org.springframework.boot.convert.DataSizeUnit;
import org.springframework.boot.convert.DurationUnit;
import org.springframework.stereotype.Component;
import org.springframework.util.unit.DataSize;
import org.springframework.util.unit.DataUnit;
import org.springframework.validation.annotation.Validated;

import javax.validation.constraints.Max;
import javax.validation.constraints.Min;
import java.time.Duration;
import java.time.temporal.ChronoUnit;

@Data
@Component
@ConfigurationProperties(prefix = "servers")
//2.开启对当前bean的属性注入校验
@Validated
public class ServersConfig {


    private String ipAddress;
    //3.设置具体的规则
    @Max(value = 8888,message = "最大值不能超过8888")
    @Min(value = 202,message = "最小值不能小于202")
    private int port;
    private long timeout;
    @DurationUnit(ChronoUnit.HOURS)
    private Duration serverTimeOut;
    @DataSizeUnit(DataUnit.MEGABYTES)
    private DataSize dataSize;
}
2.5 补充
yaml语法规则
字面值表达方式
boolean: TRUE  			#TRUE,true,True,FALSE,false,False均可
float: 3.14    			#6.8523015e+5  #支持科学计数法
int: 123       			#0b1010_0111_0100_1010_1110    #支持二进制、八进制、十六进制
null: ~        			#使用~表示null
string: HelloWorld      		#字符串可以直接书写
string2: "Hello World"  		#可以使用双引号包裹特殊字符
date: 2018-02-17        		#日期必须使用yyyy-MM-dd格式
datetime: 2018-02-17T15:02:31+08:00  #时间和日期之间使用T连接,最后使用+代表时区
3.测试
3.1 加载测试专用属性
① 在启动测试环境时可以通过properties参数设置测试环境专用的属性
优势:比多环境开发中的测试环境影响范围更小,仅对当前测试类有效
② 在启动测试环境时可以通过args参数设置测试环境专用的传入参数
测试类
package com.example;

import org.junit.jupiter.api.Test;
import org.springframework.beans.factory.annotation.Value;
import org.springframework.boot.test.context.SpringBootTest;

//properties属性可以为当前测试用例添加临时的属性配置
//@SpringBootTest(properties = {"test.prop=testValue1"})

//args属性可以为当前测试用例添加临时的命令行参数
//@SpringBootTest(args = {"--test.prop=testValue2"})

//args覆盖properties
@SpringBootTest(args = {

    "--test.prop=testValue2"},properties = {

    "test.prop=testValue1"})
public class PropertiesAndArgsTest {


    @Value("${test.prop}")
    private String msg;

    @Test
    void testProperties(){


        System.out.println(msg);
    }
}
3.2 加载测试专用配置
使用@Import注解加载当前测试类专用的配置
实验
在测试包下创建
MsgConfig
package com.example.config;

import org.springframework.context.annotation.Bean;
import org.springframework.context.annotation.Configuration;

@Configuration
public class MsgConfig {


    @Bean
    public String msg(){


        return "bean msg";
    }
}
ConfigurationTest
package com.example;

import com.example.config.MsgConfig;
import org.junit.jupiter.api.Test;
import org.springframework.beans.factory.annotation.Autowired;
import org.springframework.boot.test.context.SpringBootTest;
import org.springframework.context.annotation.Import;

@SpringBootTest
@Import(MsgConfig.class)
public class ConfigurationTest {


    @Autowired
    private String msg;

    @Test
    void testConfiguration(){


        System.out.println(msg);
    }
}
3.3 Web环境模拟测试
将pom.xml中的spring-boot-starter依赖改为spring-boot-starter-web
<dependency>
    <groupId>org.springframework.boot</groupId>
    <artifactId>spring-boot-starter-web</artifactId>
</dependency>
模拟端口
package com.example;


import org.junit.jupiter.api.Test;
import org.springframework.boot.test.context.SpringBootTest;

//RANDOM_PORT随机端口 DEFINED_PORT默认端口(8080)
@SpringBootTest(webEnvironment = SpringBootTest.WebEnvironment.RANDOM_PORT)
public class WebTest {


    @Test
    void test(){


    }
}
虚拟请求
main包下创建controller类
package com.example.controller;

import org.springframework.web.bind.annotation.GetMapping;
import org.springframework.web.bind.annotation.RequestMapping;
import org.springframework.web.bind.annotation.RestController;

@RestController
@RequestMapping("/books")
public class BookController {


    @GetMapping
    public String getById(){


        System.out.println("getById is running ...");
        return "springboot";
    }
}
虚拟请求测试
package com.example;

import org.junit.jupiter.api.Test;
import org.springframework.beans.factory.annotation.Autowired;
import org.springframework.boot.test.autoconfigure.web.servlet.AutoConfigureMockMvc;
import org.springframework.boot.test.context.SpringBootTest;
import org.springframework.test.web.servlet.MockMvc;
import org.springframework.test.web.servlet.request.MockHttpServletRequestBuilder;
import org.springframework.test.web.servlet.request.MockMvcRequestBuilders;

//RANDOM_PORT随机端口 DEFINED_PORT默认端口
@SpringBootTest(webEnvironment = SpringBootTest.WebEnvironment.RANDOM_PORT)
//开启虚拟MVC调用
@AutoConfigureMockMvc
public class WebTest {


    @Test
    void test(){


    }

    @Test
    void testWeb(@Autowired MockMvc mvc) throws Exception {


        //创建虚拟请求,当前访问/books
        MockHttpServletRequestBuilder builder = MockMvcRequestBuilders.get("/books");
        //执行对应的请求
        mvc.perform(builder);
    }
}
虚拟请求状态匹配
    @Test
    void testStatus(@Autowired MockMvc mvc) throws Exception {


//        MockHttpServletRequestBuilder builder = MockMvcRequestBuilders.get("/books");
        MockHttpServletRequestBuilder builder = MockMvcRequestBuilders.get("/books1");
        ResultActions action = mvc.perform(builder);

        //设定预期值,与真实值进行比较,成功测试通过,失败测试失败
        //定义本次调用的预期值
        StatusResultMatchers status = MockMvcResultMatchers.status();
        //预计本次调用成功的:状态200
        ResultMatcher ok = status.isOk();
        //添加预期值到本次调用过程中进行匹配
        action.andExpect(ok);
    }
虚拟请求体匹配
    @Test
    void testBody(@Autowired MockMvc mvc) throws Exception {


        MockHttpServletRequestBuilder builder = MockMvcRequestBuilders.get("/books");
        ResultActions action = mvc.perform(builder);

        //设定预期值,与真实值进行比较,成功测试通过,失败测试失败
        //定义本次调用的预期值
        ContentResultMatchers content = MockMvcResultMatchers.content();
        //预计本次调用成功的预期结果
//        ResultMatcher result = content.string("springboot");
        ResultMatcher result = content.string("springboot2");
        //添加预期值到本次调用过程中进行匹配
        action.andExpect(result);
    }
虚拟请求体(json)匹配
实体类
package com.example.domain;

import lombok.Data;

@Data
public class Book {


    private int id;
    private String name;
    private String type;
    private String Description;
}
controller类模拟数据
package com.example.controller;

import com.example.domain.Book;
import org.springframework.web.bind.annotation.GetMapping;
import org.springframework.web.bind.annotation.RequestMapping;
import org.springframework.web.bind.annotation.RestController;

@RestController
@RequestMapping("/books")
public class BookController {


    @GetMapping
    public Book getById(){


        System.out.println("getById is running ...");
        Book book = new Book();
        book.setId(1);
        book.setName("springboot");
        book.setType("springboot");
        book.setDescription("springboot");
        return book;
    }
}
测试
    @Test
    void testJson(@Autowired MockMvc mvc) throws Exception {


        MockHttpServletRequestBuilder builder = MockMvcRequestBuilders.get("/books");
        ResultActions action = mvc.perform(builder);

        //设定预期值,与真实值进行比较,成功测试通过,失败测试失败
        //定义本次调用的预期值
        ContentResultMatchers content = MockMvcResultMatchers.content();
        //预计本次调用成功的预期结果
//        ResultMatcher result = content.string("{\"id\":1,\"name\":\"springboot\",\"type\":\"springboot\",\"description\":\"springboot\"}");
        ResultMatcher result = content.string("{\"id\":1,\"name\":\"springboot\",\"type\":\"springboot\",\"description\":\"springboot2\"}");
        //添加预期值到本次调用过程中进行匹配
        action.andExpect(result);
    }
虚拟请求响应头匹配
    @Test
    void testContentType(@Autowired MockMvc mvc) throws Exception {


        MockHttpServletRequestBuilder builder = MockMvcRequestBuilders.get("/books");
        ResultActions action = mvc.perform(builder);

        //设定预期值,与真实值进行比较,成功测试通过,失败测试失败
        //定义本次调用的预期值
        HeaderResultMatchers header = MockMvcResultMatchers.header();
        //预计本次调用成功的预期结果
        ResultMatcher contentType = header.string("Content-Type","application/json");
        //添加预期值到本次调用过程中进行匹配
        action.andExpect(contentType);
    }
模拟测试
    @Test
    void testGetById(@Autowired MockMvc mvc) throws Exception {


        MockHttpServletRequestBuilder builder = MockMvcRequestBuilders.get("/books");
        ResultActions action = mvc.perform(builder);

        StatusResultMatchers status = MockMvcResultMatchers.status();
        ResultMatcher ok = status.isOk();
        action.andExpect(ok);

        ContentResultMatchers content = MockMvcResultMatchers.content();
        ResultMatcher result = content.string("{\"id\":1,\"name\":\"springboot\",\"type\":\"springboot\",\"description\":\"springboot2\"}");
        action.andExpect(result);

        HeaderResultMatchers header = MockMvcResultMatchers.header();
        ResultMatcher contentType = header.string("Content-Type","application/json");
        action.andExpect(contentType);
    }
3.4 数据层测试回滚
在图书管理项目中实验
1.为测试用例添加事务,SpringBoot会对测试用例对应的事务提交操作进行回滚
2.如果想在测试用例中提交事务,可以通过@Rollback注释设置
package com.example;

import com.example.domain.Book;
import com.example.service.BookService;
import org.junit.jupiter.api.Test;
import org.springframework.beans.factory.annotation.Autowired;
import org.springframework.boot.test.context.SpringBootTest;
import org.springframework.test.annotation.Rollback;
import org.springframework.transaction.annotation.Transactional;

@SpringBootTest
//@Transactional默认发生回滚即@Rollback(true)
@Transactional
//@Rollback(false)
public class ServiceTest {


    @Autowired
    private BookService bookService;

    @Test
    void testSave(){


        Book book = new Book();
        book.setName("springboot");
        book.setType("springboot");
        book.setDescription("springboot");

        bookService.save(book);
    }
}
3.5 测试用例数据设定
测试用例数据通常采用随机值进行测试,使用SpringBoot提供的随机数为其赋值
① 在配置文件中添加
testcase:
  book:
    id: ${random.int}
    id2: ${random.int(10)} # 随机生成10以内的值
    name: ${random.value}
    uuid: ${random.uuid}
    publishTime: ${random.long}
② 实体类
package com.example.testcase.domain;

import lombok.Data;
import org.springframework.boot.context.properties.ConfigurationProperties;
import org.springframework.stereotype.Component;

@Component
@Data
@ConfigurationProperties(prefix = "testcase.book")
public class BookCase {


    private int id;
    private int id2;
    private String name;
    private String uuid;
    private long publishTime;
}
③ 测试随机赋值
package com.example.testcase.domain;

import org.junit.jupiter.api.Test;
import org.springframework.beans.factory.annotation.Autowired;
import org.springframework.boot.test.context.SpringBootTest;

@SpringBootTest
public class BookCaseTest {


    @Autowired
    private BookCase bookCase;

    @Test
    void testProperties(){


        System.out.println(bookCase);
    }
}
补充:
- ${random.int}表示随机整数
- ${random.int(10)}表示10以内的随机数
- ${random.int(10,20)}表示10到20的随机数
- 其中()可以是任意字符,例如[],!!均可
4.数据层解决方案
4.1 SQL
现有数据层解决方案技术选型
Druid + MyBatis-Plus + MySQL
数据源:DruidDataSource
持久化技术:MyBatis-Plus / MyBatis
数据库:MySQL
数据源配置格式
格式一
spring:
  datasource:
    druid:
      driver-class-name: com.mysql.cj.jdbc.Driver
      url: jdbc:mysql://192.168.1.224:3306/ssm_db
      username: root
      password: 123456
格式二
spring:
  datasource:
    driver-class-name: com.mysql.cj.jdbc.Driver
    url: jdbc:mysql://192.168.1.224:3306/ssm_db
    username: root
    password: 123456
    type: com.alibaba.druid.pool.DruidDataSource
4.1.1 内置数据源
数据源配置
- SpringBoot提供了3种内嵌的数据源对象供开发者选择
- HikariCP:默认内置数据源对象
- Tomcat提供DataSource:HikariCP不可用的情况下,且在web环境中,将使用tomcat服务器配置的数据源对象
- Commons DBCP:Hikari不可用,tomcat数据源也不可用,将使用dbcp数据源
spring:
  datasource:
    hikari:
      driver-class-name: com.mysql.cj.jdbc.Driver
      username: root
      password: 123456
      maximum-pool-size: 50
    url: jdbc:mysql://192.168.1.224:3306/ssm_db
4.1.2 内置持久化解决方案——jdbcTemplate
内置持久化解决方案——jdbcTemplate
添加依赖
<dependency>
    <groupId>org.springframework.boot</groupId>
    <artifactId>spring-boot-starter-jdbc</artifactId>
</dependency>
测试
package com.example;

import com.example.domain.Book;
import org.junit.jupiter.api.Test;
import org.springframework.beans.factory.annotation.Autowired;
import org.springframework.boot.test.context.SpringBootTest;
import org.springframework.jdbc.core.JdbcTemplate;
import org.springframework.jdbc.core.RowMapper;

import java.sql.ResultSet;
import java.sql.SQLException;
import java.util.List;

@SpringBootTest
public class SpringBootSqlTest {


    @Autowired
    private JdbcTemplate jdbcTemplate;

    @Test
    void testJdbcTemplateSave(){


        String sql = "insert into tbl_book values(2,'springboot2','springboot2','springboot2')";
        jdbcTemplate.update(sql);
    }

    @Test
    void testJdbc(){


        String sql = "select * from tbl_book where id = 1";
        List<Book> query = jdbcTemplate.query(sql, new RowMapper<Book>() {


            @Override
            public Book mapRow(ResultSet rs, int rowNum) throws SQLException {


                Book temp = new Book();
                temp.setId(rs.getInt("id"));
                temp.setName(rs.getString("name"));
                temp.setType(rs.getString("type"));
                temp.setDescription(rs.getString("description"));

                return temp;
            }
        });

        System.out.println(query);
    }
}
JdbcTemplate配置
spring:
  jdbc:
    template:
      query-timeout: -1   # 查询超时时间
      max-rows: 500       # 最大行数
      fetch-size: -1      # 缓存行数
4.1.3 内嵌数据库
内嵌数据库
- SpringBoot提供了3种内嵌数据库供开发者选择,提高开发测试效率
- H2
- HSQL
- Derby
① 导入H2相关坐标
<dependency>
    <groupId>com.h2database</groupId>
    <artifactId>h2</artifactId>
    <scope>runtime</scope>
</dependency>
<dependency>
    <groupId>org.springframework.boot</groupId>
    <artifactId>spring-boot-starter-jdbc</artifactId>
</dependency>
② 设置当前项目为web工程,并配置H2管理控制台参数
访问用户名sa,默认密码123456
server:
  port: 80
spring:
  h2:
    console:
      enabled: true
      path: /h2
  datasource:
    hikari:
      driver-class-name: org.h2.Driver
      username: sa
      password: 123456
    url: jdbc:h2:~/test
③ 浏览器访问:http://localhost/h2
输入密码登录
操作数据库(创建表)
create table tbl_book (id int,name varchar,type varchar,description varchar);

insert into tbl_book values(1,'springboot','springboot','springboot');

select * from tbl_book;
运行SpringBootSqlTest测试类
H2数据库控制台仅用于开发阶段,线上项目请务必关闭控制台功能
spring:
  h2:
    console:
      enabled: false
      path: /h2
SpringBoot可以根据url地址自动识别数据库种类,在保障驱动类存在的情况下,可以省略配置
server:
  port: 80
spring:
  h2:
    console:
      enabled: true
      path: /h2
  datasource:
    hikari:
      # driver-class-name: org.h2.Driver
      username: sa
      password: 123456
    url: jdbc:h2:~/test
4.2 NoSQL
市场上常见的NoSQL解决方案
Redis
Mongo
ES
说明:上述技术通常在Linux西永中安装部署,为降低学习者压力,下面内容是基于Windows版本的
4.2.1 Redis
-
Redis是一款key-value存储结构的内存级NoSQL数据库
- 支持多种数据存储格式
- 支持持久化
- 支持集群
-
Redis下载( Windows版)
- https://github.com/tporadowski/redis/releases
- Redis-x64-5.0.14.msi(链接:https://pan.baidu.com/s/1sp2qwD-_0J_eVzU6DsJsjw 提取码:02uy)
-
Redis安装与启动(Windows版)
- Windows解压安装或一键式安装
- 服务端启动
redis-server.exe redis.windows.conf - 客户端启动命令
redis-cli.exe
Redis启动
Windows版本存在bug,执行redis-cli.exe --> shutdown --> exit --> redis-server.exe redis.windows.conf 启动Redis
D:\tools\redis>redis-cli.exe
127.0.0.1:6379> shutdown
not connected> exit

D:\tools\redis>redis-server.exe redis.windows.conf
[25480] 03 Jun 15:39:45.243 # oO0OoO0OoO0Oo Redis is starting oO0OoO0OoO0Oo
[25480] 03 Jun 15:39:45.243 # Redis version=5.0.14.1, bits=64, commit=ec77f72d, modified=0, pid=25480, just started
[25480] 03 Jun 15:39:45.243 # Configuration loaded
                _._
           _.-``__ ''-._
      _.-``    `.  `_.  ''-._           Redis 5.0.14.1 (ec77f72d/0) 64 bit
  .-`` .-```.  ```\/    _.,_ ''-._
 (    '      ,       .-`  | `,    )     Running in standalone mode
 |`-._`-...-` __...-.``-._|'` _.-'|     Port: 6379
 |    `-._   `._    /     _.-'    |     PID: 25480
  `-._    `-._  `-./  _.-'    _.-'
 |`-._`-._    `-.__.-'    _.-'_.-'|
 |    `-._`-._        _.-'_.-'    |           http://redis.io
  `-._    `-._`-.__.-'_.-'    _.-'
 |`-._`-._    `-.__.-'    _.-'_.-'|
 |    `-._`-._        _.-'_.-'    |
  `-._    `-._`-.__.-'_.-'    _.-'
      `-._    `-.__.-'    _.-'
          `-._        _.-'
              `-.__.-'

[25480] 03 Jun 15:39:45.246 # Server initialized
[25480] 03 Jun 15:39:45.248 * DB loaded from disk: 0.000 seconds
[25480] 03 Jun 15:39:45.249 * Ready to accept connections
Redis最基本的操作
D:\tools\redis>Redis-cli
127.0.0.1:6379> set name test
OK
127.0.0.1:6379> get name
"test"
127.0.0.1:6379> set name2 test2
OK
127.0.0.1:6379> keys *
1) "name2"
2) "name"
127.0.0.1:6379> hset keya a1 aa1
(integer) 1
127.0.0.1:6379> hset keya a2 aa2
(integer) 1
127.0.0.1:6379> hget keya a1
"aa1"
127.0.0.1:6379> hget keya a2
"aa2"
想要了解更多可以去找Redis课程学习
4.2.2 SpringBoot整合Redis
新建SpringBoot项目,勾选Spring Data Redis(Access + Driver)
SpringBoot版本选择2.5.4
① 配置Redis(采用默认配置)
# 使用默认地址和端口号可以不进行配置(内部已经配置)
spring:
  redis:
    host: localhost
    port: 6379
② RedisTemplate提供操作各种数据存储类型的接口API
客户端:RedisTemplate以对象作为key和value,内部对数据进行序列化
package com.example;

import org.junit.jupiter.api.Test;
import org.springframework.beans.factory.annotation.Autowired;
import org.springframework.boot.test.context.SpringBootTest;
import org.springframework.data.redis.core.HashOperations;
import org.springframework.data.redis.core.RedisTemplate;
import org.springframework.data.redis.core.ValueOperations;

@SpringBootTest
class SpringbootRedisApplicationTests {


    @Autowired
    private RedisTemplate redisTemplate;

    @Test
    void set() {


        ValueOperations ops = redisTemplate.opsForValue();
        ops.set("age",41);
    }

    @Test
    void get(){


        ValueOperations ops = redisTemplate.opsForValue();
        Object age = ops.get("age");
        System.out.println(age);
    }

    @Test
    void hset() {


        HashOperations ops = redisTemplate.opsForHash();
        ops.put("info","a","aa");
    }

    @Test
    void hget(){


        HashOperations ops = redisTemplate.opsForHash();
        Object val = ops.get("info","a");
        System.out.println(val);
    }
}
客户端:StringRedisTemplate以字符串作为key和value,与Redis客户端操作等效
package com.example;

import org.junit.jupiter.api.Test;
import org.springframework.beans.factory.annotation.Autowired;
import org.springframework.boot.test.context.SpringBootTest;
import org.springframework.data.redis.core.StringRedisTemplate;
import org.springframework.data.redis.core.ValueOperations;

@SpringBootTest
public class StringRedisTemplateTest {


    @Autowired
    private StringRedisTemplate stringRedisTemplate;

    @Test
    void get(){


        ValueOperations<String, String> ops = stringRedisTemplate.opsForValue();
        String name = ops.get("name");
        System.out.println(name);
    }
}
SpringBoot操作Redis客户端的技术切换(jdeis)
① 导入jdeis坐标
<dependency>
    <groupId>redis.clients</groupId>
    <artifactId>jedis</artifactId>
</dependency>
② 添加配置
spring:
  redis:
    host: localhost
    port: 6379
    client-type: jedis
    jedis:
      pool:
        max-active: 16
lettcus与jedis区别
- jedis连接Redis服务器是直连模式,当多线程模式下使用jedis会存在线程安全问题,解决方案可以通过配置连接池使每个连接专用,这样整体性能就大受影响。
- lettcus基于Netty框架进行与Redis服务器连接,底层设计中采用StatefulRedisConnection。 StatefulRedisConnection自身是线程安全的,可以保障并发访问安全问题,所以一个连接可以被多线程复用。当然lettcus也支持多连接实例一起工作。
4.2.3 MongoDB
MongoDB是一个开源、高性能、无模式的文档型数据库。NoSQL数据库产品中的一种,是最像关系型数据库的非关系型数据库
应用场景
- 淘宝用户数据
- 存储位置:数据库
- 特征:永久性存储,修改频度极低
- 游戏装备数据、游戏道具数据
- 存储位置:数据库、Mongodb
- 特征:永久性存储与临时存储相结合、修改频度较高
- 直播数据、打赏数据、粉丝数据
- 存储位置:数据库、Mongodb
- 特征:永久性存储与临时存储相结合,修改频度极高
- 物联网数据
- 存储位置:Mongodb
- 特征:临时存储,修改频度飞速
- 其他数据……
安装和启动
Windows版MongDB下载:
官网:https://www.mongodb.com/try/download
可以选择一键式安装或者解压缩(链接:https://pan.baidu.com/s/1-hRy0X-fKDKvO4vyzhzIaA 提取码:f6e6)
Windows版Mongo安装:
解压缩后设置数据目录(data\db)
Windows版Mongo启动:
服务端启动:
mongod --dbpath=..\data\db
客户端启动:
mongo --host=127.0.0.1 --port=27017
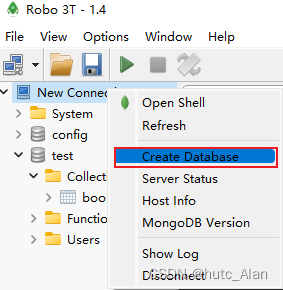
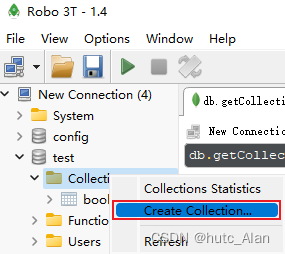
推荐可视化客户端Robo3T(链接:https://pan.baidu.com/s/1cpl_zE62YmR8-xkrm1byQA 提取码:n0cs)
Robo3T的使用
-
创建数据库
-
创建表
基础操作
3. 添加
//添加数据(文档)
db.book.save({"name":"springboot"})
db.book.save({"name":"springboot",type:"springboot"})
- 查询
//db.getCollection('book').find({})
//db.book.find()
db.book.find({type:"springboot"})
- 删除
//删除操作(不加条件相当于删除表)
db.book.remove({type:"springboot"})
- 修改
//修改操作
//只修改第一个符合条件的数据
db.book.update({name:"springboot"},{$set:{name:"springboot2"}})
//修改所有符合条件的数据
db.book.updateMany({name:"springboot2"},{$set:{name:"springboot"}})
MongoDB基础CRUD
- 基础查询
- 查询全部:db.集合.find();
- 查第一条:db.集合.findOne()
- 查询指定数量文档:db.集合.find().limit(10) //查10条文档
- 跳过指定数量文档:db.集合.find().skip(20) //跳过20条文档
- 统计:db.集合.count()
- 排序:db.集合.sort({age:1}) //按age升序排序
- 投影:db.集合名称.find(条件,{name:1,age:1}) //仅保留name与age域
- 条件查询
- 基本格式:db.集合.find({条件})
- 模糊查询:db.集合.find({域名:/正则表达式/}) //等同SQL中的like,比like强大,可以执行正则所有规则
- 条件比较运算:db.集合.find({域名:{$gt:值}}) //等同SQL中的数值比较操作,例如:name>18
- 包含查询:db.集合.find({域名:{$in:[值1,值2]}}) //等同于SQL中的in
- 条件连接查询:db.集合.find({$and:[{条件1},{条件2}]}) //等同于SQL中的and、or
4.2.4 SpringBoot整合MongoDB
1 创建的springboot项目,勾选Spring Data MongoDB,修改springboot版本为2.5.4
或者导坐标
<dependency>
    <groupId>org.springframework.boot</groupId>
    <artifactId>spring-boot-starter-data-mongodb</artifactId>
</dependency>
- 导入lombok坐标
<dependency>
    <groupId>org.projectlombok</groupId>
    <artifactId>lombok</artifactId>
</dependency>
- 创建实体类Book
java
package com.example.domain;

import lombok.Data;

@Data
public class Book {


    private int id;
    private String name;
    private String type;
    private String Description;
}
- 配置客户端
spring:
  data:
    mongodb:
      uri: mongodb://localhost/test
- 客户端读写MongoDB
package com.example;

import com.example.domain.Book;
import org.junit.jupiter.api.Test;
import org.springframework.beans.factory.annotation.Autowired;
import org.springframework.boot.test.context.SpringBootTest;
import org.springframework.data.mongodb.core.MongoTemplate;

import java.util.List;

@SpringBootTest
class SpringbootMongodbApplicationTests {


    @Autowired
    private MongoTemplate mongoTemplate;

    @Test
    void testSave() {


        Book book = new Book();
        book.setId(1);
        book.setName("springboot");
        book.setType("springboot");
        book.setDescription("springboot");

        mongoTemplate.save(book);
    }

    @Test
    void testFind(){


        List<Book> all = mongoTemplate.findAll(Book.class);
        System.out.println(all);
    }
}
如果测试find报错,则将id不是int型的数据删除
4.2.5 Elasticsearch(ES)
ES是一个分布式全文搜索引擎
倒排索引:指的是将文档内容中的单词作为索引,将包含该词的文档 ID 作为记录的结构。
Windows版ES下载:
下载网址:https://www.elastic.co/cn/downloads/elasticsearch
(链接:https://pan.baidu.com/s/1bW19luc5qZ64SrAhWjDJBQ 提取码:5n29)
Windows版ES安装与启动:
运行bin\elasticsearch.bat
使用postman测试
添加数据:发送put请求:http://localhost:9200/books
获取数据:发送get请求:http://localhost:9200/books
删除数据:发送delete请求:http://localhost:9200/books
注:如果send卡住,重启ES
IK分词器
下载地址:https://github.com/medcl/elasticsearch-analysis-ik/releases
将elasticsearch-analysis-ik-7.16.2.zip解压缩到plugins包中
发送put请求:http://localhost:9200/books
创建索引并指定规则(请求体中添加json格式数据)
{


    "mappings":{


        "properties":{


            "id":{


                "type":"keyword"
            },
            "name":{


                "type":"text",
                "analyzer":"ik_max_word",
                "copy_to":"all"
            },
            "type":{


                "type":"keyword"
            },
            "description":{


                "type":"text",
                "analyzer":"ik_max_word",
                "copy_to":"all"
            },
            "all":{


                "type":"text",
                "analyzer":"ik_max_word"
            }
        }
    }
}
4.2.6 ES文档操作
1.创建文档
请求体
{
    "name":"springboot",
    "type":"springboot",
    "description":"springboot"
}
发送post请求
http://localhost:9200/books/_doc #使用系统生成id
http://localhost:9200/books/_doc/1 #使用指定id,不存在创建,存在更新(版本递增)
http://localhost:9200/books/_create/1 #使用指定id
2.查询文档
发送get请求
http://localhost:9200/books/_doc/1 #查询单个文档
http://localhost:9200/books/_search #查询全部文档
3.条件查询
发送get请求
http://localhost:9200/books/_search?q=name:springboot
4.删除文档
发送delete请求
http://localhost:9200/books/_doc/1
5.修改文档(全量修改)
发送put请求
http://localhost:9200/books/_doc/1
请求体包含内容
{


    "name":"springboot",
    "type":"springboot",
    "description":"springboot"
}
6.修改文档(部分修改)
发送post请求
http://localhost:9200/books/_update/1
请求体内容为
{


    "doc":{


        "name":"springboot"
    }
}
4.2.7 SpringBoot整合ES客户端操作
低级别的客户端
- 创建新的springboot项目,勾选Spring Data Elasticsearch(Access+Driver)
或者添加坐标
<dependency>
    <groupId>org.springframework.boot</groupId>
    <artifactId>spring-boot-starter-data-elasticsearch</artifactId>
</dependency>
- 配置
spring:
  elasticsearch:
    rest:
      uris: http://localhost:9200
- 客户端
package com.example;

import org.junit.jupiter.api.Test;
import org.springframework.beans.factory.annotation.Autowired;
import org.springframework.boot.test.context.SpringBootTest;
import org.springframework.data.elasticsearch.core.ElasticsearchRestTemplate;

@SpringBootTest
class SpringbootEsApplicationTests {


    @Autowired
    private ElasticsearchRestTemplate template;
}
高级别的客户端
高版本的springboot已经整合了
- 添加依赖坐标
<dependency>
    <groupId>org.elasticsearch.client</groupId>
    <artifactId>elasticsearch-rest-high-level-client</artifactId>
</dependency>
- 客户端
package com.example;

import org.apache.http.HttpHost;
import org.elasticsearch.client.RequestOptions;
import org.elasticsearch.client.RestClient;
import org.elasticsearch.client.RestClientBuilder;
import org.elasticsearch.client.RestHighLevelClient;
import org.elasticsearch.client.indices.CreateIndexRequest;
import org.junit.jupiter.api.AfterEach;
import org.junit.jupiter.api.BeforeEach;
import org.junit.jupiter.api.Test;
import org.springframework.boot.test.context.SpringBootTest;

import java.io.IOException;

@SpringBootTest
class SpringbootEsApplicationTests {


    private RestHighLevelClient client;

    @BeforeEach
    void setUp() {


        HttpHost host = HttpHost.create("http://localhost:9200");
        RestClientBuilder builder = RestClient.builder(host);
        client = new RestHighLevelClient(builder);
    }

    @AfterEach
    void tearDown() throws IOException {


        client.close();
    }

    @Test
    void testCreateIndex() throws IOException {


        CreateIndexRequest request = new CreateIndexRequest("books");
        client.indices().create(request, RequestOptions.DEFAULT);
    }
}
- 添加文档
添加相关依赖
<dependency>
    <groupId>com.alibaba</groupId>
    <artifactId>fastjson</artifactId>
    <version>1.2.78</version>
</dependency>

<dependency>
    <groupId>org.projectlombok</groupId>
    <artifactId>lombok</artifactId>
</dependency>
测试添加文档
   package com.example;

import com.alibaba.fastjson.JSON;
import lombok.Data;
import org.apache.http.HttpHost;
import org.elasticsearch.action.admin.indices.delete.DeleteIndexRequest;
import org.elasticsearch.action.bulk.BulkRequest;
import org.elasticsearch.action.index.IndexRequest;
import org.elasticsearch.client.RequestOptions;
import org.elasticsearch.client.RestClient;
import org.elasticsearch.client.RestClientBuilder;
import org.elasticsearch.client.RestHighLevelClient;
import org.elasticsearch.client.indices.CreateIndexRequest;
import org.elasticsearch.common.xcontent.XContentType;
import org.junit.jupiter.api.AfterEach;
import org.junit.jupiter.api.BeforeEach;
import org.junit.jupiter.api.Test;
import org.springframework.boot.test.context.SpringBootTest;

import java.io.IOException;
import java.util.ArrayList;
import java.util.List;

@SpringBootTest
class SpringbootEsApplicationTests {


    private RestHighLevelClient client;

    @BeforeEach
    void setUp() {


        HttpHost host = HttpHost.create("http://localhost:9200");
        RestClientBuilder builder = RestClient.builder(host);
        client = new RestHighLevelClient(builder);
    }

    @AfterEach
    void tearDown() throws IOException {


        client.close();
    }

    @Test
    void testCreateIndex() throws IOException {


        CreateIndexRequest request = new CreateIndexRequest("books");
        client.indices().create(request, RequestOptions.DEFAULT);
    }

    @Test
    void testCreateIndexByIK() throws IOException {


        CreateIndexRequest request = new CreateIndexRequest("books");
        String json = "{\n" +
                "    \"mappings\":{\n" +
                "        \"properties\":{\n" +
                "            \"id\":{\n" +
                "                \"type\":\"keyword\"\n" +
                "            },\n" +
                "            \"name\":{\n" +
                "                \"type\":\"text\",\n" +
                "                \"analyzer\":\"ik_max_word\",\n" +
                "                \"copy_to\":\"all\"\n" +
                "            },\n" +
                "            \"type\":{\n" +
                "                \"type\":\"keyword\"\n" +
                "            },\n" +
                "            \"description\":{\n" +
                "                \"type\":\"text\",\n" +
                "                \"analyzer\":\"ik_max_word\",\n" +
                "                \"copy_to\":\"all\"\n" +
                "            },\n" +
                "            \"all\":{\n" +
                "                \"type\":\"text\",\n" +
                "                \"analyzer\":\"ik_max_word\"\n" +
                "            }\n" +
                "        }\n" +
                "    }\n" +
                "}";
        //设置请求中的参数
        request.source(json, XContentType.JSON);
        client.indices().create(request, RequestOptions.DEFAULT);
    }

    //添加文档
    @Test
    void testCreateDoc() throws IOException {


        //数据实际上来自于数据库
        //Book book = bookDao.selectById(1);
        //String json = JSON.toJSONString(book);
        IndexRequest request = new IndexRequest("books").id("1");
        //模拟数据
        String json = "{\n" +
                "    \"name\":\"springboot\",\n" +
                "    \"type\":\"springboot\",\n" +
                "    \"description\":\"springboot\"\n" +
                "}";
        request.source(json,XContentType.JSON);
        client.index(request, RequestOptions.DEFAULT);
    }

    //批量添加文档
    @Test
    void testCreateDocAll() throws IOException {


        //从数据库中读取
//        List<Book> bookList = bookDao.selectList(null);
        //模拟数据
        List<Book> bookList = new ArrayList<>();

        Book book1 = new Book();
        book1.setId(1);
        book1.setName("springboot");
        book1.setType("springboot");
        book1.setDescription("springboot");

        Book book2 = new Book();
        book2.setId(2);
        book2.setName("springboot2");
        book2.setType("springboot2");
        book2.setDescription("springboot2");

        bookList.add(book1);
        bookList.add(book2);

        BulkRequest bulk = new BulkRequest();
        for (Book book : bookList) {


            IndexRequest request = new IndexRequest("books").id(Integer.toString(book.getId()));
            String json = JSON.toJSONString(book);
            request.source(json,XContentType.JSON);
            bulk.add(request);
        }

        client.bulk(bulk,RequestOptions.DEFAULT);
    }

    @Data
    public static class Book {


        private int id;
        private String name;
        private String type;
        private String Description;
    }
}
- 查询文档
    //按id查询
    @Test
    void testGet() throws IOException {


        GetRequest request = new GetRequest("books","1");
        GetResponse response = client.get(request, RequestOptions.DEFAULT);
        String json = response.getSourceAsString();
        System.out.println(json);
    }

    //按条件查询
    @Test
    void testSearch() throws IOException {


        SearchRequest request = new SearchRequest("books");

        SearchSourceBuilder builder = new SearchSourceBuilder();
        builder.query(QueryBuilders.termQuery("all","springboot"));
        request.source(builder);

        SearchResponse response = client.search(request, RequestOptions.DEFAULT);
        SearchHits hits = response.getHits();
        for (SearchHit hit : hits) {


            String json = hit.getSourceAsString();
//            System.out.println(json);
            Book book = JSON.parseObject(json,Book.class);
            System.out.println(book);
        }
    }