
目录
一、axios
1. 功能
axios相比浏览器提供的fetch,有更多的优点 :
- 在浏览器中发送 XMLHttpRequests 请求
- 在 node.js 中发送 http请求
- 支持 Promise AP
- 拦截请求和响应 ( 原生fetch需要自己手动封装,比较麻烦 )
- 转换请求和响应数据
- ......
2. 安装
npm i axios二、axios发送请求
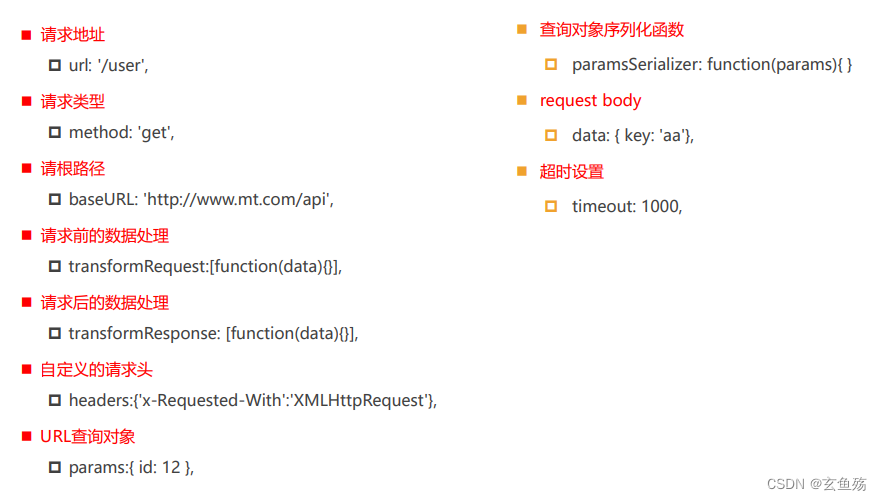
1. 常见的配置选项
2. 请求方式
01 - axios
axios(config)
import axios from 'axios';

axios({
  // 请求方式
  method: 'get',
  // 请求地址
  url: 'http:......'
}).then((res) => {
  // 会返回一个promise,可以通过.then拿到结果
  console.log('res', res.data);
});
02 - request
axios.request(config)
import axios from 'axios';

axios.request({
  // 请求方式
  method: 'get',
  // 请求地址
  url: 'http:......'
}).then((res) => {
  // 会返回一个promise,可以通过.then拿到结果
  console.log('res', res.data);
});
03 - get
axios.get(url[, config])
// 1. 可以在地址栏上直接跟上参数
axios.get('http://xxxxxx?id=123&name=coder').then((res) => {
  console.log('res', res.data);
});

axios
  .get('http://xxxxxx', {
    // 2. 参数写在这里
    params: {
      id: 123,
      name: 'coder'
    }
  })
  .then((res) => {
    console.log('res', res.data);
  });
04 - post
axios.post(url[, data[, config]])
import axios from 'axios';

axios
  .post('http:xxxxxx', {
    // 1. 把传递的参数直接写在这里
    name: 'coder',
    age: 18
  })
  .then((res) => {
    console.log('res', res.data);
  });

axios
  .post('http:xxxxxx', {
    // 2. 参数写在这里
    data: {
      name: 'star',
      age: 16
    }
  })
  .then((res) => {
    console.log('res', res.data);
  });
05 - delete
axios.delete(url[, config])
代码和上面一样呢,亲
06 - head
axios.head(url[, config])
代码和上面一样呢,亲
07 - put
axios.put(url[, data[, config]])
代码和上面一样呢,亲
08 - patch
axios.patch(url[, data[, config]])
代码和上面一样呢,亲
3. 配置公共的基础配置
// 1.baseURL
const baseURL = "http://123.123.123.123:8000"

// 给axios实例配置公共的基础配置
axios.defaults.baseURL = baseURL
axios.defaults.timeout = 10000
axios.defaults.headers = {}

// 2.使用
axios.get("/abc/a").then(res => {
  console.log("res:", res.data)
})

// 3. 如果地址完整,就不会使用默认的配置
axios.get("http://456.456.456.456:8000/abc/a").then(res => {
  console.log("res:", res.data)
})
4. 同时发送多个请求
// 等待两个请求都完成后,才会调用then
axios.all([
  axios.get("http://123.111.222.333:9001/a"),
  axios.get("http://123.222.333.444:9001/b")
]).then(res => {
  console.log("res:", res)
})

// 底层的本质是调用了promise.all
三、axios创建实例
创建实例的目的 :
- 当我们从axios模块中导入对象时, 使用的实例是默认的实例
- 当给该实例设置一些默认配置时, 这些配置就被固定下来了
- 但是后续开发中, 某些配置可能会不太一样
- 比如某些请求需要使用特定的baseURL或者timeout等
- 这个时候, 可以创建新的实例, 并且传入属于该实例的配置信息.
如果项目比较大,用的数据并不是来自同一个服务器
方式一 : 创建各个实例,配置不同的baseURL
方式二 : 配置proxy,根据相同路由名称来映射至不同的网络
// 创建实例一
const instance1 = axios.create({
  baseURL: "http://123.123.123.123:9001",
  timeout: 6000,
  headers: {}
})
// 发送网络请求
instance1.get("/abc", {
  params: {
    id: 1
  }
}).then(res => {
  console.log("res:", res.data)
})

// 创建实例二
const instance2 = axios.create({
  baseURL: "http://456.456.456.456:8000",
  timeout: 10000,
  headers: {}
})
四、axios请求和响应拦截器
1. 请求拦截
/**
   对实例配置拦截
   这里使用默认实例
*/
axios.interceptors.request.use((config) => {
  console.log("请求成功的拦截")
  /**
    可以做
        开始loading的动画
        对原来的配置进行一些修改
        header
        认证登录: token/cookie
        请求参数进行某些转化
  */
  config.header['token'] = '123321fasdfagea'

  // 最后要把被指返回出去
  return config
}, (err) => {
  console.log("请求失败的拦截")
  return err
})
2. 响应拦截
axios.interceptors.response.use((res) => {
  console.log("响应成功的拦截")

  // 1.结束loading的动画

  // 2.对数据进行转化, 再返回数据
  return res.data
}, (err) => {
  console.log("响应失败的拦截:", err)
  return err
})
五、axios请求库封装
1. 简洁版
import axios from 'axios'

// 1. 创建一个类
class starRequest {
  // 2. 构造函数中配置实例的基本配置
  constructor(baseURL, timeout=10000) {
    this.instance = axios.create({
      baseURL,
      timeout
    })
  }
  // 3. 封装请求
  request(config) {
    return new Promise((resolve, reject) => {
      this.instance.request(config).then(res => {
        resolve(res.data)
      }).catch(err => {
        reject(err)
      })
    })
  }

  get(config) {
    return this.request({ ...config, method: "get" })
  }

  post(config) {
    return this.request({ ...config, method: "post" })
  }
}

// 4. 导出
export default new starRequest("http://xxxxx:9001")