顺序表
1. 线性表
- 线性表示具有n个相同性质的数据元素的有限数列。在实际中使用广泛,常见的线性表:顺序表,链表,栈,队列,字符串…
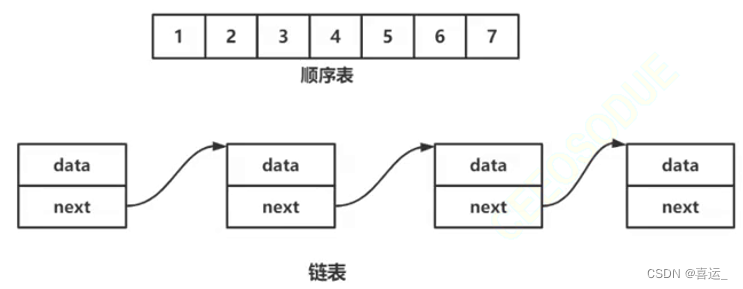
- 线性表在逻辑上是线性结构,可以理解为一条连续的直线,但是在物理结构上不一定是连续的,线性表在存储时,通常以数组;和链式结构的形式存储。
2. 顺序表
- 顺序表是用一段物理地址连续的存储单元依次存储数据元素的线性结构,一般情况下采用数组存储。在数组上完成增删查改。
- 顺序表一般可以分为两种:
- 静态顺序表:使用定长数组存储元素。
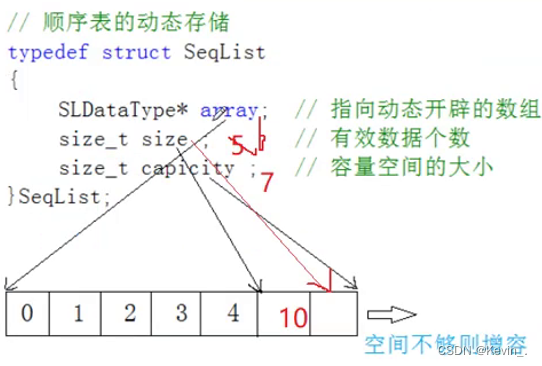
- 动态顺序表:使用动态开辟的数组存储
//顺序表的静态存储
#define N 7
typedef int SLDataType;
typedef struct SeqList
{


	 SLDataType arry[N];  //定长数组
     size_t size;  //有效数据的个数
}SeqList;


//动态的顺序表
typedef struct SeqList
{


	SLDataType* arry;  //指向动态开辟的数组
	size_t size; //有效数据的个数
	size_t capicity;  //容量空间的大小
}SeqList;

满了以后,扩2倍比较合适。一次扩多了,存在空间浪费,一次扩少了,
频繁扩容,效率损失。
1. 顺序表的定义
//动态顺序表
typedef int SLDataType;
typedef struct SeqList;
{


	SLDataType* a
	int size ;  //用来指示存储数据的量
	int capacity; //用来指示存储空间的大小
}SL;
2. 顺序表的初始化
//通过这种方法初始化时,会将实参拷贝一份形参a,capacity,size,初始化的是形参里存储的内容,
//函数调用结束,形参也随即销毁,形参的改变不会影响实参,起不到初始化的效果
void SeqListInit(SL sl)
{


	assert(psl);
	sl.a=NULL;
	sl.capacity=sl.size=0;
}
当进入到调用函数内部时,顺序表被初始化
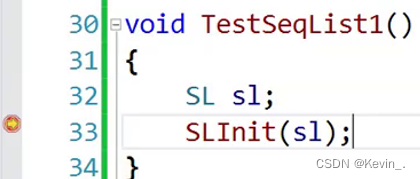
结束调用函数,发现顺序表没有被初始化

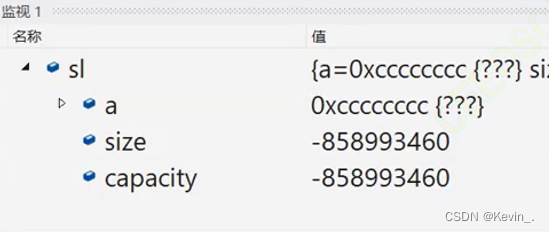
为了解决这个问题,在传值时应该串结构体的指针,代码如下:
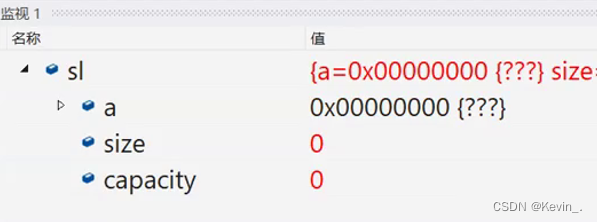
void SLInit(SL*psl)
{


	assert(psl);
	psl->a=NULL;
	psl->capacity=psl.size=0;
}
3. 顺序表的销毁
void SLDatatory(SL,sl)
{


	assert(psl);
   // if(psl->a)
   // {


       free(psl->a);   //free 会自行检查psl->a是否为空,所以可以不提前判断
       psl->a=NULL;
       psl->capacity=psl->size=0;
   // }
}
4.顺序表的尾插
void SLPushBack(SL* psl,SLDataType x)
{


	assert(psl);
	//检查容量
	SLCheckCapcacity(psl);
	psl->a[psl->size]=x;
	psl->size++;
}

//可以替换为:
void SLPushBack(SL* psl,SLDataType x)
{


	SLInsert(psl,psl->size,x);
}
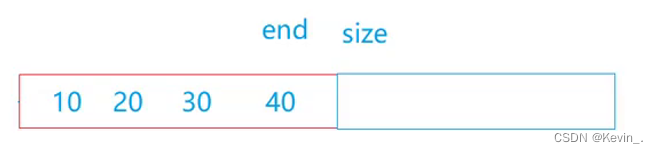
5.顺序表的头插
void SLPushFront(SL* psl,SLDataType x)
{


	assert(psl);
	SLCheckCapcacity(psl);
	//挪动数据
	int end=psl->size-1;
	while(end>=0)
	{


		psl->a[end+1]=psl->a[end];
		--end;
	}
	psl->a[0]=x;
	psl->size++;
}

//可以替换为:
void SLPushFront(SL* psl,SLDataType x)
{


	SLInsert(psl,0,x);
}
6.顺序表的尾删
void SLPopBack(SL* psl)
{


	assert(psl);
	//检查顺序表是否已经删空
	if(psl->size==0)
	{


 	  	return ;
	}
	//assert(pls->size>0);
	psl->size--;
}

//可以替换为:
void SLPopBack(SL* psl)
{


	SLErase(psl,psl->size-1);
}

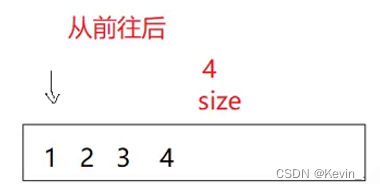
7.顺序表的头删
void SLPopFront(SL* psl)
{


	assert(psl);
	int begin=0;
	//挪动覆盖
	while(begin<psl->size-1)
	{


		psl->a[begin]=psl->a[begin+1];
		++begin;
	}
	--psl->size;
}
//可以替换为:
void SLPopFront(SL* psl)
{


	assert(psl);
	int begin=1;
	//挪动覆盖
	while(begin<psl->size)
	{


		psl->a[begin-1]=psl->a[begin];
		++begin;
	}
	--psl->size;
}

//可以替换为:
void SLPopBack(SL* psl)
{


	SLErase(psl,psl->size-1);
}
8. 顺序表的打印
void SLPrint(SL* psl)
{


	assert(psl);
	for(int i=0;i<psl->size;++i)
	{


		printf("%d",pls->[i]);
	}
	printf("\n");
}
9. 检查容量
void SLCheckCapcacity(SL*psl)
{


	if(psl->size==psl->capacity)
	{


		//容量大小是原来的二倍
int newCapacity=psl->capacity==0?4:psl->capacity*2;
		//使用realloc扩容返回的地址有三种可能性
		// 1. 原地扩容
		// 2. 异地扩容
		// 3. 扩容失败 (没有足够的空间了),返回空指针
SLDataType*tmp=(SLDataType*)realloc(psl->a,newCapacity*sizeof(SLDataType));
		//为了防止原来的地址将原来的地址覆盖,先用tmp接收,判断返回的是否为空指针
	if(tmp==NULL)
	  {


		perror("malloc fail");
		return ;
		//exit(-1);
	  }
	 	psl->a=tmp;
		psl->capacity=newCapicity;
	}
}
10. 查找
int SLFind(SL* psl,SLDataType x)
{


	assert(psl);
	for(int i=0;i<psl->size;++i)
	{


		 if(psl->a[i]==x)
		 {


	 		 return i;
		 }
	}
	return -1;
}
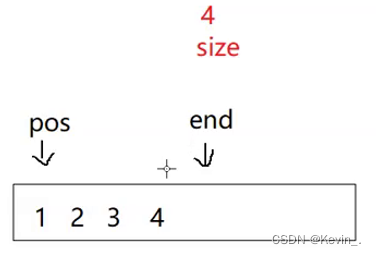
11. 在pos位置插入x
void SLInsert(SL* psl,size_t pos,SLDataType x)
//void SLInsert(SL* psl,int pos,SLDataType x)
{


	 assert(psl);
	 assert(pos<=psl->size);
	 //检查容量
	 SLCheckCapacity(psl);
	 //挪动数据
	 size_t end=psl->size;
	 //int end=psl->size-1;
	 while(end>pos)
	 {


	   psl->a[end]=psl->a[end-1];
	   --end;
	 }
	 //将x插入空缺位置
	 psl->a[pos]=x;
	 ++psl->size;
}
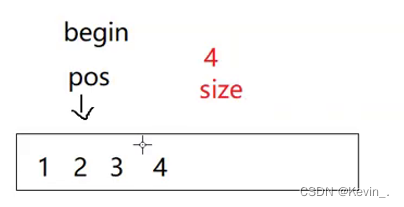
12. 删除pos位置的值
void SLErase(SL* psl,size_t pos)
{


	assert(psl);
	assert(pos<psl->size);//检查要删除的位置是否在范围内

	size_t begin=pos;
	//挪动覆盖
	while(begin<psl->size-1)
	{


		psl->a[begin]=psl->a[begin+1];
		++begin;
	}
	psl->size--;
}
13. 修改
void SLModify(SL* psl,size_t pos,sl)
{


	assert(psl);
	assert(pos<psl->size);//检查要修改的位置是否在范围内
	psl->a[pos]=x;
}
14. 菜单
void memu()
{


	printf("****************************************\n");
	printf("1、尾插数据 2、头插数据\n");
	printf("7、打印数据 -1、退出\n");
	printf("****************************************\n");
}

int main()
{


	SL s;
	SLInit(&s);
	int option = 0;
	int x = 0;
	do
	{


		memu();
		printf("请输入你的操作:>");
		scanf("%d", &option);
		switch (option)
		{


			case 1:
				printf("请连续输入你要插入的数据,以-1结束\n");
				scanf("%d", &x);
				while (x != -1)
				{


					SLPushBack(&s, x);
					scanf("%d", &x);
				}
				break;
			case 2:
				break;
			case 3:
				break;
			case 7:
				SLPrint(&s);
				break;
			default:
				break;
		}

	} while (option != -1);

	SLDestory(&s);

	return 0;
}
15. 测试函数
在写代码时,最好边写边分别测,方便查找错误和修改,最后再写菜单
#include "SeqList.h"
void TestSeqList1()
{


	SL s;
	SLInit(&s);
	SLPushBack(&s,1);
	SLPushBack(&s,2);
	SLPushBack(&s,3);
	SLPushBack(&s,4);
	SLPushBack(&s,5);
	SLPrint(&s);

	SLInit(&s,2,30);
	SLPrint(&s);


	//查找并插入
	int x=0;
	scanf("%d",&x);
	int pos=SLFind(&s,x);
	if(pos!=-1)
	{


		SLInert(&s,pos,x*100);
	}
	SLPrint(&s);

	SLPushFront(&s,1);
	SLDestory(&s);
}

void TestSeqList2
{


}

int main()
{


	TestSeqList1();
	TestSeqList2();

	return 0;
}
16. 顺序表的声明
#pragma once
#include <stdio.h>
#include <stdlib.h>
#include <assert.h>
//动态的顺序表
typedef int SLDataType;
SLDataType* a;
int size;      // 存储数据的个数
int capacity;  // 存储空间的大小
}SL;
//void SeqListInit(SL sl);
void SLInit(SL* psl);
void SLDestory(SL* psl);
void SLPrint(const SL* psl);

// 头插头删 尾插尾删
void SLPushBack(SL* psl, SLDataType x);
void SLPushFront(SL* psl, SLDataType x);
void SLPopBack(SL* psl);
void SLPopFront(SL* psl);

// 没有找到就返回-1
int SLFind(SL* psl, SLDataType x);
// 顺序表在pos位置插入x
void SLInsert(SL* psl, size_t pos, SLDataType x);
// 顺序表删除pos位置的值
void SLErase(SL* psl, size_t pos);
3. 顺序表习题
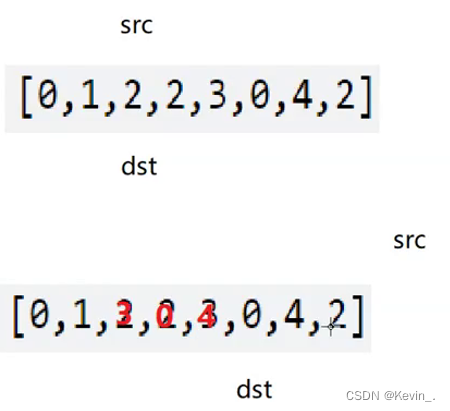
- 移除元素
双指针法:
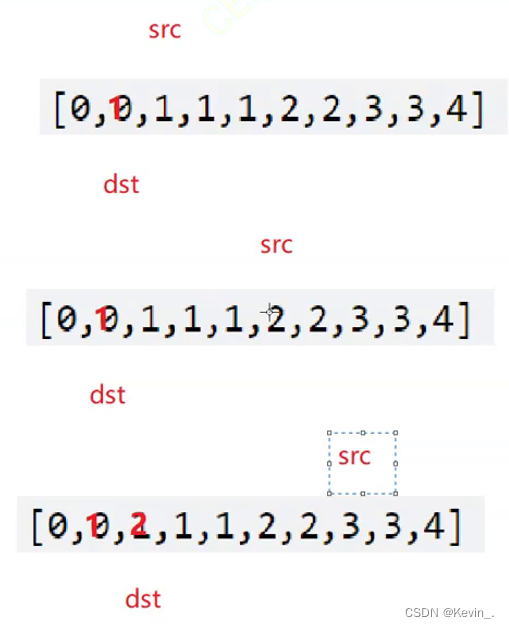
- 删除有序数组中的重复项
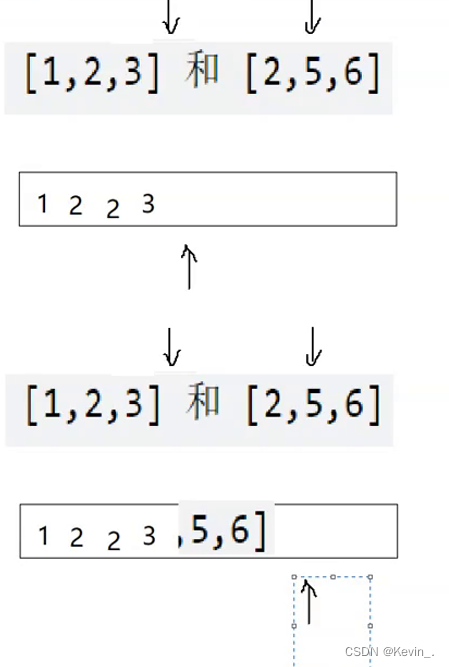
- 合并两个有序数组