参考于韩顺平老师JAVA基础课程以及笔记
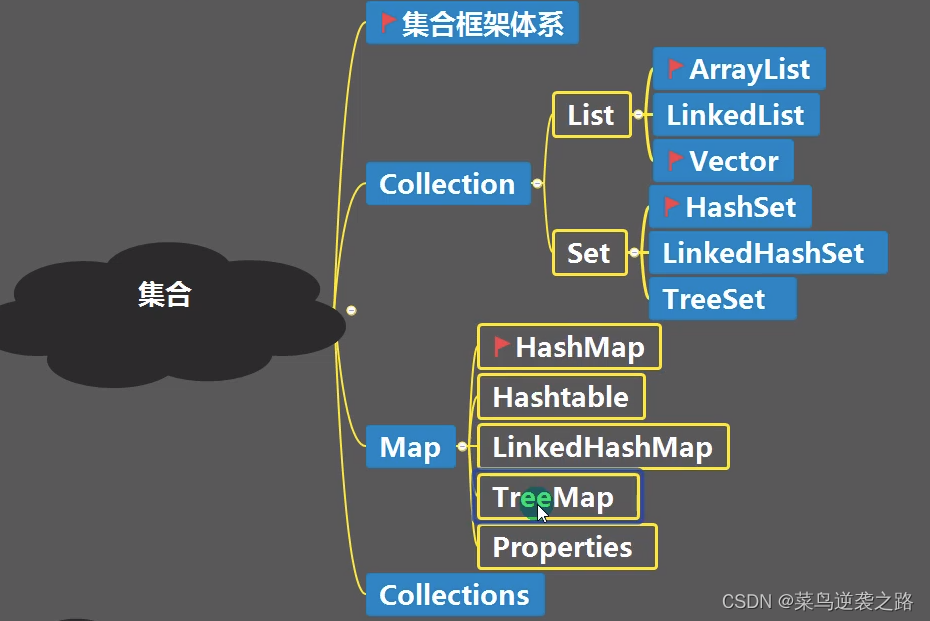
一张图了解JAVA集合框架体系
为什么使用集合呢?
由于数组保存数据有以下缺点:
- 长度开始时必须指定,而且一旦指定,不能更改
- 保存的必须为同一类型的元素
- 使用数据进行增加/删除元素比较麻烦
而使用集合的优点:
- 动态保存任意多个对象,使用方便
- 提供一系列操作对象的方法,add、remove、set、get等
- 使用集合添加、删除新元素很方便
集合的框架体系(重要)
- 单列结合(Collection)
- 双列集合(Map)
实线代表继承,虚线代表实现
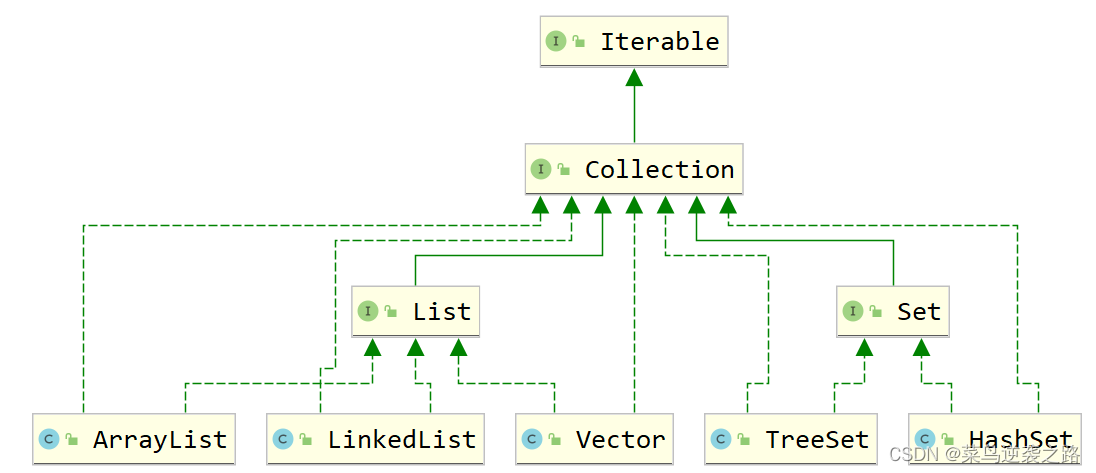

Collection接口及常用方法
接口实现类特点
没有直接的实现子类,通过它的子接口Set和List来实现

常用方法
-
add() 添加元素

-
remove() 删除元素

-
contains() 查找元素是否存在

-
size() 获取元素个数

-
isEmpty() 判断是否为空

-
clear() 清空

-
addAll() 添加多个元素

-
containsAll: 查找多个元素是否都存在

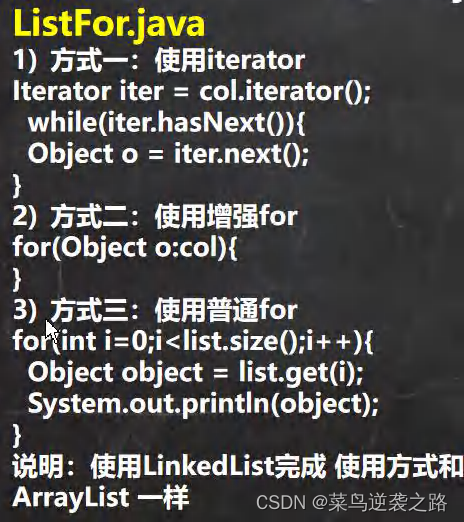
常用遍历方式
- 使用Iterator(迭代器)

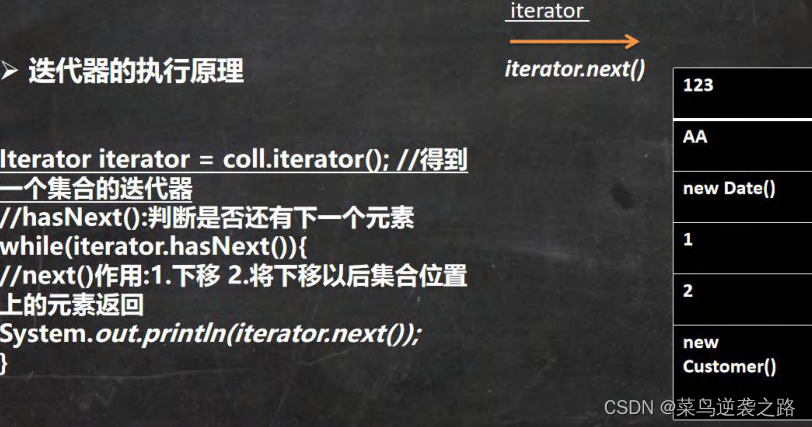
 Collection col =new ArrayList();
 col.add("jack");
//1. 先得到 col 对应的 迭代器
  Iterator iterator = col.iterator();
//2. 使用 while 循环遍历,快捷键itit
 while (iterator.hasNext()) {

    //判断是否还有数据
 //返回下一个元素,类型是 Object
 Object obj = iterator.next();
 System.out.println("obj=" + obj);
}
- 增强for循环

Collection col = new ArrayList();
        col.add(new Book("三国演义", "罗贯中", 10.1));
        col.add(new Book("小李飞刀", "古龙", 5.1));
        col.add(new Book("红楼梦", "曹雪芹", 34.6));
        for (Object o : col) {


            System.out.println(o);
        }
List接口和常用方法
List接口特点
- 元素有序,可重复
- 支持索引

接口常用方法
-
add() 添加元素

-
addAll() 从index位置开始将所有元素都添加

-
get() 根据索引获取制定元素

-
indexOf() 返回元素首次出现的位置

-
lastOf() 返回元素末次出现的位置

-
remove() 移除指定index位置元素

-
set() 设置指定index位置元素

-
subList() 返回从fromindex到toIndex位置的子集合(fromindex<=sublist<toindex)

常用遍历方式
由于List接口具有索引机制,因此可以采用普通for循环遍历
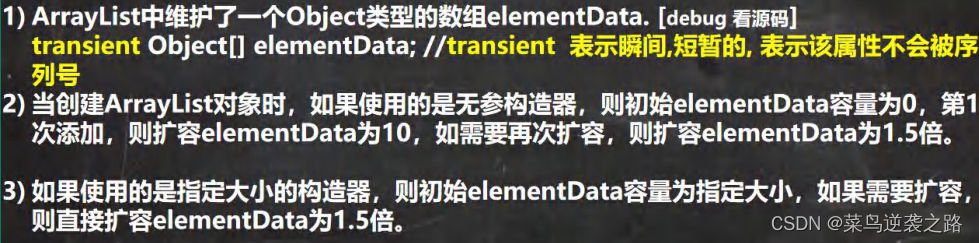
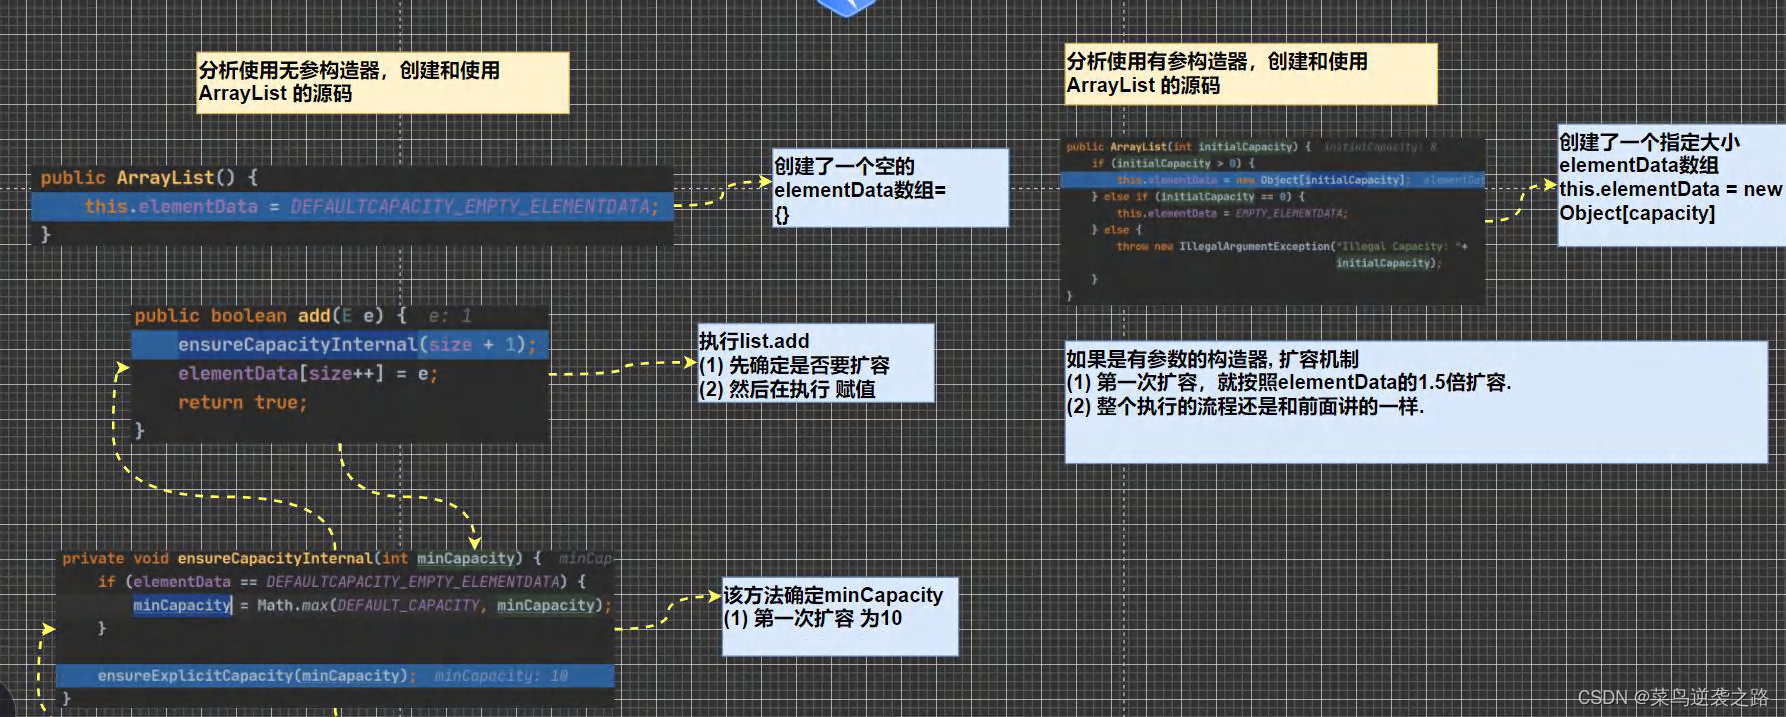
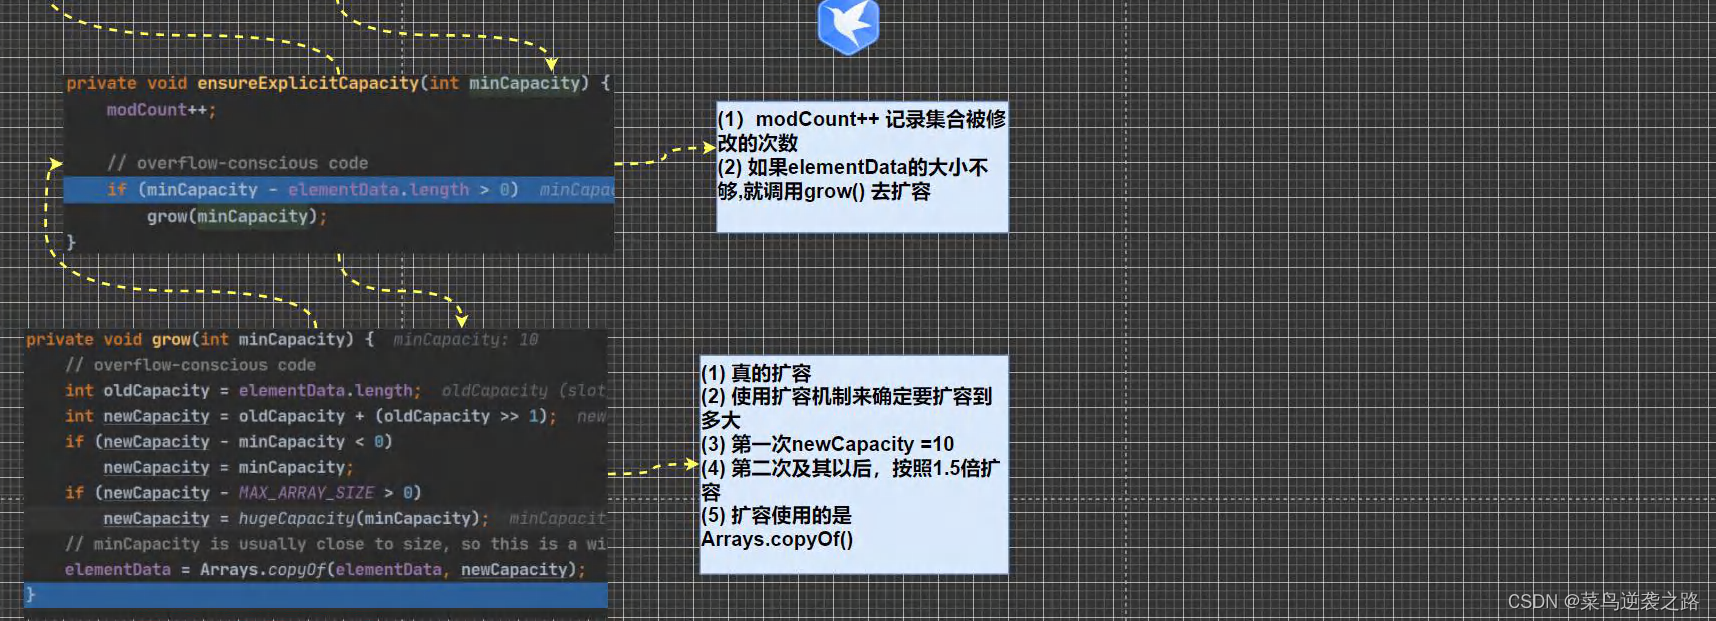
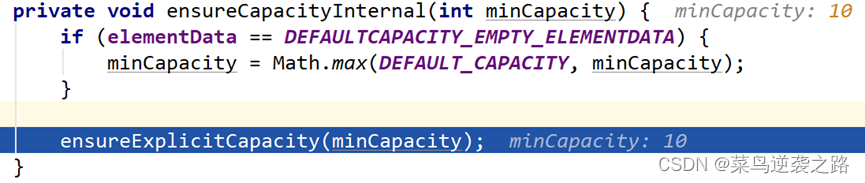
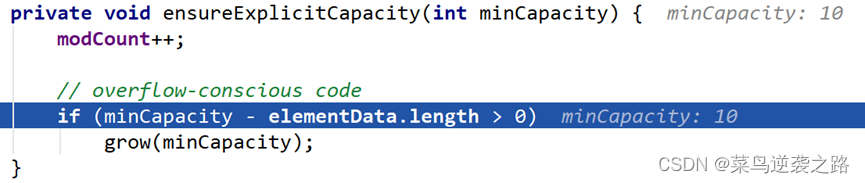
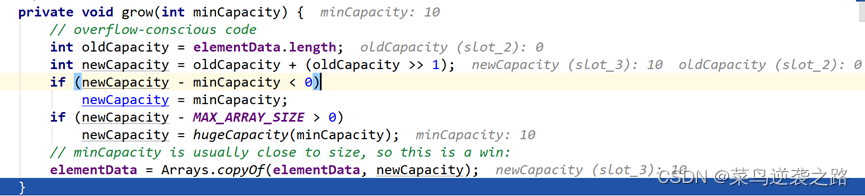
ArrayList 底层结构和源码分析
ArrayList注意事项

ArrayList 的底层操作机制源码分析(重要)
-
重要结论
-
测试代码(使用debug模式测试源码)
 import java.util.ArrayList;
import java.util.Collection;
import java.util.Iterator;
import java.util.List;


public class ArrayListSource {


    public static void main(String[] args) {


        //使用无参构造器创建ArrayList对象
        //ArrayList list = new ArrayList();
        ArrayList list = new ArrayList(8);
        //使用for给list集合添加 1-10数据
        for (int i = 1; i <= 10; i++) {


            list.add(i);
        }
        //使用for给list集合添加 11-15数据
        for (int i = 11; i <= 15; i++) {


            list.add(i);
        }
        list.add(100);
        list.add(200);
        list.add(null);

    }
}


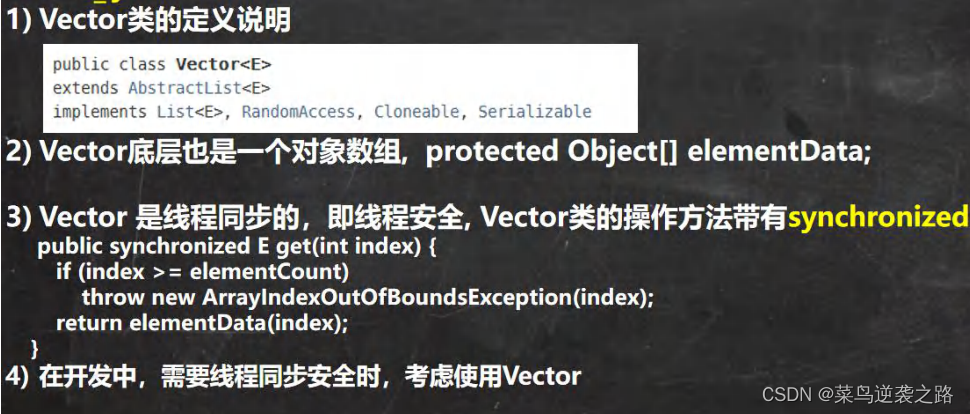
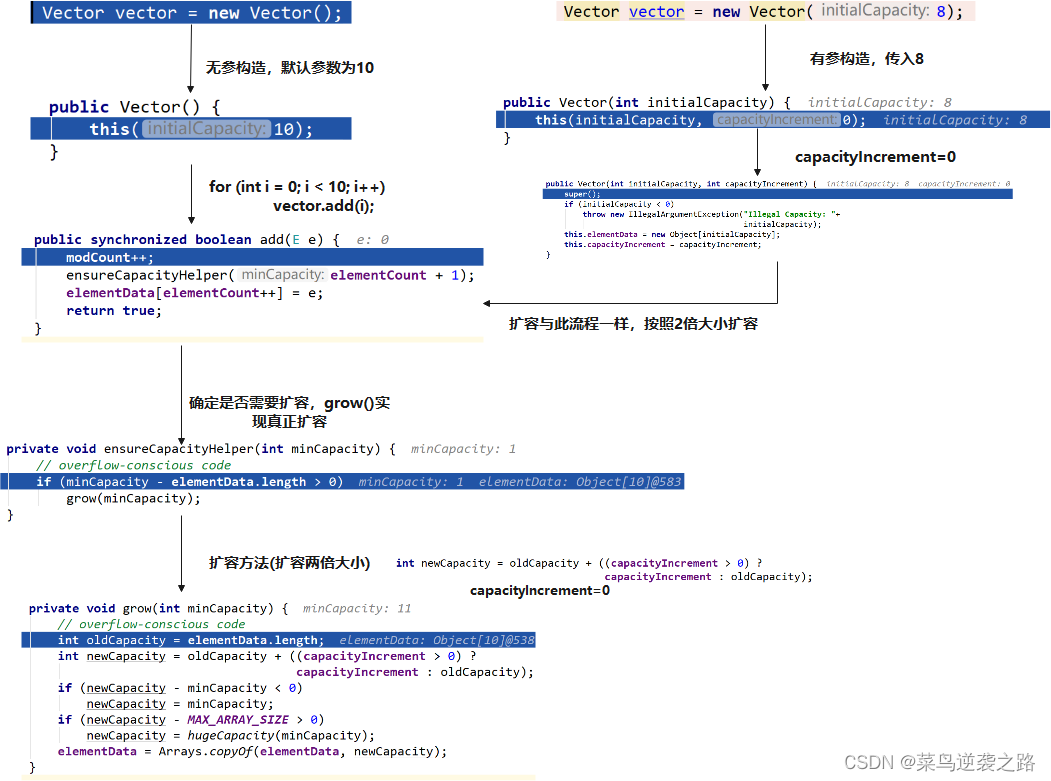
Vector 底层结构和源码剖析
- 重要结论
- 测试代码
import java.util.Vector;

/**
 * @author wzl
 * @version 1.0
 */

public class Vector_ {


    public static void main(String[] args) {


        //无参构造器
//        Vector vector = new Vector();
//        for (int i = 0; i < 10; i++) {


//            vector.add(i);
//        }
//        vector.add(100);

        Vector vector = new Vector(8);
        for (int i = 0; i < 10 ; i++) {


            vector.add(i);
        }
    }
}
ArrayList VS Vector

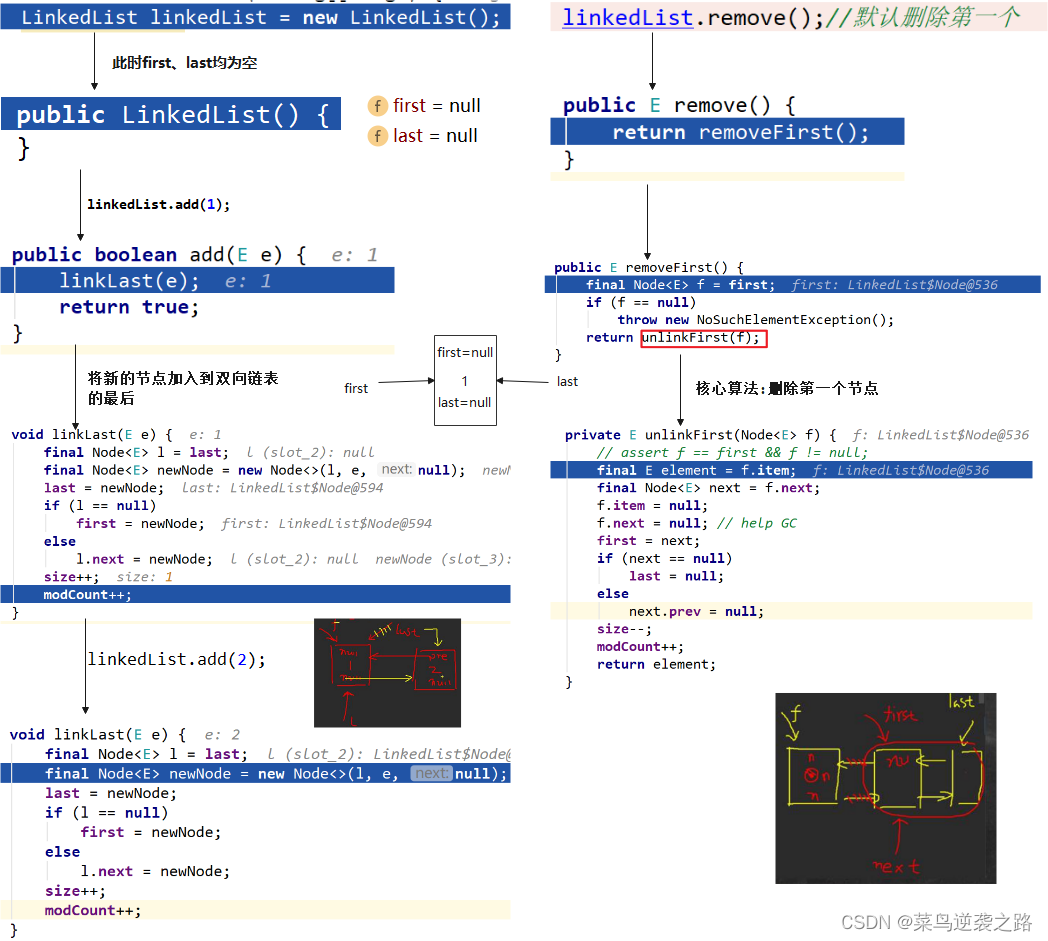
LinkedList底层结构和源码剖析
-
底层结构


-
构造一个简单的双向链表
 import javax.sound.midi.Soundbank;
import javax.swing.plaf.nimbus.NimbusLookAndFeel;

/**
 * @Description
 * @autor wzl
 * @date 2022/8/9-15:33
 */
public class LinkedList01 {


    public static void main(String[] args) {


        //模拟一个简单的双向链表
        Node jack = new Node("jack");
        Node tom = new Node("tom");
        Node hsp = new Node("hsp");

        //连接三个节点,形成双向链表
        //jack->tom->hsp
        jack.next = tom;
        tom.next = hsp;

        //hsp->tom->jack
        hsp.pre = tom;
        tom.pre = jack;

        Node first = jack;//first指向jack,就是双向链表的头结点
        Node last = hsp;//last指向hsp,就是双向链表的尾结点

        //从头到尾遍历
        while (true) {


            if (first == null) {


                break;
            }
            //输出first信息
            System.out.println(first);
            //调换指针
            first=first.next;
        }

        //从尾到头遍历
        while (true) {


            if(last==null){


                break;
            }
            System.out.println(last);
            last=last.pre;
        }

        //演示链表的添加对象/数据,很方便
        //在tom和hsp之间插入liming
        Node liming=new Node("liming");
        liming.next=hsp;
        hsp.pre=liming;
        tom.next=liming;
        liming.pre=tom;

        //first指向jack
        System.out.println("==============");
        first=jack;
        while (true) {


            if (first == null) {


                break;
            }
            //输出first信息
            System.out.println(first);
            //调换指针
            first=first.next;
        }


    }
}

//定义一个Node类,Node对象,表示双向链表的一个节点

class Node {


    public Object item;//存放的数据
    public Node next;//指向下一个节点
    public Node pre;//指向前一个节点

    public Node(Object name) {


        this.item = name;
    }

    public String toString() {


        return "Node name=" + item;
    }
}
- 底层源码测试
 import javax.activation.MailcapCommandMap;
import java.util.LinkedList;

/**
 * @Description
 * @autor wzl
 * @date 2022/8/9-15:50
 */
public class LinkedListCRUD {


    public static void main(String[] args) {


        LinkedList linkedList = new LinkedList();
        linkedList.add(1);
        linkedList.add(2);

        //删除一个节点
        linkedList.remove();//默认删除第一个
        System.out.println(linkedList);
    }
}
- 底层源码分析(add(),remove()方法)
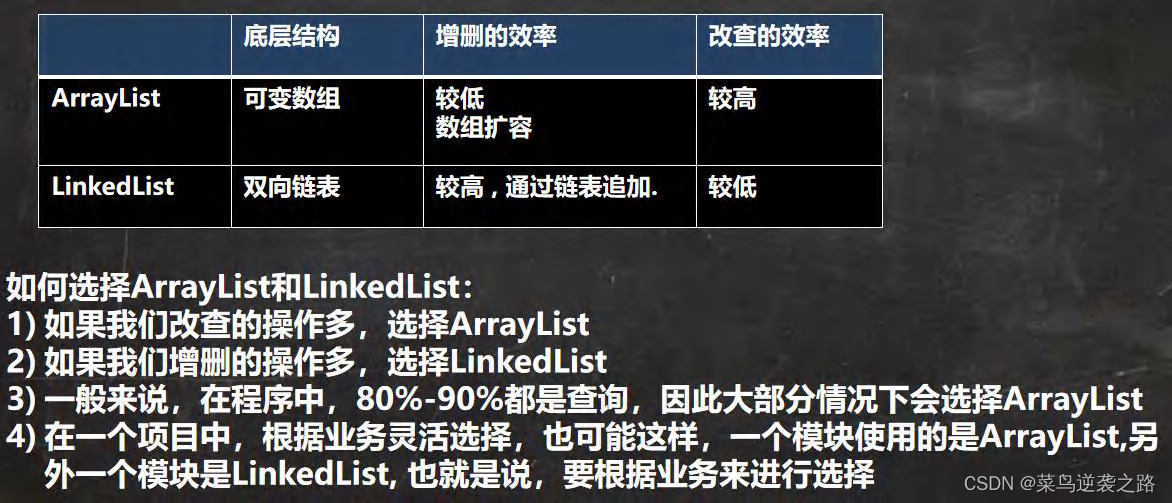
ArrayList VS LinkedList
Set接口
- 特点
注意:虽然添加和取出的顺序不一致,但是只要添加的顺序不变,取出的顺序则是固定的

- 遍历方式

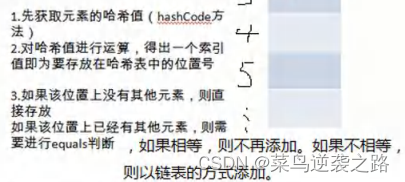
HashSet接口底层结构以及源码分析
-
特点

-
底层结构

-
模拟HashSet的底层结构
数组元素16个,数组+链表
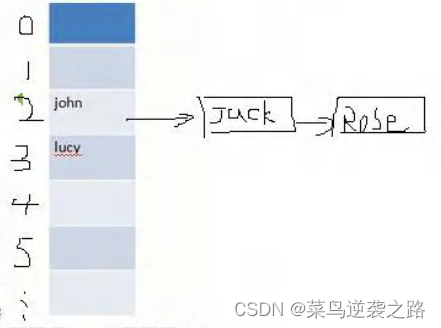
 package com;

import org.omg.CORBA.NO_IMPLEMENT;

/**
 * @Description
 * @autor wzl
 * @date 2022/8/9-16:46
 */
public class HashSetStructure {


    public static void main(String[] args) {


        //模拟一个HashSet的底层(HashMap的底层结构)

        //1.创建一个数据,元素为16个,数组类型为Node[],也叫做表
        Node[] table=new Node[16];
        System.out.println("table="+table);

        //2.创建节点
        Node john = new Node("john", null);


        table[2]=john;
        Node jack = new Node("jack", null);
        john.next=jack;//将jack挂载到john

        Node rose = new Node("rose", null);
        jack.next=rose;//将rose挂载到jack

        Node luck = new Node("luck", null);
        table[3]=luck;

        System.out.println("table="+table);

    }
}
class Node{

     //节点,存储数据,可以指向下一个节点,形成链表
    Object item;//数据
    Node next;//指向写一个节点

    public Node(Object item, Node next) {


        this.item = item;
        this.next = next;
    }
}
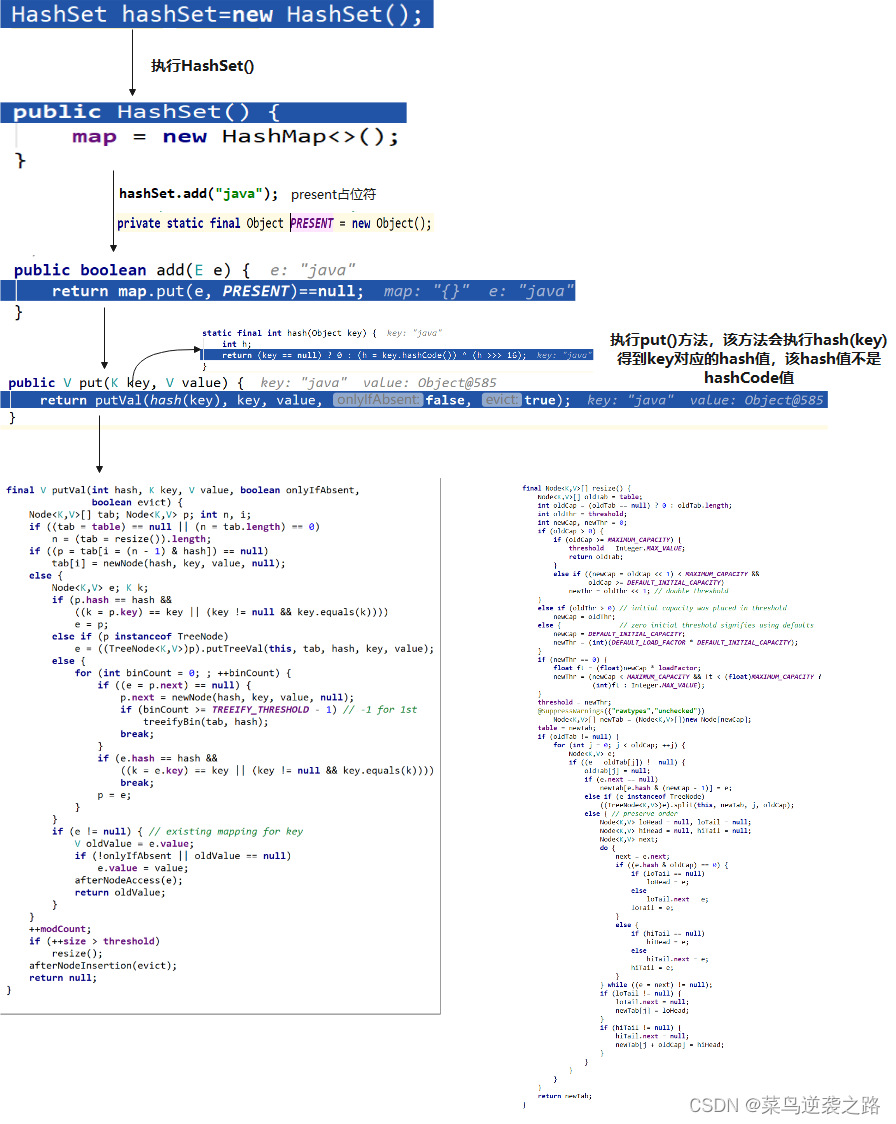
HashSet底层机制(重要)
- 重要结论
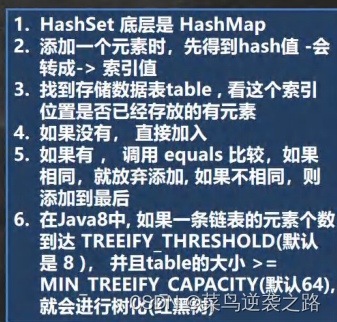
- 底层源码分析(*****)
 package com;

import javax.activation.MailcapCommandMap;
import java.util.HashSet;

/**
 * @Description
 * @autor wzl
 * @date 2022/8/9-17:09
 */
public class HashSetSource {


    public static void main(String[] args) {


        HashSet hashSet=new HashSet();
        hashSet.add("java");
        hashSet.add("php");
        hashSet.add("java");
        System.out.println("set="+hashSet);

        /*
          final V putVal(int hash, K key, V value, boolean onlyIfAbsent,
                   boolean evict) {
        Node<K,V>[] tab; Node<K,V> p; int n, i; //定义辅助变量
        //table就是HashMap的一个数组(属性)
        //if语句表示如果table为null或者大小为0,就是第一次扩容,16个空间(1<<4)
        if ((tab = table) == null || (n = tab.length) == 0)
            n = (tab = resize()).length;

        //(1)根据key,得到hash,然后去计算该key应该存放到table表的那个索引位置,并把这个位置的对象赋给P
        //(2)判断P是否为null
        //如果p为null,表示还没有存放元素,就创建一个Node(key="java",value=PRESENT)
        //就放在该位置tab[i] = newNode(hash, key, value, null);

        if ((p = tab[i = (n - 1) & hash]) == null)
            tab[i] = newNode(hash, key, value, null);
        else {

           //一个优秀开发技巧:在需要局部变量时,在创建比较好
            Node<K,V> e; K k;

           //当之前的这个位置的hash和这次计算的hash相等 并且准备加入的key 和p指向的Node节点的key是同一个对象,
           //或者当前元素的equals()方法和准备加入的key比较后相同
            if (p.hash == hash &&
                ((k = p.key) == key || (key != null && key.equals(k))))
                e = p;

            //再判断p是不是一颗红黑树,
            //如果是一颗红黑树,就调用putTreeVal进行添加
            else if (p instanceof TreeNode)
                e = ((TreeNode<K,V>)p).putTreeVal(this, tab, hash, key, value);

            //如果table对应索引位置,已经是一个链表,就是用for循环比较
            //依次和该链表的每一个元素比较后,都不相同,则加入到该链表的最后
            //  注意:在把元素添加到链表后,立即判断该链表是否已经达到8个节点,
            // 就调用treeifyBin() 对当前这个链表进行树化(转成红黑树)
            // 注意,在转成红黑树时,要进行判断,判断条件为
            //  if (tab == null || (n = tab.length) < MIN_TREEIFY_CAPACITY 64)
            //            resize();
            //   如果上述条件成立,先table扩容
            //  只要上面条件不成立时,才进行转成红黑树
            //依次和该链表比较的过程中,如果有相同的情况,就直接break
            else {
                for (int binCount = 0; ; ++binCount) {
                    if ((e = p.next) == null) {
                        p.next = newNode(hash, key, value, null);
                        if (binCount >= TREEIFY_THRESHOLD - 1) // -1 for 1st
                            treeifyBin(tab, hash);
                        break;
                    }
                    if (e.hash == hash &&
                        ((k = e.key) == key || (key != null && key.equals(k))))
                        break;
                    p = e;
                }
            }
            if (e != null) { // existing mapping for key
                V oldValue = e.value;
                if (!onlyIfAbsent || oldValue == null)
                    e.value = value;
                afterNodeAccess(e);
                return oldValue;
            }
        }
        ++modCount;
        if (++size > threshold)
            resize();
        afterNodeInsertion(evict);
        return null;
    }
         */
    }
}
-
底层扩容和红黑树机制(重要)
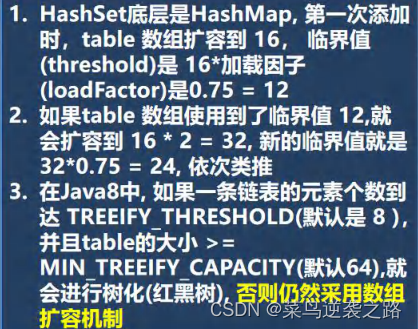
-
测试代码
 package com;

import java.util.HashSet;
import java.util.Objects;

/**
 * @Description
 * @autor wzl
 * @date 2022/8/10-8:55
 */
public class HashSetIncrement {


    public static void main(String[] args) {


        HashSet hashSet=new HashSet();

        //测试扩容机制
//        for (int i = 0; i <=100; i++) {


//            hashSet.add(i);
//        }

        //测试红黑树机制
//        for (int i = 1; i <= 12; i++) {


//            hashSet.add(new A(i));
//
//        }
//
        /*
         当我们向hashSet增加一个元素,就算是增加了一个,而不是只必须加入的数组的第一个元素
         */
        for (int i = 0; i < 7; i++) {

    //在table表的某一条链表上添加了7个A对象
            hashSet.add(new A(i));
        }
        for (int i = 0; i < 7; i++) {

    //在table表的另一条链表上添加7个B对象
            hashSet.add(new B(i));
        }
        System.out.println("hashset="+hashSet);

    }
}
class B{


    private int n;
    public B(int n){


        this.n=n;
    }

    @Override
    public int hashCode() {


        return 200;
    }
}

class A{


    private int n;
    public A(int n){


        this.n=n;
    }

    @Override
    public int hashCode() {


        return 100;
    }
}
- HashSet测试题

- 重点是重写两个类的equals()和hashcode()方法
 package com;

import java.util.HashSet;
import java.util.Objects;

/**
 * @Description
 * @autor wzl
 * @date 2022/8/10-9:53
 */
public class HashSet02 {


    public static void main(String[] args) {


        HashSet hashSet =new HashSet();
        hashSet.add(new Employee("tom",20,new MyDate(2020,1,21)));
        hashSet.add(new Employee("tom",21,new MyDate(2020,1,21)));
        hashSet.add(new Employee("john",20,new MyDate(2020,1,21)));
        System.out.println("hashSet="+hashSet);
    }
}
class Employee{


    private String name;
    private float sal;
    private MyDate birthday;

    public Employee(String name, float sal, MyDate birthday) {


        this.name = name;
        this.sal = sal;
        this.birthday = birthday;
    }

    @Override
    public boolean equals(Object o) {


        if (this == o) return true;
        if (o == null || getClass() != o.getClass()) return false;
        Employee employee = (Employee) o;
        return Objects.equals(name, employee.name) &&
                Objects.equals(birthday, employee.birthday);
    }

    @Override
    public int hashCode() {


        return Objects.hash(name, birthday);
    }

    @Override
    public String toString() {


        return "Employee{" +
                "name='" + name + '\'' +
                ", sal=" + sal +
                ", birthday=" + birthday +
                '}';
    }
}

class MyDate{


    private int year;
    private int month;
    private int day;


    public MyDate(int year, int month, int day) {


        this.year = year;
        this.month = month;
        this.day = day;
    }

    @Override
    public boolean equals(Object o) {


        if (this == o) return true;
        if (o == null || getClass() != o.getClass()) return false;
        MyDate myDate = (MyDate) o;
        return year == myDate.year &&
                month == myDate.month &&
                day == myDate.day;
    }

    @Override
    public int hashCode() {


        return Objects.hash(year, month, day);
    }
}
LinkedHashSet底层结构以及源码分析
-
底层结构特点

-
底层源码分析

- 底层原理类似于HashSet,最大的区别是使用了双向链表
package com;
import java.util.HashMap;
import java.util.LinkedHashMap;
import java.util.LinkedHashSet;
import java.util.Set;
/**
* @Description
* @autor wzl
* @date 2022/8/10-10:21
*/
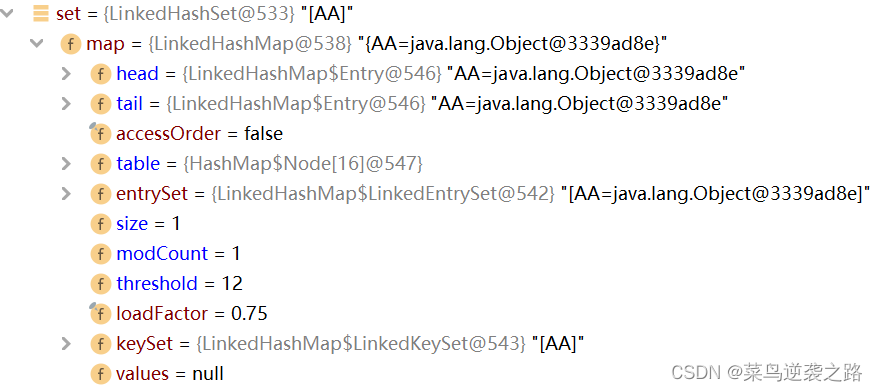
public class LinkedHashSetSource {
public static void main(String[] args) {
Set set=new LinkedHashSet();
set.add(new String("AA"));
set.add(456);
set.add(456);
set.add(new Customer("AA",1001));
set.add(123);
set.add("wzl");
//添加顺序和查询顺序一致
// linkedHashSet 底层维护的是一个LinkeHashMap(是HashMap的子类)
// LinkedHashSet 底层结构(数组table+双向链表)
// 第一次添加元素时,直接将数组table 扩容到16,存放的节点类型是 LinkedHashMap$Entry
// 数组table类型是 HashMap$Node[] 存放的元素/数据是 LinkedHashMap$Entry类型
/*
//继承关系是在内部类中完成
static class Entry<K,V> extends HashMap.Node<K,V> {
Entry<K,V> before, after;
Entry(int hash, K key, V value, Node<K,V> next) {
super(hash, key, value, next);
}
}*/
System.out.println("set="+set);
}
}
class Customer{
private String name;
private int no;
public Customer(String name, int no) {
this.name = name;
this.no = no;
}
}