参考于韩顺平老师JAVA基础课程以及笔记
本文讲解双列集合
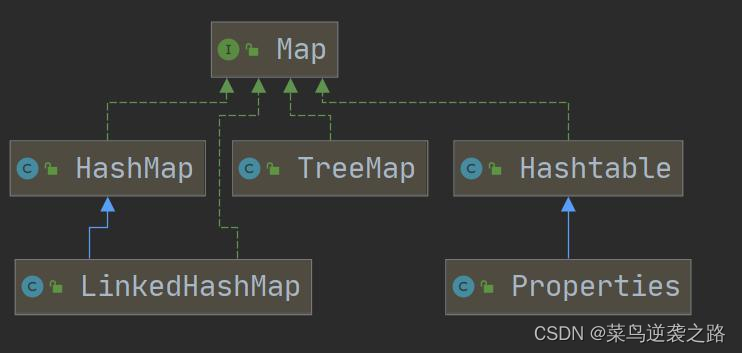
Map接口以及常用方法
-
JDK1.8 接口的特点

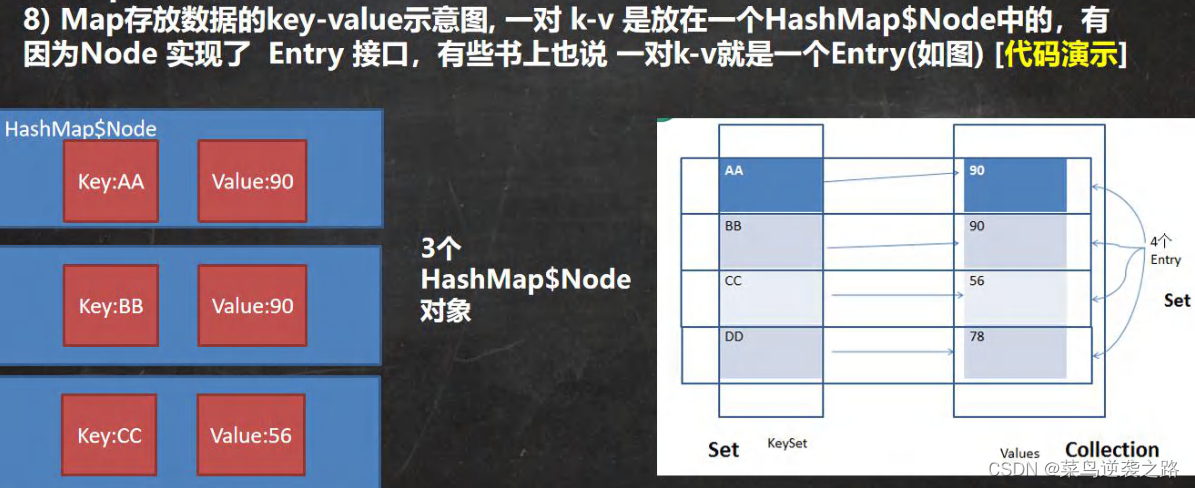
-
Map接口常用方法


-
Map接口遍历方法
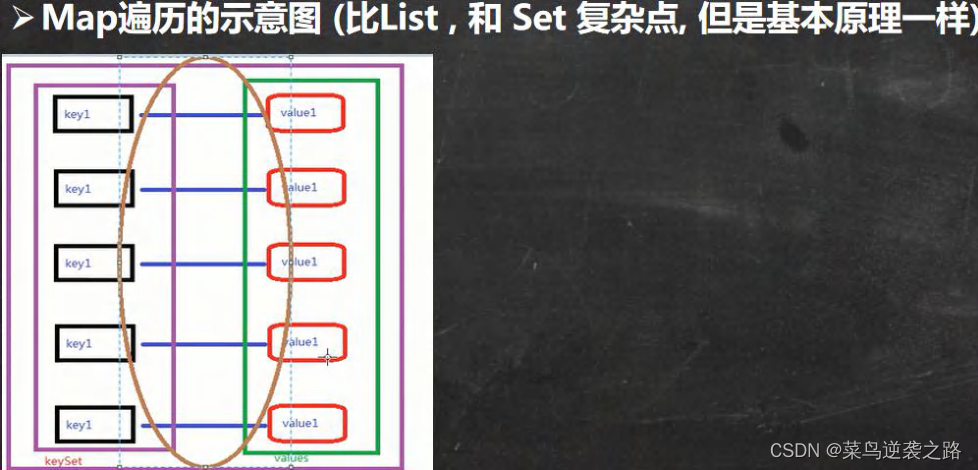
使用KeySet(),取出所有的key,通过key取出对应的value
主要两种方法:增强for循环、迭代器
   //增强for循环
        for (Object key : set) {


            System.out.println(map.get(key));
        }

   //迭代器
        System.out.println("===========");
        Iterator iterator = set.iterator();
        while (iterator.hasNext()) {


            Object key = iterator.next();
            System.out.println(map.get(key));
        }
使用values()获取所有的值
主要有:增强for循环、迭代器
     Collection values = map.values();
        //可以使用所有的collection遍历的方法

        //(1)增强for
        for (Object value : values) {


            System.out.println(value);
        }
        //(2)迭代器
        while (iterator.hasNext()) {


            Object next = iterator.next();
            System.out.println(next);
        }
通过EntrySet来获取k-v
主要有:增强for循环、迭代器
 Set entrySet = map.entrySet();// EntrySet<Map.Entry<K,V>>

//(1)增强for
System.out.println("--------------");
for (Object entry : entrySet) {


   //将entry转成Map.Entry
    Map.Entry m =(Map.Entry)entry;
    System.out.println(m.getKey()+"-"+m.getValue());
}
//(2)迭代器
System.out.println("------------");
Iterator it = entrySet.iterator();
while (it.hasNext()) {


    Object entry =  it.next();

    //向下转型
    Map.Entry m=(Map.Entry)entry;
    System.out.println(m.getKey()+"-"+m.getValue());
    }
Map接口实现类–HashMap
-
特点

-
HashMap底层机制与源码剖析(重要)
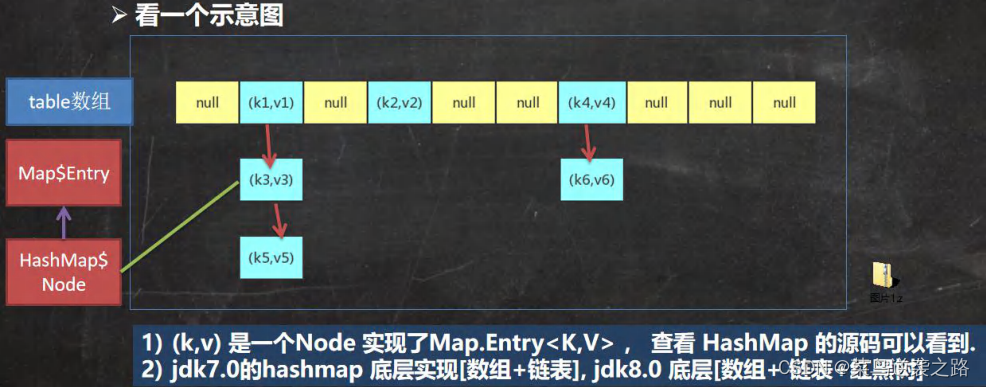
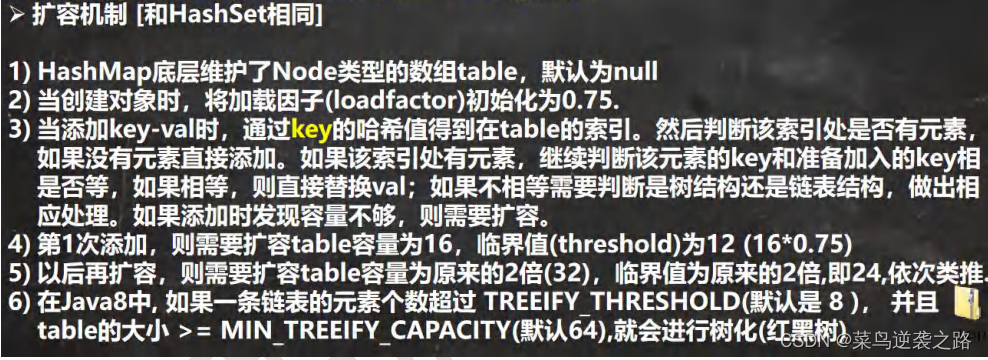
-
测试代码
 package com.map;

import java.util.HashMap;
import java.util.HashSet;

/**
 * @Description
 * @autor wzl
 * @date 2022/8/13-21:48
 */
public class HashMapSource {


    public static void main(String[] args) {


        HashMap map =new HashMap();
        map.put("java",10);
        map.put("php",10);
        map.put("java",20);

        System.out.println("map="+map);
    }
    /*
 * 执行构造器 new HashMap()
初始化加载因子 loadfactor = 0.75
HashMap$Node[] table = null
 * 执行 put 调用 hash 方法,计算 key 的 hash 值 (h = key.hashCode()) ^ (h >>> 16)
public V put(K key, V value) {//K = "java" value = 10
return putVal(hash(key), key, value, false, true);
}
 * 执行 putVal
final V putVal(int hash, K key, V value, boolean onlyIfAbsent,
boolean evict) {
Node<K,V>[] tab; Node<K,V> p; int n, i;//辅助变量
//如果底层的 table 数组为 null, 或者 length =0 , 就扩容到 16
if ((tab = table) == null || (n = tab.length) == 0)
n = (tab = resize()).length;
//取出 hash 值对应的 table 的索引位置的 Node, 如果为 null, 就直接把加入的 k-v
//, 创建成一个 Node ,加入该位置即可
if ((p = tab[i = (n - 1) & hash]) == null)
tab[i] = newNode(hash, key, value, null);
else {
Node<K,V> e; K k;//辅助变量
// 如果 table 的索引位置的 key 的 hash 相同和新的 key 的 hash 值相同,
// 并 满足(table 现有的结点的 key 和准备添加的 key 是同一个对象 || equals 返回真)
// 就认为不能加入新的 k-v
if (p.hash == hash &&
((k = p.key) == key || (key != null && key.equals(k))))
e = p;
else if (p instanceof TreeNode)//如果当前的 table 的已有的 Node 是红黑树,就按照红黑树的方式处
理
e = ((TreeNode<K,V>)p).putTreeVal(this, tab, hash, key, value);
else {
//如果找到的结点,后面是链表,就循环比较
for (int binCount = 0; ; ++binCount) {//死循环
if ((e = p.next) == null) {//如果整个链表,没有和他相同,就加到该链表的最后
p.next = newNode(hash, key, value, null);
//加入后,判断当前链表的个数,是否已经到 8 个,到 8 个,后
//就调用 treeifyBin 方法进行红黑树的转换
if (binCount >= TREEIFY_THRESHOLD - 1) // -1 for 1st
treeifyBin(tab, hash);
break;
}
if (e.hash == hash && //如果在循环比较过程中,发现有相同,就 break,就只是替换 value
((k = e.key) == key || (key != null && key.equals(k))))
break;
p = e;
}
}
if (e != null) { // existing mapping for key
V oldValue = e.value;
if (!onlyIfAbsent || oldValue == null)
e.value = value; //替换,key 对应 value
afterNodeAccess(e);
return oldValue;
}
}
++modCount;//每增加一个 Node ,就 size++
if (++size > threshold[12-24-48])//如 size > 临界值,就扩容
resize();
afterNodeInsertion(evict);
return null;
}
 * 关于树化(转成红黑树)
//如果 table 为 null ,或者大小还没有到 64,暂时不树化,而是进行扩容.
//否则才会真正的树化 -> 剪枝
final void treeifyBin(Node<K,V>[] tab, int hash) {
int n, index; Node<K,V> e;
if (tab == null || (n = tab.length) < MIN_TREEIFY_CAPACITY)
resize();
}
*/
}
- HashMap扩容机制(与HashSet部分一样)
public class HashMapSource2 {


   public static void main(String[] args) {


   HashMap hashMap = new HashMap();
   for(int i = 1; i <= 12; i++) {


   hashMap.put(i, "hello");
}
hashMap.put("aaa", "bbb");
System.out.println("hashMap=" + hashMap);//12 个 k-v
}
}
class A {


private int num;
publicA(int num) {


this.num = num;
}
//所有的 A 对象的 hashCode 都是 100
// @Override
// public int hashCode() {


// return 100;
// }
@Override
public String toString() {


return "\nA{" +
"num=" + num +
'}';
}
}
Map接口实现类-HashTable
-
特点

-
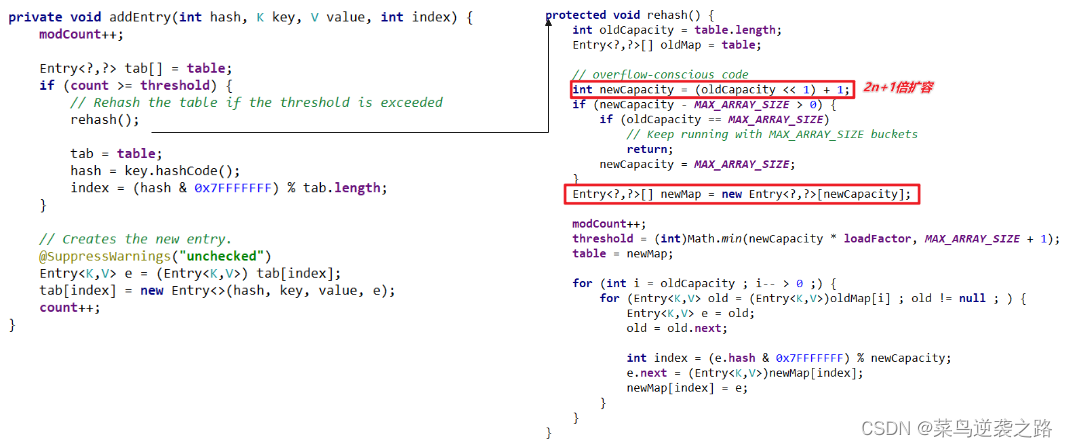
底层源码与扩容机制
1.底层有数组,Hashtable$Entry[],初始化大小为11
2.临界值 threshold 8=11*0.75
3.扩容:按照自己的扩容机制进行
4.执行方法 addEntry(hash,key,value,index);添加k-v封装到Entry
5.当if(count>=threshold)满足时,就进行扩容
6.按照2n+1扩容
package com.map;

import javax.swing.table.TableCellEditor;
import java.lang.annotation.Target;
import java.util.Hashtable;

/**
 * @Description
 * @autor wzl
 * @date 2022/8/14-7:50
 */
public class HashTableSoure {


    public static void main(String[] args) {


        Hashtable hashtable =new Hashtable();
        hashtable.put("lucy",100);
        hashtable.put("jack",200);
        hashtable.put("jac",200);
        hashtable.put("ja",200);
        hashtable.put("j",200);
        hashtable.put("ack",200);
        hashtable.put("ck",200);
        hashtable.put("k",200);
        hashtable.put("jackk",200);

        System.out.println(hashtable);

        //HashTable底层原理
        /*
        1.底层有数组,Hashtable$Entry[],初始化大小为11
        2.临界值 threshold 8=11*0.75
        3.扩容:按照自己的扩容机制进行
        4.执行方法 addEntry(hash,key,value,index);添加k-v封装到Entry
        5.当if(count>=threshold)满足时,就进行扩容
        6.按照2n+1扩容
         */
    }
}
HashMap VS HashTable

Map接口实现类-Properties
- 特点
由于继承Hashtable类,所以特性与它一样,底层扩容机制也一样

- 基本使用
 package com.map;

import java.util.Properties;

/**
 * @Description
 * @autor wzl
 * @date 2022/8/14-8:16
 */
public class Properties_ {


    public static void main(String[] args) {


        Properties properties =new Properties();
        properties.put("lucy",100);
        properties.put("john",100);
        properties.put("lic",100);
        System.out.println(properties);

        //如何通过key获取对应值 查
        System.out.println(properties.getProperty("lic"));
        System.out.println(properties.get("lic"));

        //删除
        properties.remove("lucy");
        System.out.println(properties);

        //改
        properties.put("john",200);
        System.out.println(properties);
    }
}
TreeSet源码解读
- 当我们使用无参构造器创建TreeSet时,它仍然是无序的
- 假设按照字符串大小来排序
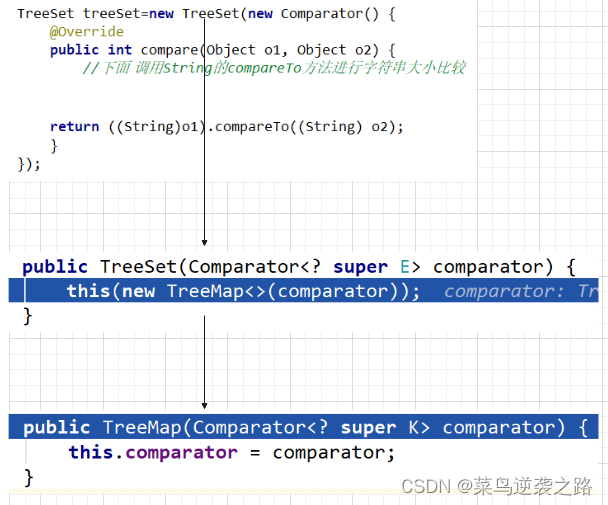
- 使用TreeSet提供给的一个构造器,可以传入一个比较器(匿名内部类)
package com.map;

import javax.transaction.TransactionRequiredException;
import java.util.Comparator;
import java.util.TreeSet;

/**
 * @Description
 * @autor wzl
 * @date 2022/8/14-8:25
 */
public class TreeSet_ {


    public static void main(String[] args) {


        /*
        1. 当我们使用无参构造器创建TreeSet时,它仍然是无序的
        2. 假设按照字符串大小来排序
        3. 使用TreeSet提供给的一个构造器,可以传入一个比较器(匿名内部类)

         */
        //TreeSet treeSet=new TreeSet();

        TreeSet treeSet = new TreeSet(new Comparator() {


            @Override
            public int compare(Object o1, Object o2) {


                //下面 调用String的compareTo方法进行字符串大小比较


                return ((String) o1).compareTo((String) o2);
            }
        });
        treeSet.add("john");
        treeSet.add("lucy");
        treeSet.add("lick");
        treeSet.add("a");

        System.out.println(treeSet);

        /*
           1. 构造器把传入的比较器对象,赋给了 TreeSet 的底层的 TreeMap 的属性 this.comparator
           public TreeMap(Comparator<? super K> comparator) {
           this.comparator = comparator;
             }
           2. 在 调用 treeSet.add("tom"), 在底层会执行到
           if (cpr != null) {//cpr 就是我们的匿名内部类(对象)
            }do {
            parent = t;
           //动态绑定到我们的匿名内部类(对象)compare
          cmp = cpr.compare(key, t.key);
            if (cmp < 0)
            t = t.left;
            else if (cmp > 0)
            t = t.right;
            else //如果相等,即返回 0,这个 Key 就没有加入
            return t.setValue(value);
            } while (t != null);
        }
*/

    }
}
TreeMap源码解读
package com.map;

import java.util.Comparator;
import java.util.TreeMap;

/**
 * @Description
 * @autor wzl
 * @date 2022/8/14-8:54
 */
public class TreeMap_ {


    public static void main(String[] args) {


        //使用默认的构造器,创建TreeMap,输入和输出顺序是不一致的(也没有排序)
        //TreeMap treeMap=new TreeMap();
        TreeMap treeMap=new TreeMap(new Comparator() {


            @Override
            public int compare(Object o1, Object o2) {


                return ((String)o1).length()-((String)o2).length();
               // return ((String)o1).compareTo((String)o2);
            }
        });
        treeMap.put("jack", "杰克");
        treeMap.put("tom", "汤姆");
        treeMap.put("kristina", "克瑞斯提诺");
        treeMap.put("smith", "斯密斯");
        treeMap.put("hsp", "韩顺平");//加入不了
        System.out.println("treemap=" + treeMap);

        /*
        1. 构造器. 把传入的实现了 Comparator 接口的匿名内部类(对象),传给给 				               TreeMap 的 comparator
        public TreeMap(Comparator<? super K> comparator) {
         this.comparator = comparator;
}
 * 调用 put 方法
2.1 第一次添加, 把 k-v 封装到 Entry 对象,放入 root
       Entry<K,V> t = root;
   		if (t == null) {
		compare(key, key); // type (and possibly null) check
		root = new Entry<>(key, value, null);
		size = 1;
		modCount++;
		return null;
		}
2.2 以后添加
		Comparator<? super K> cpr = comparator;
		if (cpr != null) {
		do { //遍历所有的 key , 给当前 key 找到适当位置
		parent = t;
		cmp = cpr.compare(key, t.key);//动态绑定到我们的匿名内部类的 compare
		if (cmp < 0)
		t = t.left;
		else if (cmp > 0)
		t = t.right;
		else //如果遍历过程中,发现准备添加 Key 和当前已有的 Key 相等,就不添加
		return t.setValue(value);
		} while (t != null);
}
         */
    }
}
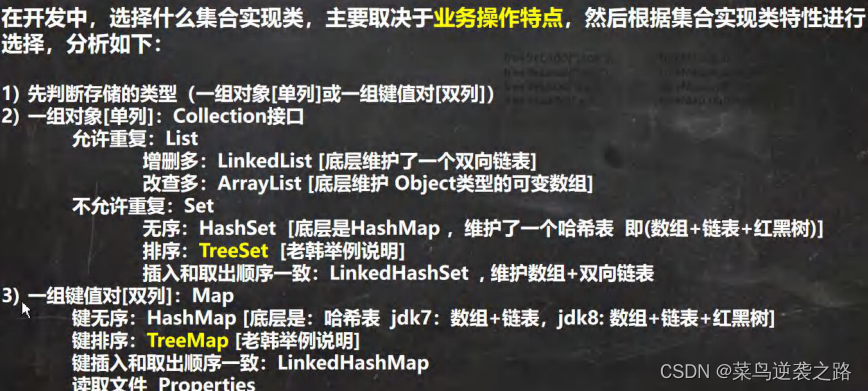
如何选择集合类
Collections工具类
-
作用

-
常用方法举例


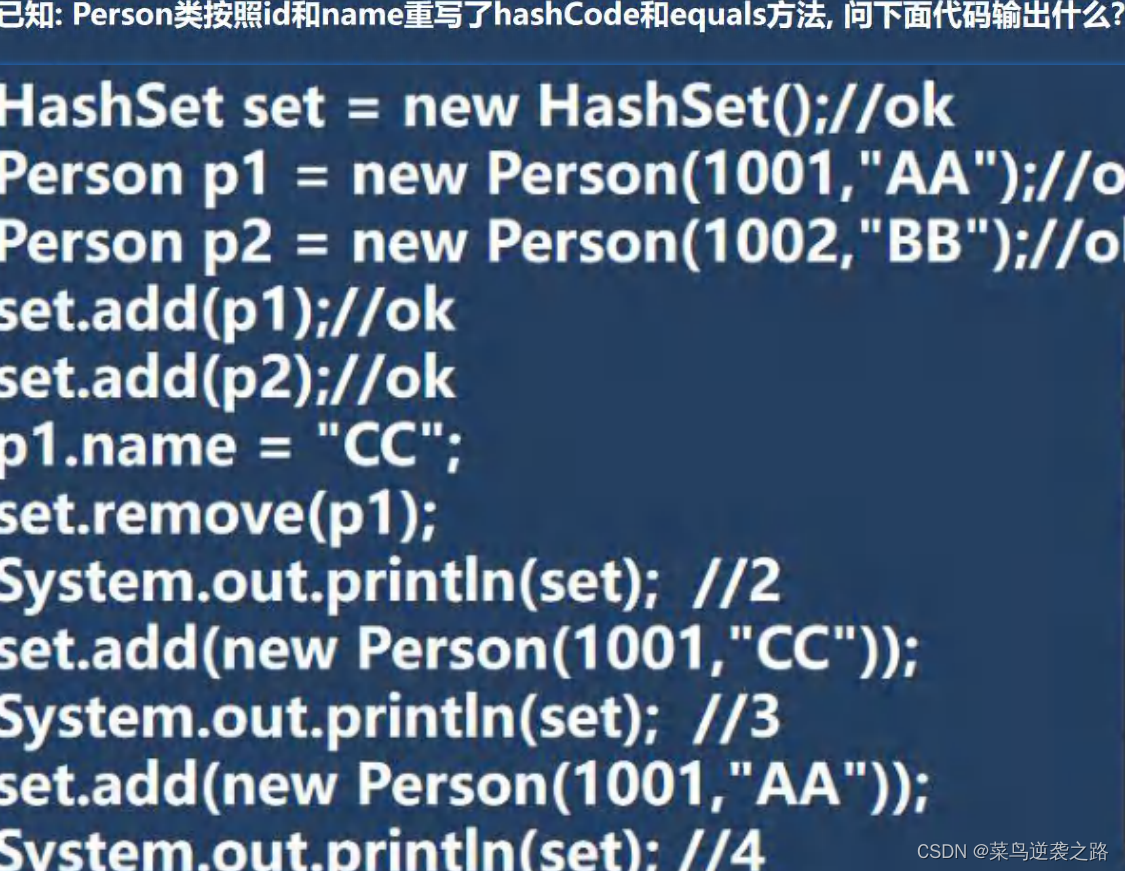
集合练习题


关键看Person()类是否实现了compareable接口,如果没有,会出现类型转换异常
