前言
多线程的重要不言而喻,本文会先过一遍多线程的基础,然后再详细介绍CompletableFuture的使用方式。
文章目录
在Java中,多线程的创建方式有四种
- 集成Thread
- 实现Runnable
- 实现Callable
- 线程池
一般在实际项目中,我们都是通过线程池的方式来使用多线程,而在JDK8新特性中,我们可以通过 CompletableFuture 来给线程池提交任务
1、多线程的四种创建方式
1.1、继承Thread
public class ShowThread{


    public static void main(String[] args) {


        System.out.println("main...start...");
        new Thread01().start();
        System.out.println("main...end...");
    }

    public static class Thread01extends Thread{


        @Override
        public void run() {


            System.out.println("当前线程:" + Thread.currentThread().getId());
            int i = 10 / 2;
            System.out.println("运行结果为:" + i);
        }
    }
}
我们可以看到输出结果,多线程任务使用成功~

1.2、实现Runnable接口
public class ShowThread{


    public static void main(String[] args) {


        System.out.println("main...start...");
        Runnable01 runnable01 = new Runnable01();
        new Thread(runnable01).start();
        System.out.println("main...end...");
    }

    public static class Runnable01 implements Runnable{


        @Override
        public void run() {


            System.out.println("当前线程:" + Thread.currentThread().getId());
            int i = 10 / 2;
            System.out.println("运行结果为:" + i);
        }
    }
}
我们可以看到输出结果,多线程任务使用成功~

1.3、实现Callable接口
Callable和Runnable最大的区别在于:Callable可以有返回值
public class ShowThread {
public static void main(String[] args) throws ExecutionException, InterruptedException {
System.out.println("main...start...");
FutureTask<Integer> futureTask = new FutureTask<>(new Callable01());
new Thread(futureTask).start();
//注意:get()是阻塞等待,只有整个线程值完成,才能获取到返回结果
Integer integer = futureTask.get();
System.out.println("Callable返回值为:" + integer);
System.out.println("main...end...");
}
public static class Callable01 implements Callable<Integer> {
@Override
public Integer call() throws Exception {
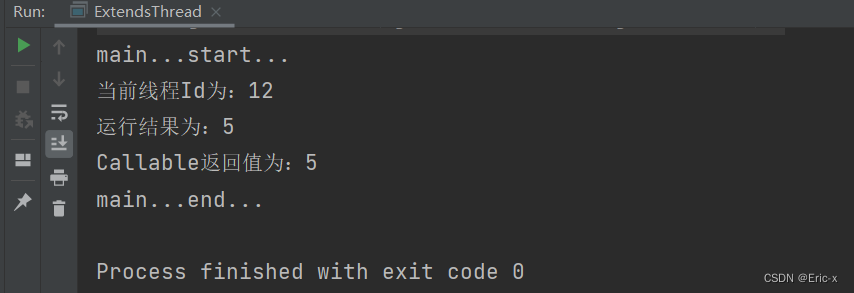
System.out.println("当前线程Id为:" + Thread.currentThread().getId());
int i = 10 / 2;
System.out.println("运行结果为:" + i);
return i;
}
}
}
我们可以看到输出结果,多线程任务使用成功~
并且由于我们使用了get,导致 输出语句:main…end…在最后指定,这是因为get()方法是阻塞式等待的,只有等线程执行完成,才能获取到返回结果。
1.4、线程池
线程池的好处不言而喻,最明显的好处就是:大大的降低资源消耗、提高响应效率、线程方便管理等。
public class ShowThread {


    //创建线程池  第一个参数代表核心线程数
    public static ExecutorService executor = Executors.newFixedThreadPool(10);

    public static void main(String[] args) {


        /**
         * 线程池七大参数介绍:
         *   1、corePoolSize:核心线程数,一直存在,在线程池创建好后就准备就绪
         *   2、maximumPoolSize:最大线程数,用于控制资源
         *   3、keepAliveTime:存活时间,如果当前的线程数量大于core【核心线程数】,就释放空闲的线程
         *   4、unit:时间单位
         *   5、BlockingQueue<Runnable> workQueue: 阻塞队列,如果任务有很多,就会将目前多的任务放在队列里面
         *   6、threadFactory:线程的创建工厂(一般指定自己的线程池)
         *   7、RejectedExecutionHandler handler:如果队列满了,就按照我们的指定的拒绝策略拒绝执行任务
         *
         * 线程池工作顺序
         *   1、线程池创建,准备好core数量的核心线程,准备接受任务
         *   2、core满了,就将再进来的任务放入阻塞队列中,空闲的core就会自己去阻塞队列获取任务执行
         *   3、阻塞队列也满了,就直接开新线程执行,最大只能开到max指定的数量
         *   4、max都执行完成,有很多空闲,就在指定的时间 keepAliveTime 以后,释放掉max-core这些线程
         *
         */
        ThreadPoolExecutor executor = new ThreadPoolExecutor(5,
                200,
                10,
                TimeUnit.SECONDS,
                new LinkedBlockingDeque<>(10000),//如果不填写值,那么默认为Integer的最大值
                null,
                null);


    }
}
上面是Java内置线程池,如果想详细了解,可以查看这篇文章:Java线程池详细介绍与使用
2、异步编排:CompletableFuture
2.1、创建异步对象
public class ShowThread {


    //创建线程池  第一个参数代表核心线程数
    public static ExecutorService executor = Executors.newFixedThreadPool(10);

    public static void main(String[] args) {


        System.out.println("main....start....");
//        //没有返回结果
//        CompletableFuture.runAsync(() -> {


//            System.out.println("当前线程Id:" + Thread.currentThread().getId());
//            int i = 10 / 2;
//            System.out.println("运行结果:" + i);
//        },executor);

        //有返回结果
        CompletableFuture<Integer> future = CompletableFuture.supplyAsync(() -> {


            System.out.println("当前线程Id:" + Thread.currentThread().getId());
            int i = 10 / 2;
            System.out.println("运行结果:" + i);
            return i;
        }, executor);
        System.out.println("main....end....");
    }

}
我们可以看到输出结果,多线程任务使用成功~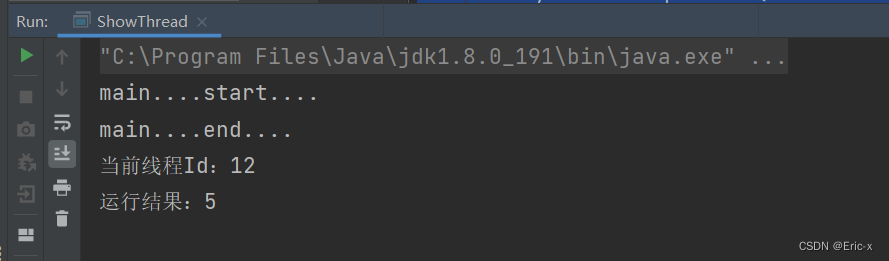
同时,我们也可以接受返回值(注意,所有CompletableFuture中的get()都是阻塞式等待的)
public class ShowThread {
//创建线程池 第一个参数代表核心线程数
public static ExecutorService executor = Executors.newFixedThreadPool(10);
public static void main(String[] args) throws ExecutionException, InterruptedException {
System.out.println("main....start....");
CompletableFuture<Integer> future = CompletableFuture.supplyAsync(() -> {
System.out.println("当前线程Id:" + Thread.currentThread().getId());
int i = 10 / 2;
System.out.println("运行结果:" + i);
return i;
}, executor);
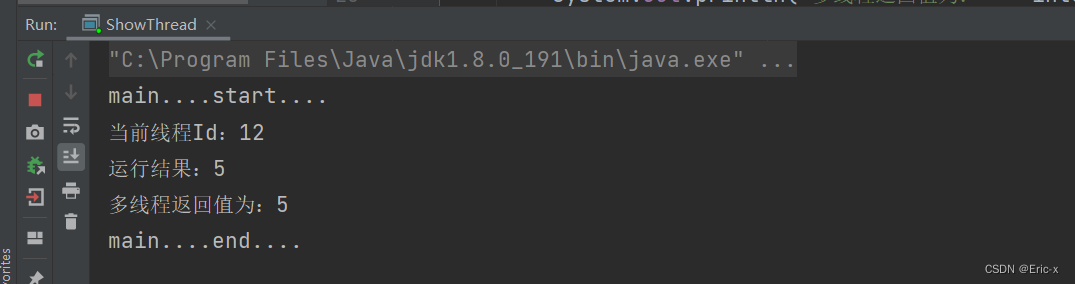
//get():阻塞式等待,只有等线程执行完毕,才能获取到返回值
Integer integer = future.get();
System.out.println("多线程返回值为:" + integer);
System.out.println("main....end....");
}
}
我们可以看到输出结果,返回值获取成功,同时 main…end…是在最后输出的
2.2、计算完成时方法(完成回调与感知异常)
public class ShowThread {
//创建线程池 第一个参数代表核心线程数
public static ExecutorService executor = Executors.newFixedThreadPool(10);
public static void main(String[] args) throws ExecutionException, InterruptedException {
System.out.println("main....start....");
CompletableFuture<Integer> future = CompletableFuture.supplyAsync(() -> {
try {
Thread.sleep(3000);//加上 sleep() 是为了让输出结果更明显
} catch (InterruptedException e) {
e.printStackTrace();
}
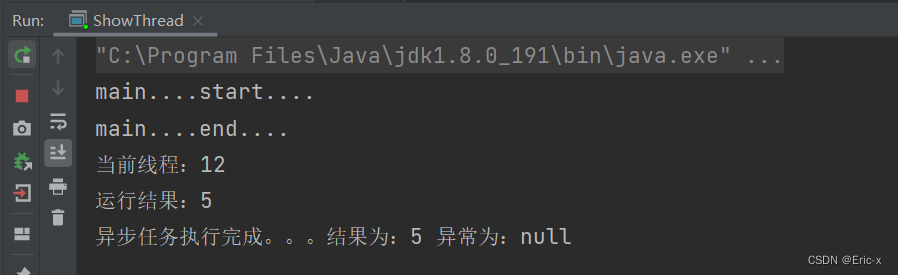
System.out.println("当前线程:" + Thread.currentThread().getId());
int i = 10 / 2;
System.out.println("运行结果:" + i);
return i;
}, executor).whenCompleteAsync((res,exception) -> {
//异步任务执行完成的回调
System.out.println("异步任务执行完成。。。结果为:" + res + " 异常为:" + exception);
}).exceptionally(throwable -> {
//一部任务执行失败的回调,同时可以指定返回值
return 10;
});
System.out.println("main....end....");
}
}
通过输出结果,我们可以看到,多线程执行完成后的回调成功啦~(这里就不截屏失败的了,各位小伙伴可自行测试)
同样的,我们可以通过 get() 方法来获取返回值,这里就不展示了
2.3、handle方法
如果我们要使用多线程的回调和感知异常,handle() 是一个绝佳的选择
public class ShowThread {


    //创建线程池  第一个参数代表核心线程数
    public static ExecutorService executor = Executors.newFixedThreadPool(10);

    public static void main(String[] args) throws ExecutionException, InterruptedException {


        System.out.println("main....start....");

        CompletableFuture<Integer> future = CompletableFuture.supplyAsync(() -> {


            System.out.println("当前线程:" + Thread.currentThread().getId());
            int i = 10 / 4;
            System.out.println("运行结果:" + i);
            return i;
        }, executor).handle((res,exception) -> {


            //方法完成后的处理:handle()
            if(res != null){


                //如果res不等空,说明有返回结果(这里只是演示,正常情况下可以直接将res返回出去或者经过处理再返回出去)
                return  res * 2;
            }
            if(exception != null){


                //说明出现异常了
                return 0;
            }
            return 0;
        });
        //获取返回值,也是阻塞式等待
        Integer integer = future.get();

        System.out.println("main....end....");
    }
}
2.4、多线程串行方法
什么情况下会用到线程串行呢,比如在进入某个商品详情的时候,我们可能会调用多个接口来获取这个商品的所有信息,但比如接口A调用的可能就需要用到接口B返回的值在进行调用,这个时候就需要用到 多线程串行方法了
public class ShowThread {
//创建线程池 第一个参数代表核心线程数
public static ExecutorService executor = Executors.newFixedThreadPool(10);
public static void main(String[] args) throws ExecutionException, InterruptedException {
System.out.println("main....start....");
/**
* 线程串行化
* 1)、thenRunAsync:不能获取到上一步的执行结果,无返回值
* .thenRunAsync(() -> {
* System.out.println("线程任务2启动了。。。");
* },executor)
*
* 2)、thenAcceptAsync:可以获取到上一步的执行结果,无返回值
* .thenAcceptAsync(res -> {
* System.out.println("线程任务2启动了。。。线程任务1的结果为:" + res);
* },executor)
*
* 3)、thenApplyAsync:可以获取到上一步的结果,并且有返回值
*/
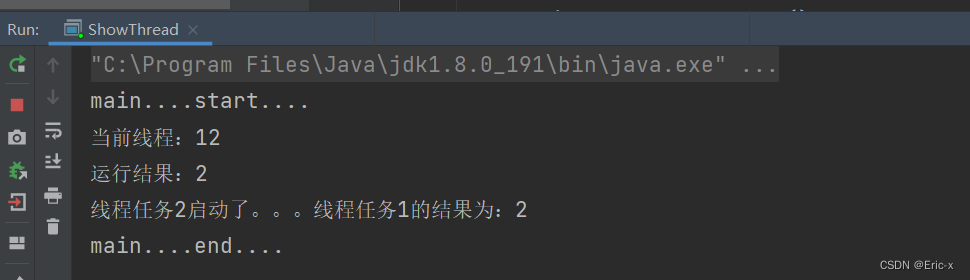
CompletableFuture<String> future = CompletableFuture.supplyAsync(() -> {
System.out.println("当前线程:" + Thread.currentThread().getId());
int i = 10 / 4;
System.out.println("运行结果:" + i);
return i;
}, executor).thenApplyAsync(res -> {
System.out.println("线程任务2启动了。。。线程任务1的结果为:" + res);
return "Hello " + res;
}, executor);
//get() 获取返回结果,是一个阻塞方法
String s = future.get();
System.out.println("main....end....");
}
}
这里只举例了 thenApplyAsync 方法,感兴趣的小伙伴可以去试试另外两个方法:thenRunAsync、thenAcceptAsync 说明我都写在注释中了~
通过结果我们可以看到,线程2确实是等线程1执行完毕后再执行的,并且如果使用 thenApplyAsync 方法的话还能拿到线程1的返回值。
2.5、两任务组合 - 都要完成
在某种特殊的场景下,我们需要等待两个指定的线程执行完毕后,再执行第三个线程。
public class ShowThread {
//创建线程池 第一个参数代表核心线程数
public static ExecutorService executor = Executors.newFixedThreadPool(10);
public static void main(String[] args) throws ExecutionException, InterruptedException {
System.out.println("main....start....");
//1、先准备好两个线程
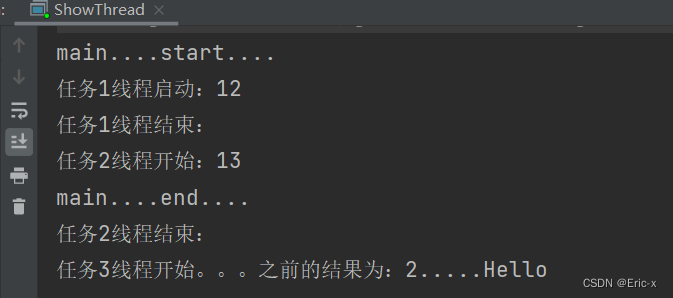
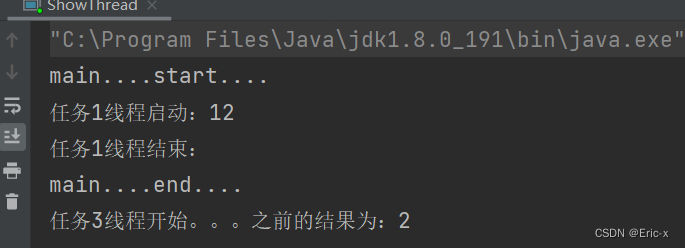
CompletableFuture<Object> future01 = CompletableFuture.supplyAsync(() -> {
System.out.println("任务1线程启动:" + Thread.currentThread().getId());
int i = 10 / 4;
System.out.println("任务1线程结束:");
return i;
}, executor);
CompletableFuture<Object> future02 = CompletableFuture.supplyAsync(() -> {
System.out.println("任务2线程开始:" + Thread.currentThread().getId());
try {
Thread.sleep(3000);//线程2加上这个是为了更好的显示结果
} catch (InterruptedException e) {
e.printStackTrace();
}
System.out.println("任务2线程结束:");
return "Hello";
}, executor);
/**
* 两个任务,两个都完成
* 1)runAfterBothAsync:无感知结果,无返回值
* 2)thenAcceptBothAsync:有感知结果,无返回值
* 3)thenCombineAsync:有感知结果,有返回值
*
*/
// //此时,任务3一定是等到任务1和任务2执行完成才会执行的
// // runAfterBothAsyn() 是不能感知到前面两个任务的结果的
future01.runAfterBothAsync(future02,() -> {
System.out.println("任务3线程开始");
},executor);
//
// //thenAcceptBothAsync() 可以获取到前面两个任务的返回结果
future01.thenAcceptBothAsync(future02,(f1,f2) -> {
System.out.println("任务3线程开始。。。之前的结果为:" + f1 + "....." + f2);
},executor);
//
// //
CompletableFuture<String> future = future01.thenCombineAsync(future02, (f1, f2) -> {
System.out.println("任务3线程开始。。。之前的结果为:" + f1 + "....." + f2);
return f1 + " :" + f2 + "-> HaHa";
}, executor);
System.out.println("main....end....");
}
}
有三个方法,这里演示了 thenCombineAsync 这个有感知结果,并且有返回值的方法。
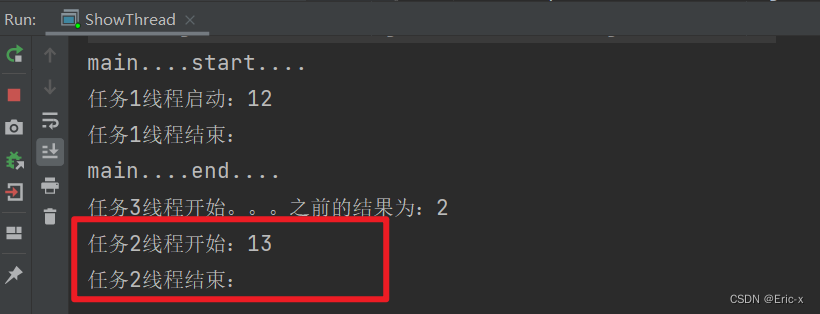
通过输出结果,我们可以看到,因为我们在任务2中加了睡眠三秒,导致一开始的输出结果是这样的:
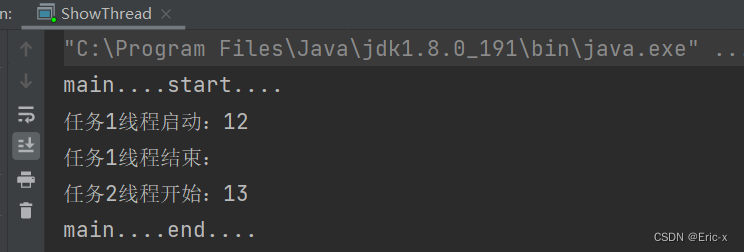
只有等到3s过后,线程3才开始启动,而这正是我们想要的结果~
2.6、两任务组合 - 一个完成
这个和上面的是一样的,只不过这三个方法只需要其中一个线程执行完成后就会执行指定的线程
public class ShowThread {


    //创建线程池  第一个参数代表核心线程数
    public static ExecutorService executor = Executors.newFixedThreadPool(10);

    public static void main(String[] args) throws ExecutionException, InterruptedException {


        System.out.println("main....start....");

        //1、先准备好两个线程
        CompletableFuture<Object> future01 = CompletableFuture.supplyAsync(() -> {


            System.out.println("任务1线程启动:" + Thread.currentThread().getId());
            int i = 10 / 4;
            System.out.println("任务1线程结束:");
            return i;
        }, executor);

        CompletableFuture<Object> future02 = CompletableFuture.supplyAsync(() -> {


            try {


                Thread.sleep(3000);//线程2加上这个是为了更好的显示结果
            } catch (InterruptedException e) {


                e.printStackTrace();
            }
            System.out.println("任务2线程开始:" + Thread.currentThread().getId());

            System.out.println("任务2线程结束:");
            return "Hello";
        }, executor);

        /**
         * 两个任务,只要有一个完成,就执行任务3
         * 1)runAfterEitherAsync:不感知结果,自己也无返回值
         * 2)acceptEitherAsync:感知结果,自己也无返回值
         * 3)applyToEitherAsync:感知结果,自己有返回值
         */
//        future01.runAfterEitherAsync(future02,()-> {


//            //此时效果不明显,我们可以给任务2睡眠3,看任务3是否能执行
//            System.out.println("任务3线程开始");
//        },executor);

//        future01.acceptEitherAsync(future02,res -> {


//            System.out.println("任务3线程开始。。。之前的结果为:" + res);
//        },executor);

        CompletableFuture<String> future = future01.applyToEitherAsync(future02, res -> {


            System.out.println("任务3线程开始。。。之前的结果为:" + res);
            return res.toString() + "-> 哈哈";
        }, executor);

        System.out.println("main....end....");
    }
}
同样的,这里也只演示一个,但其他的方法使用都在,只是注释掉了。
通过输出结果我们可以看到,线程3确实是在线程1执行完成后执行的,并且因为我们在线程2上加了睡眠3s,所以一开始的输出结果是这样的
3s后是这样的
2.7、多任务组合
public class ShowThread {


    //创建线程池  第一个参数代表核心线程数
    public static ExecutorService executor = Executors.newFixedThreadPool(10);

    public static void main(String[] args) throws ExecutionException, InterruptedException {


        System.out.println("main....start....");

        CompletableFuture<String> futureImg = CompletableFuture.supplyAsync(() -> {


            System.out.println("查询商品的图片信息");
            return "hello.jpg";
        }, executor);

        CompletableFuture<String> futureAttr = CompletableFuture.supplyAsync(() -> {


            try {


                Thread.sleep(3000);
            } catch (InterruptedException e) {


                e.printStackTrace();
            }
            System.out.println("查询商品的属性信息");
            return "黑色+256G";
        }, executor);

        CompletableFuture<String> futureDesc = CompletableFuture.supplyAsync(() -> {


            System.out.println("查询商品介绍");
            return "华为Mate40 Pro";
        }, executor);


        //按照正常的写法是通过 get(),等上一个任务执行完,再执行下一个,一次类推
        //但这样是相当耗时的,假设第一个任务执行需要10s,那么后面所有的任务都需要等待10s
//        futureImg.get();
//        futureAttr.get();
//        futureDesc.get();

        //在JDK8我们可以使用  CompletableFuture.allOf();
        CompletableFuture<Void> future = CompletableFuture.allOf(futureImg,futureAttr,futureDesc);

        //任一任务完成执行
//        CompletableFuture<Void> future = CompletableFuture.anyOf(futureImg,futureAttr,futureDesc);

        //等待所有线程的结果完成
        future.get();//输出结果可以看到,只有等三个线程执行完后才输出的 main...end..

        //但如果我们不调用 future.get() 方法,我们可以发现 main...end.. 并不是最后输出的
        //为了效果明显,我们可以在线程2中加上睡眠3s

        System.out.println("main....end....");
    }
}
注意:如果直接使用 get() 方法,等上一个任务执行完,再执行下一个,以此类推,那么这样是相当耗时的,假设第一个任务执行需要10s,那么后面所有的任务都需要等待10s,所以建议使用:CompletableFuture.allOf();方法
总结
在实际项目中,我们多线程环基本都不使用前三种方式来创建多线程,因为那样太消耗资源了,而是通过线程池的方式来提交任务,而线程池的使用,用的更多则是JDK8新特征中的 CompletableFuture。
在最后,补充一个多线程的面试题:一个线程池,core 7 max 20 queue 50,100并发进来是怎么分配的。
答:7个线程会立即得到执行,50个会进入队列,队列满了之后会再开13个线程进行执行,剩下的30个使用拒绝策略(注:拒绝策略有很多种)。