前言
在进行微信公众号业务开发的时候,微信支付可以说是非常重要的一环。该篇文章每一步都有记录,力争理解的同时各位小伙伴也能够实现功能
文章目录
1、公众号配置
1、绑定域名
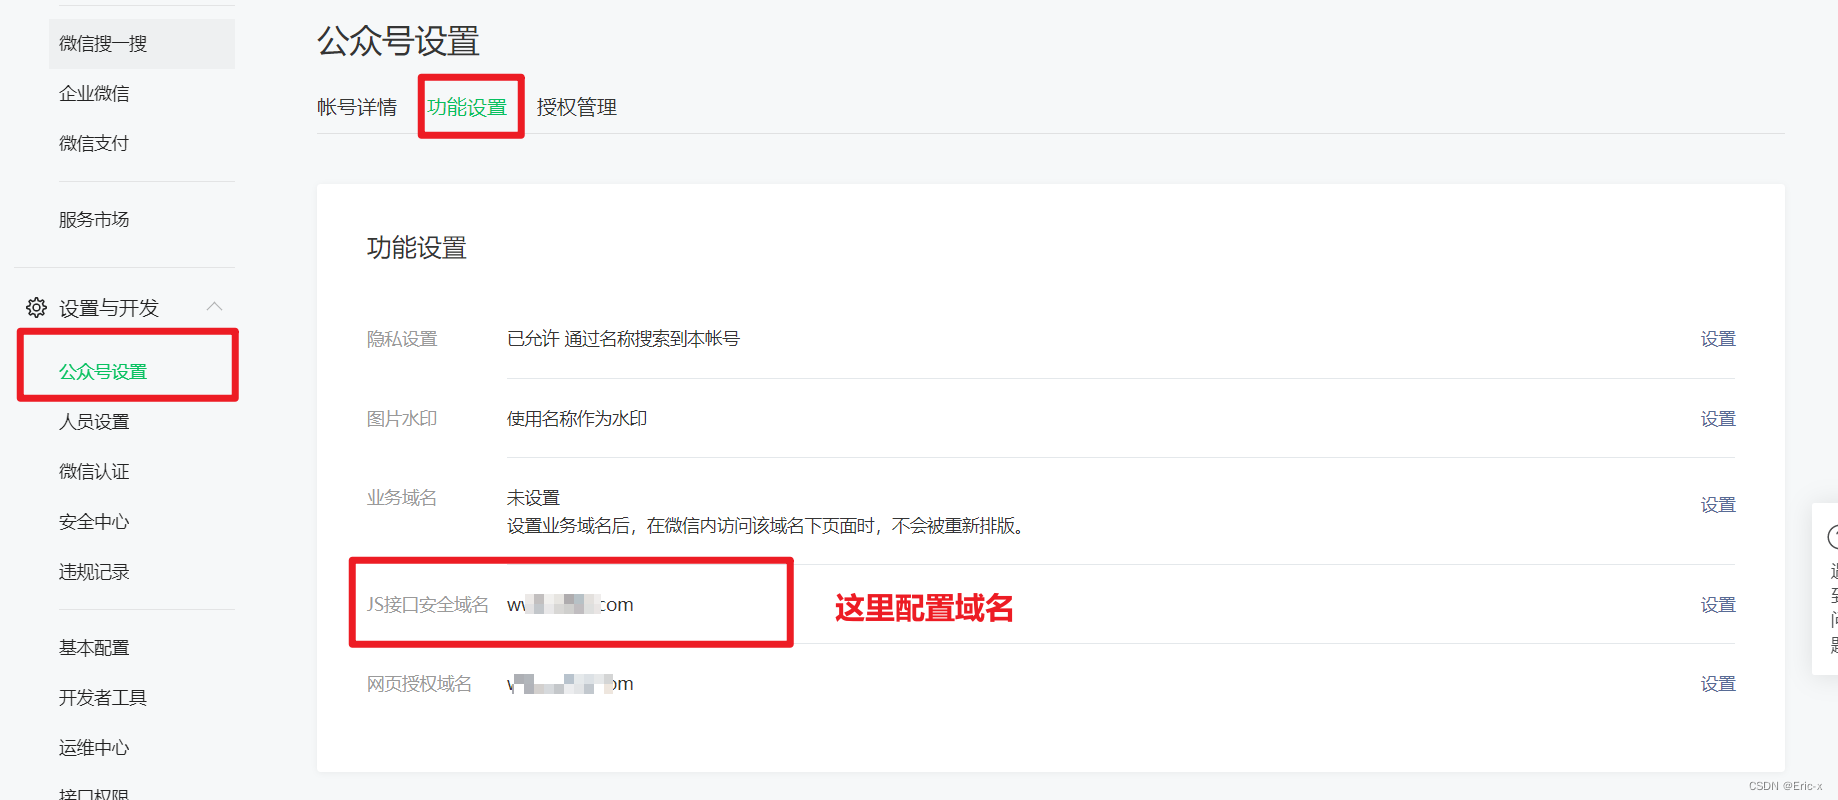
先登录微信公众平台进入“设置与开发”,“公众号设置”的“功能设置”里填写“JS接口安全域名”。
说明:测试号不支持支付功能,需要使用正式号才能进行测试。
2、商户平台配置支付目录

2、微信支付实现代码
1、引入依赖
<dependency>
	<groupId>com.github.wxpay</groupId>
	<artifactId>wxpay-sdk</artifactId>
	<version>0.0.3</version>
</dependency>
2、Controller
@Api(tags = "微信支付接口")
@RestController
@RequestMapping("/api/order/wxPay")
public class WXPayController {


    @Autowired
    private WXPayService wxPayService;

    @ApiOperation(value = "下单 小程序支付")
    @GetMapping("/createJsapi/{orderNo}")
    public Result createJsapi(
            @ApiParam(name = "orderNo", value = "订单No", required = true)
            @PathVariable("orderNo") String orderNo) {


        return Result.ok(wxPayService.createJsapi(orderNo));
    }
}
3、Service接口
public interface WXPayService {


	Map createJsapi(String orderNo);
}
4、ServiceImpl实现类
@Service
@Slf4j
public class WXPayServiceImpl implements WXPayService {


	@Autowired
	private OrderInfoService orderInfoService;
	@Resource
	private UserInfoFeignClient userInfoFeignClient;

	@Override
	public Map<String, String> createJsapi(String orderNo) {


		try {


            //1、封装微信支付需要参数,使用map集合
			Map<String, String> paramMap = new HashMap();
			//正式服务号Id(appid、mch_id这两个值是固定的,不能改变)
			paramMap.put("appid", "wxf913bfa3a2c7eeeb");
            //服务号的商户号
			paramMap.put("mch_id", "1481962542");
            //使用微信依赖生成一个随机字符串
			paramMap.put("nonce_str", WXPayUtil.generateNonceStr());
            //微信支付弹框的显示内容
			paramMap.put("body", "test");
			paramMap.put("out_trade_no", orderNo);
            //支付金额,为了测试,统一支付金额为0.01元
			paramMap.put("total_fee", "1");//单位:分
            //当前支付客户端的Ip
			paramMap.put("spbill_create_ip", "127.0.0.1");
            //支付成功后的跳转页面路径
			paramMap.put("notify_url", "http://glkt.atguigu.cn/api/order/wxPay/notify");
            //支付类型:是弹出一个支付二维码,还是直接弹框支付
			paramMap.put("trade_type", "JSAPI");//弹框支付,按照固定金额支付
            //设置用户的openId
            //当前项目逻辑:1、先根据订单号获取userid,再根据userid获取openId
//			paramMap.put("openid", "o1R-t5trto9c5sdYt6l1ncGmY5Y");
			//UserInfo userInfo = userInfoFeignClient.getById(paymentInfo.getUserId());
//			paramMap.put("openid", "oepf36SawvvS8Rdqva-Cy4flFFg");
            //因为当前使用测试服务号,但测试号不支持支付功能,为了使用正式服务号进行测试使用下面固定写法,这个openId通过其他方式获取。
			paramMap.put("openid", "oQTXC56lAy3xMOCkKCImHtHoLL");

			//2、HTTPClient来根据URL访问第三方接口并且传递参数
			HttpClientUtils client = new HttpClientUtils("https://api.mch.weixin.qq.com/pay/unifiedorder");

			//client设置参数
			client.setXmlParam(WXPayUtil.generateSignedXml(paramMap, "MXb72b9RfshXZD4FRGV5KLqmv5bx9LT9"));
			client.setHttps(true);//表示支付https请求
			client.post();//发送post请求
			//3、返回第三方的数据:微信支付返回的数据
			String xml = client.getContent();
            System.out.println("微信支付返回数据-xml:" + xml);
			Map<String, String> resultMap = WXPayUtil.xmlToMap(xml);
			if(null != resultMap.get("result_code")  && !"SUCCESS".equals(resultMap.get("result_code"))) {


				throw new GgktException(20001,"支付失败");
			}

			//4、再次封装参数
			Map<String, String> parameterMap = new HashMap<>();
			String prepayId = String.valueOf(resultMap.get("prepay_id"));
			String packages = "prepay_id=" + prepayId;
			parameterMap.put("appId", "wxf913bfa3a2c7eeeb");
			parameterMap.put("nonceStr", resultMap.get("nonce_str"));
			parameterMap.put("package", packages);
			parameterMap.put("signType", "MD5");
			parameterMap.put("timeStamp", String.valueOf(new Date().getTime()));
			String sign = WXPayUtil.generateSignature(parameterMap, "MXb72b9RfshXZD4FRGV5KLqmv5bx9LT9");

			//返回结果
			Map<String, String> result = new HashMap();
			result.put("appId", "wxf913bfa3a2c7eeeb");
			result.put("timeStamp", parameterMap.get("timeStamp"));
			result.put("nonceStr", parameterMap.get("nonceStr"));
			result.put("signType", "MD5");
			result.put("paySign", sign);
			result.put("package", packages);
			System.out.println(result);
			return result;
		} catch (Exception e) {


			e.printStackTrace();
			return new HashMap<>();
		}
	}
}
总结
其实微信支付实现代码并不难,需要注意的就是一些额外配置信息。
【微信开发第一章】SpringBoot实现微信公众号创建菜单,同步菜单功能:https://blog.csdn.net/weixin_47316183/article/details/127821095?spm=1001.2014.3001.5502
【微信开发第二章】SpringBoot实现微信公众号普通消息和模板消息回复:https://blog.csdn.net/weixin_47316183/article/details/127821653?spm=1001.2014.3001.5502
【微信开发第三章】SpringBoot实现微信授权登录
https://blog.csdn.net/weixin_47316183/article/details/127833802?spm=1001.2014.3001.5502
【微信开发第四章】SpringBoot实现微信H5支付
https://blog.csdn.net/weixin_47316183/article/details/127949620?spm=1001.2014.3001.5502
【微信开发第五章】SpringBoot实现微信分享
https://blog.csdn.net/weixin_47316183/article/details/127950090?spm=1001.2014.3001.5502