一、数据集格式

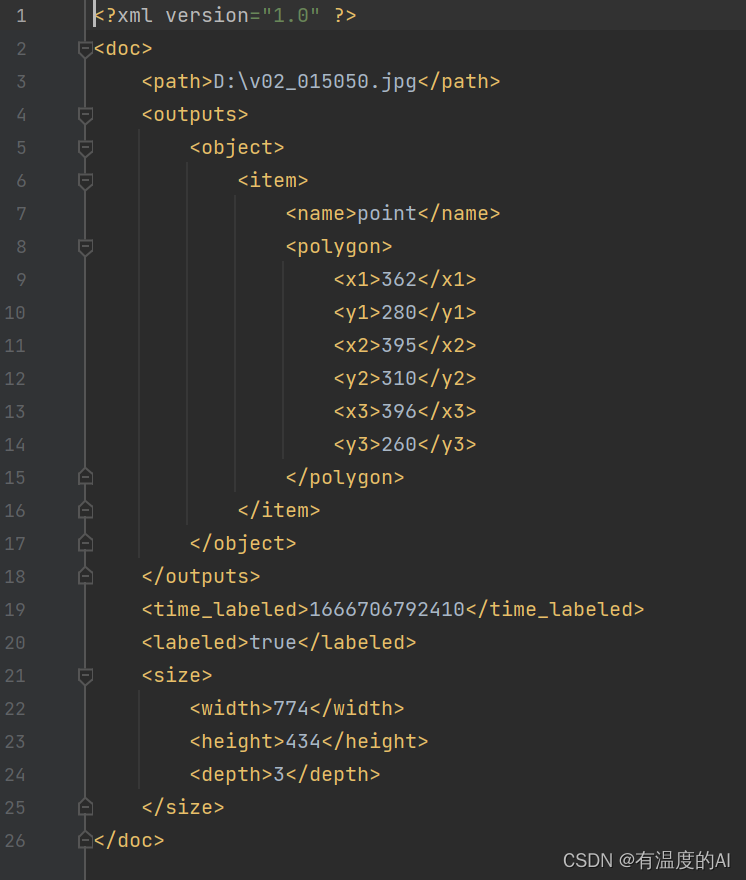
二、解析xml文件,生成data_center.txt
from PIL import Image
import math,os
from xml.etree import ElementTree as ET


def keep_image_size_open(path, size=(256, 256)):
    img = Image.open(path)
    temp = max(img.size)
    mask = Image.new('RGB', (temp, temp), (0, 0, 0))
    mask.paste(img, (0, 0))
    mask = mask.resize(size)
    return mask


def make_data_center_txt(xml_dir):
    with open('data_center.txt', 'a') as f:
        f.truncate(0)
        path=r'data/images'
        xml_names = os.listdir(xml_dir)
        for xml in xml_names:
            xml_path = os.path.join(xml_dir, xml)
            in_file = open(xml_path)
            tree = ET.parse(in_file)
            root = tree.getroot()
            image_path = root.find('path')
            polygon = root.find('outputs/object/item/polygon')
            data = []
            c_data = []
            data_str = ''
            print(xml)
            for i in polygon:
                data.append(int(i.text))
                data_str = data_str + ' ' + str(i.text)
            for i in range(0, len(data), 2):
                c_data.append((data[i], data[i + 1]))
            data_str = os.path.join(path,image_path.text.split('\\')[-1]) +data_str
            f.write(data_str + '\n')


if __name__ == '__main__':
    make_data_center_txt('data/xml')
三、加载数据集
import numpy as np
import torch
from torch.utils.data import Dataset
from torchvision import transforms
from PIL import Image

from heatmap_label import CenterLabelHeatMap

tf = transforms.Compose([  #标准化处理
    transforms.ToTensor()
])

class MyDataset(Dataset):
    def __init__(self,root): #传入路径
        f=open(root,'r')
        self.dataset=f.readlines() #读所有行
    def __len__(self):
        return len(self.dataset) #返回数据集长度
    def __getitem__(self, index):
        data=self.dataset[index] #取当前数据
        img_path=data.split(' ')[0] #以空格划分,并取出文件名,即data/images\0.png
        img_data=Image.open(img_path).resize((256, 256)) #打开图片
        # points = data.split(' ')[1:-2]  # 取出后面5个点的x,y坐标,-2是取不到的
        points=data.split(' ')[1:] #取出后面5个点的x,y坐标
        # print(img_data, points)
        #将坐标映射到256*256大小的图片上
        points = [int(points[0])*256/774, int(points[1])*256/434, int(points[2])*256/774, int(points[3])*256/434, int(points[4])*256/774, int(points[5])*256/434]
        # points=[int(i)/100 for i in points] #图像宽高为100,int(i)/100进行归一化
        # print(img_data, points)

        label = []
        for i in range(0, len(points), 2):
            heatmap = CenterLabelHeatMap(256, 256, points[i], points[i+1], 5)
            label.append(heatmap)
        #一个关键点会生成一个通道,3个关键点生成3个通道
        label = np.stack(label) #将列表转成数组的形式
        return tf(img_data), torch.Tensor(label) #将img_data标准化,将points转化为tensor格式


if __name__ == '__main__':
    data=MyDataset('data_center.txt')
    for i in data:
        print(i[0].shape)
        print(i[1].shape)
四、构建网络
import torch
from torch import nn
from torch.nn import functional as F

class Conv_Block(nn.Module):
    def __init__(self,in_channel,out_channel):
        super(Conv_Block, self).__init__()
        self.layer=nn.Sequential(
            nn.Conv2d(in_channel,out_channel,3,1,1,padding_mode='reflect',bias=False),
            nn.BatchNorm2d(out_channel),
            nn.Dropout2d(0.3),
            nn.LeakyReLU(),
            nn.Conv2d(out_channel, out_channel, 3, 1, 1, padding_mode='reflect', bias=False),
            nn.BatchNorm2d(out_channel),
            nn.Dropout2d(0.3),
            nn.LeakyReLU()
        )
    def forward(self,x):
        return self.layer(x)


class DownSample(nn.Module):
    def __init__(self,channel):
        super(DownSample, self).__init__()
        self.layer=nn.Sequential(
            nn.Conv2d(channel,channel,3,2,1,padding_mode='reflect',bias=False),
            nn.BatchNorm2d(channel),
            nn.LeakyReLU()
        )
    def forward(self,x):
        return self.layer(x)


class UpSample(nn.Module):
    def __init__(self,channel):
        super(UpSample, self).__init__()
        self.layer=nn.Conv2d(channel,channel//2,1,1)
    def forward(self,x,feature_map):
        up=F.interpolate(x,scale_factor=2,mode='nearest')
        out=self.layer(up)
        return torch.cat((out,feature_map),dim=1)


class UNet(nn.Module):
    def __init__(self,num_classes):
        super(UNet, self).__init__()
        self.c1=Conv_Block(3,64)
        self.d1=DownSample(64)
        self.c2=Conv_Block(64,128)
        self.d2=DownSample(128)
        self.c3=Conv_Block(128,256)
        self.d3=DownSample(256)
        self.c4=Conv_Block(256,512)
        self.d4=DownSample(512)
        self.c5=Conv_Block(512,1024)
        self.u1=UpSample(1024)
        self.c6=Conv_Block(1024,512)
        self.u2 = UpSample(512)
        self.c7 = Conv_Block(512, 256)
        self.u3 = UpSample(256)
        self.c8 = Conv_Block(256, 128)
        self.u4 = UpSample(128)
        self.c9 = Conv_Block(128, 64)
        self.out=nn.Conv2d(64,3, 3, 1, 1)

    def forward(self,x):
        R1=self.c1(x)
        R2=self.c2(self.d1(R1))
        R3 = self.c3(self.d2(R2))
        R4 = self.c4(self.d3(R3))
        R5 = self.c5(self.d4(R4))
        O1=self.c6(self.u1(R5,R4))
        O2 = self.c7(self.u2(O1, R3))
        O3 = self.c8(self.u3(O2, R2))
        O4 = self.c9(self.u4(O3, R1))

        return self.out(O4)

if __name__ == '__main__':
    x=torch.randn(2,3,256,256)
    net=UNet(num_classes=3)
    print(net(x).shape)
五、开始训练
import os
from torch import nn,optim
import torch
from dataset import *
from net import *
from torch.utils.data import DataLoader
if __name__ == '__main__':
device=torch.device('cuda' if torch.cuda.is_available() else 'cpu')
net=UNet(num_classes=3).to(device) #实例化网络并指认到设备上
weights='params/unet.pth'
if os.path.exists(weights): #如果有初始权值就加载
net.load_state_dict(torch.load(weights)) #加载权重
print('loading successfully')
opt=optim.Adam(net.parameters()) #指定优化器并传入参数
# loss_fun=nn.BCELoss() #定义损失函数
loss_fun=nn.BCEWithLogitsLoss()
dataset=MyDataset('data_center.txt') #实例化数据集
data_loader=DataLoader(dataset,batch_size=2,shuffle=True) #加载数据集
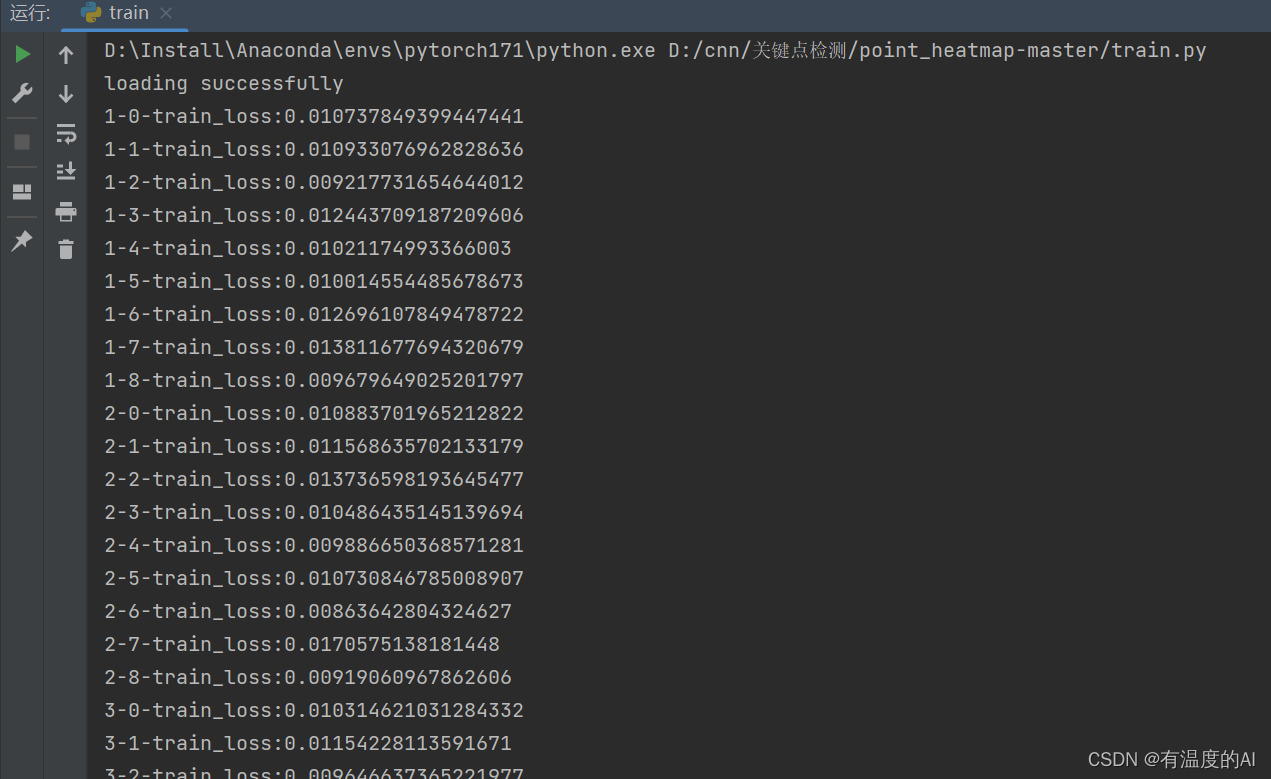
epoch = 1
while True:
for i,(image,label) in enumerate(data_loader): #用枚举的方式遍历数据集
image,label=image.to(device),label.to(device) #将图片和标签指认到设备上
# print(image.shape, label.shape)
out=net(image) #将图片输入网络
train_loss=loss_fun(out,label) #预测值和真是标签做损失
print(f'{epoch}-{i}-train_loss:{train_loss.item()}') #打印当前轮次当前批次的训练损失
opt.zero_grad() #梯度清零
train_loss.backward() #反向传播
opt.step() #更新梯度
if epoch % 10 == 0: #每10轮保存一次权重
torch.save(net.state_dict(),f'params/unet.pth') #保存参数
print('save successfully')
epoch += 1
六、利用训练好的权重进行预测
import os

import torch
from PIL import Image,ImageDraw
from dataset import *
from net import *    #import * 代表导入所有

path='test_image'
net=UNet(num_classes=3) #实例化网络
net.load_state_dict(torch.load('params/unet.pth')) #加载训练好的权重
net.eval() #测试模式
for j in os.listdir(path):
    img=Image.open(os.path.join(path,j)).resize((256, 256))
    draw=ImageDraw.Draw(img) #创建画板
    img_data=tf(img) #标准化
    img_data=torch.unsqueeze(img_data,dim=0) #设置批次维度
    out=net(img_data)
    out=out.squeeze()
    d=torch.max_pool2d(out, 256).squeeze()
    print(d)

    rst = []
    for i in range(3): #有3个关键点,故有3个通道
        h,w=np.where(out[i]==out[i].max()) #当前通道恒等于当前通道的最大值,就取其索引

        # rst.append((w[0], h[0]))


        draw.ellipse((w[0]*774/256-2, h[0]*434/256-2, w[0]*774/256+2, h[0]*434/256+2),(255,0,0)) #画半径为2的圆

    img.show()
    img.save(f'test_result/{j}')
reference
>>>>>来自B站大佬
【深度学习关键点回归(直接回归法&heatmap热力图法)】 https://www.bilibili.com/video/BV1sS4y197J1/?p=2&share_source=copy_web&vd_source=95705b32f23f70b32dfa1721628d5874