路由守卫
作用:对路由进行权限控制
路由守卫可以给开路由添加权限判断,例如
用户未登录就不能去某个页面,登录之后可以去到一些页面
如下:
-
to:要跳转到的路由目标
-
from:从哪里跳转的路由 来源
-
next:函数体 必须要next()才会让路由正常地跳转和切换,next(false)在原地停留,next(“强制修改到另一个路由路径上”)
注意:一定要调用next,如果不调用next,那么页面不会跳转的
全局路由在真正跳转之前,会执行一次beforeEach函数,next调用则跳转,也可以强制修改要跳转的路由
router.beforeEach((to,from,next) => {


//路由跳转“之前”先执行这里,决定是否跳转
let isLogin = false; //未登录
	if (to.path === '/center' && isLogin === false) {


		this.$message.success("请登录")
		next(false) //阻止路由跳转
	}else {


		next() //正常放行
	}
})
-
全局守卫:
//全局前置守卫:初始化时执行、每次路由切换前执行
router.beforeEach((to,from,next)=>{


	console.log('beforeEach',to,from)
	if(to.meta.isAuth){

       //判断当前路由是否需要进行权限控制
		if(localStorage.getItem('school') === 'zhejiang'){

       //权限控制的具体规则
			next() //放行
		}else{


			alert('暂无权限查看')
			// next({name:'guanyu'})
		}
	}else{


		next() //放行
	}
})

//全局后置守卫:初始化时执行、每次路由切换后执行
router.afterEach((to,from)=>{


	console.log('afterEach',to,from)
	if(to.meta.title){


		document.title = to.meta.title //修改网页的title
	}else{


		document.title = 'vue_test'
	}
})
实例
// 这个文件专门用于创建整个应用的路由器
import VueRouter from 'vue-router'
// 引入组件
import About from '../pages/About.vue'
import Home from '../pages/Home.vue'
import News from '../pages/News.vue'
// 创建并暴露一个路由器
const router = new VueRouter({


    routes: [
        {


            path: '/home',
            component: Home,
            meta:{

    title:'主页'},
            children: [
                {


                    path: 'news',
                    component: News,
                    meta:{

    isAuth:true,title:'新闻'}
                }
              }
            ]
        },
        {


            path: '/about',
            component: About,
            meta:{

     title: '关于' }
        }
    ]
})

// 全局前置路由守卫————初始化的时候被调用、每次路由切换之前被调用
router.beforeEach((to, from, next) => {


    console.log('前置路由守卫', to, from);
    if(to.meta.isAuth) {


        if(localStorage.getItem('token') ) {


            // 放行
            next()
        } else {


            alert('没有登录,无权查看')
        }
    } else {


        next()
    }
})

// 全局后置路由守卫————初始化的时候被调用、每次路由切换之后被调用
router.afterEach((to, from) => {


    console.log('后置路由守卫', to, from)
    document.title = to.meta.title || '我的系统'
})

export default router
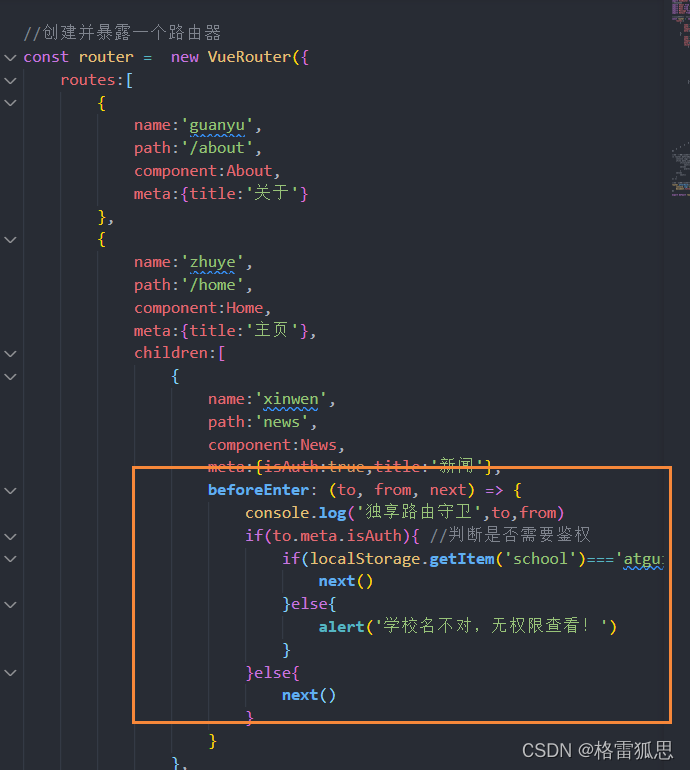
- 独享守卫:
就是在 routes 子路由内写守卫
beforeEnter(to,from,next){


	console.log('beforeEnter',to,from)
	if(to.meta.isAuth){

      //判断当前路由是否需要进行权限控制
		if(localStorage.getItem('school') === 'atguigu'){


			next()
		}else{


			alert('暂无权限查看')
			// next({name:'guanyu'})
		}
	}else{


		next()
	}
}
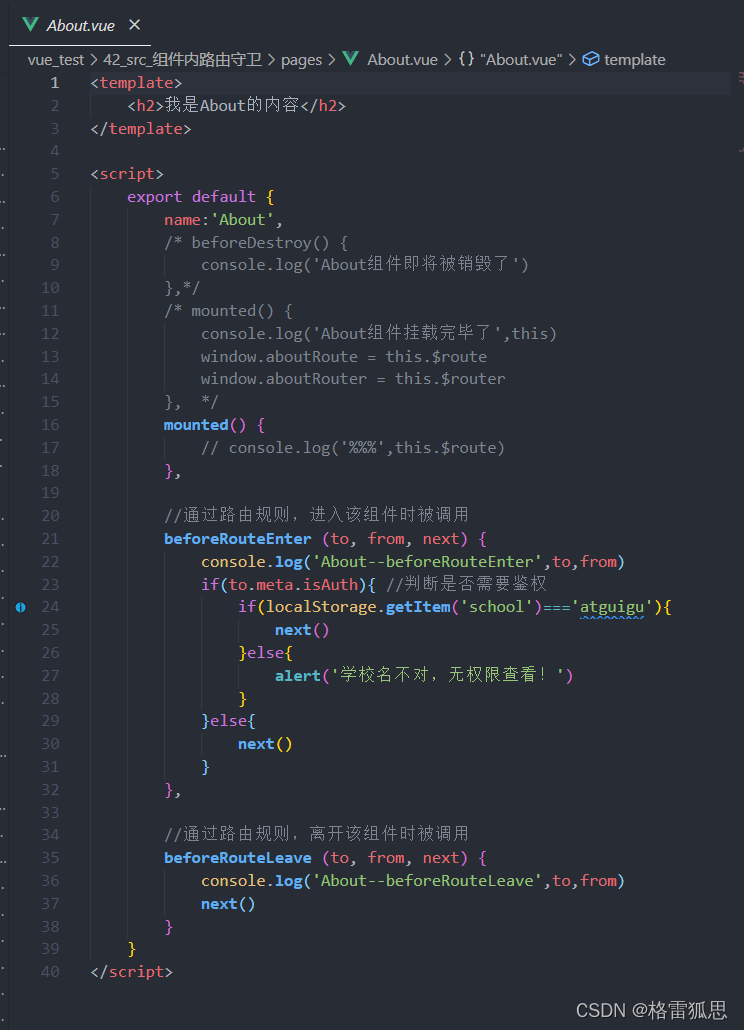
- 组件内守卫:
//进入守卫:通过路由规则,进入该组件时被调用
beforeRouteEnter (to, from, next) {


},
//离开守卫:通过路由规则,离开该组件时被调用
beforeRouteLeave (to, from, next) {


}