环境:
- window10 x64
- vs2022 企业版 17.0.0
- .NET 6.0
- IdentityServer4 4.1.2
ids4 全称:IdentityServer4 是专门为 .net core 而生产了一个中间件,目前是为了数据安全 做的鉴权中心。
第一步:创建一个空的core api项目:当然你要建core mvc也可以了,但是没有必要。

第二步:引用 IdentityServer4。

第三步:添加中间件
需要注意一点:ConfigureServices里面添加的是:
builder.Services.AddIdentityServer()
                .AddDeveloperSigningCredential()
                .AddInMemoryApiResources(Config.GetApiResources())
                .AddInMemoryIdentityResources(Config.GetIdentityResources())
                .AddInMemoryApiScopes(Config.ApiScopes)
                .AddInMemoryClients(Config.GetClients());
Configure方法里面添加的是
app.UseIdentityServer();其他的代码跟ids4无关
using IdentityServer4.Test;

var builder = WebApplication.CreateBuilder(args);

// Add services to the container.

builder.Services.AddControllers();
// Learn more about configuring Swagger/OpenAPI at https://aka.ms/aspnetcore/swashbuckle
builder.Services.AddEndpointsApiExplorer();
builder.Services.AddSwaggerGen();
builder.Services.AddIdentityServer()
                .AddDeveloperSigningCredential()
                .AddInMemoryApiResources(Config.GetApiResources())
                .AddInMemoryIdentityResources(Config.GetIdentityResources())
                .AddInMemoryApiScopes(Config.ApiScopes)
                .AddInMemoryClients(Config.GetClients());

var app = builder.Build();

app.UseIdentityServer();

// Configure the HTTP request pipeline.
if (app.Environment.IsDevelopment())
{
    app.UseSwagger();
    app.UseSwaggerUI();
}

app.UseAuthorization();

app.MapControllers();

app.Run();
第四步: Config类的创建 这里整个类都复制出来,直接生成一个文件就可以使用了。
using IdentityServer4.Models;

namespace IdentityServer4.Test
{
    /// <summary>
    /// 路由 /connect/token post方式 body参数client_id,client_secret,grant_type
    /// </summary>
    public class Config
    {
        public static IEnumerable<ApiResource> GetApiResources()
        {
            return new List<ApiResource>()
            {
                new ApiResource("api", "My Api"){ Scopes ={"api"} }
            };
        }

        public static IEnumerable<Client> GetClients()
        {
            return new List<Client>()
            {
                new Client()
                {
                    ClientId = "client",
                    AllowedGrantTypes = GrantTypes.ClientCredentials,
                    ClientSecrets =
                    {
                        new Secret("123456".Sha256())
                    },
                    AllowedScopes =
                    {
                        "api"
                    }
                }
            };
        }

        public static IEnumerable<ApiScope> ApiScopes =>
            new ApiScope[] { new ApiScope("api") };

        public static IEnumerable<IdentityResource> GetIdentityResources()
        {
            return new List<IdentityResource>
            {
                new IdentityResources.OpenId(),
                new IdentityResources.Profile()
            };
        }
    }
}
第五步:启动鉴权中心服务
该项目端口号自定义设置为 19128。所以访问是:http://localhost:19128/connect/token。
注意: connect/token 这个是固定不变的,是 ids4最近的方法,不是开发自定义的,所以只需要直接去用就可以了。
主要需要注意他的调用方式跟参数
1:post方式调用
2:参数 client_id,client_secret,grant_type
3:参数值:上面的参数 对应的值分别是 : 记得上面配置了config,这3个值就是上面的config里面配置的。
client_id 就是 ClientId ,但是在postman里面必须用 client_id 对应的值就是 client 了,这个自己设置。
client_secret 这个就是ClientSecrets 对应的值就是自定义的:123456。
grant_type 就是一个枚举了,AllowedGrantTypes 对应的值是 client_credentials。
虽然枚举是:GrantTypes.ClientCredentials,但是 传的实际值是 client_credentials。
调用接口如图:
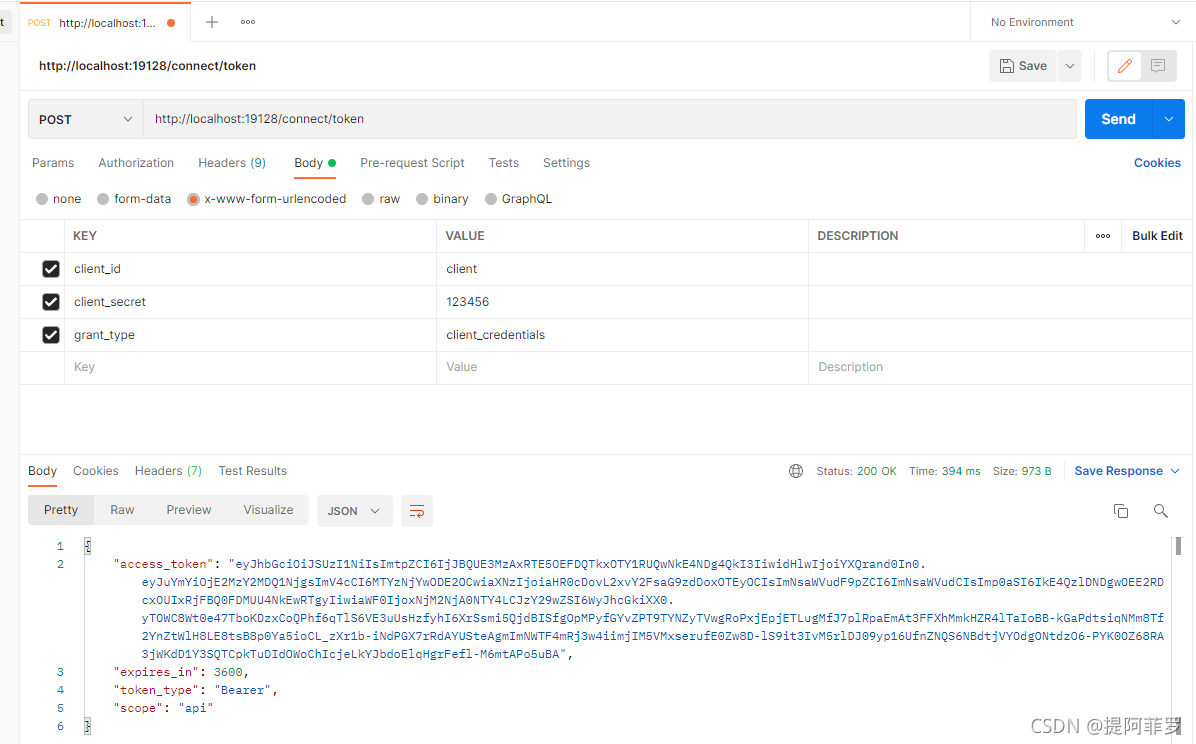
这样就成功了。
以上就是整个鉴权中心服务,我们知道怎么获取 token了,但是不知道怎么用?
因为ids4是专门为core而生的,所以他也同时集成到了ocelot网关里面了。
下一篇我将为大家带来ocelot网关!