使用 React 和 Kotlin/JS 构建 Web 应用程序
概述
本文通过KotlinConf相关的数据,演示如何使用React和Kotlin/JS构建一个Web全栈应用。
通过本文,你将学到如下内容:
-
完成与构建典型 React 应用程序相关的常见任务。
-
探索如何使用 Kotlin 的 DSL 来帮助简洁、统一地表达概念,同时又不牺牲可读性,从而允许您完全用 Kotlin 编写完整的应用程序。
-
了解如何使用现成的 npm 组件、使用外部库以及发布最终应用程序。
demo代码地址如下:
https://github.com/kotlin-hands-on/web-app-react-kotlin-js-gradle
最终的完整功能,请查看finish分支。
准备工作
下载项目模板,并将代码导入IntelliJ IDEA。
- 项目中的
build.gradle.kts依赖外部库如下:
dependencies {


    // React, React DOM + Wrappers
    implementation(enforcedPlatform("org.jetbrains.kotlin-wrappers:kotlin-wrappers-bom:1.0.0-pre.354"))
    implementation("org.jetbrains.kotlin-wrappers:kotlin-react")
    implementation("org.jetbrains.kotlin-wrappers:kotlin-react-dom")

    // Kotlin React Emotion (CSS)
    implementation("org.jetbrains.kotlin-wrappers:kotlin-emotion")

    // Video Player
    implementation(npm("react-player", "2.10.1"))

    // Share Buttons
    implementation(npm("react-share", "4.4.0"))

    // Coroutines & serialization
    implementation("org.jetbrains.kotlinx:kotlinx-coroutines-core:1.6.3")
    implementation("org.jetbrains.kotlinx:kotlinx-serialization-json:1.3.3")
}
- 一个 HTML 模板页面src/main/resources/index.html
<!doctype html>
<html lang="en">
<head>
    <meta charset="UTF-8">
    <title>Hello, Kotlin/JS!</title>
</head>
<body>
    <div id="root"></div>
    <script src="confexplorer.js"></script>
</body>
</html>
Kotlin/JS 项目会自动与所有代码及其依赖项捆绑到一个与项目同名的 JavaScript 文件中,当你构建它们时。作为典型的 JavaScript 约定,首先加载正文的内容(包括 div),以确保浏览器在脚本之前加载所有页面元素。confexplorer.js root
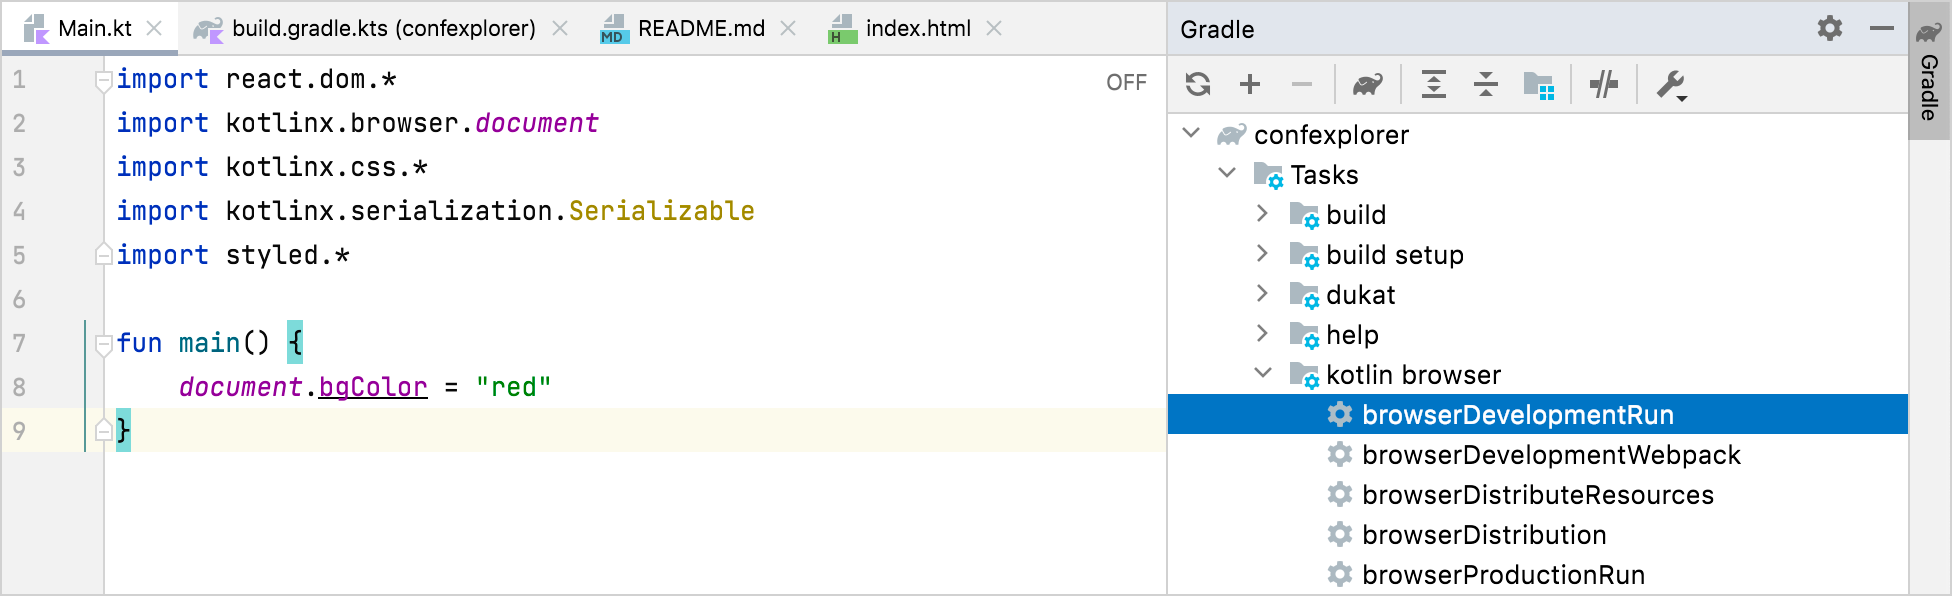
- main函数入口文件src/main/kotlin/Main.kt
import kotlinx.browser.document

fun main() {


    document.bgColor = "red"
}
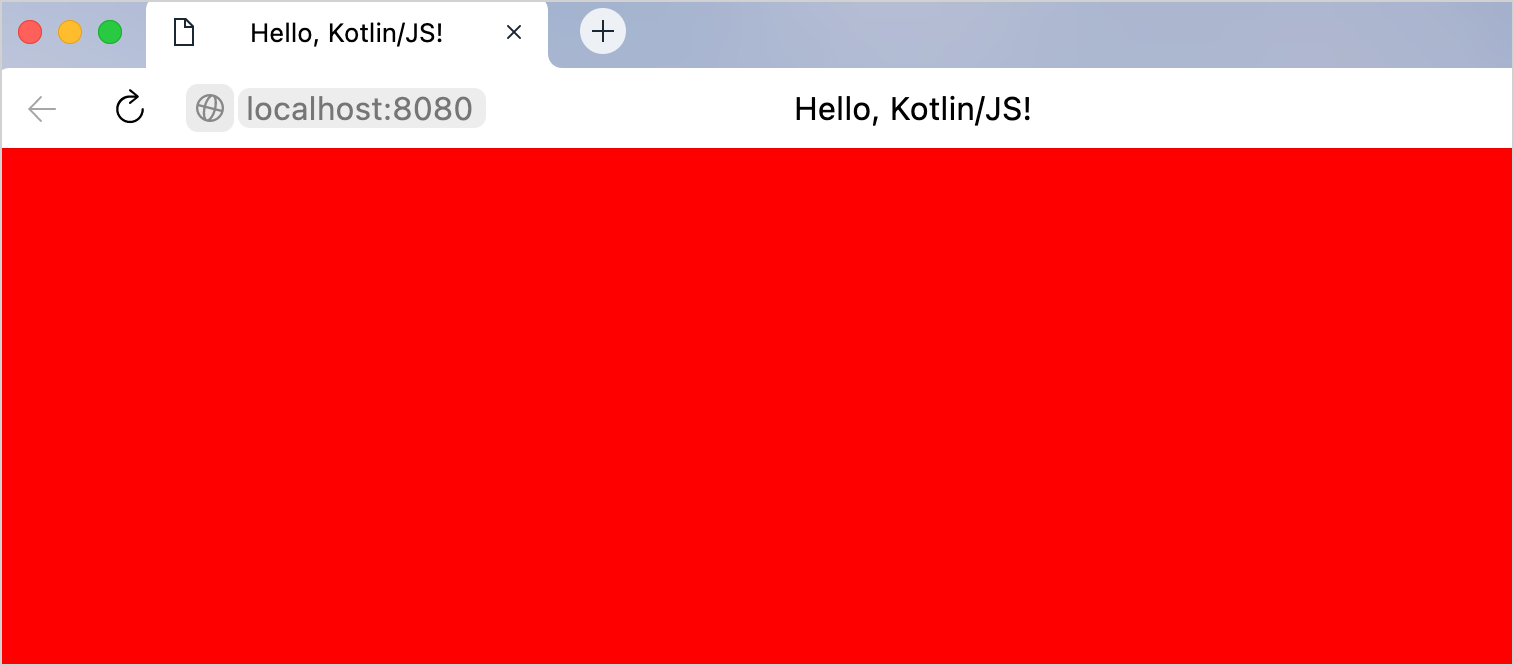
运行程序
默认情况下,使用webpack打包,IDEA中嵌入了Web服务器,所以你只需运行gradle命令,在
localhost:8080端口查看页面效果即可。
#终端运行
./gradlew run
也可在IDEA中运行jsRun或者browerDevelopmentRun gradle任务。
配置热重载
配置热重载后,不需要重新运行命令,即刻查看修改效果
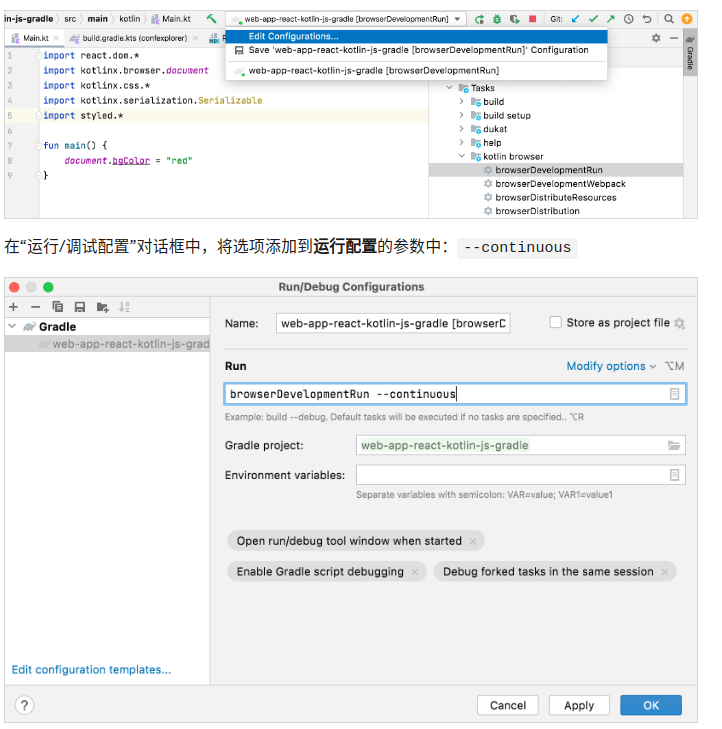
或者通过sh命令带入continuous参数
./gradlew run --continuous
创建Web App应用框架
使用 React 添加第一个静态页面
Main.kt文件替换成如下内容
import kotlinx.browser.document
import react.*
import emotion.react.css
import csstype.Position
import csstype.px
import react.dom.html.ReactHTML.h1
import react.dom.html.ReactHTML.h3
import react.dom.html.ReactHTML.div
import react.dom.html.ReactHTML.p
import react.dom.html.ReactHTML.img
import react.dom.client.createRoot
import kotlinx.serialization.Serializable

fun main() {


    val container = document.getElementById("root") ?: error("Couldn't find root container!")
    createRoot(container).render(Fragment.create {


        h1 {


            +"Hello, React+Kotlin/JS!"
        }
    })
}
通过React#render的函数将HTML片段加入到html的root节点。效果如下:

Kotlin对react进行的包装,使得用纯kotlin编写html成为可能,这得益于kotlin的DSL特性。
它类似于JavaScript中的JSX。
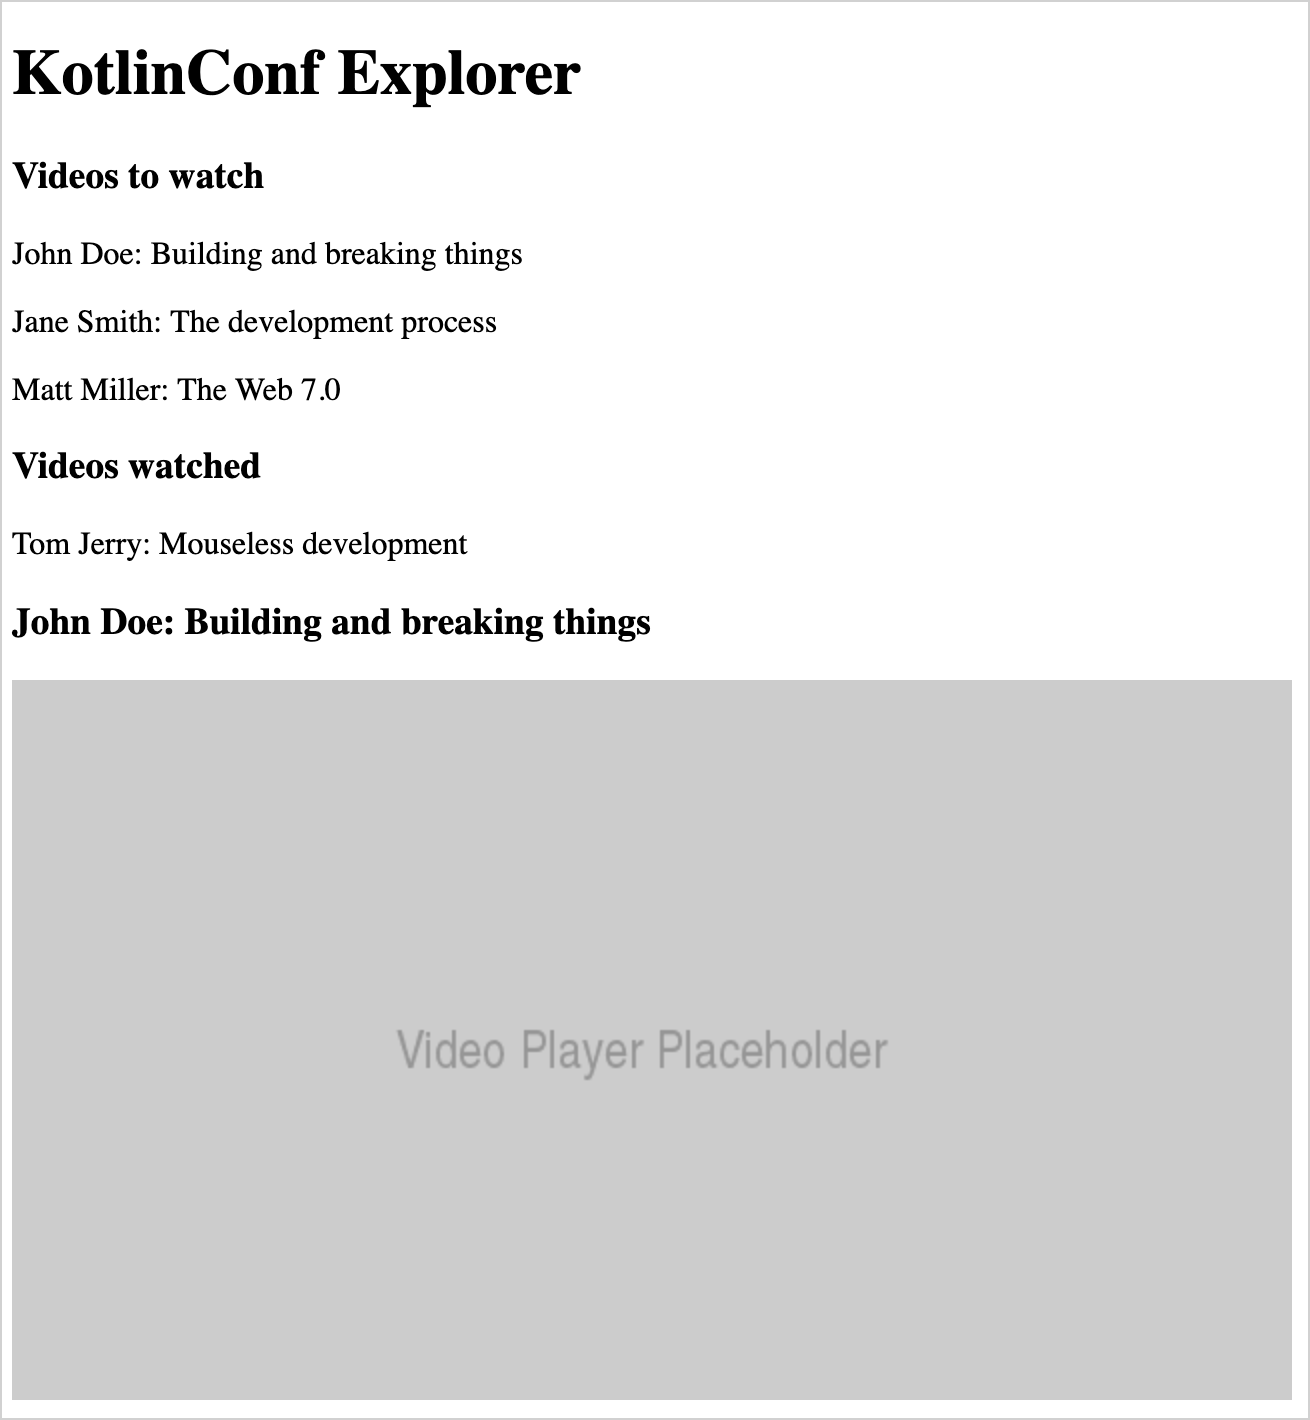
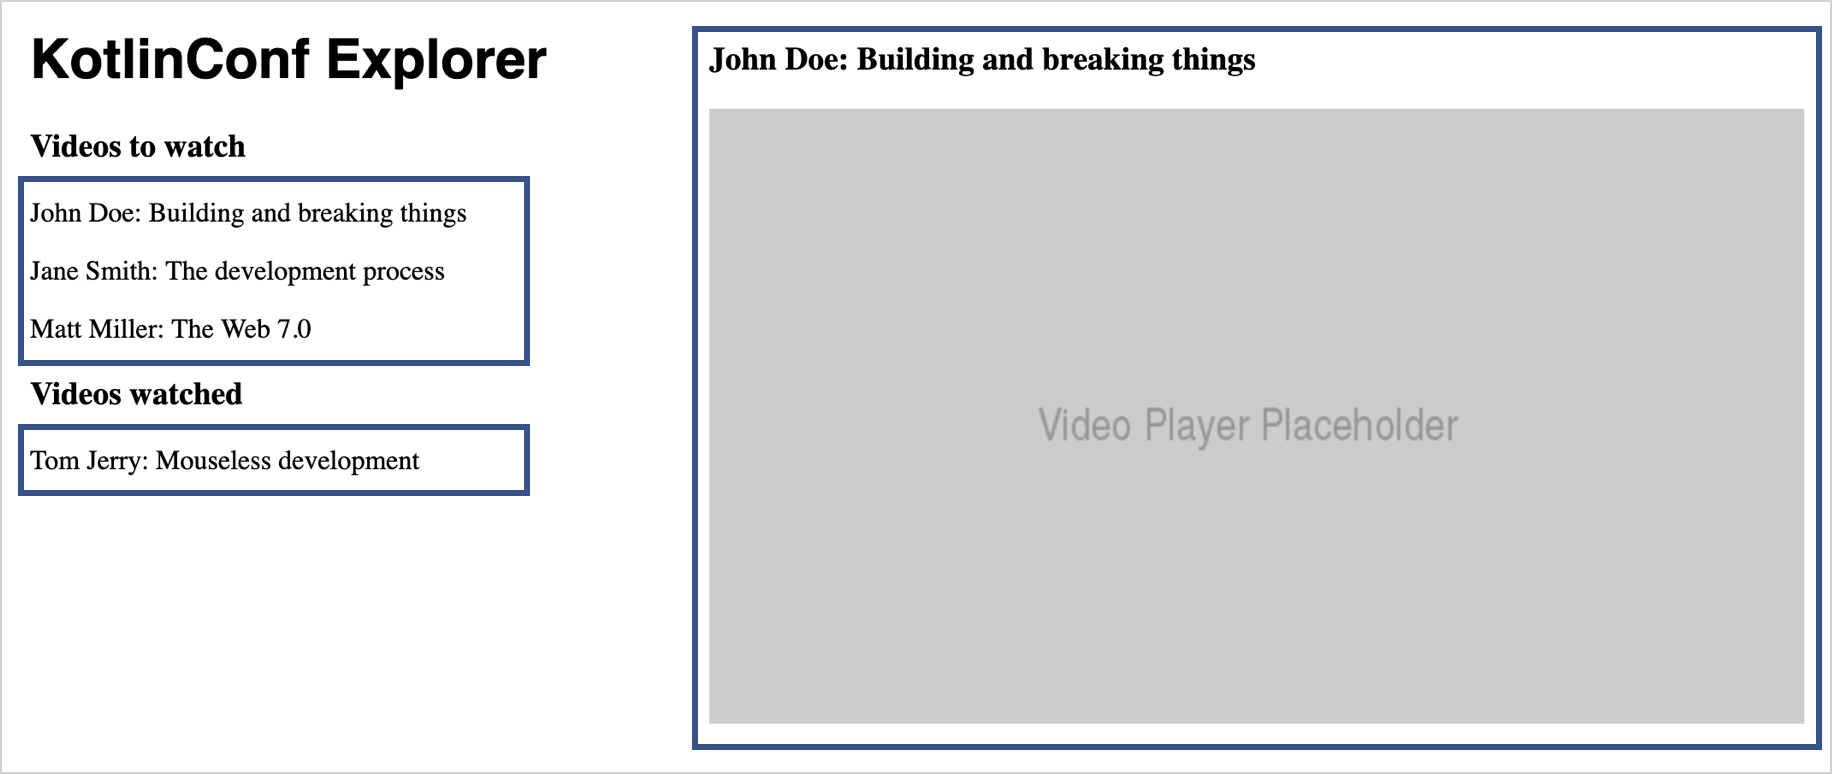
下面是html代码与kotlin代码的对比
<h1>KotlinConf Explorer</h1>
<div>
    <h3>Videos to watch</h3>
    <p>John Doe: Building and breaking things</p>
    <p>Jane Smith: The development process</p>
    <p>Matt Miller: The Web 7.0</p>
    <h3>Videos watched</h3>
    <p>Tom Jerry: Mouseless development</p>
</div>
<div>
    <h3>John Doe: Building and breaking things</h3>
    <img src="https://via.placeholder.com/640x360.png?text=Video+Player+Placeholder">
</div>
实现同样界面也可使用kotlin包装的react代码
h1 {


    +"KotlinConf Explorer"
}
div {


    h3 {


        +"Videos to watch"
    }
    p {


        + "John Doe: Building and breaking things"
    }
    p {


        +"Jane Smith: The development process"
    }
    p {


        +"Matt Miller: The Web 7.0"
    }
    h3 {


        +"Videos watched"
    }
    p {


        +"Tom Jerry: Mouseless development"
    }
}
div {


    h3 {


        +"John Doe: Building and breaking things"
    }
    img {


       src = "https://via.placeholder.com/640x360.png?text=Video+Player+Placeholder"
    }
}
将Fragment.create中的代码块替换成上面的内容可以看到如下效果:
使用kotlin-wrappers html标签构造视频列表数据
使用kotlin构建html的好处是,能够使用常规的 Kotlin 构造(如循环、条件、集合和字符串插值)来操作您的应用程序。
- 创建一个数据类以将所有视频属性保存在一个位置:Main.ktVideo
data class Video(
    val id: Int,
    val title: String,
    val speaker: String,
    val videoUrl: String
)
- 填写两个列表,分别用于未观看的视频和观看的视频。在文件级别添加这些声明:
Main.kt
val unwatchedVideos = listOf(
    Video(1, "Opening Keynote", "Andrey Breslav", "https://youtu.be/PsaFVLr8t4E"),
    Video(2, "Dissecting the stdlib", "Huyen Tue Dao", "https://youtu.be/Fzt_9I733Yg"),
    Video(3, "Kotlin and Spring Boot", "Nicolas Frankel", "https://youtu.be/pSiZVAeReeg")
)

val watchedVideos = listOf(
    Video(4, "Creating Internal DSLs in Kotlin", "Venkat Subramaniam", "https://youtu.be/JzTeAM8N1-o")
)
- 要在页面上使用这些视频,请编写一个 Kotlin 循环来迭代未监视对象的集合。将“要观看的视频”下的三个标记替换为以下代码段:forVideop
for (video in unwatchedVideos) {


    p {


        +"${

      video.speaker}: ${

      video.title}"
    }
}
- 应用相同的过程来修改“观看的视频”后面的单个标记的代码:
for (video in watchedVideos) {


    p {


        +"${

      video.speaker}: ${

      video.title}"
    }
}
等待浏览器重新加载。布局应与以前相同。您可以向列表中添加更多视频,以确保循环正常工作。
添加css样式
kotlin包装了emotion框架,使得在kotlin中使用css成为可能,类似css-in-js
https://github.com/JetBrains/kotlin-wrappers/blob/master/kotlin-emotion/
添加依赖
dependencies {


    // ...
    // Kotlin React Emotion (CSS) (chapter 3)
    implementation("org.jetbrains.kotlin-wrappers:kotlin-emotion")
    // ...
}
使用示例
将视频播放器移动到页面的右上角,使用 CSS 并调整视频播放器的代码
div {


    css {


        position = Position.absolute
        top = 10.px
        right = 10.px
    }
    h3 {


        +"John Doe: Building and breaking things"
    }
    img {


        src = "https://via.placeholder.com/640x360.png?text=Video+Player+Placeholder"
    }
}
设计应用组件
在React中,组成页面的基本单位是组件。组件最大好处是可以复用。所以Conf界面可以按下面方式分割成不同的部分,使用React实现为不同组件。
创建主组件
组件可以使用FC创建
val App = FC<Props> {


    // typesafe HTML goes here, starting with the first h1 tag!
}
可以理解为一切皆组件,整个web应用都是通过组件堆叠起来的,上面是整个应用的根组件,其他界面元素可通过实现为组件然后组装到这个根组件上来。
main函数按照如下方式修改
fun main() {


    val container = document.getElementById("root") ?: error("Couldn't find root container!")
    createRoot(container).render(App.create())
}
现在,程序创建组件的实例并将其呈现到指定的容器。
React相关文档参考
https://reactjs.org/docs/hello-world.html#how-to-read-this-guide
提取组件
创建2个视频列表,视频列表和已观看视频列表watchedVideos unwatchedVideos
- 创建
VideoList.kt
import kotlinx.browser.window
import react.*
import react.dom.*
import react.dom.html.ReactHTML.p

val VideoList = FC<Props> {


    for (video in unwatchedVideos) {


        p {


            +"${

      video.speaker}: ${

      video.title}"
        }
    }
}
App.kt中引用VideoList
// . . .
div {


    h3 {


        +"Videos to watch"
    }
    VideoList()

    h3 {


        +"Videos watched"
    }
    VideoList()
}
// . . .
下一步是向组件中传入数据。
添加 props 以在组件之间传递数据
React中使用 props作为数据与组件的桥梁,当组件的 props 在 React 中被更改时,框架会自动重新渲染该组件。
- 定义
VideoListProps
external interface VideoListProps : Props {


    var videos: List<Video>
}
- 定义
VideoListFC
val VideoList = FC<VideoListProps> {

     props ->
    for (video in props.videos) {


        p {


            key = video.id.toString()
            +"${

      video.speaker}: ${

      video.title}"
        }
    }
}
- 组合VideoList props与FC
h3 {


    +"Videos to watch"
}
VideoList {


    videos = unwatchedVideos
}
h3 {


    +"Videos watched"
}
VideoList {


    videos = watchedVideos
}
现在重新刷新,你可以看到两个视频列表。
给列表添加点击交互
// . . .
p {


    key = video.id.toString()
    onClick = {


        window.alert("Clicked $video!")
    }
    +"${

      video.speaker}: ${

      video.title}"
}
// . . .
直接将lambda表达式赋给onClick不是一种很好的处理,最好是将lambda提取出一个函数,将函数作为变量赋值给onClick
添加状态保存值
界面操作时,我们通常需要不存部分状态数据,比如,这里我们想保存当前选择的视频项,那么应该总样处理呢,在react中,我们使用useState保存数据状态
示例代码如下:
val VideoList = FC<VideoListProps> {

     props ->
    var selectedVideo: Video? by useState(null)
    for (video in props.videos) {


        p {


            key = video.id.toString()
            onClick = {


                selectedVideo = video
            }
            if (video == selectedVideo) {


                +"▶ "
            }
            +"${

      video.speaker}: ${

      video.title}"
        }
    }
}
编写组件
React中确保 props 只能从父组件传递到它的子组件。
如果组件想要更改同级组件的状态,则需要通过其父级执行此操作。此时,状态也不再属于任何子组件,而是属于总体父组件。
将状态从组件迁移到其父级的过程称为提升状态。
因此,视频列表业务中,我们需要将视频列表和当前选择视频项提到App组件中,然后传递给子组件,子组件通过接口形式向外传递状态更新。
完整的代码如下:
App.kt
@Serializable
data class Video(
    val id: Int,
    val title: String,
    val speaker: String,
    val videoUrl: String,
)
val VideoApp = FC<Props> {


    var currentVideo: Video? by useState(null)
    var unwatchedVideos: List<Video> by useState(emptyList())
    var watchedVideos: List<Video> by useState(emptyList())
  h1 {


        +"Hello, React+Kotlin/JS!"
    }
    div {


        h3 {


            +"Videos to watch"
        }
        VideoList {


            videos = unwatchedVideos
            selectedVideo = currentVideo
            onSelectVideo = {

     video ->
                currentVideo = video
            }
        }

        h3 {


            +"Videos watched"
        }
        VideoList {


            videos = watchedVideos
            selectedVideo = currentVideo
            onSelectVideo = {

     video ->
                currentVideo = video
            }
        }
    }
}
VideoList.kt
external interface VideoListProps : Props {


    var videos: List<Video>
    var selectedVideo: Video?
    var onSelectVideo: (Video) -> Unit
}

val VideoList = FC<VideoListProps> {

     props ->
    val (searchTerm, setSearchTerm) = useState("")
    val filteredVideos=props.videos.filter {


        it.title.lowercase().contains(searchTerm.lowercase())
    }
    input {


        type = InputType.text
        placeholder = "Search videos"
        value = searchTerm
        onChange = {


            setSearchTerm(it.target.value)
        }
    }

    for (video in filteredVideos) {


        p {


            key = video.id.toString()
            onClick = {


                props.onSelectVideo(video)
            }
            if (video == props.selectedVideo) {


                +"▶ "
            }
            +"${

      video.speaker}: ${

      video.title}"
        }
    }
}
添加更多组件
为了功能完整,我们还需要增加一些组件
提取播放器组件
- 创建播放器组件
VideoPlayer.kt
package com.video

import csstype.*
import react.*
import emotion.react.css
import react.dom.html.ReactHTML.button
import react.dom.html.ReactHTML.div
import react.dom.html.ReactHTML.h3
import react.dom.html.ReactHTML.img

external interface VideoPlayerProps : Props {


    var video: Video
    var onWatchedButtonPressed: (Video) -> Unit
    var unwatchedVideo: Boolean
}

val VideoPlayer = FC<VideoPlayerProps> {

     props ->
    div {


        css {


            position = Position.absolute
            top = 10.px
            right = 10.px
        }
        h3 {


            +"${

      props.video.speaker}: ${

      props.video.title}"
        }
        button {


            css {


                display = Display.block
                backgroundColor = if (props.unwatchedVideo) NamedColor.lightgreen else NamedColor.red
            }
            onClick = {


                props.onWatchedButtonPressed(props.video)
            }
            if (props.unwatchedVideo) {


                +"Mark as watched"
            } else {


                +"Mark as unwatched"
            }
        }
        div {


            css {


                display = Display.flex
                marginBottom = 10.px
            }
            EmailShareButton {


                url = props.video.videoUrl
                EmailIcon {


                    size = 32
                    round = true
                }
            }
            TelegramShareButton {


                url = props.video.videoUrl
                TelegramIcon {


                    size = 32
                    round = true
                }
            }
        }
        ReactPlayer {


            url = props.video.videoUrl
            controls = true
        }
    }
}
- 传入当前要播放的视频数据
currentVideo?.let {

     curr ->
        VideoPlayer {


            video = curr
            unwatchedVideo = curr in unwatchedVideos
            onWatchedButtonPressed = {


                if (video in unwatchedVideos) {


                    unwatchedVideos = unwatchedVideos - video
                    watchedVideos = watchedVideos + video
                } else {


                    watchedVideos = watchedVideos - video
                    unwatchedVideos = unwatchedVideos + video
                }
            }
        }
    }
使用 npm 中的包
在本例中我们引入了一些外部js包,如ReactPlayer、ReactShare等三方js包,在kotlin中引入js有一定的规则,这里以ReactPlayer引入为例子说明相关步骤:
- 添加gradle以来
dependencies {


    // ...
    // Video Player
    implementation(npm("react-player", "2.10.1"))
    // ...
}
- Kotlin 编译器提供外部声明
这里注意@file注解必须放在文件开头,只有添加了外部声明,kotlin编译器才不会将这些代码编译,而是原样保留
@file:JsModule("react-player")
@file:JsNonModule

package com.video
import react.*

@JsName("default")
external val ReactPlayer: ComponentClass<ReactPlayerProps>

external interface ReactPlayerProps : Props {


    var url: String
    var controls: Boolean
}
- 使用ReactPlayer
ReactPlayer {


    url = props.video.videoUrl
    controls = true
}
按照同样的步骤,react-share可以轻松引入项目中。
使用外部REST API
引入协程
为了解决异步和Js回调的问题,我们可以在应用中使用协程完成API请求。
dependencies {


    // . . .
    // Coroutines & serialization
    implementation("org.jetbrains.kotlinx:kotlinx-coroutines-core:1.6.3")
}
引入序列化
为了解决序列化问题,需要同步引入序列化相关依赖。
plugins {


    // . . .
    kotlin("plugin.serialization") version "1.8.10"
}

dependencies {


    // . . .
    // Serialization
    implementation("org.jetbrains.kotlinx:kotlinx-serialization-json:1.3.3")
}
告诉序列化器有关类的信息
@Serializable
data class Video(
    val id: Int,
    val title: String,
    val speaker: String,
    val videoUrl: String
)
获取视频
获取单个视频
suspend fun fetchVideo(id: Int): Video {


    val response = window
        .fetch("https://my-json-server.typicode.com/kotlin-hands-on/kotlinconf-json/videos/$id")
        .await()
        .text()
        .await()
    return Json.decodeFromString(response)
}
获取视频列表
suspend fun fetchVideos(): List<Video> = coroutineScope {


    (1..25).map {

     id ->
        async {


            fetchVideo(id)
        }
    }.awaitAll()
}
使用视频列表
协程需要在协程作用域中调用,这里使用MainScope作为全局作用域
val mainScope = MainScope()

val App = FC<Props> {


    var currentVideo: Video? by useState(null)
    var unwatchedVideos: List<Video> by useState(emptyList())
    var watchedVideos: List<Video> by useState(emptyList())

    useEffectOnce {


        mainScope.launch {


            unwatchedVideos = fetchVideos()
        }
    }
// . . .
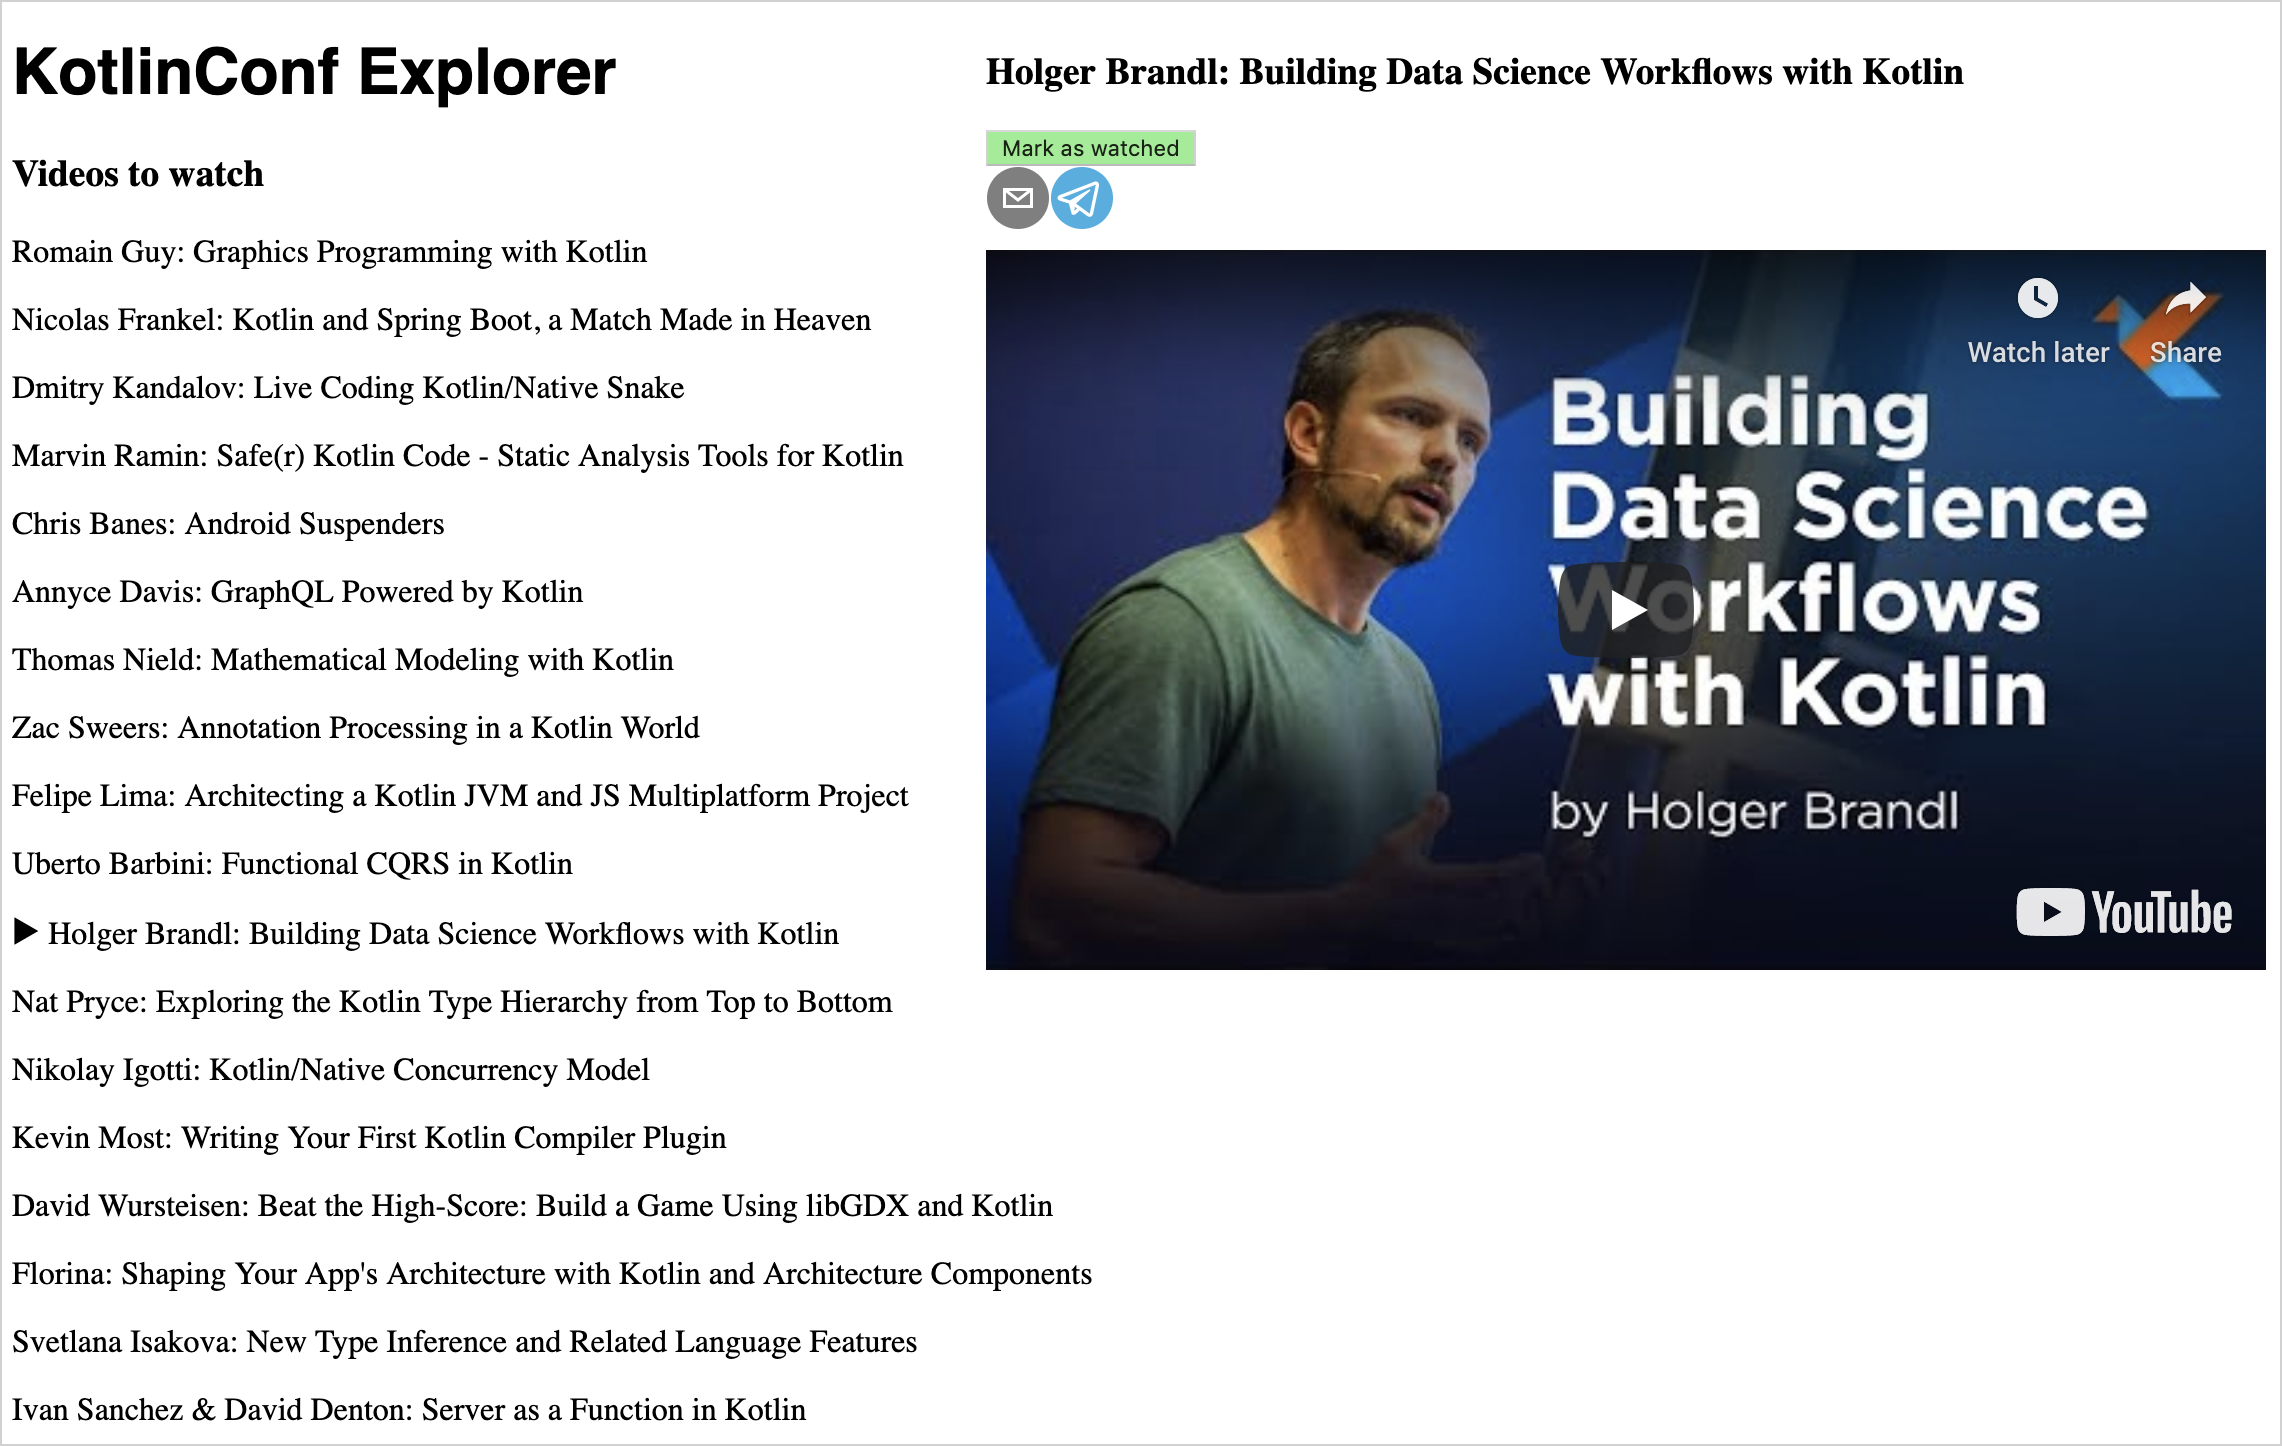
完整效果图
部署
使用
./gradlew build
命令编译应用将在/build/distributions下产生最终产物。
可以参考链接中关于部署到生产和云的部分,将Web站点部署到公网服务器上例如,部署到Heroku上。
参考链接
https://kotlinlang.org/docs/js-react.html