本文主要是对SPA搭建的实践过程讲解,在对react、redux、react-router有了初步了解后,来运用这些技术构建一个简单的单页应用。这个应用包括了侧边导航栏与主体内容区域。下面简单罗列了将会用到的一些框架与工具。
- create-react-app:脚手架
- react:负责页面组件构建
- react-router:负责单页应用路由部分的控制
- redux:负责管理整个应用的数据流
- react-redux:将react与redux这两部分相结合
- redux-thunk:redux的一个中间件。可以使action creator返回一个
function(而不仅仅是object),并且使得dispatch方法可以接收一个function作为参数,通过这种改造使得action支持异步(或延迟)操作 - redux-actions:针对redux的一个FSA工具箱,可以相应简化与标准化action与reducer部分
create-react-app 是一个全局的命令行工具用来创建一个新的项目
react-scripts 是一个生成的项目所需要的开发依赖
一般我们开始创建react web应用程序的时候,要自己通过 npm 或者 yarn 安装项目的全部依赖,再写webpack.config.js,一系列复杂的配置,搭建好开发环境后写src源代码。
现在 如果你正在搭建react运行环境,使用 create-react-app 去自动构建你的app程序。你的项目所在的文件夹下是没有配置文件。react-scripts 是唯一的 额外的 构建依赖在你的package.json中,你的运行环境将有每一个你需要用来构建一个现代React app应用程序。你需要的依赖,和在配置文件中编写的配置代码,react-scripts 都帮你写了,比如:react-scripts帮你自动下载需要的 webpack-dev-server 依赖,然后react-scripts自己写了一个nodejs服务端的脚本代码 start.js来 实例化 WebpackDevServer ,并且运行启动了一个使用 express 的Http服务器,现在你只需要专心写src源代码就可以了。省去了很多精力,最适合快速上手一个demo了。
react-scripts有以下支持,都帮你配置好了:
React, JSX, ES6, and Flow syntax support.
Language extras beyond ES6 like the object spread operator.
Import CSS and image files directly from JavaScript.
Autoprefixed CSS, so you don’t need -webkit or other prefixes.
A build script to bundle JS, CSS, and images for production, with sourcemaps.
A dev server that lints for common errors.
使用create-react-app脚手架
create-react-app是Facebook官方出品的脚手架。有了它,你只需要一行指令即可跳过webpack繁琐的配置、npm繁多的引入等过程,迅速构建react项目。
安装
npm install -g create-react-app 创建一个应用程序
create-react-app my-app
cd my-app
生成的目录结构
my-app/
  README.md
  node_modules/
  package.json
  .gitignore
  public/
    favicon.ico
    index.html
  src/
    App.css
    App.js
    App.test.js
    index.css
    index.js
    logo.svg
运行应用程序
npm run start 在浏览器中打开
http://localhost:3000 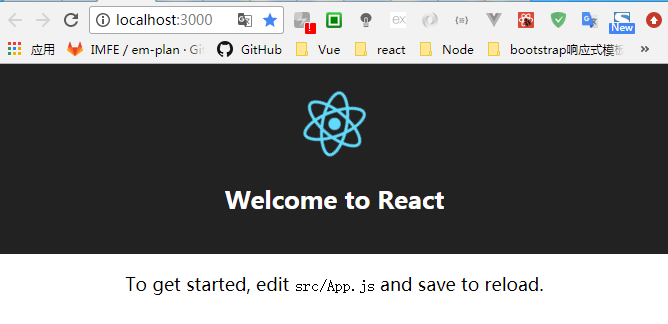
现在我们看 my-app文件夹下的public/index.html 和src/index.js的源码,我们可以在这里编写项目代码,但是注意 public/index.html 是启动http服务器的首页,src/index.js是编译的入口文件,只能叫index这个名字,改别的名字不行。
打开 http://localhost:3000/index.html 首页,f12查看 网页源码,你会看到
<script type="text/javascript" src="/static/js/bundle.js"></script> /static/js/bundle.js
在你的项目my-app你是看不到这个文件路径的,你也没有写配置文件webpack.config.js,
http服务器配置,自动代开浏览器窗口,react,es6语法编译,babel-core,webpack,等等这些 你都没下载,配置。
这些活,react-scripts 都帮你做了。
回顾
npm run start
我们 一开始这么启动服务 运行项目
打开你的my-app\package.json
"scripts": {
    "start": "react-scripts start",
      ...
  }
所以执行的是 react-scripts start
打开你的my-app\node_modules\react-scripts这个文件夹下的bin文件夹下的react-scripts.js文件
#!/usr/bin/env node
var spawn = require('cross-spawn');
var script = process.argv[2];
var args = process.argv.slice(3);

switch (script) {
case 'build':
case 'eject':
case 'start':
case 'test':
  var result = spawn.sync(
    'node',
    [require.resolve('../scripts/' + script)].concat(args),
  .......
上面代码中 script 的变量值是 start
所以执行 my-app\node_modules\react-scripts\scripts 文件夹下的 start.js 文件代码节选重点如下
var webpack = require('webpack');
var WebpackDevServer = require('webpack-dev-server');  // 启动http服务器
var paths = require('../config/paths');  //要编译的文件路径与生成路径等
var config = require('../config/webpack.config.dev');
var DEFAULT_PORT = parseInt(process.env.PORT, 10) || 3000; //这就是为什么 端口号 不是8080 而是 3000 的原因,在这里可以改成8080,重新npm run start 生效
detect(DEFAULT_PORT).then(port => {
  if (port === DEFAULT_PORT) {
    run(port); //这里开始运行
    return;
  }
......

function run(port) {
// 这里可以设置 http协议, 或者可以在 npm run start 之前 cmd命令窗口中执行 set HTTPS=true&&npm start 改成https 安全协议
  var protocol = process.env.HTTPS === 'true' ? "https" : "http";
  var host = process.env.HOST || 'localhost';
  setupCompiler(host, port, protocol);  // 编译源码 ,生成路径
  runDevServer(host, port, protocol);  //启动 http服务器
}


//配置http服务器
function runDevServer(host, port, protocol) {
  var devServer = new WebpackDevServer(compiler, {
   compress: true,
    clientLogLevel: 'none',
    contentBase: paths.appPublic,   //根据导入的paths 指定应用根目录(即index.html所在目录)
    hot: true,

    publicPath: config.output.publicPath, //根据导入的 config 变量,指定 虚拟目录,自动指向path编译目录(/assets/ => /build/js/)。html中引用js文件时,
                                             //必须引用此虚拟路径(但实际上引用的是内存中的文件,既不是/build/js/也不是/assets/)。

    quiet: true,


    watchOptions: {
      ignored: /node_modules/
    },
    // Enable HTTPS if the HTTPS environment variable is set to 'true'
    https: protocol === "https",
    host: host
  });
  /**
   * 省略其他代码
   */
    openBrowser(protocol + '://' + host + ':' + port + '/');    // 打开浏览器 向服务器发送请求
  });
}


function setupCompiler(host, port, protocol) {

  compiler = webpack(config, handleCompile);  //  根据导入的 config 变量  指向的 webpack.config.dev 配置文件  运行
     /**
   * 省略其他代码
   */
}
start.js 文件代码 中 导入了 my-app\node_modules\react-scripts\config文件夹下的 webpack.config.dev.js 与 paths.js
paths.js 代码节选如下:
var appDirectory = fs.realpathSync(process.cwd());   // 获取npm run start 运行所在的路径
function resolveApp(relativePath) {
  return path.resolve(appDirectory, relativePath);
}

module.exports = {
  appPath: resolveApp('.'),
  ownPath: resolveApp('node_modules/react-scripts'),
  appBuild: resolveApp('build'),
  appPublic: resolveApp('public'),
  appHtml: resolveApp('public/index.html'),   //  这就是  一开始  我们的项目 要使用public/index.html作为 默认首页
                //  这里写什么文件名,项目中就要使用什么文件名  包括 也要有public文件夹
  appIndexJs: resolveApp('src/index.js'),   //编译的入口文件的文件名  项目中要包括src文件夹
  appPackageJson: resolveApp('package.json'),
  appSrc: resolveApp('src'),
  yarnLockFile: resolveApp('yarn.lock'),
  testsSetup: resolveApp('src/setupTests.js'),
  appNodeModules: resolveApp('node_modules'),
  // this is empty with npm3 but node resolution searches higher anyway:
  ownNodeModules: resolveOwn('node_modules'),
  nodePaths: nodePaths,
  publicUrl: getPublicUrl(resolveApp('package.json')),
  servedPath: getServedPath(resolveApp('package.json'))
};
 /**
   * 省略其他代码
   */
webpack.config.dev.js 代码节选如下:
var paths = require('./paths');  //也导入了 同文件夹下的 paths.js
module.exports = {  entry: [    require.resolve('react-dev-utils/webpackHotDevClient'),    require.resolve('./polyfills'),    paths.appIndexJs     // 编译的入口文件  ],  output: {    path: paths.appBuild,    pathinfo: true,       filename: 'static/js/bundle.js', // 只是编译后生成的目标文件 ,这就是一开始我们 打开浏览器按f12看到的index.html导入的           //  <script type="text/javascript" src="/static/js/bundle.js"></script>    publicPath: publicPath  },
 /**
   * 省略其他代码
   */

}
已经搭建好运行环境了,接下来 如何开发app
导入组件
由于babel依赖,这个项目支持es6模块
当你仍然使用require() and module.exports ,我们鼓励你去使用import and export 替代.
例如:
Button.js
import React, { Component } from 'react';

class Button extends Component {
  render() {
    // ...
  }
}
export default Button; // 不要忘记去使用 export default!
DangerButton.js
import React, { Component } from 'react';
import Button from './Button'; //从另一个文件导入一个组件


class DangerButton extends Component {
  render() {
    return <Button color="red" />;
  }
}
export default DangerButton;
增加样式
Button.css
.Button {
  padding: 20px;
}
Button.js
import React, { Component } from 'react';
import './Button.css'; // 告诉webpack Button.js 使用这些样式


class Button extends Component {
  render() {
    // You can use them as regular CSS styles
    return <div className="Button" />;
  }
}
Autoprefixer
react-scripts 通过Autoprefixer 帮你的css文件自动添加浏览器兼容前缀
例如:
.App {
  display: flex;
  flex-direction: row;
  align-items: center;
}
变成
.App {
  display: -webkit-box;
  display: -ms-flexbox;
  display: flex;
  -webkit-box-orient: horizontal;
  -webkit-box-direction: normal;
      -ms-flex-direction: row;
          flex-direction: row;
  -webkit-box-align: center;
      -ms-flex-align: center;
          align-items: center;
}
增加CSS预处理器
首先在 my-app/ 目录下 安装node-sass用来将scss编译成css
npm install node-sass --save-dev 打开my-app/package.json,增加以下代码到scripts中
   "scripts": {
+    "build-css": "node-sass src/ -o src/",
+    "watch-css": "npm run build-css && node-sass src/ -o src/ --watch",
     "start": "react-scripts start",
     "build": "react-scripts build",
     ......
} 现在你可以重新命名my-app/src/App.css to my-app/src/App.scss and 运行 npm run watch-css
或者你可以改成
"scripts": {
    "build-css": "node-sass src/ -o src/",
    "start": "npm run build-css && react-scripts start",  //先执行 build-css 再执行 react-scripts start
    "build": "react-scripts build",
    "test": "react-scripts test --env=jsdom",
    "eject": "react-scripts eject"
  }
直接 npm run start
增加图片
import React from 'react';
import logo from './logo.png'; // 告诉webpack 这个js文件使用这张图片

console.log(logo); // /logo.84287d09.png  会改变图片的名字

function Header() {
  //导入结果是这个图片的url地址
  return <img src={logo} alt="Logo" />;
}

export default Header;
当项目构建的时候,Webpack将正确的移动图片到构建的文件夹下,提供我们正确的路径
在css工作中的方式也一样
.Logo {
  background-image: url(./logo.png);
}
webpack发现所有的相对模块, 以 ./ 开始
增加 bootstrap
在react+es6 moudle+bootstrap
你不是一定要React Bootstrap和React 一起使用,但是他是流行的库去整合 bootstrap 和react应用程序,如果你需要他,你可以通过Create React App整合他,通过以下几个步骤
首先安装React Bootstrap and Bootstrap从npm,React Bootstrap 不包括Bootstrap CSS ,所以你需要去安装
在 my-app/ 目录下 安装
npm install react-bootstrap --save
npm install bootstrap@3 --save
修改 my-app/src/index.js
在你的src/index.js 文件内容的顶部,导入 Bootstrap CSS 和可选的 Bootstrap theme CSS
import React from 'react';
import ReactDOM from 'react-dom';
import 'bootstrap/dist/css/bootstrap.css';  // 必须的
import 'bootstrap/dist/css/bootstrap-theme.css';  //  可选的
import App from './App';
import './index.css';

ReactDOM.render(
  <App />,
  document.getElementById('root')
);
修改 my-app/src/App.js
import React, { Component } from 'react';
import { Grid, Navbar, Jumbotron, Button } from 'react-bootstrap';

class App extends Component {
  render() {
    return (
      <div>
        <Navbar inverse fixedTop>
          <Grid>
            <Navbar.Header>
              <Navbar.Brand>
                <a href="/">React App</a>
              </Navbar.Brand>
              <Navbar.Toggle />
            </Navbar.Header>
          </Grid>
        </Navbar>
        <Jumbotron>
          <Grid>
            <h1>Welcome to React</h1>
            <p>
              <Button
                bsStyle="success"
                bsSize="large"
                href="http://react-bootstrap.github.io/components.html"
                target="_blank">
                View React Bootstrap Docs
              </Button>
            </p>
          </Grid>
        </Jumbotron>
      </div>
    );
  }
}

export default App;
最后 运行
npm run start 参考链接 https://github.com/facebookincubator/create-react-app
参考资料:https://blog.csdn.net/github_squad/article/details/57452333