【项目大纲】:vue3+SpringBoot+postgresql 简单实现项目前后端传参:
- 使用postgresql数据库,
- 前端使用vue3+vite+ts,
- 后端使用SpringBoot框架。
目录
一、postgresql数据库
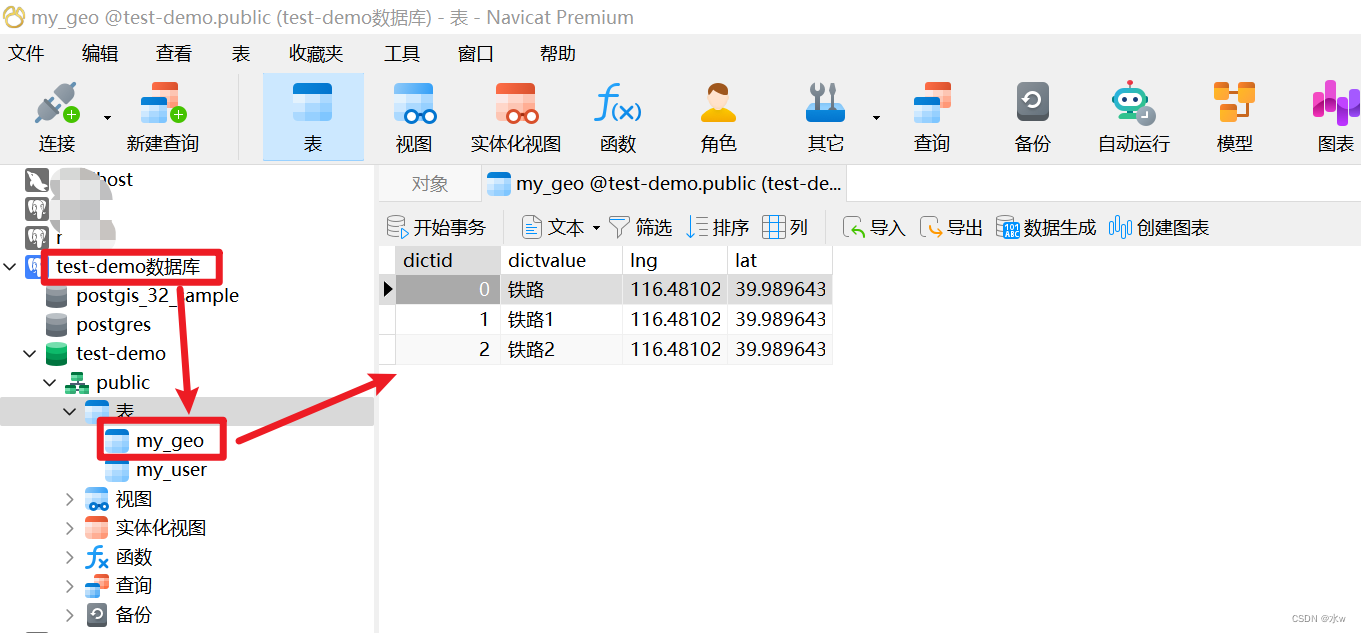
postgresql中新建了一个数据库【test-demo】,其中又新建了【my_geo】表结构,插入了三条数据。
二、vue3+vite部分
如果需要新建vite+vue3+ts项目,请移步到新建vite+vue3+ts项目,以及解决过程中遇到的问题_水w的博客-CSDN博客
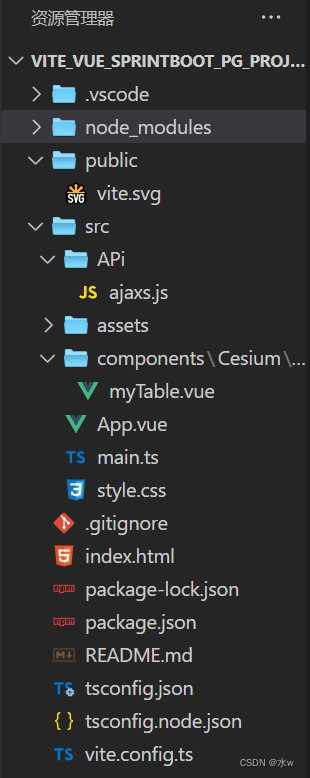
目前项目的目录结构,如下所示:
1 main.ts
首先你要将axios作为全局的自定义属性,每个组件可以在内部直接访问(Vue3),该部分要放在pp.mount('#app')的全面。(这部分需要放在app.mount('#app')的前面)
import { createApp } from 'vue'
import './style.css'
import App from './App.vue'
import ElementPlus from 'element-plus'
// import 'element-plus/theme-chalk/index.css';
import 'element-plus/dist/index.css'
import axios from 'axios'

const app = createApp(App)

// 配置请求根路径
axios.defaults.baseURL = 'http://localhost:8088'
//将axios作为全局的自定义属性,每个组件可以在内部直接访问(Vue3),该部分要放在pp.mount('#app')的全面
app.config.globalProperties.$http = axios

app.use(ElementPlus)
app.mount('#app')
2 App.vue
App.vue是运行vue的主文件,引入myTable.vue测试文件。代码如下:
<template>
  <div>
    <myTable></myTable>
  </div>
</template>

<script lang="ts">
import myTable from '@/components/Cesium/demo-test/myTable.vue'
export default {
  name: 'App',
  data:function(){
    return {
    }
  },
  created: function(){
    console.log("组件被创建了")
  },
  components: {
    myTable
  }
}
</script>
<style>
</style>
3 myTable.vue测试页面
这是测试页面,逻辑流程如下,
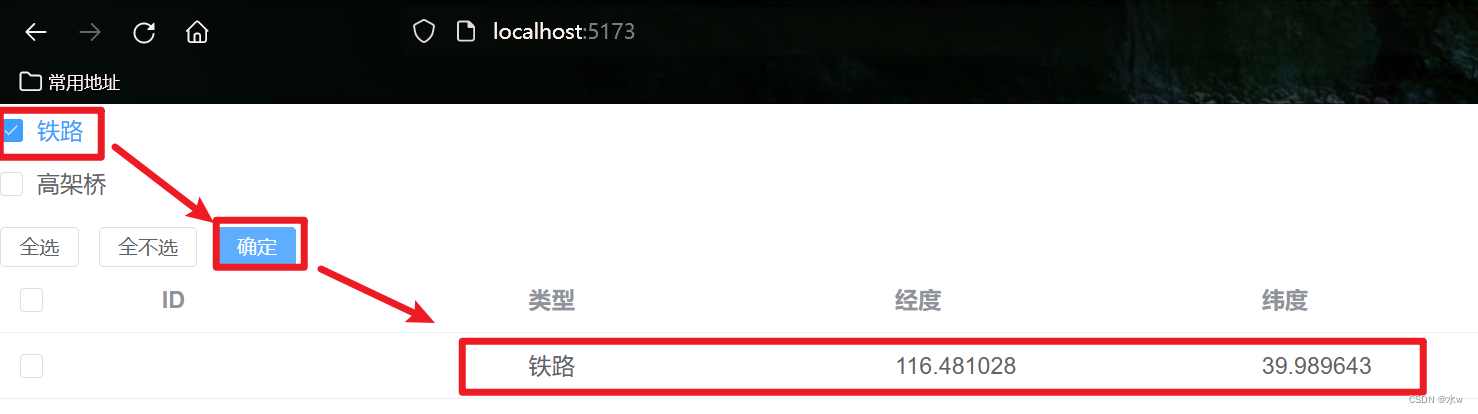
- 首先加载页面的时候,前端vue接收到sprintboot返回到的查询【my_geo】表中所有数据记录,展示到页面上;
- 当点击复选框选择“铁路”类型,并点击“确定”按钮之后,vue的axios将“铁路”参数传送到sprintboot后端;
- sprintboot后端接收到“铁路”参数,重新查询数据库中的【my_geo】表,过滤得到结果,并返回给前端vue;
- 前端vue接收到sprintboot返回到的结果时,更新页面展示数据,并展示到页面上;
<template>
	<div>
	  <div>
		<div v-for="item in checkboxData"
		:key="item.dictid"
		style="font-size: 18px">
		  <el-checkbox
			v-model="item.checked" :label="item.type" :id="item.typeid" :value="item.type">
		  </el-checkbox>
		</div>
		<div style="margin-top: 10px">
		<el-button @click="checkall" size="small">全选</el-button>
		<el-button @click="checkno" size="small">全不选</el-button>
		<el-button type="primary" @click="checkok" size="small">确定</el-button>
	  </div>
	  </div>

	  <el-table
      ref="multipleTable"
      :data="tableDataInfo"
      tooltip-effect="dark"
      style="width: 100%"
      @selection-change="handleSelectionChange">
        <el-table-column type="selection" width="85">
        </el-table-column>
        <el-table-column prop="dictid" label="ID" width="220">
        </el-table-column>
        <el-table-column prop="dictvalue" label="类型" width="220">
        </el-table-column>
        <el-table-column prop="lng" label="经度" width="220">
        </el-table-column>
        <el-table-column prop="lat" label="纬度" width="220">
        </el-table-column>
      </el-table>
	</div>
  </template>

<script>
export default {
	name: 'test',
	data: function(){
	  return {
		sourcedata: [],
		checkboxData: [],
		selectedData: [],
		tableDataInfo:[]
	  }
	},
	methods:{
	  checkall(){ // 全选
		this.checkboxData.forEach(item => {
		  item.checked = true;
		})
		this.selectedData = []
	  },

	  checkno(){ // 全不选
		this.checkboxData.forEach(item => {
		  item.checked = false;
		})
		this.selectedData = []
	  },
	  checkok(){ // 确定
		// 获取Array [ Proxy, Proxy ]的target数据
		var selected = JSON.parse(JSON.stringify(this.checkboxData.filter(item => item.checked)))
		for(var i=0; i<selected.length; i++){
			this.selectedData.push(JSON.parse(JSON.stringify(selected[i])).type)  // 返回被选中的type,存入列表
		}
		console.log(JSON.parse(JSON.stringify(this.selectedData)))  // 返回proxy,转列表
		var p = this.selectedData[0]
		//  get请求 RequestParam传参
		var data = this.$http.get('/geo/getRequestParam', {params: {p}}).then((response)=>{
			console.log("get请求 RequestParam传参", data);
			this.tableDataInfo = response.data
			console.log(response.data)
		})
	  }
	},
	created(){
	// 【从后端获取过来的json数据】
	  this.$http.get("/geo/findAll").then((response)=>{
		this.sourcedata = response.data
		this.tableDataInfo = response.data

		// 原数据中没有checked字段,所以给每条数据添加checked以便后续操作
		for(var i=0; i<this.sourcedata.length; i++){
			this.sourcedata[i].checked = false
		}
		// console.log("this.sourcedata:", this.sourcedata)
		this.tableDataInfo = this.sourcedata
		})
	// 【复选框中的树结构数据】
	  this.checkboxData = [
		{ typeid: 0, type: '铁路'},
		{ typeid: 1, type: '高架桥'},
	  ]
	}
}
</script>
<style scoped>
</style>
三、springboot部分
如果有需要,请移步到基于vscode创建SpringBoot项目,连接postgresql数据库 2 更简单_水w的博客-CSDN博客
目前项目的目录结构,如下所示:

1 Geo.java
创建实体类,
package com.example.demotwo.entity;

//@TableName("my_geo")
public class Geo {
    private int dictid;
    private String dictvalue;
    private String lng;
    private String lat;

    public String getDictvalue() {
        return dictvalue;
    }

    public void setDictvalue(String dictvalue) {
        this.dictvalue = dictvalue;
    }

    public String getLng() {
        return lng;
    }

    public void setLng(String lng) {
        this.lng = lng;
    }

    public String getLat() {
        return lat;
    }

    public void setLat(String lat) {
        this.lat = lat;
    }

    @Override
    public String toString() {
        return "{" + "dictid:" + dictid +
                ", dictvalue:" + dictvalue + '\'' +
                ", lng:" + lng +
                ", lat:" + lat +
                '}';
    }
}
2 GeoMapper.java
package com.example.demotwo.mapper;

//import com.baomidou.mybatisplus.core.mapper.BaseMapper;
import com.example.demotwo.entity.Geo;
import org.apache.ibatis.annotations.Insert;
import org.apache.ibatis.annotations.Mapper;
import org.apache.ibatis.annotations.Param;
import org.apache.ibatis.annotations.Select;
import java.util.List;

@Mapper
public interface GeoMapper {
    // 查询所有用户
    @Select("select * from my_geo")
    public List<Geo> find();

    @Select("select * from my_geo WHERE dictvalue = #{type}")
    public List<Geo> filter(@Param("type") String p);
}
3 application.properties配置文件
application.properties配置如下,其中Tomcat端口也可以不改,那就是8080,我是为了防止端口冲突,就随便改了一个。
- url在数据为postgresql时是jdbc:postgresql://localhost:5432/[数据库名]
- 后面是用户名和密码,我直接postgres登录的。
#??Tomcat??
server.port=8088
spring.datasource.url=jdbc:postgresql://localhost:5432/test-demo
spring.datasource.username=postgres
spring.datasource.password=123456
spring.datasource.driver-class-name=org.postgresql.Driver
4 GeoController.java
springboot接口如下:
- 使用get请求获得时,要用params传参数给后端,params会被添加到url的请求字符串中,就是常见的点击某个按钮路径后面会拼接一堆东西。
package com.example.demotwo.controller;

import com.example.demotwo.entity.Geo;
import com.example.demotwo.mapper.GeoMapper;
import org.springframework.beans.factory.annotation.Autowired;
import org.springframework.web.bind.annotation.CrossOrigin;
import org.springframework.web.bind.annotation.GetMapping;
import org.springframework.web.bind.annotation.PostMapping;
import org.springframework.web.bind.annotation.RestController;
import org.springframework.web.bind.annotation.PathVariable;
import org.springframework.web.bind.annotation.RequestBody;
import org.springframework.web.bind.annotation.RequestMapping;
import org.springframework.web.bind.annotation.RequestParam;
import org.springframework.web.bind.annotation.RestController;
import java.util.List;

@RestController
@CrossOrigin
public class GeoController {
    @Autowired
    private GeoMapper geoMapper;

    @GetMapping("/geo/findAll")
    public List query(){
        List <Geo> list = geoMapper.find();
        System.out.println(list);  // 快捷键:so
        return list;
    }

    /**
     * 测试get请求RequestParam传参
     */
    @GetMapping("/geo/getRequestParam")
    public List testGetRequestParam(@RequestParam("p") String p) {
        System.out.println("result:" + p);
        List <Geo> result = geoMapper.filter(p);
        System.out.println(result);  // 快捷键:so
        return result;
    }
}
四、测试结果
(1)启动sprintboot项目,效果如下图所示:

(2)然后,把前端vue项目文件夹,在vscode里面打开, 打开终端,然后vscode进入此文件夹的终端命令行窗口,执行如下指令运行该项目:
npm run dev 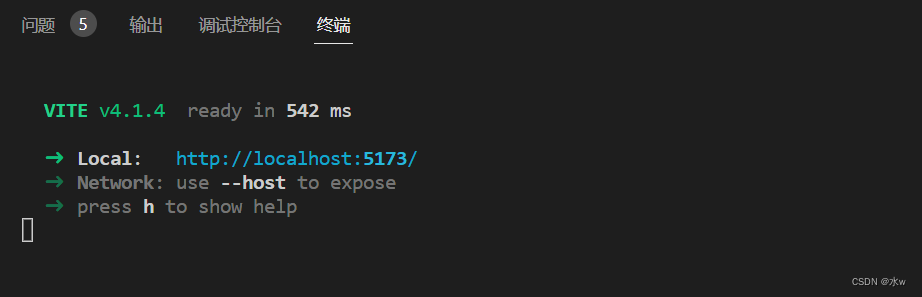
(3)最终,在浏览器打开http://localhost:5173/进行访问,效果如下图所示:

点击按钮之后,效果如下图所示: