官网介绍,DataBinding是用于将数据的和视图绑定在一起的支持库,特点是只需要在视图定义的xml中编写绑定信息,减少在代码中的视图于数据的交互逻辑。
这样可以分离数据和视图,减少这两个模块在代码层面上的耦合。
启用功能
在项目的build.gradle中添加如下代码即可:
android {
    ...
    dataBinding {
        enabled = true
    }
}
常见问题:
1. DSL element ‘android.dataBinding.enabled’ is obsolete and has been replaced with ‘android.buildFeatures.dataBinding’.
参考:https://blog.csdn.net/qq_40533422/article/details/106838495
android {
  ...
  buildFeatures {
    dataBinding = true
  }
}
2. If you plan to use data binding in a Kotlin project, you should apply the kotlin-kapt plugin. 如果是使用Kotlin开发需要启用Kotlin插件,不然可能会有莫名其妙的问题。
plugins {
  ...
  id 'kotlin-kapt'
}
基础的绑定用法
更详细的用法参考官网的布局和绑定表达式,基础绑定用法示例:
const val TAG = "databinding"
class MainActivity : AppCompatActivity() , View.OnClickListener{
    lateinit var activityMainBinding: ActivityMainBinding
    override fun onCreate(savedInstanceState: Bundle?) {
        super.onCreate(savedInstanceState)
        activityMainBinding = DataBindingUtil.setContentView(this, R.layout.activity_main)
        activityMainBinding.aty = this
        activityMainBinding.data = SimpleData("Jack")
    }
    override fun onClick(v: View?) {
        Log.d(TAG, "onClick: v = $v")
    }
    fun doClick() {
        Log.d(TAG, "doClick: called")
    }
}
其中 MainActivity 的 ActivityMainBinding (这个叫做绑定类)是根据布局文件和其名称自动生成的,需要注意的是,任何情况下都不应该自己实现绑定类,这个一定要交给DataBinding来生成。对应的布局文件如下,一共两个:
<layout xmlns:android="http://schemas.android.com/apk/res/android"
xmlns:bind="http://schemas.android.com/apk/res-auto"
xmlns:tools="http://schemas.android.com/tools">
<data>
<variable name="aty" type="com.im_hero.databinding.MainActivity" />
<variable name="data" type="com.im_hero.databinding.data.SimpleData" />
</data>
<LinearLayout
android:layout_width="match_parent"
android:layout_height="match_parent"
android:orientation="vertical"
tools:context=".MainActivity">
<!-- Data Binding -->
<TextView
android:id="@+id/tvDataName"
android:layout_width="match_parent"
android:layout_height="wrap_content"
android:text="@{data.name}" />
<!-- Reference of id -->
<TextView
android:layout_width="match_parent"
android:layout_height="wrap_content"
android:text="@{tvDataName.text}" />
<!-- Plurals usage -->
<TextView
android:layout_width="match_parent"
android:layout_height="wrap_content"
android:text="@{@plurals/banana(1, 1)}" />
<!-- format string -->
<TextView
android:layout_width="match_parent"
android:layout_height="wrap_content"
android:text="@{@string/format_name(`Jason`)}" />
<!-- Event Listener -->
<TextView
android:layout_width="match_parent"
android:layout_height="wrap_content"
android:background="#99FF22"
android:onClick="@{aty::onClick}"
android:text="@string/event_listener" />
<!-- Lambda Event Listener -->
<TextView
android:layout_width="match_parent"
android:layout_height="wrap_content"
android:background="#99FF22"
android:onClick="@{(v) -> aty.doClick()}"
android:text="@string/lambda_event_listener" />
<!-- Include element data binding -->
<include
layout="@layout/include_data"
android:layout_width="match_parent"
android:layout_height="wrap_content"
bind:aty="@{aty}"
bind:data="@{data}" />
</LinearLayout>
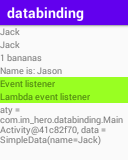
</layout>第二个布局是被 include 标签引用的,include_data 布局,可以用过 bind:aty="@{aty} 和 bind:data="@{data}" 这种语法将数据传递给被引用的布局:
<layout xmlns:android="http://schemas.android.com/apk/res/android">
    <data>
        <variable name="aty" type="com.im_hero.databinding.MainActivity" />
        <variable name="data" type="com.im_hero.databinding.data.SimpleData" />
    </data>
    <TextView
        android:layout_width="match_parent"
        android:layout_height="wrap_content"
        android:text="@{`aty = ` + aty + `, data = ` + data}" />
</layout>
运行结果如下图:
下面来介绍可被观察的数据,用来实现界面当数据改变时自动更新。
可被观察的数据
参考官网:使用可观察的数据对象。基础的可被观察的数据:
- ObservableBoolean
- ObservableChar
- ObservableShort
等等……都是继承自androidx.databinding.BaseObservable,看下核心源码:
public class BaseObservable implements Observable {
    private transient PropertyChangeRegistry mCallbacks;
    ...
    public void notifyChange() {
        synchronized (this) {
            if (mCallbacks == null) {
                return;
            }
        }
        mCallbacks.notifyCallbacks(this, 0, null);
    }
    ...
    public void notifyPropertyChanged(int fieldId) {
        synchronized (this) {
            if (mCallbacks == null) {
                return;
            }
        }
        mCallbacks.notifyCallbacks(this, fieldId, null);
    }
}
public class CallbackRegistry<C, T, A> implements Cloneable {
    ...
    private List<C> mCallbacks = new ArrayList<C>();
    ...
    private void notifyCallbacks(T sender, int arg, A arg2, final int startIndex,
            final int endIndex, final long bits) {
        long bitMask = 1;
        for (int i = startIndex; i < endIndex; i++) {
            if ((bits & bitMask) == 0) {
                mNotifier.onNotifyCallback(mCallbacks.get(i), sender, arg, arg2);
            }
            bitMask <<= 1;
        }
    }
    ...
    public abstract static class NotifierCallback<C, T, A> {
        public abstract void onNotifyCallback(C callback, T sender, int arg, A arg2);
    }
}
就是普通的观察者模式。只是Google自动生成了特别多的代码,大幅减少了我们的工作量。
基本使用方法
首先我们需要有个实现了BaseObservable的类:
class ObservableData() : BaseObservable() {
    @get:Bindable
    var name: String = ""
    set(value) {
        field = value
        notifyPropertyChanged(BR.name)
    }
    @get:Bindable
    var age: Int = 0
    set(value) {
        field = value
        notifyPropertyChanged(BR.age)
    }
    override fun toString(): String = "ObservableData(name='$name', age=$age)"
}
让后将其声明在布局中:
<layout xmlns:android="http://schemas.android.com/apk/res/android"
xmlns:tools="http://schemas.android.com/tools">
<data>
<import type="android.content.Intent"/>
<variable name="oBoolean" type="androidx.databinding.ObservableBoolean"/>
<variable name="oByte" type="androidx.databinding.ObservableByte"/>
<variable name="oChar" type="androidx.databinding.ObservableChar"/>
<variable name="oShort" type="androidx.databinding.ObservableShort"/>
<variable name="oInt" type="androidx.databinding.ObservableInt"/>
<variable name="oLong" type="androidx.databinding.ObservableLong"/>
<variable name="oFloat" type="androidx.databinding.ObservableFloat"/>
<variable name="oDouble" type="androidx.databinding.ObservableDouble"/>
<variable name="oParcelable" type="androidx.databinding.ObservableParcelable<Intent>"/>
<variable name="oData" type="com.im_hero.databinding.data.ObservableData" />
<variable name="aty" type="com.im_hero.databinding.ObservableActivity" />
</data>
<LinearLayout
android:layout_width="match_parent"
android:layout_height="match_parent"
android:orientation="vertical"
tools:context=".ObservableActivity">
<TextView
android:layout_width="match_parent"
android:layout_height="wrap_content"
android:text="@{oBoolean ? `true` : `false`}" />
<TextView
android:layout_width="match_parent"
android:layout_height="wrap_content"
android:text="@{String.valueOf(oByte)}" />
<TextView
android:layout_width="match_parent"
android:layout_height="wrap_content"
android:text="@{String.valueOf(oChar)}" />
<TextView
android:layout_width="match_parent"
android:layout_height="wrap_content"
android:text="@{String.valueOf(oShort)}" />
<TextView
android:layout_width="match_parent"
android:layout_height="wrap_content"
android:text="@{String.valueOf(oInt)}" />
<TextView
android:layout_width="match_parent"
android:layout_height="wrap_content"
android:text="@{String.valueOf(oLong)}" />
<TextView
android:layout_width="match_parent"
android:layout_height="wrap_content"
android:text="@{String.valueOf(oFloat)}" />
<TextView
android:layout_width="match_parent"
android:layout_height="wrap_content"
android:text="@{String.valueOf(oDouble)}" />
<TextView
android:layout_width="match_parent"
android:layout_height="wrap_content"
android:text="@{String.valueOf(oParcelable.action)}" />
<TextView
android:layout_width="match_parent"
android:layout_height="wrap_content"
android:text="@{oData.name+`: `+oData.age}" />
</LinearLayout>
</layout>
有一些DataBinding库中自带的一些基础类型实现在其中,就一起测试了一下,需要注意的是不能通过aty.observableBoolean这种方式,因为DataBinding会去监听aty这个对象,而MainActivity是没有实现BaseObservable的!。Activity代码如下:
class ObservableActivity : AppCompatActivity() {
    val observableBoolean: ObservableBoolean = ObservableBoolean()
    val observableByte: ObservableByte = ObservableByte()
    val observableChar: ObservableChar = ObservableChar('a')
    val observableShort: ObservableShort = ObservableShort()
    val observableInt: ObservableInt = ObservableInt()
    val observableLong: ObservableLong = ObservableLong()
    val observableFloat: ObservableFloat = ObservableFloat()
    val observableDouble: ObservableDouble = ObservableDouble()
    val observableParcelable: ObservableParcelable<Intent> = ObservableParcelable<Intent>(Intent("action"))
    val observableData: ObservableData = ObservableData().apply { name = "Jason"; age = 22 }
    lateinit var binding: ActivityObservableBinding
    var handler = Handler(Looper.getMainLooper())
    var changeData = Runnable {
        observableBoolean.set(!observableBoolean.get())
        observableByte.set((observableByte.get() + 1).toByte())
        observableChar.set('b')
        observableShort.set((observableShort.get() + 1).toShort())
        observableInt.set(observableInt.get() + 1)
        observableLong.set(observableLong.get() + 1)
        observableFloat.set(observableFloat.get() + 1)
        observableDouble.set(observableDouble.get() + 1)
        observableParcelable.set(Intent("new ${observableParcelable.get()!!.action}"))
        observableData.age = observableData.age + 1
    }
    override fun onCreate(savedInstanceState: Bundle?) {
        super.onCreate(savedInstanceState)
        Log.d(TAG, "onCreate: new")
        binding = DataBindingUtil.setContentView(this, R.layout.activity_observable)
        binding.oBoolean = observableBoolean
        binding.oByte = observableByte
        binding.oChar = observableChar
        binding.oShort = observableShort
        binding.oInt = observableInt
        binding.oLong = observableLong
        binding.oFloat = observableFloat
        binding.oDouble = observableDouble
        binding.oParcelable = observableParcelable
        binding.oData = observableData
        handler.postDelayed(changeData, TimeUnit.SECONDS.toMillis(5))
    }
}
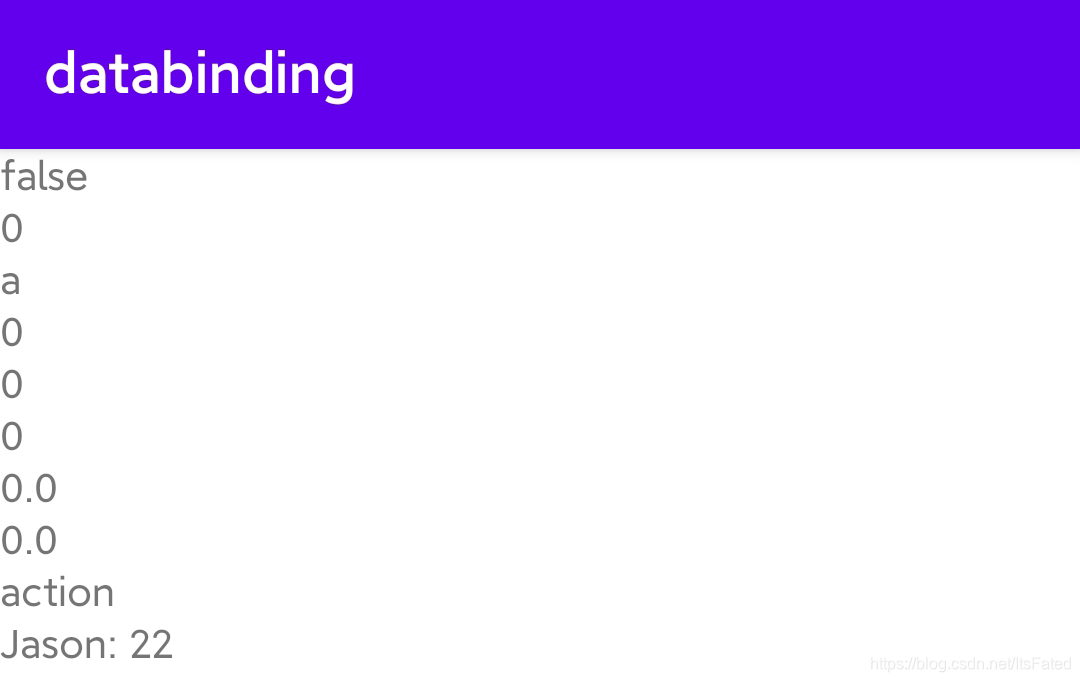
启动时界面:
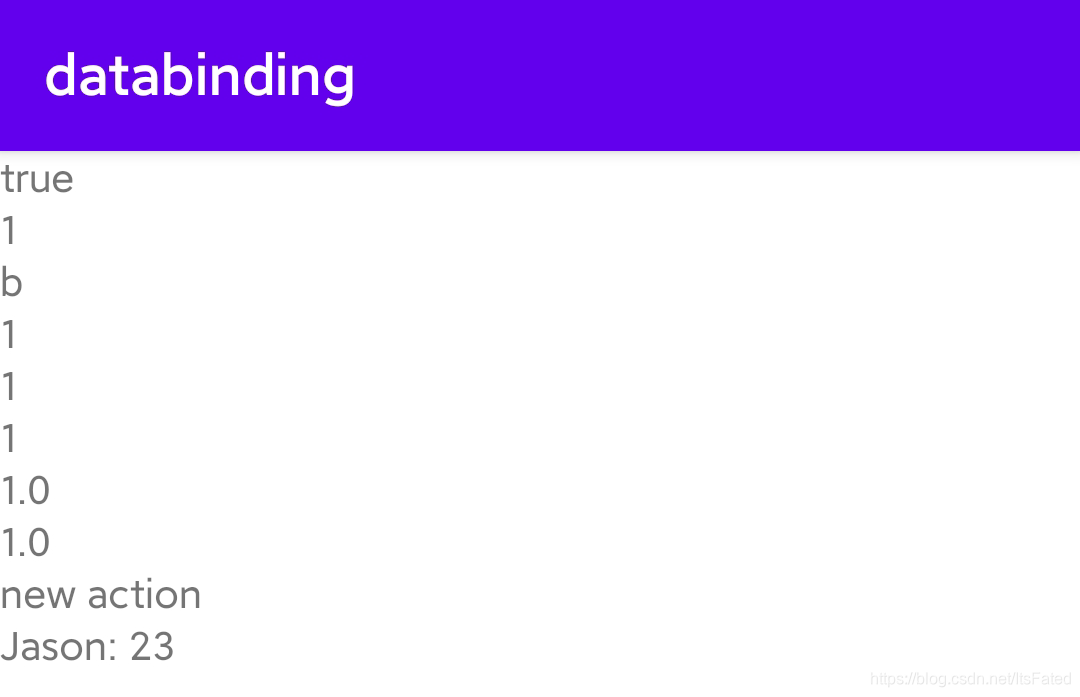
5秒后改变数据的界面:
这里记录常见的应用场景和一些基础知识点
Activity和Fragment之间的交互(它们都有使用DataBinding)
- 定义自动生成的绑定类的名称
- 和ViewStub的搭配方法
- View的ID会在绑定类中自动生成控件的成员变量
- Activity视图内包含Fragment和ViewStub
在Activity中包含Fragment和ViewStub是很常见的操作,然而DataBinding可以让他们之间的关联代码减少很多。下面的代码用来演示他们之间通过DataBinding是如何来进行交互的。
<layout xmlns:android="http://schemas.android.com/apk/res/android"
xmlns:tools="http://schemas.android.com/tools">
<data>
<variable
name="viewStubData"
type="androidx.databinding.ObservableField<String>" />
</data>
<LinearLayout
android:layout_width="match_parent"
android:layout_height="match_parent"
android:orientation="vertical"
tools:context=".CustomBindingActivity">
<fragment
android:id="@+id/fCustomFragment"
class="com.im_hero.databinding.CustomBindingFragment"
android:layout_width="match_parent"
android:layout_height="0dp"
android:layout_weight="1" />
<TextView
android:layout_width="match_parent"
android:layout_height="wrap_content"
android:background="#2299FF"
android:text="@{viewStubData}" />
<ViewStub
android:id="@+id/viewStub"
android:layout_width="match_parent"
android:layout_height="wrap_content"
android:layout="@layout/custom_view_stub" />
</LinearLayout>
</layout>
这是Activity的布局文件,其中“<”符号被替换成了“<”,参考表达式语言-常见功能。它包含了一个Fragment和一个ViewStub,其中viewStubData是一个可被观察的数据,用来标识viewStub的显示状态。如下,是对应Activity的代码:
class CustomBindingActivity : AppCompatActivity(), CustomBindingFragment.CustomBindingFragmentListener {
    lateinit var activityCustomBindingBinding: ActivityCustomBindingBinding
    lateinit var fCustomFragment: CustomBindingFragment
    lateinit var tvViewStub: TextView
    lateinit var customViewStubBinding: CustomViewStubBinding
    val oFieldViewStub = ObservableField(INVISIBLE)
    override fun onCreate(savedInstanceState: Bundle?) {
        super.onCreate(savedInstanceState)
        activityCustomBindingBinding = DataBindingUtil.setContentView(this, R.layout.activity_custom_binding)
        activityCustomBindingBinding.viewStubData = oFieldViewStub
        fCustomFragment = supportFragmentManager.findFragmentById(R.id.fCustomFragment) as CustomBindingFragment
    }
    /**
     * [CustomBindingFragment.CustomBindingFragmentListener.showViewStub]用于让CustomBindingFragment控制ViewStub的显示状态
     */
    override fun showViewStub(checked: Boolean) {
        if (::tvViewStub.isInitialized) {
            oFieldViewStub.set(if (checked) VISIBLE else INVISIBLE)
        } else {
            tvViewStub = activityCustomBindingBinding.viewStub.viewStub!!.inflate() as TextView
            // 运行时绑定,因为ViewStub是在运行时并且需要了才会填充到布局内部。
            customViewStubBinding = DataBindingUtil.bind(tvViewStub)!!
            customViewStubBinding.viewStubData = oFieldViewStub
            oFieldViewStub.set(VISIBLE)
        }
    }
}
运行时绑定,比较实用给ViewStub这种在运气期间加入到布局的内部的视图。
有个细节,如下代码中第一个viewStub是activity_custom_binding布局中ViewStub控件的ID在绑定类中生成的属性,其真实类名是androidx.databinding.ViewStubProxy,第二个viewStub才是布局中的ViewStub:
activityCustomBindingBinding.viewStub.viewStub
ViewStub布局文件:
<layout xmlns:android="http://schemas.android.com/apk/res/android">
<data>
<import type="android.view.View" />
<import type="com.im_hero.databinding.ConstantsKt"/>
<variable
name="viewStubData"
type="androidx.databinding.ObservableField<String>" />
</data>
<TextView
android:id="@+id/tvViewStub"
android:layout_width="match_parent"
android:layout_height="wrap_content"
android:text="@{`ViewStub:`+viewStubData}"
android:visibility="@{ConstantsKt.INVISIBLE.equals(viewStubData) ? View.GONE : View.VISIBLE}" />
</layout>
如下是ViewStub的布局文件和常量定义:
// Constants.kt 文件中
const val INVISIBLE = "Invisible"
const val VISIBLE = "Visible""
下面是CustomBindingFragment的布局文件和实现代码:
<layout xmlns:android="http://schemas.android.com/apk/res/android"
    xmlns:tools="http://schemas.android.com/tools">
    <data class="CustomDataBinding">
        <import type="com.im_hero.databinding.ConstantsKt"/>
        <variable
            name="showViewStubStatus"
            type="androidx.databinding.ObservableBoolean" />
    </data>
    <LinearLayout
        android:layout_width="match_parent"
        android:layout_height="match_parent"
        tools:context=".CustomBindingFragment">
        <ToggleButton
            android:id="@+id/btnShowViewStub"
            android:layout_width="match_parent"
            android:layout_height="wrap_content"
            android:checked="@{showViewStubStatus}"
            android:textOn="@{ConstantsKt.VISIBLE}"
            android:textOff="@{ConstantsKt.INVISIBLE}" />
    </LinearLayout>
</layout>
其中 <data class=“CustomDataBinding”> 就是用来指定布局自动生成的绑定类名。
class CustomBindingFragment : Fragment(), CompoundButton.OnCheckedChangeListener{
    lateinit var customDataBinding: CustomDataBinding
    lateinit var customBindingFragmentListener: CustomBindingFragmentListener
    val oBoolean = ObservableBoolean(false)
    override fun onCreateView(
        inflater: LayoutInflater,
        container: ViewGroup?,
        savedInstanceState: Bundle?
    ): View {
        customDataBinding = CustomDataBinding.inflate(inflater, container, false)
        customDataBinding.showViewStubStatus = oBoolean
        customDataBinding.btnShowViewStub.setOnCheckedChangeListener(this)
        return customDataBinding.root
    }
    override fun onAttach(context: Context) {
        super.onAttach(context)
        if (context is CustomBindingFragmentListener) {
            customBindingFragmentListener = context
        } else {
            throw AndroidRuntimeException("Context must implements CustomBindingFragmentListener")
        }
    }
    override fun onCheckedChanged(buttonView: CompoundButton?, isChecked: Boolean) {
        customBindingFragmentListener.showViewStub(isChecked)
    }
    interface CustomBindingFragmentListener {
        fun showViewStub(checked: Boolean)
    }
}
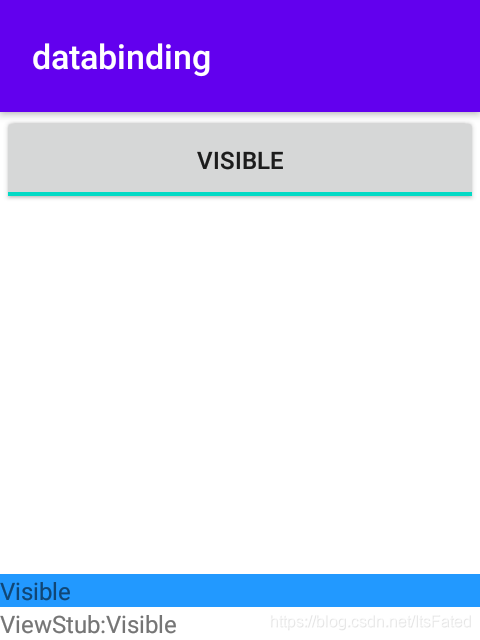
至此通过Fragment上的按钮控制Activity上的ViewStub的填充和显示隐藏的功能就完成了。这个例子主要是用于演示开头的那几个知识点,特别简单哈,主要是用于演示DataBinding可以给我们减少很多的关联代码。这样我们就主要关注与数据的更新和界面的逻辑,关联代码就完全交给了DataBinding。贴上运行结果图,ViweStub未显示的界面:
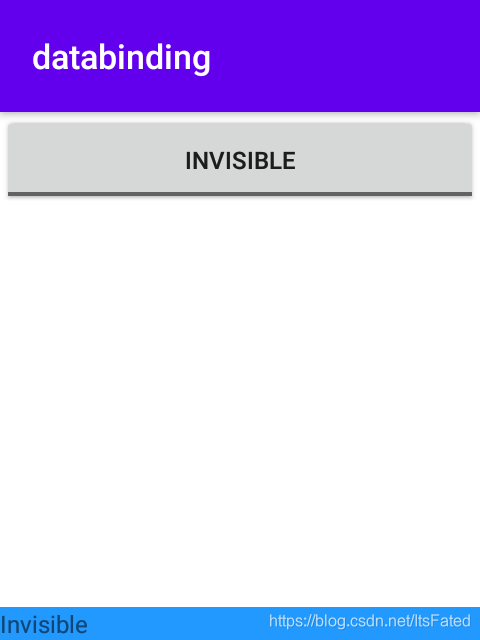
显示ViewStub的界面:
下面主要记录绑定适配器和双向绑定的基本用法,这篇文章会包含完整的代码和运行效果。
绑定适配器
绑定适配器的作用就是给布局文件(xml)和特定方法之间起到相互绑定的作用的注解。 如下示例(其中invertColorBackground这个app的前缀是可以省略的,而且不省略AndroidStudio还会报警告:Application namespace for attribute app:colorValue will be ignored.):
@BindingAdapter("invertColorBackground")
fun setupInvertColorBackground(invertBackgroundColorView: View, colorValue: Int) {
...
}
@BindingAdapter("android:text")
fun setText(view: TextView, text: CharSequence) {
...
}
对应的xml应用方式:
<TextView
    ...
    android:text="..."
    app:invertColorBackground="@{color}" />
转换器
转换器用于将xml中其他的数据类型转换成绑定适配器需要的数据类型。如下定义:
@BindingConversion
fun convertColorToDrawable(color: ObservableInt) = ColorDrawable(color.get())
这个就是将xml中为ObservableInt的数据类型转换为ColorDrawable的数据类型,示例如下:
<variable name="color" type="androidx.databinding.ObservableInt" />
...
<View
    ...
    android:background="@{color}" />
这样就可以将ObservableInt直接设置为背景色了。
双向绑定
双向绑定的作用是在数据绑定的基础上,增加视图的变化时更新数据的功能。 如下示例:
<TextView
    ...
    app:colorValue="@={color}" />
是的没错,就是多了一个‘=’号。这样就是双向绑定的使用方法。那么如何定义呢?一共有三个步骤:
1. 定义绑定适配器(BindingAdapter),数据改变时通知视图更新
@BindingAdapter(value = ["colorValue"])
fun setupColorValue(tvColorValue: TextView, colorValue: Int) {
    tvColorValue.setTextColor(colorValue)
    tvColorValue.text = String.format("0x%08x", colorValue).toUpperCase(Locale.getDefault())
}
2. 定义反向绑定适配器(InverseBindingAdapter),定义视图更新时如何更新数据
@InverseBindingAdapter(attribute = "colorValue")
fun onColorValueChanged(tvColorValue: TextView): Int {
    return tvColorValue.currentTextColor
}
3. 定义何时需要通知DataBinding去更新数据(注意,这里用的也是BindingAdapter注解,而且一定需要 AttrChanged 作为适配器中 colorValue 的后缀,不然会报错!)
@BindingAdapter(value = ["colorValueAttrChanged"])
fun setOnColorValueChanged(tvColorValue: TextView, attrChanged: InverseBindingListener) {
    tvColorValue.addTextChangedListener(object : TextWatcher {
        override fun beforeTextChanged(s: CharSequence?, start: Int, count: Int, after: Int) {
            Log.d(TAG, "beforeTextChanged: s = $s")
        }
        override fun onTextChanged(s: CharSequence?, start: Int, before: Int, count: Int) {
            Log.d(TAG, "onTextChanged: s = $s")
        }
        override fun afterTextChanged(s: Editable?) {
            Log.d(TAG, "afterTextChanged: s = $s")
            attrChanged.onChange()
        }
    })
}
这个示例实现了如下双向更新的功能:
- 当颜色值(colorValue)更新时,更新字体颜色和文字显示
- 当前字体颜色更新时,更新颜色值(colorValue)
完整代码示例
下面的代码会实现一个包含四个控件的视图:
- 功能开关按钮:用于开启和关闭自动变色,以及控制是否可以变色
- 手动变色按钮:用于直接让变色控件变色
- 变色控件:用于显示当前颜色
- 颜色提示控件:用于显示当前颜色值是多少
运行效果如下图:

用到了以下知识点:
- 绑定适配器
- 双向绑定适配器
- DataBinding中如何应用merge布局
绑定适配器的定义
- 实现了TextView的文字于颜色值的双向绑定
- 根据颜色值显示其反色的背景
@BindingAdapter(value = ["colorValue"])
fun setupColorValue(tvColorValue: TextView, colorValue: Int) {
    tvColorValue.setTextColor(colorValue)
    tvColorValue.text = String.format("0x%08x", colorValue).toUpperCase(Locale.getDefault())
}
@InverseBindingAdapter(attribute = "colorValue")
fun onColorValueChanged(tvColorValue: TextView): Int {
    return tvColorValue.currentTextColor
}
@BindingAdapter(value = ["colorValueAttrChanged"])
fun setOnColorValueChanged(tvColorValue: TextView, attrChanged: InverseBindingListener) {
    tvColorValue.addTextChangedListener(object : TextWatcher {
        override fun beforeTextChanged(s: CharSequence?, start: Int, count: Int, after: Int) {
            Log.d(TAG, "beforeTextChanged: s = $s")
        }
        override fun onTextChanged(s: CharSequence?, start: Int, before: Int, count: Int) {
            Log.d(TAG, "onTextChanged: s = $s")
        }
        override fun afterTextChanged(s: Editable?) {
            Log.d(TAG, "afterTextChanged: s = $s")
            attrChanged.onChange()
        }
    })
}

@BindingAdapter(value = ["invertColorBackground"])
fun setupInvertColorBackground(invertBackgroundColorView: View, colorValue: Int) {
    val invertColor = (0xFF0000 - (colorValue and 0xFF0000))
        .or(0xFF00 - (colorValue and 0xFF00))
        .or(0xFF - (colorValue and 0xFF))
    Log.d(TAG, "setupInvertColorBackground: invertColor = $invertColor")
    invertBackgroundColorView.setBackgroundColor(Color.BLACK or invertColor)
}

@BindingConversion
fun convertColorToDrawable(color: ObservableInt) = ColorDrawable(color.get())
布局的实现
- activity_binding_adapter.xml 显示控制按钮
- merge_layout.xml 显示颜色控件
activity_binding_adapter.xml
<layout xmlns:android="http://schemas.android.com/apk/res/android"
    xmlns:app="http://schemas.android.com/apk/res-auto"
    xmlns:bind="http://schemas.android.com/apk/res-auto"
    xmlns:tools="http://schemas.android.com/tools">
    <data>
        <variable name="btnColorSwitch" type="androidx.databinding.ObservableBoolean" />
        <variable name="color" type="androidx.databinding.ObservableInt" />
        <variable name="onCheckedChangeListener" type="android.widget.CompoundButton.OnCheckedChangeListener" />
        <variable name="onClickListener" type="android.view.View.OnClickListener" />
    </data>
    <LinearLayout
        android:layout_width="match_parent"
        android:layout_height="match_parent"
        android:orientation="vertical"
        tools:context=".BindingAdapterActivity">
        <ToggleButton
            android:id="@+id/btnSwitch"
            android:layout_width="match_parent"
            android:layout_height="wrap_content"
            android:checked="@={btnColorSwitch}"
            android:onCheckedChanged="@{onCheckedChangeListener}"
            app:onCheckedChangeListener="@{onCheckedChangeListener}"/>
        <Button
            android:id="@+id/btnChangeColor"
            android:layout_width="match_parent"
            android:layout_height="wrap_content"
            android:text="@string/change_color"
            app:onClickListener="@{onClickListener}"/>
        <include
            layout="@layout/merge_layout"
            android:id="@+id/includeMergeLayout"
            android:layout_width="match_parent"
            android:layout_height="0dp"
            android:layout_weight="1"
            bind:color="@{color}" />
    </LinearLayout>
</layout>
merge_layout.xml
<layout xmlns:android="http://schemas.android.com/apk/res/android"
    xmlns:app="http://schemas.android.com/apk/res-auto">
    <data>
        <variable name="color" type="androidx.databinding.ObservableInt" />
    </data>
    <merge>
        <View
            android:id="@+id/vColor"
            android:layout_width="match_parent"
            android:layout_height="0dp"
            android:layout_weight="1"
            android:background="@{color}" />
        <TextView
            android:id="@+id/tvColorValue"
            android:layout_width="match_parent"
            android:layout_height="wrap_content"
            android:gravity="center"
            android:textAlignment="center"
            app:invertColorBackground="@{color}"
            app:colorValue="@={color}" />
    </merge>
</layout>
Activity的实现
- 每隔1.5秒自动改变color的颜色值
- 实现开关控制
- 实现单击变色
class BindingAdapterActivity : AppCompatActivity(), CompoundButton.OnCheckedChangeListener, View.OnClickListener{
    lateinit var activityBindingAdapterBinding: ActivityBindingAdapterBinding
    val color = ObservableInt(Color.WHITE)
    val btnColorSwitch = ObservableBoolean(false)
    val random = Random()
    var lastRandom = 0
    val DELAY_TO_CHANGE_COLOR = 1500L
    val mHandler = Handler(Looper.getMainLooper())
    val colorChanger = object : Runnable {
        override fun run() {
            color.set(randomColor())
            mHandler.postDelayed(this, DELAY_TO_CHANGE_COLOR)
        }
    }
    override fun onCreate(savedInstanceState: Bundle?) {
        super.onCreate(savedInstanceState)
        activityBindingAdapterBinding = DataBindingUtil.setContentView(this, R.layout.activity_binding_adapter)
        activityBindingAdapterBinding.onCheckedChangeListener = this
        activityBindingAdapterBinding.onClickListener = this
        activityBindingAdapterBinding.color = color
        activityBindingAdapterBinding.btnColorSwitch = btnColorSwitch
    }
    override fun onResume() {
        super.onResume()
        if (btnColorSwitch.get()) startChangeColor()
    }
    override fun onPause() {
        if (btnColorSwitch.get()) stopChangeColor()
        super.onPause()
    }
    override fun onCheckedChanged(buttonView: CompoundButton?, isChecked: Boolean) {
        if (isChecked) {
            startChangeColor()
        } else {
            stopChangeColor()
        }
    }
    override fun onClick(v: View) {
        when (v.id) {
            R.id.btnChangeColor -> {
                if (btnColorSwitch.get()) {
                    mHandler.removeCallbacks(colorChanger)
                    setupColorValue(activityBindingAdapterBinding.includeMergeLayout.tvColorValue, randomColor())
                    mHandler.postDelayed(colorChanger, DELAY_TO_CHANGE_COLOR)
                } else {
                    Log.d(TAG, "onCreate: btnColorSwitch = false")
                }
            }
        }
    }
    private fun startChangeColor() {
        mHandler.removeCallbacks(colorChanger)
        mHandler.postDelayed(colorChanger, DELAY_TO_CHANGE_COLOR)
    }
    private fun stopChangeColor() {
        mHandler.removeCallbacks(colorChanger)
    }
    private fun randomColor(): Int {
        val nextInt = random.nextInt(7)
        lastRandom = if (lastRandom == nextInt) (nextInt + 1) % 7 else nextInt
        return when (lastRandom) {
            0 -> Color.WHITE
            1 -> Color.RED
            2 -> Color.BLUE
            3 -> Color.YELLOW
            4 -> Color.CYAN
            5 -> Color.MAGENTA
            else -> Color.BLACK
        }
    }
}
可以看到配置视图数据和状态等操作全部都交给了DataBinding,而这里只需要负责给数据赋值,实现变更逻辑。这样我们可以将流程设计和具体实现给分开,让代码逻辑更加清晰,代码管理更加方便。