前提废话
之前关注了一个python的公众号,每天都会推送文章,每次看都会看到他有使用wordcloud这个库来生成好看的词云,于是乎,我就学习了jieba分词和wordcloud词云。
这里给win系统的小伙伴提示下,如果你的pip install wordcloud 时候出现了确实VC++文件时,提示你需要安装VC++,但是很多人肯定是不愿意安装的,所以,我就找到了一个直接安装wordcloud库的方法
wordcloud安装
win系统下:
可以直接点击,然后找到wordcloud库,下载对应的版本,然后放在方便的盘中,使用cmd进入该盘中,然后输入pip install wordcloud-1.2.1-cp36-cp36m-win_amd64.whl(后面加你下载的版本即可)
这样就成功的安装好了
爬虫部分
之前寒假的时候写过一个小说下载器,之前就是通过免费小说网站直接爬取所有章节,这一部分就不详细说明了,不懂的小伙伴可以点击查看我之前的博客
直接附上代码:
url = 'https://www.ybdu.com/xiaoshuo/2/2746/'
head = {'User-Agent':'Mozilla/5.0 (Windows NT 10.0; Win64; x64) AppleWebKit/537.36 (KHTML, like Gecko) Chrome/63.0.3239.84 Safari/537.36'}
file = open('test.txt','w')

html = requests.get(url,params=head)
html.encoding='gbk'
wenzhang_select = re.compile(r'<ul class="mulu_list">(.*?)</ul>',re.S)
wenzhang = wenzhang_select.search(html.text)
"""soup = BeautifulSoup(html,"html.parser")
list_old = soup.find(class_= "mulu_list")
list_new = list_old.find_all('li')"""
select = re.compile(r'<li>(.+?)</li>')
list_new = select.findall(wenzhang[0])
for i in list_new:
    id_select = re.compile(r'<a href="(.*?)">(.*?)</a>')
    one_url = url + id_select.findall(i)[0][0]
    one_html = requests.get(one_url,params=head)
    one_html.encoding = 'gbk'
    soup = BeautifulSoup(one_html.text,"html.parser")
    try:
        file.write(soup.find(class_ = 'h1title').h1.text + '\n')
    except BaseException:
        print('Sorry1')
    try:
        file.write((soup.find(class_ = 'contentbox').text.split('\n')[1].replace('    ','\n')) + '\n')
    except BaseException:
        print('Sorry2')
file.close()
分词和生成词云
这一部分,我主要想找出人名的词频,但是直接使用jieba的分词,会分出来很多不是你想要的词,所以我就找到了所有的三国里的人名链接(当然不一定是全部人名),然后使用自定义字典对文本进行分词,分词后还是有很多多余的标点、空格等等,我直接使用索引略过了那些,最后根据一张猫猫的照片生成了一般的词云图和颜色与照片一致的词云图。
代码如下:
text_read = open('test.txt').read()
jieba.load_userdict('test_dic.txt')
c = jieba.cut(text_read, cut_all=False, HMM=True)
word_list = []
for i in c:
word_list.append(i)
word_dic = {}
for i in word_list:
if i not in word_dic:
word_dic[i] = 1
else :
word_dic[i] += 1
over_list = sorted(word_dic.items(), key = lambda x : x[1], reverse=True)
font_path = "D:\Fonts\simkai.ttf"#字体路径
dizi_path = "D:\dizi.jpg"#底子图片路径
back_coloring = imread(dizi_path)#使用PIL来读取图像
wc = WordCloud(background_color="white", #背景颜色
font_path=font_path, #字体选择
max_words=1000, #最大词数
mask=back_coloring ,#背景图片
max_font_size=100, #最大字体大小
width=1000, height=860, margin=2)
wc.fit_words(dict(over_list[20:]))
plt.figure()
#显示图片
plt.imshow(wc)
plt.axis("off")
plt.show()
#保存图片
wc.to_file(path.join(path.dirname(__file__), 'wordcloud1.png'))
#改变颜色
image_color = ImageColorGenerator(back_coloring)#从背景图片生成颜色值
plt.imshow(wc.recolor(color_func=image_color))#使用新的颜色值布局着色
plt.axis('off')#关闭坐标轴
#绘制背景颜色的词云
plt.figure()
plt.imshow(back_coloring, cmap = plt.cm.gray)
plt.axis('off')
plt.show()
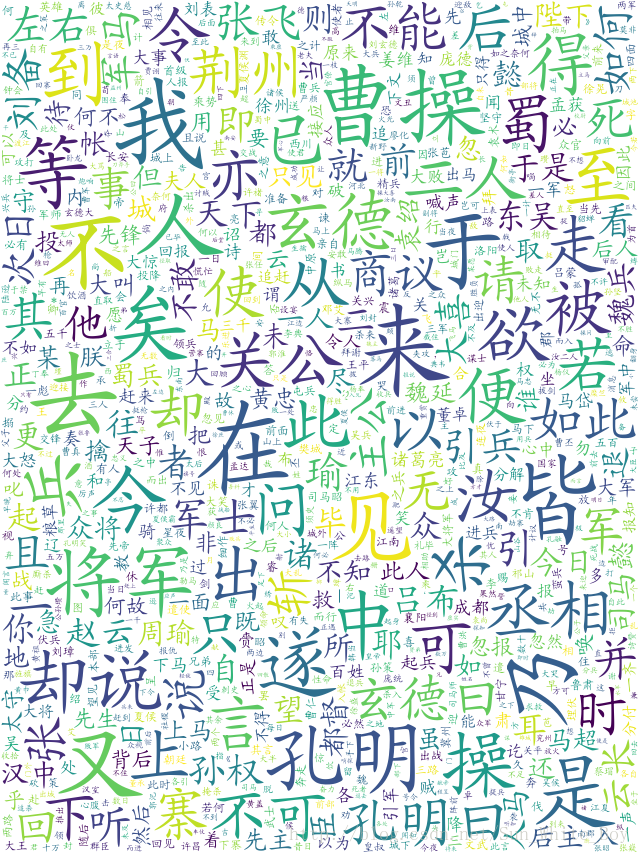
wc.to_file(path.join(path.dirname(__file__), 'wordcloud2.png'))最后附上图片
背景图:

初始词云:
背景色词云:

PS:
古文版的《三国演义》中出现最多的是曹操、孔明、玄德,可以看出这几个人是书中的重点人物,有时候把一些枯燥的数据可视化以后还是很好玩的,以后会多多尝试。