文章目录
tabBar制作
在 pages 目录中,创建首页(home)、分类(cate)、购物车(cart)、我的(my) 这 4 个 tabBar 页面。
然后我们将原本的index页面删除(包括文件夹以及page.json中的页面路径),否则在我们测试的时候会发现页面上并没有我们制作的效果
默认是以pages配置项中的第一个页面作为首页
在pages.json 配置文件中,新增 tabBar 的配置节点,完整代码如下:
{


  "tabBar": {


    "selectedColor": "#C00000",
    "list": [
      {


        "pagePath": "pages/home/home",
        "text": "首页",
        "iconPath": "static/tab_icons/home.png",
        "selectedIconPath": "static/tab_icons/home-active.png"
      },
      {


        "pagePath": "pages/cate/cate",
        "text": "分类",
        "iconPath": "static/tab_icons/cate.png",
        "selectedIconPath": "static/tab_icons/cate-active.png"
      },
      {


        "pagePath": "pages/cart/cart",
        "text": "购物车",
        "iconPath": "static/tab_icons/cart.png",
        "selectedIconPath": "static/tab_icons/cart-active.png"
      },
      {


        "pagePath": "pages/my/my",
        "text": "我的",
        "iconPath": "static/tab_icons/my.png",
        "selectedIconPath": "static/tab_icons/my-active.png"
      }
    ]
  }
}
selectedColor代表tab上的文字被选中时的颜色
首页制作
配置网络请求
由于平台的限制,小程序项目中不支持 axios,而且原生的 wx.request() API 功能较为简单,不支持拦截器等全局定制的功能。因此,建议在 uni-app 项目中使用 @escook/request-miniprogram 第三方包发起网络数据请求。
@escook/request-miniprogram的官方文档;
https://www.npmjs.com/package/@escook/request-miniprogram
在安装这个包之前,我们先使用如下命令初始化一个package.json配置文件,有了这个配置文件之后我们接下来就可以安装这个包了。
npm init -y
然后我们运行以下命令装包:
npm install @escook/request-miniprogram
将导入的对象挂载到uniapp项目的顶级对象uni上,方便我们发送请求
uni.$http = $http
接下来我们可以设置请求拦截器和响应拦截器来完成展示loading效果和隐藏loading效果:
//请求拦截器
$http.beforeRequest = function(options){


  // 显示loading提示框
  //	需主动调用 uni.hideLoading 才能关闭提示框。
  uni.showLoading({


    title:"数据加载中····"
  })
}

// 响应拦截器
$http.afterRequest = function(options){


  //隐藏loading提示框
  uni.hideLoading()
}
在原生小程序内部我们是使用wx去调用showLoading的,但是在uniapp项目里面我们不建议使用wx去掉调用那些api了,我们建议大家使用uni去调用那些小程序api
制作轮播图效果
首先我们去请求轮播图的数据;
请求URL:
https://api-ugo-web.itheima.net/api/public/v1/home/swiperdata
请求方式:
- GET
参数: 无
返回示例
{


    "message": [
        {


            "image_src": "https://api-ugo-web.itheima.net/pyg/banner1.png",
            "open_type": "navigate",
            "goods_id": 129,
            "navigator_url": "/pages/goods_detail/index?goods_id=129"
        }
    ],
    "meta": {


        "msg": "获取成功",
        "status": 200
    }
}
返回参数说明
| 参数名 | 类型 | 说明 |
|---|---|---|
| image_src | string | 图片路径 |
| open_type | string | 打开方式 |
| goods_id | number | 商品id |
| navigator_url | string | 导航链接 |
备注
- 更多返回错误代码请看首页的错误代码描述
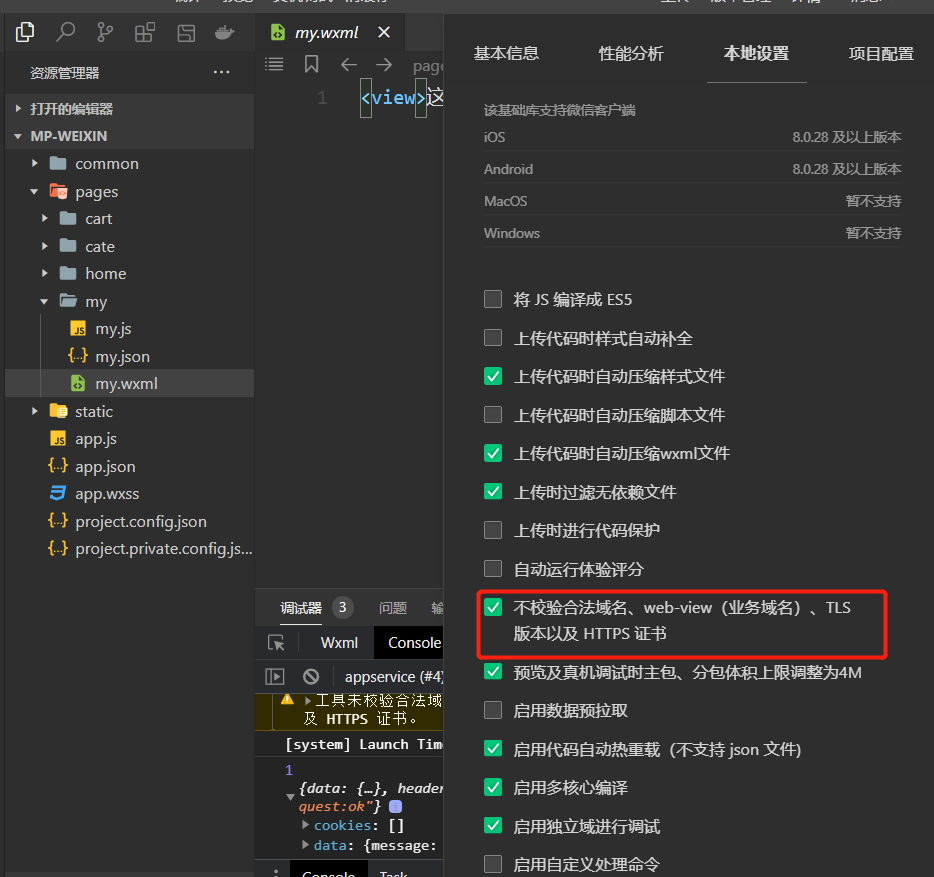
记得先开启不校验合法域名:
记得在main.js文件里面设置一下请求的根路径;

我们先看一下我们发出请求之后返回来的数据结构:
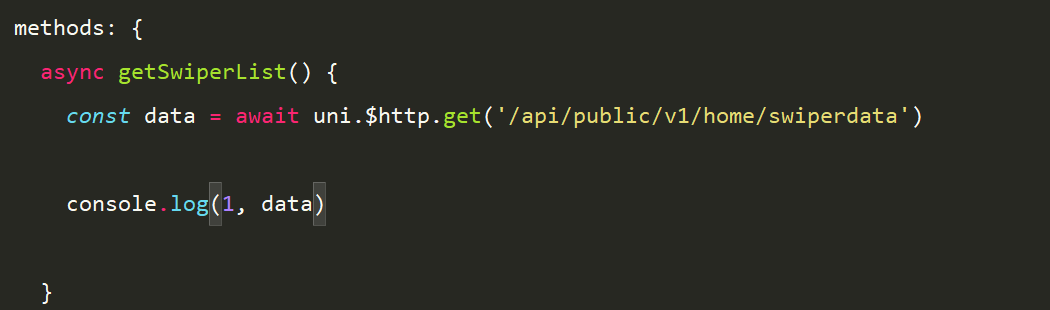

发现我们要的数据在data之中,我们直接把他们解构出来使用:
	async getSwiperList() {


        const {

    data: res} = await uni.$http.get('/api/public/v1/home/swiperdata')
        this.swiperList = res.message
      }
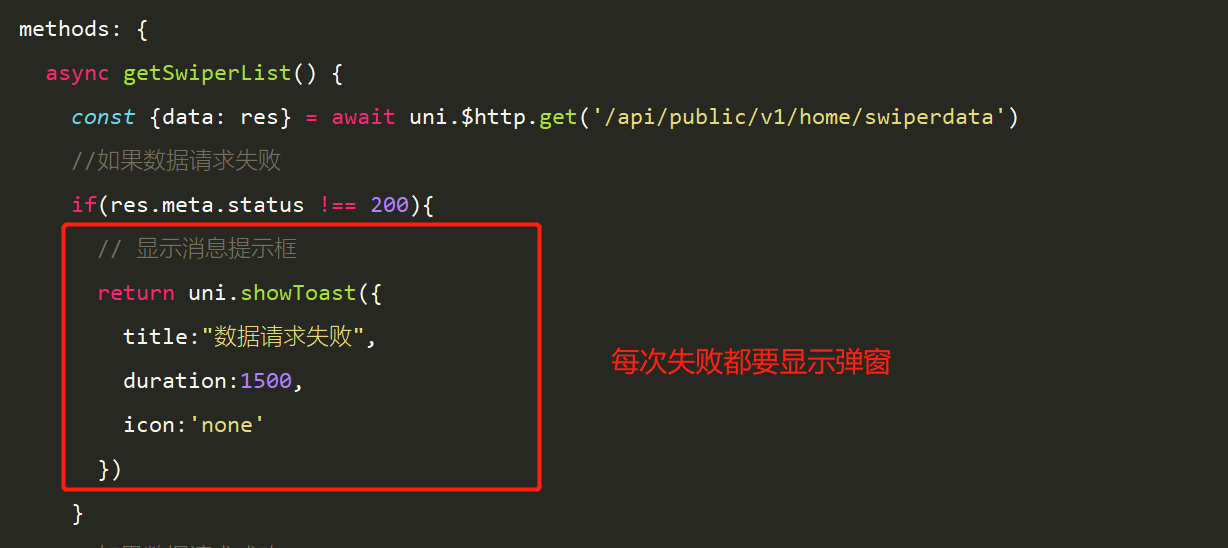
但是这里res.message不一定会有值,比如说在请求失败的时候,所以说我们在赋值之前先要判断一下请求是否成功,完整代码如下:
<template>
  <view>
    这里是home页面
  </view>
</template>

<script>
  export default {


    data() {


      return {


        swiperList: [],
      };
    },
    onLoad() {


      this.getSwiperList()
    },
    methods: {


      async getSwiperList() {


        const {

    data: res} = await uni.$http.get('/api/public/v1/home/swiperdata')
        //如果数据请求失败
        if(res.meta.status !== 200){


          // 显示消息提示框
          return uni.showToast({


            title:"数据请求失败",
            duration:1500,
            icon:'none'
          })
        }
        //如果数据请求成功
        this.swiperList = res.message
        // uni.showToast({


        //   title:"数据请求成功",
        //   duration:1500,
        //   icon:'success'
        // })

      }
    }
  }
</script>

<style lang="scss">

</style>
uni.showToast(OBJECT)
显示消息提示框
duration:1500 定义弹框的时间 单位是ms
具体使用方法,直接看文档非常的清晰:
https://uniapp.dcloud.net.cn/api/ui/prompt.html#showtoast
渲染轮播图的UI解构
这里没什么注意点,就是一个for循环构建轮播图的item就行
<template>
  <view>
    <swiper :indicator-dots="true" :autoplay="true" :interval="3000" :duration="1000" circular="true">
      <swiper-item v-for="item in swiperList" :key="item.goods_id">
        <img :src="item.image_src" alt="">
      </swiper-item>
    </swiper>
  </view>
</template>

<style lang="scss">
  swiper {


    height: 330rpx;
    img {


      width: 100%;
    }
  }

</style>
效果:

配置小程序分包
分包可以减少小程序首次启动时的加载时间
我们在项目中,把 tabBar 相关的 4 个页面放到主包中,其它页面(例如:商品详情页、商品列表页)放到分包中。
在uni-app中配置分包的步骤如下:
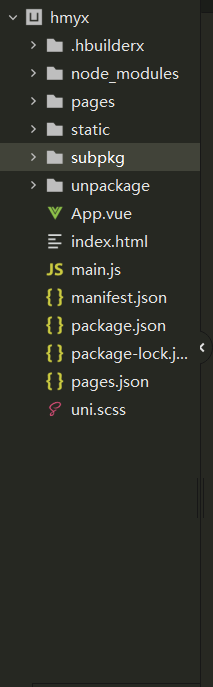
首先我们在项目的根目录中创建一个分包的根目录,这里我们就把这个目录命名为subpkg;
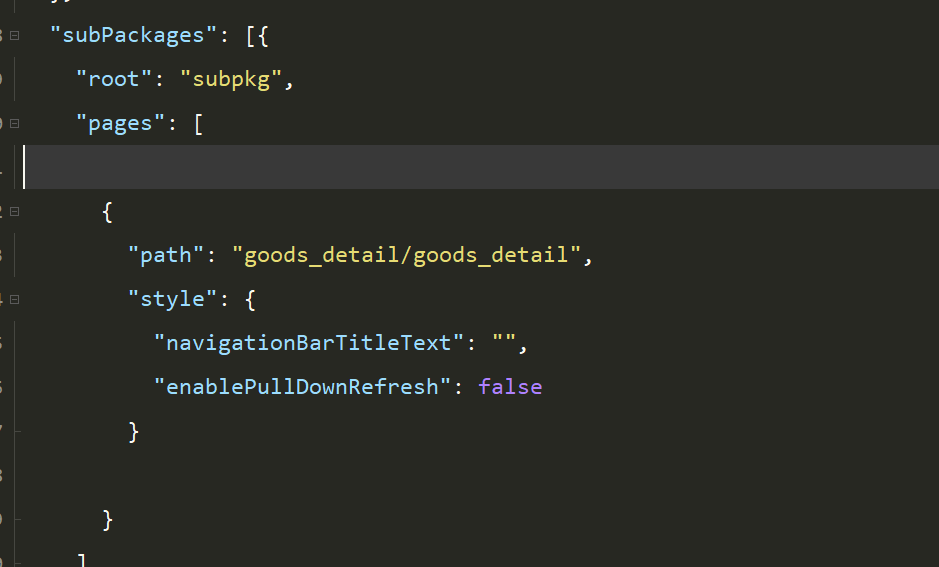
然后我们在 pages.json 中,和 pages 节点平级的位置声明 subPackages 节点,用来定义分包相关的结构:
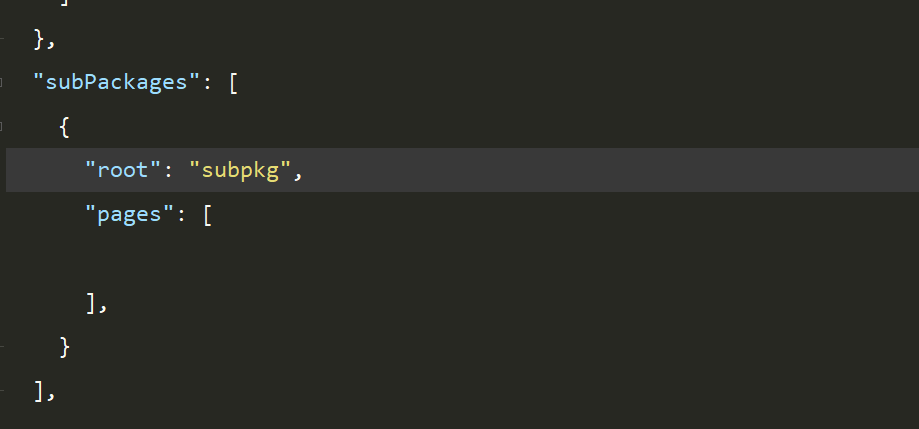
注意这里配置完之后一定要保存,否则你在分包中创建页面的时候不会出现选择分包选项。
最后我们在创建的分包目录中创建新页面即可:

这里我们先将商品详情页放进去,创建完毕之后,我们回看pages.json文件会发现其中帮我们配置好了相关信息:
点击轮播图跳转到商品详情页面
直接将img元素用navigator包裹起来就行,url使用字符串的拼接:
<template>
  <view>
    <swiper :indicator-dots="true" :autoplay="true" :interval="3000" :duration="1000" circular="true">
      <swiper-item v-for="item in swiperList" :key="item.goods_id">
        <navigator :url="'/subpkg/goods_detail/goods_detail?goods_id=' + item.goods_id">
          <img :src="item.image_src" alt="">
        </navigator>
      </swiper-item>
    </swiper>
  </view>
</template>
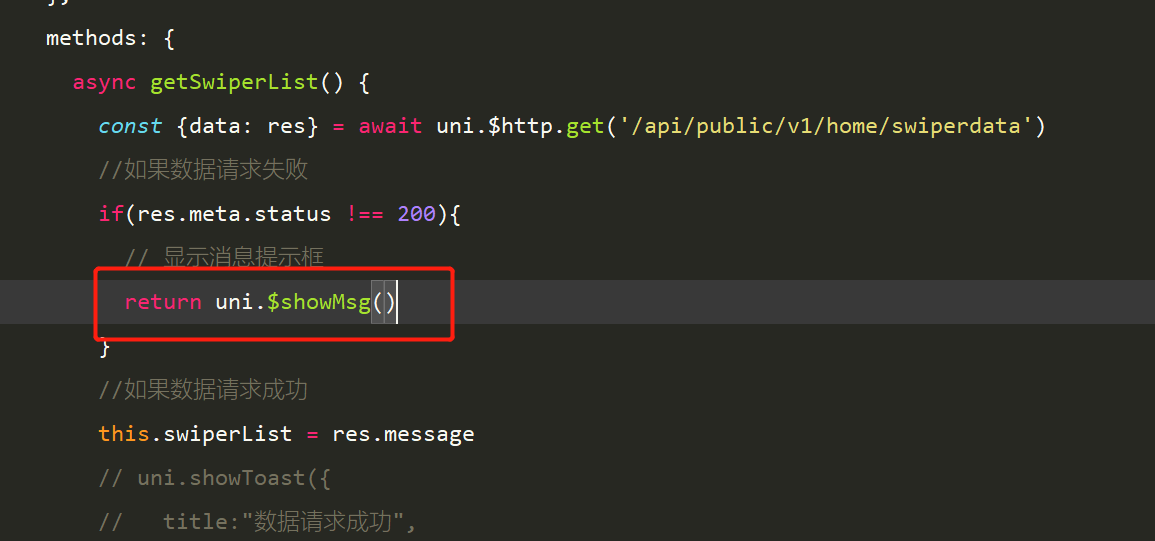
封装 uni.$showMsg() 方法
我们封装uni.$showMsg()方法是因为每当数据请求失败之后,经常需要调用 uni.showToast({ /* 配置对象 */ }) 方法来提示用户:
我们干脆把这段代码给抽象出来单独挂载到uni身上,这样减少代码冗余的同时,还能简化开发。
方法如下:
在 main.js 中,为 uni 对象挂载自定义的 $showMsg() 方法:
uni.$showMsg = function(title = "数据请求失败",duration = 1500){


  uni.showToast({


    title,
    duration,
    icon:'none'
  })
}
这里我们使用了默认参数,如果我们没有传入参数,则title 默认为数据请求失败,duration 默认为1500
然后我们使用上述我们封装好了的代码:
分类导航区制作
分类导航栏也就是如下区域:
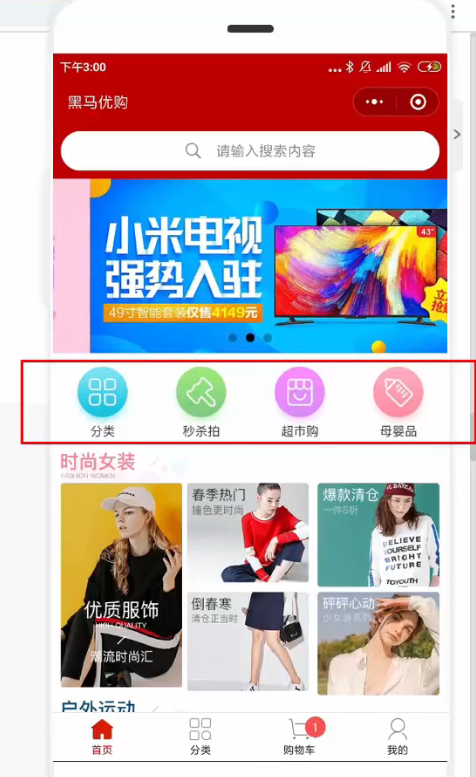
制作这个分类导航栏我们的基本步骤还是,先获取数据,再做页面的UI渲染
首先数据接口相关信息如下:
请求URL:
https://api-ugo-web.itheima.net/api/public/v1/home/catitems
请求方式:
- GET
参数: 无
返回示例
{
    "message": [
        {
            "name": "分类",
            "image_src": "https://api-ugo-web.itheima.net/pyg/[email protected]",
            "open_type": "switchTab",
            "navigator_url": "/pages/category/index"
        },
        {
            "name": "秒杀拍",
            "image_src": "https://api-ugo-web.itheima.net/pyg/[email protected]"
        },
        {
            "name": "超市购",
            "image_src": "https://api-ugo-web.itheima.net/pyg/[email protected]"
        },
        {
            "name": "母婴品",
            "image_src": "https://api-ugo-web.itheima.net/pyg/[email protected]"
        }
    ],
    "meta": {
        "msg": "获取成功",
        "status": 200
    }
}
返回参数说明
| 参数名 | 类型 | 说明 |
|---|---|---|
| name | string | 标题名称 |
| image_src | string | 图片路径 |
备注
- 更多返回错误代码请看首页的错误代码描述
然后编写请求数据的代码;
	async getNavList() {


        const {

    data:res} = await uni.$http.get("/api/public/v1/home/catitems")
        if(res.meta.status !== 200){


          uni.$showMssg()
        }
        this.NavList = res.message
      }
然后我们在onLoad方法中去调用它;
	onLoad() {


      this.getNavList()
    },
最后我们再去渲染一下界面:
.nav-list {


    display: flex;
    view {


      width: 25%;
      text-align: center;
      margin: 15rpx 0;
      img {


        height: 140rpx;
        width: 128rpx;

      }
    }
  }
效果如下;

接下来我们还要实现一个功能就是点击第一项,切换到分类页面,效果如下图所示:

我们的基本思路就是给每一个导航栏绑定点击事件,当被点击的导航栏的name属性与‘分类’吻合,那么就进行跳转,代码实现如下;
	<view class="nav-list">
      <view v-for="(item,index) in NavList" :key="index" @click="navClickHandler(item)">
        <img :src="item.image_src">
      </view>
    </view>
点击事件的处理逻辑;
	navClickHandler(item){


        if(item.name === "分类") {


          uni.switchTab({


            url:"/pages/cate/cate"
          })
        }
      }
楼层区域制作
效果如下:
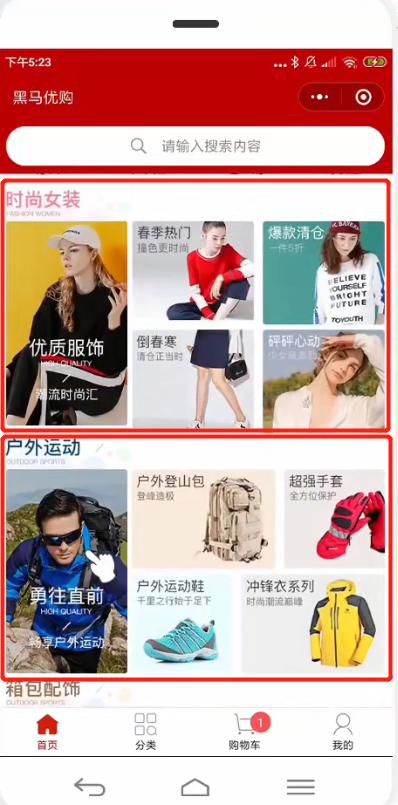
当前项目中的楼层区域有三个:
- 时尚女装
- 户外运动
- 箱包配饰
首先我们还是先获取数据,楼层数据的接口文档如下:
请求URL:
https://api-ugo-web.itheima.net/api/public/v1/home/floordata
请求方式:
- GET
参数: 无
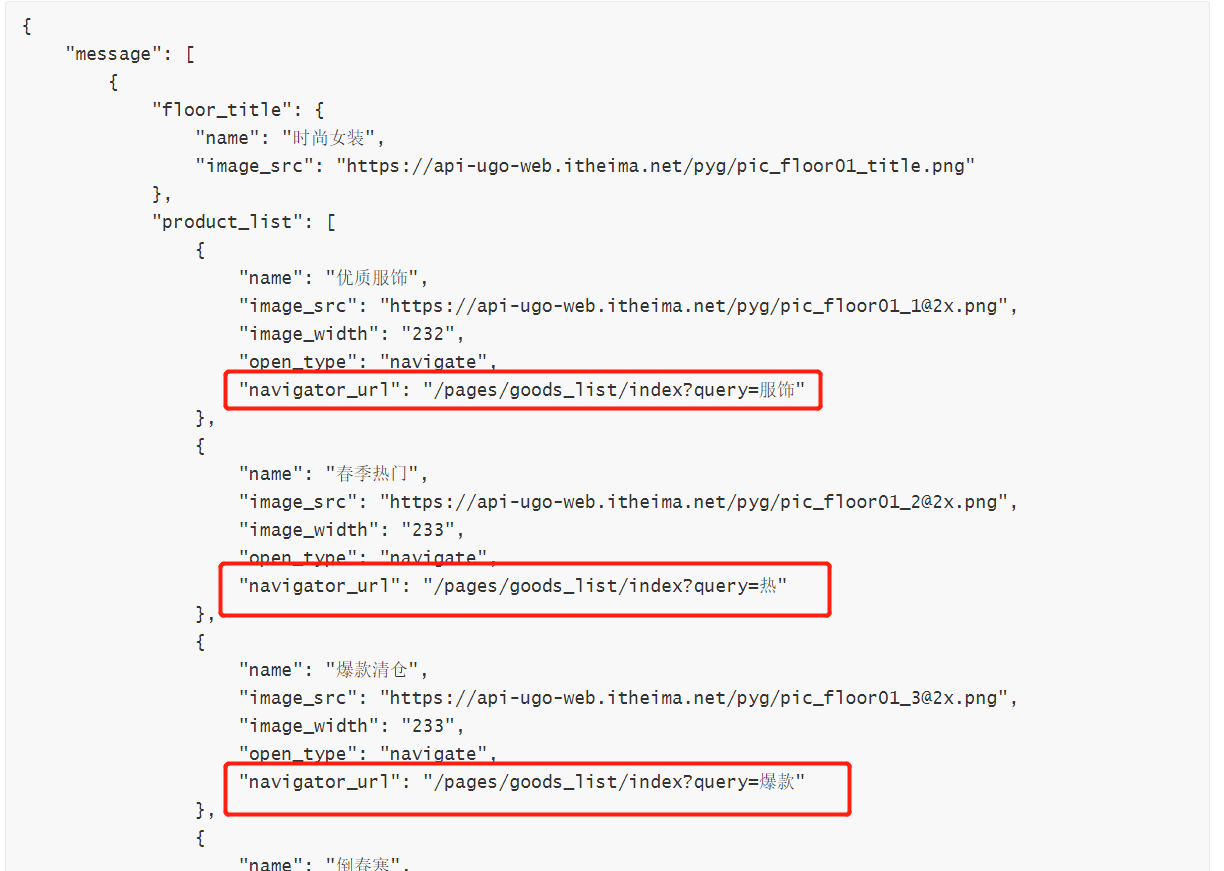
返回示例
{
    "message": [
        {
            "floor_title": {
                "name": "时尚女装",
                "image_src": "https://api-ugo-web.itheima.net/pyg/pic_floor01_title.png"
            },
            "product_list": [
                {
                    "name": "优质服饰",
                    "image_src": "https://api-ugo-web.itheima.net/pyg/[email protected]",
                    "image_width": "232",
                    "open_type": "navigate",
                    "navigator_url": "/pages/goods_list/index?query=服饰"
                },
                {
                    "name": "春季热门",
                    "image_src": "https://api-ugo-web.itheima.net/pyg/[email protected]",
                    "image_width": "233",
                    "open_type": "navigate",
                    "navigator_url": "/pages/goods_list/index?query=热"
                },
                {
                    "name": "爆款清仓",
                    "image_src": "https://api-ugo-web.itheima.net/pyg/[email protected]",
                    "image_width": "233",
                    "open_type": "navigate",
                    "navigator_url": "/pages/goods_list/index?query=爆款"
                },
                {
                    "name": "倒春寒",
                    "image_src": "https://api-ugo-web.itheima.net/pyg/[email protected]",
                    "image_width": "233",
                    "open_type": "navigate",
                    "navigator_url": "/pages/goods_list/index?query=春季"
                },
                {
                    "name": "怦然心动",
                    "image_src": "https://api-ugo-web.itheima.net/pyg/[email protected]",
                    "image_width": "233",
                    "open_type": "navigate",
                    "navigator_url": "/pages/goods_list/index?query=心动"
                }
            ]
        },
        {
            "floor_title": {
                "name": "户外活动",
                "image_src": "https://api-ugo-web.itheima.net/pyg/pic_floor02_title.png"
            },
            "product_list": [
                {
                    "name": "勇往直前",
                    "image_src": "https://api-ugo-web.itheima.net/pyg/[email protected]",
                    "image_width": "232",
                    "open_type": "navigate",
                    "navigator_url": "/pages/goods_list/index?query=户外"
                },
                {
                    "name": "户外登山包",
                    "image_src": "https://api-ugo-web.itheima.net/pyg/[email protected]",
                    "image_width": "273",
                    "open_type": "navigate",
                    "navigator_url": "/pages/goods_list/index?query=登山包"
                },
                {
                    "name": "超强手套",
                    "image_src": "https://api-ugo-web.itheima.net/pyg/[email protected]",
                    "image_width": "193",
                    "open_type": "navigate",
                    "navigator_url": "/pages/goods_list/index?query=手套"
                },
                {
                    "name": "户外运动鞋",
                    "image_src": "https://api-ugo-web.itheima.net/pyg/[email protected]",
                    "image_width": "193",
                    "open_type": "navigate",
                    "navigator_url": "/pages/goods_list/index?query=运动鞋"
                },
                {
                    "name": "冲锋衣系列",
                    "image_src": "https://api-ugo-web.itheima.net/pyg/[email protected]",
                    "image_width": "273",
                    "open_type": "navigate",
                    "navigator_url": "/pages/goods_list/index?query=冲锋衣"
                }
            ]
        },
        {
            "floor_title": {
                "name": "箱包配饰",
                "image_src": "https://api-ugo-web.itheima.net/pyg/pic_floor03_title.png"
            },
            "product_list": [
                {
                    "name": "清新气质",
                    "image_src": "https://api-ugo-web.itheima.net/pyg/[email protected]",
                    "image_width": "232",
                    "open_type": "navigate",
                    "navigator_url": "/pages/goods_list?query=饰品"
                },
                {
                    "name": "复古胸针",
                    "image_src": "https://api-ugo-web.itheima.net/pyg/[email protected]",
                    "image_width": "263",
                    "open_type": "navigate",
                    "navigator_url": "/pages/goods_list?query=胸针"
                },
                {
                    "name": "韩版手链",
                    "image_src": "https://api-ugo-web.itheima.net/pyg/[email protected]",
                    "image_width": "203",
                    "open_type": "navigate",
                    "navigator_url": "/pages/goods_list?query=手链"
                },
                {
                    "name": "水晶项链",
                    "image_src": "https://api-ugo-web.itheima.net/pyg/[email protected]",
                    "image_width": "193",
                    "open_type": "navigate",
                    "navigator_url": "/pages/goods_list?query=水晶项链"
                },
                {
                    "name": "情侣表",
                    "image_src": "https://api-ugo-web.itheima.net/pyg/[email protected]",
                    "image_width": "273",
                    "open_type": "navigate",
                    "navigator_url": "/pages/goods_list?query=情侣表"
                }
            ]
        }
    ],
    "meta": {
        "msg": "获取成功",
        "status": 200
    }
}
返回参数说明
| 参数名 | 类型 | 说明 |
|---|---|---|
| floor_title | string | 一级分类标题 |
| product_list | array | 一级分类内容 |
| name | string | 名称 |
| image_src | string | 图片路径 |
| image_width | string | 图片宽度 |
| open_type | string | 打开方式 |
| navigator_url | string | 跳转连接 |
备注
- 更多返回错误代码请看首页的错误代码描述
export default {


  data() {


    return {


      // 1. 楼层的数据列表
      floorList: [],
    }
  },
  onLoad() {


    // 2. 在 onLoad 中调用获取楼层数据的方法
    this.getFloorList()
  },
  methods: {


    // 3. 定义获取楼层列表数据的方法
    async getFloorList() {


      const {

     data: res } = await uni.$http.get('/api/public/v1/home/floordata')
      if (res.meta.status !== 200) return uni.$showMsg()
      this.floorList = res.message
    },
  },
}
然后我们再进行UI的渲染,我们可以发现每一层楼中都是左边一张大图,右边四张小图的样式,这样的话我们可以分左、右两个盒子来装。
页面结构:
	<!-- 楼层区域 -->
    <view class="floor-list">
      <view class="floor-item" v-for="(item,index) in floorList" :key="index">
        <!-- 楼层标题 -->
        <img :src="item.floor_title.image_src" class="floor-title">
        <view class="img-box">
          <view class="left-img-box">
            <image :src="item.product_list[0].image_src"
            mode="widthFix"
            :style="{width:item.product_list[0].image_width + 'rpx'}">
            </image>
          </view>
          <view class="right-img-box">
            <view class="right-img-item"
              v-for="(item2,index2) in item.product_list"
              :key="index2"
              v-if="index2 !== 0">
              <image :src="item2.image_src" mode="widthFix" :style="{width: item2.image_width + 'rpx'}"></image>
            </view>
          </view>
        </view>
      </view>
这里有几个注意点;
- image和img是两个标签
- 我们在image中可以使用mode属性,这个属性表示图片裁剪、缩放的方式,其中我们使用的widthFix表示宽度不变,高度自动变化,保持原图宽高比不变
- v-if不需要
:进行动态绑定
然后我们进行样式的美化;
  .floor-title {


    height: 60rpx;
    width: 100%;
    display: flex;
  }

  .right-img-box {


    display: flex;
    flex-wrap: wrap;
    justify-content: space-around;
  }

  .img-box {


    display: flex;

    padding-left: 10rpx;
  }
接下来我们完善一下功能:点击楼层图片跳转到列表页
首先我们在子包subpkg中新建goods_list页面:
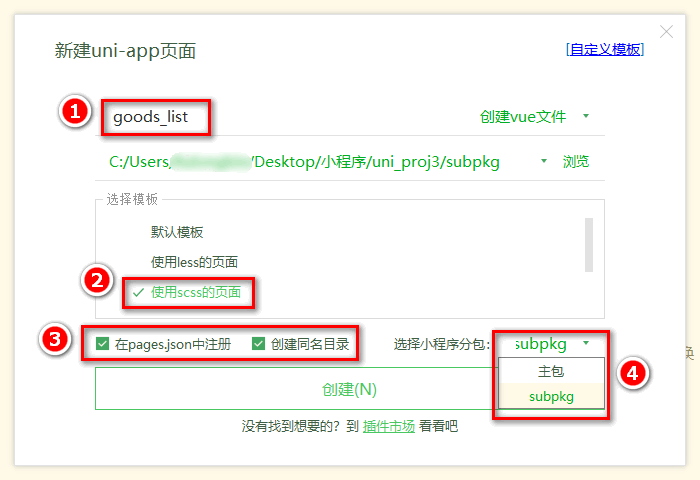
首先我们来看一下我们从数据接口请求到的数据:
我们发现提供的url与我们的项目并不一致,所以我们先要对这些地址进行处理,方法就是使用forEach进行双层for循环:
	async getFloorList() {


        const {

    data:res} = await uni.$http.get("/api/public/v1/home/floordata")
        if(res.meta.status !== 200){


          uni.$showMsg()
        }

        res.message.forEach((floor) => {


          floor.product_list.forEach((item) => {


            item.navigator_url = "/subpkg/goods_list/goods_list?" + item.navigator_url.split('?')[1]
          })
        })
        this.floorList = res.message
      }
接下来我们去调整一下页面的结构:
<!-- 楼层区域 -->
    <view class="floor-list">
      <view class="floor-item" v-for="(item,index) in floorList" :key="index">
        <!-- 楼层标题 -->
        <img :src="item.floor_title.image_src" class="floor-title">
        <view class="img-box">
          <navigator class="left-img-box" url="item.product_list[0].navigator_url">
            <image :src="item.product_list[0].image_src"
            mode="widthFix"
            :style="{width:item.product_list[0].image_width + 'rpx'}">
            </image>
          </navigator>
          <view class="right-img-box">
            <navigator class="right-img-item"
              v-for="(item2,index2) in item.product_list"
              :key="index2"
              v-if="index2 !== 0"
              url="item2.navigator_url">
              <image :src="item2.image_src" mode="widthFix" :style="{width: item2.image_width + 'rpx'}"></image>
            </navigator>
          </view>
        </view>
      </view>
    </view>
主要修改就是把view换成navigator标签,然后添加url属性即可。