目录
该博客以不同分类的形式简绍了Linux系统中常见的指令,并伴随着这些指令的学习简绍了一些Linux系统中相关的知识点。
该篇博客篇幅过长,看的时候可能会带来麻烦,大家如果需要可以看作学习过程一个”字典“,以划分好的模块中去查找对应指令,这也是我最初的想法。如果发现那块出现问题或写的不够完整,欢迎大家批评指正,互相学习。该博客部分内容参考自《Linux就该这样学》。
为什么我们要学习Linux指令:
大家以后做的项目,大部分是部署在Linux服务器中的。Linux系统从出生到洗澡,绝大部分的操作都是命令行,如:维护服务器、进程管理、目录操作、磁盘操作、文件存取等等,都要用指令,这是一个程序员的基本技能,如果不会指令,就不会Linux。
一.Linux下的文件树

- 目录:相当于Windows系统中的文件夹,可以用来存放其他目录(文件夹)或文件
在Linux系统中,目录被组织成一个单根倒置树结构,文件系统目录结构从根目录开始,用" / "表示
根目录所存放的文件我们在这里只需要了解两个一个home目录,一个root目录。
| /home | 存放普通用户的家目录 |
|---|---|
| /root | 超级管理员的家目录,普通用户是无法进入的 |
- 超级管理员可以操作Linux系统上的一切数据,它就是Linux系统的”老天爷“
- 普通用户只能在自己对应的家目录下“作威作福“
我们学习Linux的基本指令主要使用普通用户的家目录和超级管理员的家目录。
二.工作目录切换命令
1.ls——显示当前路径下的文件和目录
语法: ls [选项] [目录或文件]
功能: 对于目录,该命令列出该目录下的所有子目录与文件。对于文件,将列出文件名以及其他信息。
常用选项:
- -a 列出目录下的所有文件,包括以 . 开头的隐含文件。
- -d 将目录象文件一样显示,而不是显示其它的文件。 如: ls –d 指定目录
- -i 输出文件的 i 节点的索引信息。 如 ls –ai 指定文件
- -k 以 k 字节的形式表示文件的大小。 ls –alk 指定文件
- -l 列出文件的详细信息(更多属性)
- -n 用数字的 UID,GID 代替名称。 (介绍 UID, GID)
- -F 在每个文件名后附上一个字符以说明该文件的类型, “*”表示可执行的普通文件; “/”表示目录; “@”表
示符号链接; “|”表示FIFOs; “=”表示套接字(sockets)。(目录类型识别)- -r 对目录反向排序。
- -t 以时间排序。
- -s 在l文件名后输出该文件的大小。(大小排序,如何找到目录下最大的文件)
- -R 列出所有子目录下的文件。 (递归)
- -1 一行只输出一个文件。
高频选项:
ls -l 显示更多文件信息
-l ·相当于list·,意义为:以列表的形式,列出更多的信息
[root@VM-16-5-centos ~]# ls
course  test
[root@VM-16-5-centos ~]# ls -l
total 8
drwxr-xr-x 4 root root 4096 Nov 29 15:11 course
drwxr-xr-x 2 root root 4096 Dec 14 02:01 test

[root@VM-16-5-centos ~]# ll    // ls -l可以简写为ll
total 8
drwxr-xr-x 4 root root 4096 Nov 29 15:11 course
drwxr-xr-x 2 root root 4096 Dec 14 02:01 test
文件 = 内容 + 属性
对文件的操作就是对文件内容和属性的操作。
多出来的信息为文件的权限,修改的时间等等。
ls -a显示目录下的隐藏文件
[root@VM-16-5-centos ~]# ls -a
.  ..  .bash_history  .bash_logout  .bash_profile  .bashrc  .cache  .config  course  .cshrc  .lesshst  .pip  .pydistutils.cfg  .ssh  .tcshrc  test
.和…还有以.开头的文件都是隐藏文件,它和Windows操作系统中的下图选项类似,除非将他选中否则不会显示在用户面前。

- 同一个指令不同的选项直接可以结合起来,如:
ls -a -l == ls -la
[root@VM-16-5-centos ~]# ls -l -a
total 76
dr-xr-x---.  8 root root  4096 Dec 14 02:01 .
dr-xr-xr-x. 20 root root  4096 Dec 14 02:25 ..
-rw-------   1 root root 15044 Dec 14 02:25 .bash_history
-rw-r--r--.  1 root root    18 Dec 29  2013 .bash_logout
-rw-r--r--.  1 root root   176 Dec 29  2013 .bash_profile
-rw-r--r--.  1 root root   176 Dec 29  2013 .bashrc
drwxr-xr-x   4 root root  4096 Dec 12 03:34 .cache
drwxr-xr-x   3 root root  4096 Nov  2 23:11 .config
drwxr-xr-x   4 root root  4096 Nov 29 15:11 course
-rw-r--r--.  1 root root   100 Dec 29  2013 .cshrc
-rw-------   1 root root   134 Nov 29 16:37 .lesshst
drwxr-xr-x   2 root root  4096 Jul 25 17:53 .pip
-rw-r--r--   1 root root    73 Nov  2 23:04 .pydistutils.cfg
drwx------   2 root root  4096 Nov  2 23:04 .ssh
-rw-r--r--.  1 root root   129 Dec 29  2013 .tcshrc
drwxr-xr-x   2 root root  4096 Dec 14 02:01 test
[root@VM-16-5-centos ~]# ls -la
total 76
dr-xr-x---.  8 root root  4096 Dec 14 02:01 .
dr-xr-xr-x. 20 root root  4096 Dec 14 02:25 ..
-rw-------   1 root root 15065 Dec 14 02:25 .bash_history
-rw-r--r--.  1 root root    18 Dec 29  2013 .bash_logout
-rw-r--r--.  1 root root   176 Dec 29  2013 .bash_profile
-rw-r--r--.  1 root root   176 Dec 29  2013 .bashrc
drwxr-xr-x   4 root root  4096 Dec 12 03:34 .cache
drwxr-xr-x   3 root root  4096 Nov  2 23:11 .config
drwxr-xr-x   4 root root  4096 Nov 29 15:11 course
-rw-r--r--.  1 root root   100 Dec 29  2013 .cshrc
-rw-------   1 root root   134 Nov 29 16:37 .lesshst
drwxr-xr-x   2 root root  4096 Jul 25 17:53 .pip
-rw-r--r--   1 root root    73 Nov  2 23:04 .pydistutils.cfg
drwx------   2 root root  4096 Nov  2 23:04 .ssh
-rw-r--r--.  1 root root   129 Dec 29  2013 .tcshrc
drwxr-xr-x   2 root root  4096 Dec 14 02:01 test
-
其中每行以 - 或 d开头,它们表示的意义如下:
-表示为文件
d表示为目录 -
既然.和…是隐藏文件那它们分别所存放的是什么内容?
. 表示当前文件
… 表示上一级目录
[root@VM-16-5-centos ~]# ls .
course  test
[root@VM-16-5-centos ~]# ls ..
bin  boot  data  dev  etc  home  lib  lib64  lost+found  media  mnt  opt  proc  public  root  run  sbin  srv  sys  tmp  usr  var
ls -n:用数字的UID,GID代替名称。
UID:用户ID
GID:用户组ID
[root@VM-16-5-centos ~]# ls -l
total 8
drwxr-xr-x 4 root root 4096 Nov 29 15:11 course
drwxr-xr-x 2 root root 4096 Dec 14 02:01 test
[root@VM-16-5-centos ~]# ls -n
total 8
drwxr-xr-x 4 0 0 4096 Nov 29 15:11 course
drwxr-xr-x 2 0 0 4096 Dec 14 02:01 test
//这里我们可以清晰的看到,每个目录属性中的两个root被替换为0
这里我们就要了解一下最开始那两个root的意义:
第一个root表示用户,第二个表示用户组
它们显示为字符为root,显示为数字则是它们对应的UID和GID
ls -d:将目录象文件一样显示,而不是显示其它的文件。
[root@VM-16-5-centos ~]# ls -d    // 只显示当前目录
.
[root@VM-16-5-centos ~]# ls -d /root
/root
[root@VM-16-5-centos ~]# ls /root
course  test
[root@VM-16-5-centos ~]# ls -d ..
..
[root@VM-16-5-centos ~]# ls -d ../home
../home
2.pwd——显示当前目录的绝对值路径
语法: pwd
功能: 显示用户当前所在的目录
[root@VM-16-5-centos ~]# pwd
/root
[root@VM-16-5-centos course]# pwd
/root/course
3.cd——切换至指定目录
change directories——改变目录
语法: cd 目录名
功能: 改变工作目录。将当前工作目录改变到指定的目录下。
cd的本质就是切换路径,最开始我们已经简绍了Linux操作系统的目录结构,
而我们平常标识文件位置最好的方法就是使用路径,因为路径具有唯一性。
- 相对路径:相对于当前路径的路径,比如:…/another
…表示上一级目录,是以当前目录为基础,所以称为相对路径
使用比较麻烦,一般在某些配置文件中,对一些文件进行特殊操作时使用。 - 绝对路径:以根目录为起始点,比如上面的代码:/root
/此时就表示根目录
常用的使用路径方案
举例:
[root@VM-16-5-centos ~]# cd ..                //返回上级目录,此时为root目录,返回上一级目录为根目录‘/’
[root@VM-16-5-centos /]# cd /root/course      //绝对路径
[root@VM-16-5-centos course]# cd ../test/     //相对路径
[root@VM-16-5-centos test]# cd ~              //返回用户家目录
[root@VM-16-5-centos ~]# cd -                 //返回最近访问目录
/root/test
[root@VM-16-5-centos test]# cd ~YX            //进入其他用户的家目录
[root@VM-16-5-centos YX]#
这个命令应该是Linux中最常用的一个命令。可以通过cd命令迅速、灵活地切换到不同的工作目录。
三.文件目录管理命令
1.touch——创建空文件
语法: touch [选项]… 文件…
功能: touch命令参数可更改文档或目录的日期时间,包括存取时间和更改时间,或者新建一个不存在的文件。
常用选项:
- -a 或–time=atime或–time=assess或–time=use只更改存取时间
- -c 或–no-create,不建立任何文档。
- -d 使用指定的日期时间,而非现在的时间。
- -f 此参数将忽略不予处理,仅负责解决BSD版本touch指令的兼容性问题。
- -m 或–time=mtime或–time=modify 只要改变动时间
- -f 把指定文档或目录的日期时间,统统设成和参考文档或目录的日期时间相同。
- -t 使用指定的日期时间,而非现在的时间。
举例:
在当前路径下,创建一个普通文件。
[root@VM-16-5-centos blogs]# pwd
/root/blogs
[root@VM-16-5-centos blogs]# touch hello.c
[root@VM-16-5-centos blogs]# ll
total 0
-rw-r--r-- 1 root root 0 Dec 14 16:22 hello.c
使用相对路径创建文本
[root@VM-16-5-centos blogs]# pwd
/root/blogs
[root@VM-16-5-centos blogs]# touch ../hello.c
[root@VM-16-5-centos blogs]# cd ..
[root@VM-16-5-centos ~]# pwd
/root
[root@VM-16-5-centos ~]# ll
total 12
drwxr-xr-x 2 root root 4096 Dec 14 16:22 blogs
drwxr-xr-x 4 root root 4096 Dec 14 16:20 course
-rw-r--r-- 1 root root    0 Dec 14 16:24 hello.c
drwxr-xr-x 2 root root 4096 Dec 14 02:01 test
使用绝对路径创建文本
[root@VM-16-5-centos ~]# touch course/hello.c
[root@VM-16-5-centos ~]# ll
total 12
drwxr-xr-x 2 root root 4096 Dec 14 16:22 blogs
drwxr-xr-x 4 root root 4096 Dec 14 16:33 course
-rw-r--r-- 1 root root    0 Dec 14 16:24 hello.c
drwxr-xr-x 2 root root 4096 Dec 14 02:01 test
[root@VM-16-5-centos ~]# cd course
[root@VM-16-5-centos course]# ll
total 12
-rw-r--r-- 1 root root    0 Dec 14 16:33 hello.c
drwxr-xr-x 3 root root 4096 Nov 29 00:29 lesson3
drwxr-xr-x 3 root root 4096 Dec  8 23:25 lesson4
-rw-r--r-- 1 root root  937 Nov 29 14:20 temp.zip
2.tree——树状打印目录
语法: tree 目录名 或 直接在想要tree的目录下使用tree
功能: 以树状图的形式,显示当前目录下的所有目录和文件。
- 如果tree没有安装,却使用tree命令,Linux会产生报错消息(在Linux中这些报错消息一定要养成习惯去看)
- 此时可以在root用户下使用如下命令,安装tree
yum install -y tree
举例:
在根目录下使用tree会显示出很长的一个树状图,会出现疯狂刷屏的现象
- 这里可以使用ctrl+c——终止程序运行
 > 在普通文件下使用tree
[root@VM-16-5-centos ~]# pwd
/root
[root@VM-16-5-centos ~]# tree
.
|-- blogs
|   `-- hello.c
|-- course
|   |-- hello.c
|   |-- lesson3
|   |   |-- dir1
|   |   |   `-- file.txt
|   |   |-- file2.txt
|   |   |-- mylog.txt
|   |   |-- my.txt
|   |   |-- test.txt
|   |   |-- time.c
|   |   `-- tmp.txt
|   |-- lesson4
|   |   |-- my.txt
|   |   |-- temp
|   |   |   |-- test.c
|   |   |   |-- test.cnp
|   |   |   |-- test.py
|   |   |   |-- test.sh
|   |   |   `-- test.txt
|   |   |-- temp.tgz
|   |   `-- test.txt
|   `-- temp.zip
|-- hello.c
`-- test

7 directories, 19 files
3.mkdir——创建目录
语法: mkdir [选项] dirname …
功能: 在当前目录下创建一个名为“dirname”的目录
常用选项:
- -p,,–parents 可以是一个路径名称。此时若路径中的某些目录尚不存在,加上此选项后,系统将自动建立好那些尚不存在的目录,即一次可以建立多个目录。
举例:
创建单个目录
[root@VM-16-5-centos blogs]# pwd
/root/blogs
[root@VM-16-5-centos blogs]# mkdir test1
[root@VM-16-5-centos blogs]# ll
total 4
-rw-r--r-- 1 root root    0 Dec 14 16:22 hello.c
drwxr-xr-x 2 root root 4096 Dec 15 02:13 test1
递归创建多个目录
[root@VM-16-5-centos blogs]# mkdir -p test/d1/d2/d3/d4/d5
[root@VM-16-5-centos blogs]# ll
total 8
-rw-r--r-- 1 root root    0 Dec 14 16:22 hello.c
drwxr-xr-x 3 root root 4096 Dec 15 02:14 test
drwxr-xr-x 2 root root 4096 Dec 15 02:13 test1
[root@VM-16-5-centos blogs]# tree test
test
`-- d1
    `-- d2
        `-- d3
            `-- d4
                `-- d5

5 directories, 0 files
4.rmdir 和 rm ——删除目录
rmdir是一个与mkdir相对应的命令,mkdir是建立目录,而rmdir是删除目录,但它比较单一,只能删除空目录。
语法: rmdir [-p] [dirName]
适应对象: 具有当前目录操作权限的所有使用者。
功能: 删除空目录
常用选项:
- -p 当子目录被删除后如果父目录也变成空目录,就连父目录一起删除,
举例:
删除空目录
[root@VM-16-5-centos blogs]# cd test/d1/d2/d3/d4/
[root@VM-16-5-centos d4]# ll
total 4
drwxr-xr-x 2 root root 4096 Dec 15 02:24 d5
[root@VM-16-5-centos d4]# ll
total 4
drwxr-xr-x 2 root root 4096 Dec 15 02:24 d5
[root@VM-16-5-centos d4]# rmdir d5
[root@VM-16-5-centos d4]# ll
total 0
rmdir -p 删除目录
[root@VM-16-5-centos blogs]# tree
.
|-- hello.c
|-- test
|   `-- d1
|       `-- d2
|           `-- d3
|               `-- d4
`-- test1

6 directories, 1 file
[root@VM-16-5-centos blogs]# rmdir -p test/d1/d2/d3/d4/
[root@VM-16-5-centos blogs]# tree
.
|-- hello.c
`-- test1

1 directory, 1 file
- 如上述代码显示,使用-p删除d4后父目录d3变为空目录随之删除,之后父目录d2变为空目录如此递归删除
rm指令可以同时删除文件和目录,并且在使用特殊选项的时候可以无视目录是否为空,rm是我们经常使用的删除指令
语法: rm [-f -i -r] [dirName/dir]
适应对象: 所有使用者
功能: 删除文件或目录
常用选项:
- -f:即使删除文件为只读(即写保护),亦直接删除(强制删除命令选项),不提示是否删除消息
- -i:删除前注意询问确认
- -r:删除目录及其下所有文件(递归删除)
注意:
- rm无法单独使用删除目录,必须配合对应的参数。但可以单独使用删除文件
- 在Linux系统中删除文件时,系统会默认向你询问是否执行删除,一般输入y表示确认,n表示否认
- 如果不想看到这种反复的确认消息,可以在rm命令后加 -f 参数来强制删除,只有在删除文件时只加 -f 有用。
- 想要删除一个目录,需要在rm后加 -r ,否则删不掉
- 同理,单独使用 -r 依然会出现提示消息,此时可以在加 -f 强制删除。
举例:
rm -r 文件名: 递归删除,目录(包括非空目录)
- 使用-r命令无法直接强制删除目录或文件,需要在输入命令后在输入y表面确定删除
[root@VM-16-5-centos blogs]# tree
.
|-- d1
|   `-- d2
|       `-- d3
|           `-- d4
|               `-- d5
|-- hello.c
`-- test1

6 directories, 1 file
[root@VM-16-5-centos blogs]# rm -r d1         //删除目录
rm: descend into directory ‘d1’? y
rm: descend into directory ‘d1/d2’? y
rm: descend into directory ‘d1/d2/d3’? y
rm: descend into directory ‘d1/d2/d3/d4’? y
rm: remove directory ‘d1/d2/d3/d4/d5’? y
rm: remove directory ‘d1/d2/d3/d4’? y
rm: remove directory ‘d1/d2/d3’? y
rm: remove directory ‘d1/d2’? y
rm: remove directory ‘d1’? y
[root@VM-16-5-centos blogs]# tree
.
|-- hello.c
`-- test1

1 directory, 1 file
[root@VM-16-5-centos blogs]# rm hello.c       //删除文件
rm: remove regular empty file ‘hello.c’? y
[root@VM-16-5-centos blogs]# tree
.
`-- test1

1 directory, 0 files
rm -rf:强制删除,不会出现提示,询问是否删除
[root@VM-16-5-centos blogs]# tree
.
|-- d1
|   `-- d2
|       `-- d3
|           `-- d4
|               `-- d5
|-- test1
`-- test.c

6 directories, 1 file
[root@VM-16-5-centos blogs]# rm -rf d1
[root@VM-16-5-centos blogs]# rm -rf test.c
[root@VM-16-5-centos blogs]# tree
.
`-- test1

1 directory, 0 files
- 这里可以很清楚的看到,使用**-rf**后没有提示消息出现。
这里要注意一点在,删除文件时,哪怕用户对这个文件没有没有删除的权力,依然可以使用rm -rf命令删除文件
这显然是不合理的,解决这个问题的方法为粘滞位,在之后的其他该系列博客中会,大家要是感兴趣也可以去搜一下
//这里我们先进入YX用户的家命令,并以root的身份创建一个文件。
//这个文件是属于root的,其他用户没有权利删除
[root@VM-16-5-centos home]# cd YX
[root@VM-16-5-centos YX]# touch test.c
[root@VM-16-5-centos YX]# ll
total 4
drwxrwxr-x 5 YX   YX   4096 Dec  9 17:12 bit
-rw-r--r-- 1 root root    0 Dec 15 03:38 test.c
//我们在以YX用户的身份进入他的家目录,并删除test.c文件
//我们可以看到,系统提示是否要删除这个写保护的文件,输入y后,删除成功
[YX@VM-16-5-centos ~]$ ll
total 4
drwxrwxr-x 5 YX   YX   4096 Dec  9 17:12 bit
-rw-r--r-- 1 root root    0 Dec 15 03:38 test.c
[YX@VM-16-5-centos ~]$ rm test.c
rm: remove write-protected regular empty file ‘test.c’? y
[YX@VM-16-5-centos ~]$ ll
total 4
drwxrwxr-x 5 YX YX 4096 Dec  9 17:12 bit
----------------------------------------------------------
//也可以使用-f参数,不显示提示消息直接删除写保护的文件。
[YX@VM-16-5-centos ~]$ ll
total 4
drwxrwxr-x 5 YX   YX   4096 Dec  9 17:12 bit
-rw-r--r-- 1 root root    0 Dec 15 03:43 test.c
[YX@VM-16-5-centos ~]$ rm -f test.c
[YX@VM-16-5-centos ~]$ ll
total 4
drwxrwxr-x 5 YX YX 4096 Dec  9 17:12 bit
5.cp——拷贝文件或目录
语法: cp [选项] 源文件或目录 目标文件或目录
功能: cp —— copy,复制文件或目录
说明: cp指令用于复制文件或目录,如同时指定两个以上的文件或目录,且最后的目的地是一个已存在的目录,则它会把前面指定的所有文件或目录复制到此目录中,若同时指定多个文件或目录,而最后的目的地并非一个已存在的目录,则会出现错误信息。
常见选项:
- -f 或 --force 强行复制文件或目录,不论目标文件或目录是否已经存在
- -i 或 --interactive 覆盖文件之前先询问用户
- -r 递归处理,将指定目录下的文件与子目录一并处理。若源文件或目录的形态,不属于目录或符号链接,则一律视为普通文件处理
- -R 或 --recursive递归处理,将指定目录下的文件及子目录一并处理
举例:
cp 文件名 路径:不使用参数,只能拷贝文件,无法拷贝目录
//将test.c文件拷贝到test1目录中
[root@VM-16-5-centos blogs]# ll
total 4
drwxr-xr-x 2 root root 4096 Dec 15 15:37 test1
-rw-r--r-- 1 root root    0 Dec 15 15:37 test.c
[root@VM-16-5-centos blogs]# tree
.
|-- test1
`-- test.c

1 directory, 1 file
[root@VM-16-5-centos blogs]# cp test.c test
test1/  test.c
[root@VM-16-5-centos blogs]# cp test.c test1/
[root@VM-16-5-centos blogs]# tree
.
|-- test1
|   `-- test.c
`-- test.c

1 directory, 2 files
cp -r 目录名 路径:r为递归参数,递归拷贝文件,即拷贝目录
[root@VM-16-5-centos blogs]# tree
.
|-- test1
|   `-- test.c
|-- test2
`-- test.c

2 directories, 2 files
[root@VM-16-5-centos blogs]# cp -r test2 test1
[root@VM-16-5-centos blogs]# tree
.
|-- test1
|   |-- test2
|   `-- test.c
|-- test2
`-- test.c

3 directories, 2 files
cp -f 文件名 路径:强制拷贝,一般,目录下有同名文件时会给出是否覆盖的确认消息;-f为暴力,不给提示,直接覆盖
但实际操作却有一些偏差
[root@VM-16-5-centos blogs]# tree
.
|-- test1
|   |-- test2
|   |-- test3
|   `-- test.c
|-- test2
|-- test3
`-- test.c

5 directories, 2 files
[root@VM-16-5-centos blogs]# cp -f test.c test1
cp: overwrite ‘test1/test.c’? y                 //还是给出了确认消息
这是因为cp本身的问题,这里我们可以使用 alias查看它的别名:
[root@VM-16-5-centos blogs]# alias cp
alias cp='cp -i'
这里我们可以看到,cp在使用中的本质就是cp -i,所以当我们使用-f时也就是使用-f -i,而cp -i在上面我们已经见过,在覆盖文件之前先询问用户,无论是否加-f都将出现提示消息。
这里我们使用unalias指令来取消别名,来解决这个问题:
[root@VM-16-5-centos blogs]# unalias cp
取消别名后:
[root@VM-16-5-centos blogs]# tree
.
|-- test1
|   |-- test2
|   |-- test3
|   `-- test.c
|-- test2
|-- test3
`-- test.c

5 directories, 2 files
[root@VM-16-5-centos blogs]# cp -f test.c test1
[root@VM-16-5-centos blogs]#
回复别名:
[root@VM-16-5-centos blogs]# alias cp='cp -i'
[root@VM-16-5-centos blogs]# alias cp
alias cp='cp -i'
6.mv——移动文件或目录或重命名
mv命令是move的缩写,可以用来移动文件或者将文件改名(move (rename)files),是Linux系统下常用的命令,经常用来备份文件或者目录。
语法: mv [选项] 源文件或目录 目标文件或目录
功能:
- 视mv命令中第二个参数类型的不同(是目标文件还是目标目录),mv命令将文件重命名或将其移至一个新的目录中。
- 当第二个参数类型是文件时,mv命令完成文件重命名,此时,源文件只能有一个(也可以是源文件名),它将所给的源文件或目录重命名为给定的目标文件名。
- 当第二个参数时已存在的目录名时,源文件或目录参数可以有多个,mv命令将各参数指定的源文件均移至目标目录中。
剪切:
mv 文件或目录 目录
重命名:
mv
常用选项:
- -f : force强制的意思,如果目标文件已经存在,不会询问而直接覆盖
- -i : 若目标文件(destination)已经存在时,就会询问是否覆盖!
举例:
重命名
mv 文件或目录 不从在文件/目录名:重命名
[root@VM-16-5-centos blogs]# ll
total 12
drwxr-xr-x 4 root root 4096 Dec 15 15:55 test1
drwxr-xr-x 2 root root 4096 Dec 15 15:43 test2
drwxr-xr-x 2 root root 4096 Dec 15 15:55 test3
-rw-r--r-- 1 root root    0 Dec 15 15:37 test.c
[root@VM-16-5-centos blogs]# mv test1 test
[root@VM-16-5-centos blogs]# ll
total 12
drwxr-xr-x 4 root root 4096 Dec 15 15:55 test
drwxr-xr-x 2 root root 4096 Dec 15 15:43 test2
drwxr-xr-x 2 root root 4096 Dec 15 15:55 test3
-rw-r--r-- 1 root root    0 Dec 15 15:37 test.c
剪切
mv 文件或目录 其他目录 :剪切到指定路径
[root@VM-16-5-centos blogs]# mkdir test1
[root@VM-16-5-centos blogs]# tree
.
|-- test
|   `-- test.c
|-- test1
`-- test.c

2 directories, 2 files
[root@VM-16-5-centos blogs]# mv test1 test
[root@VM-16-5-centos blogs]# tree
.
|-- test
|   |-- test1
|   `-- test.c
`-- test.c

2 directories, 2 files
剪切+重命名
mv 文件或目录 不从在文件/目录名+其他目录:剪切+重命名
[root@VM-16-5-centos blogs]# tree
.
|-- test
|   |-- test1
|   `-- test.c
`-- test.c

2 directories, 2 files
[root@VM-16-5-centos blogs]# mv test.c test/test1.c
[root@VM-16-5-centos blogs]# tree
.
`-- test
    |-- test1
    |-- test1.c
    `-- test.c

2 directories, 2 files
四.文本文件编辑命令
这一类的知识比较杂,需要配合着重定向等知识来讲解,我将这一块的知识整理到了另一个博客中,大家要是对这块知识了解的不够多,建议结合输入输出重定向一起学习。
1.echo——输入内容到控制台
语法: echo 字符串 或 echo 字符串 > 文件名
功能: 向显示器打印—写入到显示文件 或 配合重定向向文件打印
举例:
向显示器打印
[root@VM-16-5-centos blogs]# echo "hello world"
hello world
[root@VM-16-5-centos blogs]# echo hello world
hello world
向文件打印
[root@VM-16-5-centos blogs]# echo hello > test.c
[root@VM-16-5-centos blogs]# cat test.c    // 查看文件内数据
hello
使用输出重定向,向文件test.c中输出数据。
2.nano——编写文本软件
语法: nano 文件名
功能: 在Linux上使用文件编写代码
nano指令需要通过以下命令安装后方可使用
yum install -y nano
举例:
nano 文件名:对文件进行编辑
- 如果nano后的文件不存在,仍然会进入文件编程并保存该文件。
[root@VM-16-5-centos blogs]# touch test1.c
[root@VM-16-5-centos blogs]# nano test1.c
注意:编写程序时右边的小键盘不能使用。

编写好后,使用ctrl+x退出

询问是否保存代码,输入“y”(保存),“n”(不保存),“c”(取消),按回车退出
编译刚刚写好的代码,并输出:
[root@VM-16-5-centos blogs]# gcc test1.c                //使用gcc编译器对test.c进行编译
[root@VM-16-5-centos blogs]# ll
total 16
-rwxr-xr-x 1 root root 8360 Dec 17 01:17 a.out          //a.out为test1.c生产的可执行文件
-rw-r--r-- 1 root root   76 Dec 17 01:17 test1.c
[root@VM-16-5-centos blogs]# ./a.out                    //执行当前路径下的a.out程序
hello world!
3.cat——查看文件内容
语法: cat [选项] [文件]
功能: 查看目标文件的内容(内容较少的)
常见选项:
- -b 对非空输出行编号
- -n 对输出的所有行编号
- -s 不输出多行空行
了解:
Linux系统中有多个用于查看文本内容的命令,每个命令都有自己的特点,比如 cat命令就适合用于查看内容较少的纯文本文件的。cat这个命令也很好记,在英语中cat时“猫”的意思,猫是不是给你一种较小、可爱的感觉呢?

举例:
我们先nano一个文件向其加入数据,在使用cat查看
[root@VM-16-5-centos blogs]# nano test.c
[root@VM-16-5-centos blogs]# cat test.c
aaaaaaa
bbbbbbb

cccccccc
dddddddd


eeeeeeeeee
aaaaaaa
cccccccc
aaaaaaaaaaaaa
rrrrrr
cat -s 文件名:省略多余空行,输出内容时,如果两个字符串之间隔着多个空行,只输出一个空行
[root@VM-16-5-centos blogs]# cat -s test.c
aaaaaaa
bbbbbbb

cccccccc
dddddddd

eeeeeeeeee
aaaaaaa
cccccccc
aaaaaaaaaaaaa
rrrrrr
cat -sn 文件名:-n为对输出行进行编号, -sn为省略空行打印行数
[root@VM-16-5-centos blogs]# cat -sn test.c
     1	aaaaaaa
     2	bbbbbbb
     3
     4	cccccccc
     5	dddddddd
     6
     7	eeeeeeeeee
     8	aaaaaaa
     9	cccccccc
    10	aaaaaaaaaaaaa
    11	rrrrrr
    12
只输入cat,后面不加文件,默认从键盘中读取数据

- 使用ctrl+c退出cat输出
cat < 文件名:输入重定向,将文件内容输入到cat,并打印
[root@VM-16-5-centos blogs]# cat < test.c     //通过输入重定向读取数据
aaaaaaa
bbbbbbb

cccccccc
dddddddd


eeeeeeeeee
aaaaaaa
cccccccc
aaaaaaaaaaaaa
rrrrrr


[root@VM-16-5-centos blogs]# cat test.c      //直接读取数据
aaaaaaa
bbbbbbb

cccccccc
dddddddd


eeeeeeeeee
aaaaaaa
cccccccc
aaaaaaaaaaaaa
rrrrrr
- 代码中两种读取方法都可以,读取的结果相同,但它们所完成结果的方式不同。
由上述两个例子可知,输入重定向就是改变从键盘上读取数据的方式,改为从其他文件中读取数据。
4.more——查看文件内容
语法: more [选项] [文件]
功能: more命令,功能类似cat,用于查看纯文本文件(内容较多的)
常用选项:
- -n 对输出的所有行编号
- -q 退出more
在使用more之前,我们先写一个命令行脚本:
[root@VM-16-5-centos blogs]# touch test.txt
[root@VM-16-5-centos blogs]# cnt=0; while [ $cnt -le 1000 ]; do echo "hello $cnt"; let cnt++; done > mylog.txt
向test.txt文件中写入 hello 1 ~ hello 1000
使用cat查看一下该文件:

如上图所示,当查看内容较多的文本时,“小猫咪”cat就已经不在适合了。使用cat命令阅读长篇的文本内容时,信息就会在屏幕上快速翻滚,导致自己还没有来得及看到,内容就已经翻篇了。因此对于长篇的文本内容,推荐使用 more 命令来查看。
举例:
more 文件名:从头部查看文本内容,按回车逐行阅读

- 加入一个more文件,从第一行开始显示,按q退出该文件。
- more命令会在最下面使用百分比的形式来提示已经阅读了多少内容。
- 可以使用空格键(每次向下翻12行)或回车键(每次向下1行)向下翻页。
- 该指令只能向下无法向上。
5.less——查看文件内容
语法: less [参数] 文件
功能:
- less工具也是对文件或其它输出就行分页显示的工具,应该说是Linux正统查看文件内容的工具,功能及其强大。
- less在查看之前不会加载整个文件。
- less的语法比起more更加有弹性。在more的时候,我们并没有办法向前面翻,只能往后面看,但使用less可以随意浏览文件。
- 但若使用了less时,就可以使用 ↑、 ↓ 等按键的功能来往前往后翻看文件,更容易用来查看一个文件的内容!
- 除此之外,在less里头可以拥有更多的搜素功能,不止可以向下搜,也可以向上搜。
选项:
- -i:忽略搜素时的大小写
- -N:显示每行的行号
- /字符串:向下搜素”字符串“的功能
- ?字符串:向上搜素”字符串“的功能
- n:重复前一个搜素(与/或?有关)
- N:反向重复前一个搜素(与/或?有关)
- q:quit(退出)
举例:
less 文件名:查看文件内容支持上下翻阅

↑ 向上翻阅,↓ 向下翻阅,q 退出
使用 / 和 ? 在文件中查找,并使用 n 重复上一个搜索

- 如上图所示,第一次使用 ? 9 查找后,使用n,给出Pattern not found(press RETURN),因为此时的9已经是最上方的9,无法在搜索。
- 之后使用 / 9 查找,使用n,文件向下查找。
- 之后使用 ? 9 查找,使用n,文件向上查找。
小结论:
- / + n 向下查找
- ? + n 向上查找
6.head——显示文件开头
head与tail就像它的名字一样的浅显易懂,它是用来显示开头和结尾某个数量的文字区块,head用来显示档案的开头至标准输出中,而tail就是看档案的结尾。
语法: head [参数]… [文档]…
功能: head用来显示文档的开头至标准输出中,默认head命令命令打其相应文件的开头10行
选项:
- -n<行数> 显示的行数
举例:
head -5 test.txt:查看文件中前5行的内容
[root@VM-16-5-centos blogs]# head -5 test.txt
hello 0
hello 1
hello 2
hello 3
hello 4
[root@VM-16-5-centos blogs]#
7.tail——显示文件结尾
tail命令从指定点开始将文件写到标准输出,使用tail命令的-f选项可以方便的查阅正在改变的日志文件,tail -f filename会把filename里最尾部的内容显示在屏幕上,并且不但刷新,使你看到最新的文件内容。
语法: tail [必要参数] [选择参数] [文件]
功能: 用于显示指点文件末尾内容,不指定文件时,作为输入信息进行处理。常用查看日志文件,默认查看后10行的内容
选项:
- -f 循环读取
- -n<行数> 显示行数
举例:
tail -5 test.txt:查看文件中后5行的内容
[root@VM-16-5-centos blogs]# tail -10 test.txt
hello 991
hello 992
hello 993
hello 994
hello 995
hello 996
hello 997
hello 998
hello 999
hello 1000
我们既然学习了head和tail指令,知道一个文件的头和尾如何去查找,那我们如何直接查找一个文件中间的行数。这里有两个方法:
方法1:管道符
这里就需要用到管道符命令 |,管道命令符的作用可以用一句话来概括“把前一个命令原本要输出到屏幕的数据当作时最后一个命令的标准输入”,就是当第一个管道符前的命令执行完之后,不输出,将结果用于第一个管道符之后的指令。
head -500 test.txt | tail -10 :查看第490行到500行的内容
[root@VM-16-5-centos blogs]# head -500 test.txt | tail -10
hello 490
hello 491
hello 492
hello 493
hello 494
hello 495
hello 496
hello 497
hello 498
hello 499
- 我们先查看前500行的内容,在将着500行的内容看作一个文件,经由管道符,传向下一个指令,查看后10行的内容。
方法2:输出重定向 + 中间文件
如果对输出重定向不熟悉,可以查看这篇博客:输入输出重定向
查看第490行到500行的内容
[root@VM-16-5-centos blogs]# head -500 test.txt > mylog.txt
[root@VM-16-5-centos blogs]# tail -10 mylog.txt
hello 490
hello 491
hello 492
hello 493
hello 494
hello 495
hello 496
hello 497
hello 498
hello 499
- 向将文件的前500行内容放入mylog.txt文件,在查看mylog.txt文件的后十行,得到最终结果。
8.wc——统计文件内容
语法: wc [-lwm]
功能: 统计文件的行数、单词数、字节数
选项:
- -l 仅列出行数
- -w 仅列出单词数
- -m 仅列出字节数
扩展:
每次看到这个命令,我总联系到一种公共设施,即使两者毫无关系。如果为了方便自己记住这个命令的作用,也可以联想到上厕所时好无聊,无聊到数完了手中杂志上有多少行字。
举例:
wc 文件名 :显示文本文件的行数、单词数和字节数
[root@VM-16-5-centos blogs]# cat test.c
a sadd
sad
[root@VM-16-5-centos blogs]# wc test.c
 2  3 11 test.c
在Linux系统中,passwd是用来保存系统账户信息的文件,要统计当前系统中有多少个用户,可以使用下面的命令来进行查询。
wc -l /etc/passwd :显示文本文件的行数
[root@VM-16-5-centos blogs]#  wc -l /etc/passwd
28 /etc/passwd
9.stat——获取文件属性
语法: stat 文件名
功能: 获取文件的所有属性,如具体存储信息和时间等信息。
举例:
stat 文件名 :获取文件信息
[root@VM-16-5-centos blogs]# stat test.c
  File: ‘test.c’
  Size: 11        	Blocks: 8          IO Block: 4096   regular file
Device: fd01h/64769d	Inode: 786515      Links: 1
Access: (0644/-rw-r--r--)  Uid: (    0/    root)   Gid: (    0/    root)
Access: 2022-12-19 02:34:08.786214892 +0800
Modify: 2022-12-19 02:34:07.945218407 +0800
Change: 2022-12-19 02:34:07.945218407 +0800
 Birth: -
- 访问时间 (Access):最近访问文件内容时间,比如 cat、vim、less;
- 修改时间 (Modify):最近修改文件内容时间,比如 nano、vim;
- 状态改动时间 (Change):最近更改文件属性的时间,包括文件名、大小、内容、权限、属主、属组等,比如 nano/vim (文件大小改变),
10.sort——排序
语法: sort [选项] 文件名
功能: 对文件中的数据按ASCII码表排序,先比较第一个字符,第一个相等比较第二个,依此类推。
选项:
- -r 倒序输出到屏幕
举例:
sort 文件名 :对文件进行排序
[root@VM-16-5-centos blogs]# cat test.c
1111
2222
333
6666
777

444444
36666
78888


[root@VM-16-5-centos blogs]# sort test.c


1111
2222
333
36666
444444
6666
777
78888
11.uniq——去重
语法: uniq 文件名
功能: 相邻两行数据重复时,进行去除操作
举例:
uniq 文件名 :对文件进行去重操作
[root@VM-16-5-centos blogs]# uniq test.c
1111
2222
333
6666
777

444444
36666
78888

[root@VM-16-5-centos blogs]# sort test.c | uniq

1111
2222
333
36666
444444
6666
777
78888
- 两个空行被去掉了一个
五.系统时间命令
1.date——显示时间
date指定格式显示时间语法:date + %Y:%m:%d
date语法:date [OPTION]… [+FORMAT]
1.在显示方面,使用者可以设定欲显示的格式,格式设定为一个加号后接数个标记,其中常用的标记列表如下
- %H :小时(00…23)
- %M:分钟(00…59)
- %S:秒(00…61)
- %X:相当于%H:%M:%S
- %d:日(01…31)
- %m:月份(01…12)
- %Y:完整年份(0000…9999)
- %F:相当于%Y - %m -%d
2.在设定时间方面
- date -s //设置当前时间,只有root权限才能设置,其他只能查看
- date -s 20080523 //设置成20080523,这样会把具体时间设置成空00:00:00
- date -s 01:01:01 //设置具体时间,不会对日期做更改
- date -s “01:01:01 2008-05-23” //这样可以设置全部时间
- date -s “01:01:01 20080523” //这样可以设置全部时间
- date -s “2008-05-23 01:01:01” //这样可以设置全部时间
- date -s “20080523 01:01:01” //这样可以设置全部时间
3.时间戳
时间->时间戳: date +%s
时间戳->时间: date -d@1508749502
Unix时间戳(英文为Unix epoch, Unix time, POSIX time 或 Unix timestamp)是从1970年1月1日(UTC/GMT的午夜)开始所经过的秒数,不考虑闰秒
举例:
date + :显示时间
[root@VM-16-5-centos lesson3]# date
Mon Nov 28 23:20:38 CST 2022
[root@VM-16-5-centos lesson3]# date +%Y
2022
[root@VM-16-5-centos lesson3]# date +%Y-%m
2022-11
[root@VM-16-5-centos lesson3]# date +%Y-%m-%d
2022-11-28
[root@VM-16-5-centos lesson3]# date +%Y-%m:%d
2022-11:28
[root@VM-16-5-centos lesson3]# date +%Y-%m/%d
2022-11/28
[root@VM-16-5-centos lesson3]# date +%Y-%m-%d/%H:%M:%S
2022-11-28/23:25:16
date +%s :显示时间戳
[root@VM-16-5-centos lesson3]# date +%s
1669649722
[root@VM-16-5-centos lesson3]# date +%s
1669649726
[root@VM-16-5-centos lesson3]# date +%s
1669649727
[root@VM-16-5-centos lesson3]# date +%s
1669649729
[root@VM-16-5-centos lesson3]# date +%s
1669649730
[root@VM-16-5-centos lesson3]# date +%s
1669649731
- 时间戳是特定时间累积的秒数
date -d :时间戳转换
[root@VM-16-5-centos lesson3]# date -d @1508749502
Mon Oct 23 17:05:02 CST 2017
[root@VM-16-5-centos lesson3]# date +%Y-%m-%d/%H:%M:%S -d @1508749502
2017-10-23/17:05:02
2.cal——查看日历
cal命令可以用来显示公历(阳历)日历。公历是现在国际通用的历法,又称格列历,通称阳历。“阳历”又称“太阳历”,系已地球绕行太阳一周为一年,为西方各国所通用,故又名“西历”。
语法: cal [参数] [月份] [年份]
功能: 用于查看日历等时间信息,如只有一个参数,则表示年份(1-9999),如有两个参数,则表示月份和年份
常用选项:
- -3 显示系统前一个月,当前月,下一个月的月历
- -j 显示在当年中的第几天(一年日期按天算,从1月1号算起,默认显示当前月再一年中的天数)
- -y 显示当前年份的日期
举例:
cal :查看当月日历
[root@VM-16-5-centos blogs]# cal
    December 2022
Su Mo Tu We Th Fr Sa
             1  2  3
 4  5  6  7  8  9 10
11 12 13 14 15 16 17
18 19 20 21 22 23 24
25 26 27 28 29 30 31
cal 2000 :查看2000年全年的日历
[root@VM-16-5-centos blogs]# cal 2000
                               2000

       January               February                 March
Su Mo Tu We Th Fr Sa   Su Mo Tu We Th Fr Sa   Su Mo Tu We Th Fr Sa
                   1          1  2  3  4  5             1  2  3  4
 2  3  4  5  6  7  8    6  7  8  9 10 11 12    5  6  7  8  9 10 11
 9 10 11 12 13 14 15   13 14 15 16 17 18 19   12 13 14 15 16 17 18
16 17 18 19 20 21 22   20 21 22 23 24 25 26   19 20 21 22 23 24 25
23 24 25 26 27 28 29   27 28 29               26 27 28 29 30 31
30 31
        April                   May                   June
Su Mo Tu We Th Fr Sa   Su Mo Tu We Th Fr Sa   Su Mo Tu We Th Fr Sa
                   1       1  2  3  4  5  6                1  2  3
 2  3  4  5  6  7  8    7  8  9 10 11 12 13    4  5  6  7  8  9 10
 9 10 11 12 13 14 15   14 15 16 17 18 19 20   11 12 13 14 15 16 17
16 17 18 19 20 21 22   21 22 23 24 25 26 27   18 19 20 21 22 23 24
23 24 25 26 27 28 29   28 29 30 31            25 26 27 28 29 30
30
        July                  August                September
Su Mo Tu We Th Fr Sa   Su Mo Tu We Th Fr Sa   Su Mo Tu We Th Fr Sa
                   1          1  2  3  4  5                   1  2
 2  3  4  5  6  7  8    6  7  8  9 10 11 12    3  4  5  6  7  8  9
 9 10 11 12 13 14 15   13 14 15 16 17 18 19   10 11 12 13 14 15 16
16 17 18 19 20 21 22   20 21 22 23 24 25 26   17 18 19 20 21 22 23
23 24 25 26 27 28 29   27 28 29 30 31         24 25 26 27 28 29 30
30 31
       October               November               December
Su Mo Tu We Th Fr Sa   Su Mo Tu We Th Fr Sa   Su Mo Tu We Th Fr Sa
 1  2  3  4  5  6  7             1  2  3  4                   1  2
 8  9 10 11 12 13 14    5  6  7  8  9 10 11    3  4  5  6  7  8  9
15 16 17 18 19 20 21   12 13 14 15 16 17 18   10 11 12 13 14 15 16
22 23 24 25 26 27 28   19 20 21 22 23 24 25   17 18 19 20 21 22 23
29 30 31               26 27 28 29 30         24 25 26 27 28 29 30
                                              31
C语言在时间戳上的使用
[root@VM-16-5-centos lesson3]# cat time.c
#include<stdio.h>

int main()
{


	printf("time:%u\n",(unsigned int)time(NULL));
	return 0;
}
[root@VM-16-5-centos lesson3]# gcc time.c   //使time.c变为可执行文件
[root@VM-16-5-centos lesson3]# ./a.out      //a.out为生产的可执行文件,./a.out为执行当前目录下的a.out文件
time:1669652597
[root@VM-16-5-centos lesson3]# ./a.out
time:1669652754
[root@VM-16-5-centos lesson3]# ./a.out
time:1669652755
[root@VM-16-5-centos lesson3]# ./a.out
time:1669652756
[root@VM-16-5-centos lesson3]# ./a.out
time:1669652757
[root@VM-16-5-centos lesson3]# ./a.out
time:1669652757
六.文本文件搜索命令
在查找大型的文件时,我们可以将以下的一些命令与Linux自带的正则表达式库相结合,可以达到更高的效率。
1.man——查看某个命令的帮助手册
Linux的命令有很多参数,我们不可能全记住,我们可以通过查看联机手册获取帮助。访问Linux手册页的命令是man
语法: man [选项] 命令
功能: man 指令可以查阅 Linux 的联机手册
常见选项:
- -k 根据关键字搜素联机帮助
- num 只在第num章节找
- -a 将所有章节的都显示出来,比如man、printf它缺省从第一章开始搜素,知道就停止,用a选项,当按下q退出,他会继续往后面搜素,直到所有章节都搜素完毕。
常用按键及用途:
| 按键 | 用途 |
|---|---|
| 空格键 | 向下翻一页 |
| ↑ | 向下翻一页 |
| ↓ | 向上翻一页 |
| home | 直接前往首页 |
| end | 直接前往尾页 |
| / | 从上至下搜索某个关键词,如“/linux” |
| ? | 从下至上搜索某个关键词,如“?linux” |
| n | 定位到下一个搜索到的关键词 |
| N | 定位到上一个搜索到的关键词 |
| q / ctrl+z | 退出帮助文档 |
安装man
一般我们要使用man指令,需要先在root用户下通过下面命令安装:
yum intall -y man-pages
查找手册:
我们先使用man来查看man本身,看看man指令是如何使用的:

查找手册介绍:
| 序号 | 英文 | 中文 |
|---|---|---|
| 1☆ | Executable programs or shell commands | 普通的命令 |
| 2☆ | System calls (functions provided by the kernel) | 系统调用 |
| 3☆ | Library calls (functions within program libraries) | (C语言)库函数 |
| 4 | Special files (usually found in /dev) | 特殊文件 |
| 5 | File formats and conventions, e.g. /etc/passwd | 文件格式 |
| 6 | Games | 游戏 |
| 7☆ | Miscellaneous (including macro packages and conventions), e.g. man(7), groff(7) | 附件和变量 |
| 8 | System administration commands (usually only for root) | 系统管理命令(通常为root使用) |
| 9 | Kernel routines [Non standard] | 内核例程(非标准) |
注意:☆为常用手册
信息结构及意义:
一般来讲,使用man命令查看到的帮助内容信息都会很长很多,如果读者不了解帮助文档信息的目录结构和操作方法,咋一看到这么多的信息可能会感到相当困惑。
man alias:产看alias指令。(随便查看一个指令,引出信息结构)

所以有了下面的信息结构和信息,分别大家更方便的查找内容。
| 结构名称 | 代表意义 |
|---|---|
| NAME | 命令的名称 |
| SYNOPSIS | 参数的大致使用方法 |
| DESCRIPTION | 介绍说明 |
| EXAMPLES 演示 | (附带简单说明) |
| OVERVIEW | 概述 |
| DEFAULTS | 默认的功能 |
| OPTIONS | 具体的可用选项(带介绍) |
| ENVIRONMENT | 环境变量 |
| FILES | 用到的文件 |
| SEE ALSO | 相关的资料 |
| HISTORY | 维护历史与联系方式 |
举例:
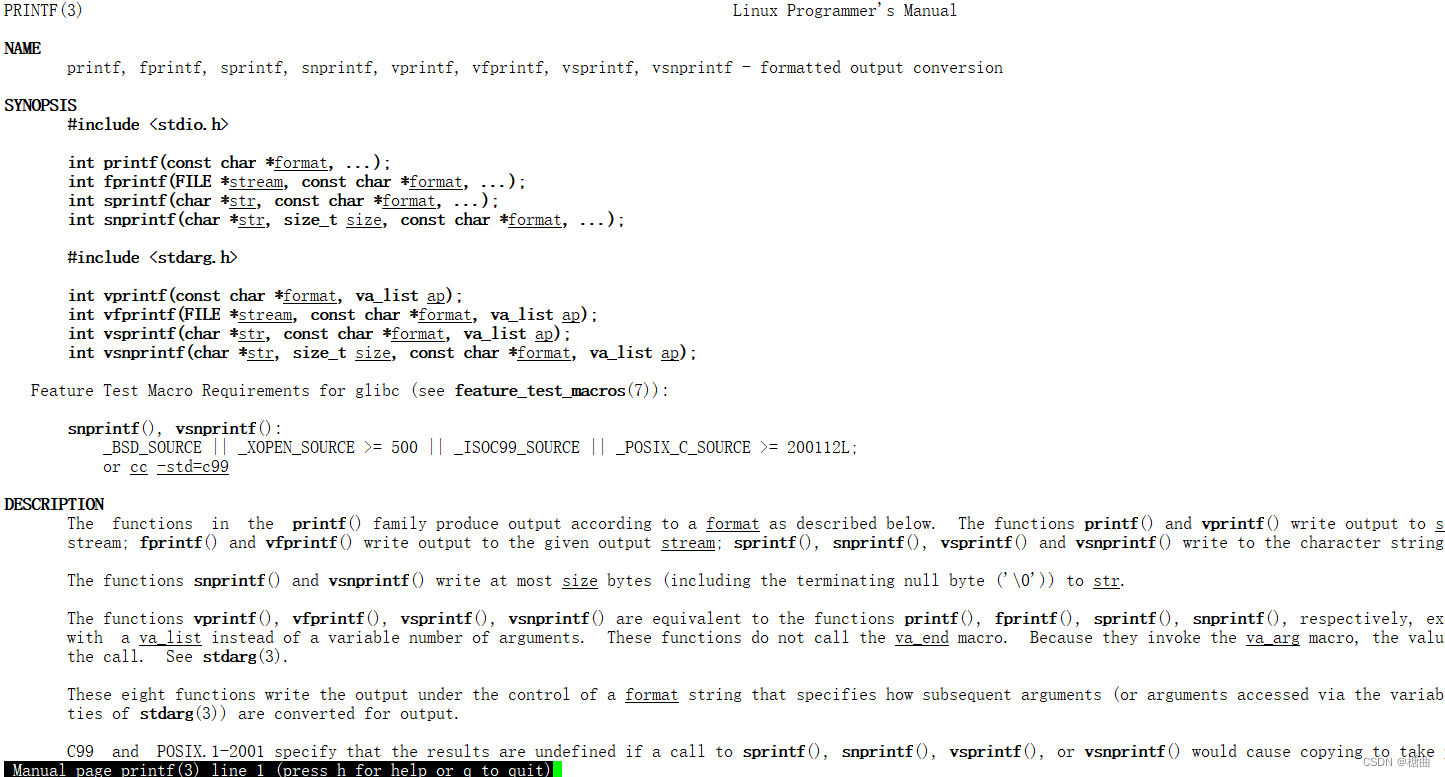
man printf:查找printf函数

如图所示,这很明显是一个指令,而非我们要找的函数。
这是因为Linux下也有printf指令,在1号手册中。
在Linux下调用printf指令
[YX@VM-16-5-centos ~]$ printf "%d:%s\n" 1 "hello world"
1:hello world
man 3 printf:在三号手册中查找printf函数
2.find——查找文件
- Linux下find命令在目录结构中搜素文件,并执行指定的操作。
- Linux下find命令提供了相当多的查找条件,功能很强大。由于find具有强大的功能,所以它的选项也很多,其中大部分选项都值得我们花时间来了解。
- 即使系统中含有网络文件系统(NFS),find命令在该文件系统中同样有效,只要你具有相应的权限。
- 在运行一个非常消耗资源的find命令时,很多人都倾向于把他放在后台执行,因为遍历一个大的文件系统可能会花费很长的时间(这里指30G自己以上的文件系统)。
语法: find pathname -options
功能: 用于在文件树中查找文件,并作出相应的处理(可能访问磁盘)
常用选项:
- -name 按照文件名查找文件。
举例:
在Linux下使用find查找文件
[root@VM-16-5-centos course]# ll
total 12
-rw-r--r-- 1 root root    0 Dec 14 16:33 hello.c
drwxr-xr-x 3 root root 4096 Nov 29 00:29 lesson3
drwxr-xr-x 3 root root 4096 Dec  8 23:25 lesson4
-rw-r--r-- 1 root root  937 Nov 29 14:20 temp.zip
[root@VM-16-5-centos course]# find lesson3        //lesson3目录在该目录下,在该目录下使用find无须在使用选项,所得内容很详细
lesson3
lesson3/time.c
lesson3/mylog.txt
lesson3/test.txt
lesson3/my.txt
lesson3/file2.txt
lesson3/tmp.txt
lesson3/dir1
lesson3/dir1/file.txt
[root@VM-16-5-centos course]# cd ~
[root@VM-16-5-centos ~]# find lesson3             //再root的家目录下查找,不使用选项,无法找到
find: ‘lesson3’: No such file or directory
[root@VM-16-5-centos ~]# find -name lesson3       //使用选项可以找到所找目录的路径
./course/lesson3
3.witch——定位指令路径
功能: 搜索特定指令的位置
举例:
[root@VM-16-5-centos lesson3]# which pwd
/usr/bin/pwd
[root@VM-16-5-centos lesson3]# which ll
alias ll='ls -l --color=auto'
	/usr/bin/ls
[root@VM-16-5-centos lesson3]# which touch
/usr/bin/touch
4.whereis——定位文件搜索
功能: 搜索在系统默认路径下搜素指定名称的文件、程序或者指定的归档文件(压缩包)
举例:
[root@VM-16-5-centos lesson3]# whereis ls
ls: /usr/bin/ls /usr/share/man/man1/ls.1.gz /usr/share/man/man1p/ls.1p.gz
[root@VM-16-5-centos lesson3]# whereis my
my: /etc/my.cnf
- find、witch、whereis是Linux中的搜素三剑客
- 这些指令是用C语言写的,写好的C语言编译后形成的可执行文件,我们使用指令,就是使用它们的可执行文件。
5.grep——搜索字符串并打印
语法: grep [选项] 搜索字符串 文件
功能: 在文件中搜素字符串,将找到的行打印出来
常用选项:
- -b: 将可执行文件(binary)当作文本文件(text)来搜索
- -c:仅显示找到的行数
- -l:查询多文件时只输出包含匹配字符的文件名
- -i:忽略大小写的不同,所以大小写视为相同
- -n:输出行号
- -v:反向选择,即显示出没有‘搜素字符串’内容的那一行
举例:
grep 搜索字符串 文本:搜索该字符串,并打印
[root@VM-16-5-centos ~]# cat my.txt
dasddq
bbbbb
cccccccc
ddddddddd
DDDDDDDDD
CCCCCCC
AAAAAA
BBBBBBBB
aaa

[root@VM-16-5-centos ~]# grep 'aaa' my.txt
aaa
grep -v 搜索字符串 文本:打印除该字符串外的其他行
[root@VM-16-5-centos ~]# grep -v 'aaa' my.txt
dasddq
bbbbb
cccccccc
ddddddddd
DDDDDDDDD
CCCCCCC
AAAAAA
BBBBBBBB
grep -i 搜索字符串 文本:无视大小写搜索并打印该字符串
[root@VM-16-5-centos ~]# grep -i 'aaa' my.txt
AAAAAA
aaa
七.压缩文件命令
1.zip/unzip——压缩/解压文件
语法: zip 压缩文件.zip 目录或文件
功能: 将目录或文件压缩成zip格式
常用选项:
- -r 递归处理,将指定目录下的所有文件和子目录一并处理
- -d 减压到指定的目录
举例:
打包—目录名
[root@VM-16-5-centos bit]# zip lesson3.zip lesson3
  adding: lesson3/ (stored 0%)
[root@VM-16-5-centos bit]# ll
total 12
drwxr-xr-x 3 root root 4096 Nov 29 00:29 lesson3
-rw-r--r-- 1 root root  166 Nov 29 13:02 lesson3.zip
drwxr-xr-x 2 root root 4096 Nov 22 19:09 lesson4
解包—目录名
[root@VM-16-5-centos bit]# mv lesson3.zip ..  //将压缩目录移至上一级目录
[root@VM-16-5-centos bit]# ll
total 8
drwxr-xr-x 3 root root 4096 Nov 29 00:29 lesson3
drwxr-xr-x 2 root root 4096 Nov 22 19:09 lesson4
[root@VM-16-5-centos bit]# cd ..
[root@VM-16-5-centos ~]# ll
total 8
drwxr-xr-x 4 root root 4096 Nov 29 13:05 bit
-rw-r--r-- 1 root root  166 Nov 29 13:02 lesson3.zip
[root@VM-16-5-centos ~]# unzip lesson3.zip     //减压压缩文件
Archive:  lesson3.zip
   creating: lesson3/
[root@VM-16-5-centos ~]# ll
total 12
drwxr-xr-x 4 root root 4096 Nov 29 13:05 bit
drwxr-xr-x 2 root root 4096 Nov 29 00:29 lesson3
-rw-r--r-- 1 root root  166 Nov 29 13:02 lesson3.zip
[root@VM-16-5-centos ~]# tree lesson3     //查看减压后,目录内的内容
lesson3             //lesson3中什么都没有,那是因为我们打包压缩的只是它的目录,而不包含其中内容

0 directories, 0 files
减压完整压缩文件
[root@VM-16-5-centos bit]# mv lesson3.zip ..   //移动压缩文件到上一级目录
[root@VM-16-5-centos bit]# ll
total 8
drwxr-xr-x 3 root root 4096 Nov 29 00:29 lesson3
drwxr-xr-x 2 root root 4096 Nov 22 19:09 lesson4
[root@VM-16-5-centos bit]# cd ..
[root@VM-16-5-centos ~]# ll
total 12
drwxr-xr-x 4 root root 4096 Nov 29 13:13 bit
-rw-r--r-- 1 root root 4571 Nov 29 13:13 lesson3.zip
[root@VM-16-5-centos ~]# unzip lesson3.zip     //减压压缩文件
Archive:  lesson3.zip
   creating: lesson3/
  inflating: lesson3/time.c
  inflating: lesson3/mylog.txt
  inflating: lesson3/test.txt
  inflating: lesson3/my.txt
 extracting: lesson3/file2.txt
  inflating: lesson3/tmp.txt
   creating: lesson3/dir1/
 extracting: lesson3/dir1/file.txt
[root@VM-16-5-centos ~]# ll
total 16
drwxr-xr-x 4 root root 4096 Nov 29 13:13 bit
drwxr-xr-x 3 root root 4096 Nov 29 00:29 lesson3
-rw-r--r-- 1 root root 4571 Nov 29 13:13 lesson3.zip
[root@VM-16-5-centos ~]# tree lesson3
lesson3
|-- dir1
|   `-- file.txt
|-- file2.txt
|-- mylog.txt
|-- my.txt
|-- test.txt
|-- time.c
`-- tmp.txt

1 directory, 7 files
- 打包:防止文件丢失
- 压缩:使用特定的算法,对我们的文件体积进行减少,以此方便再网络中传输。
减压到指定文件
[root@VM-16-5-centos bit]# unzip temp.zip -d lesson4
Archive:  temp.zip
   creating: lesson4/temp/
 extracting: lesson4/temp/test.cnp
 extracting: lesson4/temp/test.c
 extracting: lesson4/temp/test.txt
 extracting: lesson4/temp/test.py
 extracting: lesson4/temp/test.sh
2.tar——压缩/解压文件
功能: 打包/解包,不打开它,直接看内容
语法: tar [-cxtzjvf] 打包压缩后的包名 需要打包压缩的文件
常用选项:
- -c:建立一个压缩文件的参数指令(create的意思);
- -x:解开一个压缩文件的参数指令
- -t:查看tarfile里面的文件
- -z:是否同时具有gzip的属性?亦即是否需要用gzip压缩?
- -j:是否同时具有bzip2的属性?亦即是否需要用bzip2压缩?
- -v:压缩的过程中显示文件!这个常用,但不建议用在背景执行过程!
- -f:使用档名,请留意,在f之后要立即接档名!不要再加参数!
- -C:减压到指定目录
常用选项讲解:
一些必须要说的废话,建议配合下面的案例学习:
-c参数用于创建压缩文件,-x参数用于减压文件,因此这两个参数不能同时使用。
-z参数指定使用gzip格式来压缩或减压文件,-j参数指定使用bzip2格式来压缩或减压文件。用户使用时根据文件的后缀来决定应使用何种参数继续减压。
一般后缀分为三种:
.tar:只使用tar不用其他格式,此时的文件只是被打包,没有被压缩。
.tgz/.tar.gz:t—tar,gz—gaip,表示使用Gzip格式压缩的文件。
.tbz/.tar.bz:t—tar,bz—bzip2,表示使用bzip2格式压缩的文件。在执行某些压缩或减压操作时,可能需要花费数个小时,如果屏幕一直没有输出,一方面不好判断打包的进度情况,另一方面也会怀疑电脑死机了,因此推荐使用 -v 参数向用户不断显示压缩或减压过程。
-f参数特别重要,它必须放到参数的最后一位,代表要压缩或减压的软件包名称。
习惯上
压缩格式:tar -czvf 压缩包名称.tgz 要打包的目录
减压格式:tar -xzvf 压缩包名称.tgz
案例:
tar -czvf 压缩文件名 文件名:将文件压缩打包
[root@VM-16-5-centos lesson4]# tar -czvf temp.tgz temp
temp/
temp/test.cnp
temp/test.c
temp/test.txt
temp/test.py
temp/my.txt
temp/test.sh
[root@VM-16-5-centos lesson4]# ll
total 12
drwxr-xr-x 2 root root 4096 Dec 19 18:25 temp
-rw-r--r-- 1 root root 4763 Dec 19 20:28 temp.tgz
- 压缩文件名后缀 .tgz:t—tar,g—gzip压缩算法
tar -xzvf 压缩文件名:将文件减压
[root@VM-16-5-centos lesson4]# rm -rf temp               //删除temp文件,防止减压后文件覆盖,不好观察
[root@VM-16-5-centos lesson4]# tar -xzvf temp.tgz
temp/
temp/test.cnp
temp/test.c
temp/test.txt
temp/test.py
temp/my.txt
temp/test.sh
[root@VM-16-5-centos lesson4]# tree temp
temp
|-- my.txt
|-- test.c
|-- test.cnp
|-- test.py
|-- test.sh
`-- test.txt

0 directories, 6 files
tar -ztvf 压缩文件名:查看压缩文件内有那些文件
[root@VM-16-5-centos lesson4]# tar -ztvf temp.tgz
drwxr-xr-x root/root         0 2022-12-19 18:25 temp/
-rw-r--r-- root/root         0 2022-11-29 14:17 temp/test.cnp
-rw-r--r-- root/root         0 2022-11-29 14:17 temp/test.c
-rw-r--r-- root/root        15 2022-11-29 14:18 temp/test.txt
-rw-r--r-- root/root         0 2022-11-29 14:17 temp/test.py
-rw-r--r-- root/root     19378 2022-11-29 16:37 temp/my.txt
-rw-r--r-- root/root         0 2022-11-29 14:17 temp/test.sh
- 由于我们使用 gzip 压缩,所以要查阅该 tar file 内的文件时,就得要加上 z 这个参数了!这很重要的(虽然不加可以得到同样的效果)
tar -xzf 压缩文件 -C 路径:将压缩文件减压到指定路径
[root@VM-16-5-centos lesson4]# tar -xzf temp.tgz -C ..
[root@VM-16-5-centos lesson4]# ll
total 12
drwxr-xr-x 2 root root 4096 Dec 19 18:25 temp
-rw-r--r-- 1 root root 4763 Dec 19 18:27 temp.tgz
[root@VM-16-5-centos lesson4]# cd ..
[root@VM-16-5-centos course]# ll
total 12
-rw-r--r-- 1 root root    0 Dec 14 16:33 hello.c
drwxr-xr-x 4 root root 4096 Dec 19 20:05 lesson3
drwxr-xr-x 3 root root 4096 Dec 19 18:28 lesson4
drwxr-xr-x 2 root root 4096 Dec 19 18:25 temp    //减压到指定路径
[root@VM-16-5-centos course]# tree temp
temp
|-- my.txt
|-- test.c
|-- test.cnp
|-- test.py
|-- test.sh
`-- test.txt

0 directories, 6 files
八.常用系统命令
1.uname——获取系统信息
语法: uname [选项]
功能: uname 用来获取电脑和操作系统的相关消息
补充说明: uname可显示linux主机所用的操作系统的版本号、硬件的名称等基本信息。
常用选项:
- -a 或 -all 详细输出所有信息,依次为内核名称,主机名,内核版本号,内核版本,硬件名,处理器类型,硬件平台类型,操作系统名称
- -r 显示操作系统的发行版号/内核版本号
举例:
[root@VM-16-5-centos ~]# uname
Linux
[root@VM-16-5-centos ~]# uname -r
3.10.0-1160.71.1.el7.x86_64
[root@VM-16-5-centos ~]# uname -a
Linux VM-16-5-centos 3.10.0-1160.71.1.el7.x86_64 #1 SMP Tue Jun 28 15:37:28 UTC 2022 x86_64 x86_64 x86_64 GNU/Linux

cat /etc/redhat-release:查找当前系统版本的详细信息
如果要查看当前系统版本的详细信息,则需要查看redhat-release文件,其命令以及相应的结果如下:
[root@VM-16-5-centos ~]# cat /etc/redhat-release
CentOS Linux release 7.6.1810 (Core)
2.whoami——查看当前用户
语法: whoami
功能: 查看当前用户
举例:
[root@VM-16-5-centos ~]# whoami
root
[YX@VM-16-5-centos ~]$ whoami
YX
3.top——任务管理器
语法: top
功能: 用于动态地监视进程活动与系统负载等信息。(完全可以看作Linux中的“强化版的Windows任务管理器”)

- ctrl + c退出top页面
top指令执行结果的前5行为系统整体的统计信息,其所代表的含义如下:

- 第一行:系统时间、运行时间、登录终端数、系统负载(三个数值分别为1分钟、5分钟、15分钟内的平均值,数值越小意外着负载越低)。
- 第二行:进程总数、运行中的进程数、睡眠中的进程数、停止的进程数、僵死的进程数。
- 第三行:用户占用资源百分比、系统内核占用资源百分比、改变过优先级的进程资源百分比、空闲的资源百分比等。(该行数据均为CPU数据并以百分比格式显示,例如“97.1id”意味着有97.1%的CPU处理器资源处于空闲)
- 第四行:物理内存总量、内存使用量、内存空闲量、作为内核缓存的内存量。
- 第五行:虚拟内存总量、虚拟内存使用量、虚拟内存空闲量、已被提前加载的内存量。
4.alias——起别名
语法: alias 别名=‘ 指令 ’
功能: 为指令其别名,当一条指令过于复杂时,就可以给它起个别名。
举例:
alias 别名 = ‘ls -l -a -i -n’:为指令起别名
[YX@VM-16-5-centos ~]$ alias lsl='ls -l -a -i -n'
[YX@VM-16-5-centos ~]$ lsl
total 44
656507 drwx------  5 1002 1002  4096 Dec 15 03:43 .
393721 drwxr-xr-x. 5    0    0  4096 Nov 11 19:59 ..
656529 -rw-------  1 1002 1002 10037 Dec 20 00:17 .bash_history
656515 -rw-r--r--  1 1002 1002    18 Apr  1  2020 .bash_logout
656517 -rw-r--r--  1 1002 1002   193 Apr  1  2020 .bash_profile
656513 -rw-r--r--  1 1002 1002   231 Apr  1  2020 .bashrc
656511 drwxrwxr-x  5 1002 1002  4096 Dec  9 17:12 bit
656519 drwxrwxr-x  3 1002 1002  4096 Nov 11 20:08 .cache
656525 drwxrwxr-x  3 1002 1002  4096 Nov 11 20:08 .config
unalias 别名:取消别名
[YX@VM-16-5-centos ~]$ unalias lsl
[YX@VM-16-5-centos ~]$ lsl
-bash: lsl: command not found
5.clear——清屏
语法: clear
功能: 清屏

6.history——查看历史指令
语法: history
功能: 显示历史上所有的指令

7.bc——浮点运算
语法: bc
功能: bc命令可以方便的进行浮点运算
[root@VM-16-5-centos lesson4]# bc
bc 1.06.95
Copyright 1991-1994, 1997, 1998, 2000, 2004, 2006 Free Software Foundation, Inc.
This is free software with ABSOLUTELY NO WARRANTY.
For details type `warranty'.
1+2
3
2*3
6
4+3=7
(standard_in) 3: syntax error
2+3
5
^C
(interrupt) Exiting bc.
[root@VM-16-5-centos lesson4]# echo "1+2+3+4" | bc
10
8.shutdown—关机
语法: shutdown [选项]
常见选项:
- -h:将系统的服务停掉后,立即关机
- -r:在将系统的服务停掉之后就重新启动
- -t sec:-t后面加秒数,亦即【过几秒后关机】的意思
九.热键
热键: 高频被使用的按键
1.tab键
功能1

- 自动补齐
输入一个字母,按tab键后会输出所有以该字母开头的所有命令
功能2:
[YX@VM-16-5-centos ~]$ cd bit/lesson2
[YX@VM-16-5-centos lesson2]$ cd test
test/  test1/
在lesson目录下输入cd后按两下tab键,会自动显示可以输入的文件名。
[YX@VM-16-5-centos lesson2]$ cd ../lesson2/test
test/  test1/
[YX@VM-16-5-centos lesson2]$ cd ../../
bit/     .cache/  .config/
[YX@VM-16-5-centos lesson2]$ cd ../../../
lighthouse/ pangyilin/  YX/
[YX@VM-16-5-centos lesson2]$ cd ../../../../
bin/        data/       etc/        lib/        lost+found/ mnt/        proc/       run/        srv/        tmp/        var/
boot/       dev/        home/       lib64/      media/      opt/        root/       sbin/       sys/        usr/
也可以这样使用,输入上级目录后按tab键查找。
只返回一个上级目录,无法出现选项,会自动补全剩余目录。
必须要输入两个上级目录才会有此效果,否则系统会先给出一个目录,再按tab键给出全部目录
[YX@VM-16-5-centos test]$ cd ../test
test/  test1/
2.ctrl + c
中断目前程序
- 当我们不小心输入 ls ‘,进入多行输入,使用Ctrl + c中断程序
[root@VM-16-5-centos ~]# ls '
> sadas
> sdqwd
> w
> qdqwdqwdq
> wdqd
> wqdqw
> dsd
> wddwq
> dqwwd
> ^C
- 当我们使用top指令进入top页面后,也可以使用ctrl + c中断程序退出。
3.ctrl + r
在历史命令中进行搜索

- 可以和history指令结合使用
4.ctrl + d
键盘输入结束;
退出xshell时,可以使用exit或一直 ctrl + d,表示退出当前用户。
5.↑ && ↓
翻阅历史命令

十.以下命令作为扩展:
- 安装和登录命令: login、 shutdown、 halt、 reboot、 install、 mount、 umount、 chsh、 exit、 last;
- 文件处理命令: file、 mkdir、 grep、 dd、 find、 mv、 ls、 diff、 cat、 ln;
- 系统管理相关命令: df、 top、 free、 quota、 at、 lp、 adduser、 groupadd、 kill、 crontab;
- 网络操作命令: ifconfig、 ip、 ping、 netstat、 telnet、 ftp、 route、 rlogin、 rcp、 finger、 mail、 nslookup;
- 系统安全相关命令: passwd、 su、 umask、 chgrp、 chmod、 chown、 chattr、 sudo ps、 who;
- 其它命令: tar、 unzip、 gunzip、 unarj、 mtools、 man、 unendcode、 uudecode。