文章目录
写在前面:目前老师让我接手了一个项目,拿到手的项目是这样的:代码完整,可以在
PyCharm环境中直接运行。现在老师要求是部署到服务器上(我蒙了,什么是服务器我都还不知道)
现在师姐让我别管那么多,先把py文件在另一台服务器上跑通,然后再用docker打包好。(所以说,我现在就只有一份能跑通的代码,然后我的目的就是用docker把它打包好,至于为什么,接下来干什么,我啥也不知道~)
好了,开干!
参考文章:
https://zhuanlan.zhihu.com/p/436457965
1 Docker有啥用
一个成熟的python项目可能会依赖很多特定的环境,然而项目运行的结果不仅取决于代码,和运行代码的环境也息息相关。
这很有可能会造成:开发环境上的运行结果和测试环境、线上环境上的结果都不一致的现象。【在做项目的时候,甲方一般会要求部署在自己的主机上,防止是因为电脑性能很好从而得到很好的数据】
为了解决这个问题,我们可以将python项目打包成docker镜像,这样即使在不同的机器上运行打包后的项目,我们也能够得到一致的运行结果。因为docker打包是会将项目的代码和环境一起打包。
2 Docker安装
这里我的docker已经是安装好了,所以跳过这一趴。网上有很多教程,不再记录。
2.1 检查docker是否安装完成的小插曲
我在root用户下,输入docker run hello-word
报错如下:
root@server1:/home/【涉及隐私】/docker# docker run hello-word
Unable to find image 'hello-word:latest' locally
docker: Error response from daemon: pull access denied for hello-word, repository does not exist or may require 'docker login': denied: requested access to the resource is denied.
See 'docker run --help'.
期望得到的是:(也就是说它能够成功的pull)
C:\Users\stein>docker run hello-world
Unable to find image 'hello-world:latest' locally
latest: Pulling from library/hello-world
ca4f61b1923c: Pull complete
Digest: sha256:66ef312bbac49c39a89aa9bcc3cb4f3c9e7de3788c944158df3ee0176d32b751
Status: Downloaded newer image for hello-world:latest
Hello from Docker!
This message shows that your installation appears to be working correctly.
To generate this message, Docker took the following steps:
1\. The Docker client contacted the Docker daemon.
2\. The Docker daemon pulled the "hello-world" image from the Docker Hub.
    (amd64)
3\. The Docker daemon created a new container from that image which runs the
    executable that produces the output you are currently reading.
4\. The Docker daemon streamed that output to the Docker client, which sent it
    to your terminal.
To try something more ambitious, you can run an Ubuntu container with:
$ docker run -it ubuntu bash
Share images, automate workflows, and more with a free Docker ID:
[https://cloud.docker.com/](https://cloud.docker.com/)
For more examples and ideas, visit:
[https://docs.docker.com/engine/userguide/](https://docs.docker.com/engine/userguide/)
2.2 解决1
有人说要先 docker login
然后再 docker run hello-world
- 结果:报错*1
root@server1:/home/【涉及隐私】/docker# docker login
Authenticating with existing credentials...
WARNING! Your password will be stored unencrypted in /root/.docker/config.json.
Configure a credential helper to remove this warning. See
https://docs.docker.com/engine/reference/commandline/login/#credentials-store

Login Succeeded
root@server1:/home/hhu_hw_1/docker# docker run hello-word
Unable to find image 'hello-word:latest' locally
docker: Error response from daemon: pull access denied for hello-word, repository does not exist or may require 'docker login': denied: requested access to the resource is denied.
See 'docker run --help'.
- 结果:报错*2 (这里改了一下路径)
root@server1:~# docker login
Authenticating with existing credentials...
WARNING! Your password will be stored unencrypted in /root/.docker/config.json.
Configure a credential helper to remove this warning. See
https://docs.docker.com/engine/reference/commandline/login/#credentials-store

Login Succeeded
root@server1:~# docker run hello-word
Unable to find image 'hello-word:latest' locally
docker: Error response from daemon: pull access denied for hello-word, repository does not exist or may require 'docker login': denied: requested access to the resource is denied.
See 'docker run --help'.
2.3 成功解决
- 就是说,我在
root@server1:~#,然后输入docker pull hello-world它会去拉取这个镜像,并且下载
root@server1:~# docker pull hello-world
Using default tag: latest
latest: Pulling from library/hello-world
93288797bd35: Pull complete
Digest: sha256:2498fce14358aa50ead0cc6c19990fc6ff866ce72aeb5546e1d59caac3d0d60f
Status: Downloaded newer image for hello-world:latest
docker.io/library/hello-world:latest
- 此时,我再输入
docker run hello-world就没有报错了
root@server1:~# docker run  hello-world

Hello from Docker!
This message shows that your installation appears to be working correctly.

To generate this message, Docker took the following steps:
 1. The Docker client contacted the Docker daemon.
 2. The Docker daemon pulled the "hello-world" image from the Docker Hub.
    (arm64v8)
 3. The Docker daemon created a new container from that image which runs the
    executable that produces the output you are currently reading.
 4. The Docker daemon streamed that output to the Docker client, which sent it
    to your terminal.

To try something more ambitious, you can run an Ubuntu container with:
 $ docker run -it ubuntu bash

Share images, automate workflows, and more with a free Docker ID:
 https://hub.docker.com/

For more examples and ideas, visit:
 https://docs.docker.com/get-started/
3 Docker术语介绍
- Image,镜像,包括应用及系统的只读数据包
- Contatiner,容器,虚拟机的运行实例
- Respositories,仓库,管理镜像文件
4 Docker基本命令
docker build -t xxx(路径):将该路径建立为docker镜像docker images查看所有的docker镜像docker run xxx运行docker镜像docker ps -a查看运行中的容器
4.1 DockerFile
DockerFile 文件是知道docker 进行打包的文档,主要有以下部分:
FROM  		指定运行环境【一般是python3.6或3.7】
WORKDIR		指定工作目录
COPY		拷贝指令
RUN 		预运行指令【安装一些包】
CMD 		CMD运行指令
FROM:指定镜像安装什么环境,一般是代码所需环境,我的是3.7.13
WORKDIR:是指定镜像运行的当前工作目录
COPY:是将当前目录的内容拷贝到工作目录中
5 把xx项目进行docker封装
5.1 readme
- 项目文件夹
- DockerFile
- 建立Docker镜像
- 根据镜像运行Docker容器
- 启动/停止容器
6 前期工作
为了能够在Docker中训练与部署模型,我们需要一个开发环境的镜像。
-
首先准备一个镜像。【可以pull一个镜像】
例如:docker pull pytorch/pytorch:1.1.0-cuda10.0-cudnn7.5-devel -
进入到镜像(进入镜像还是容器啊…我不清楚)
具体代码就类似:docker exec -it [docker id]:/bin/bash -
激活虚拟环境
conda activate [虚拟环境名] -
代码要从宿主机拷贝到docker的镜像里面 docker cp [宿主机上的路径] [docker里面的路径]
-
python test.py运行文件
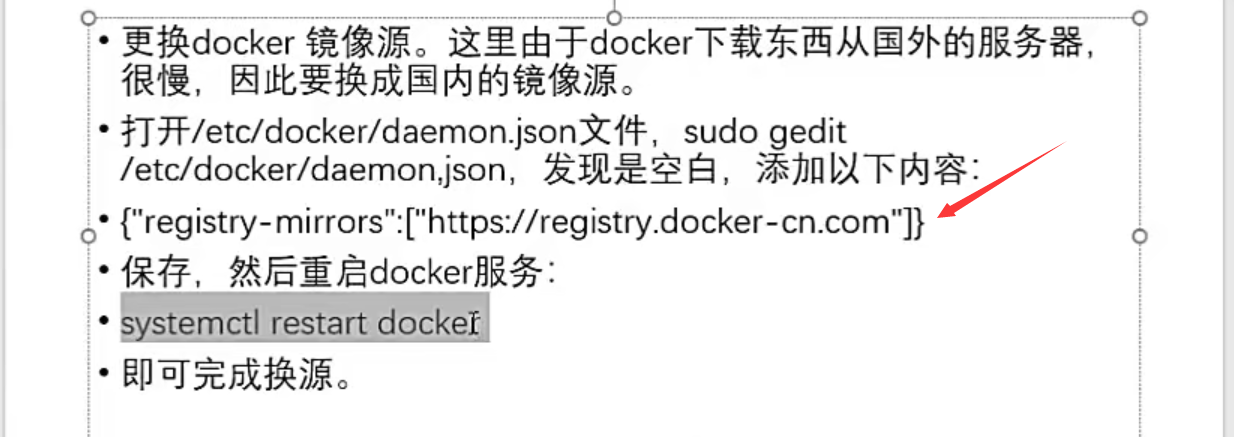
6.1 Docker换源
- 进入到docker 目录下
[cd docker](根据自己电脑上的docker路径来) - 然后
ls,查看是否存在daemon.json - 不存在就
touch daemon.json,然后vim daemon.jsom - 在vim编辑器内输入:红色箭头指向的那一行内容。
6.2 简单介绍一下vim编辑器
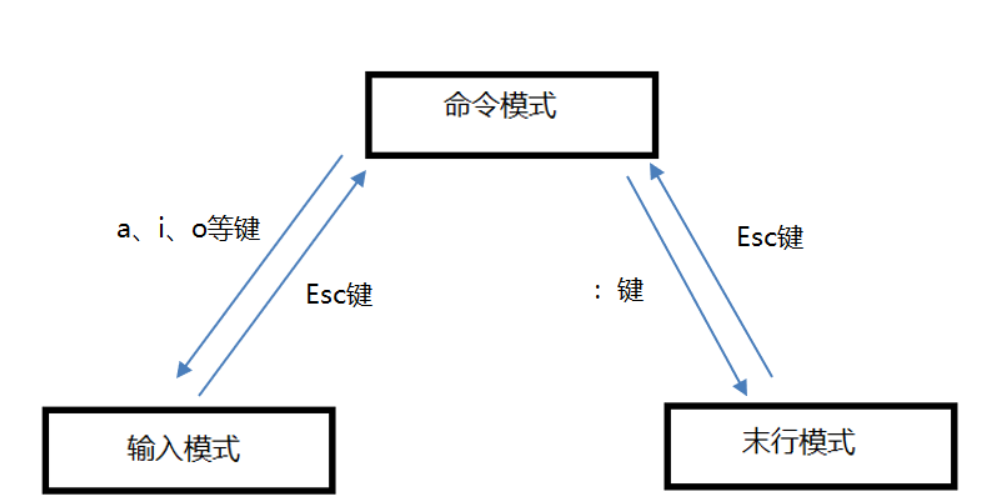
进入的时候是命令模式,然后按i进入输入模式,输入完成之后要保存并退出
首先按下Esc键,insert光标消失(说明进入了命令模式);shift +zz 就可以保存并退出。
然后再检查一下,vim daemon.json 进入,什么都不要按,此时是在命令模式下的,看到内容正确,输入:q 表示正常退出。
7 现在开始进行打包
一般情况下,我们是不需要自己从头制作一个镜像的,可以在别人的镜像上进行二次制作。
比如先pull一个python 3.6 docker pull python:3.6 【冒号后面的是tag,如果不加tag的话,默认是latest】
7.1 搞清楚项目的结构
我的项目结构是这样的,然后我会进入到lstm_project里面去进行操作。
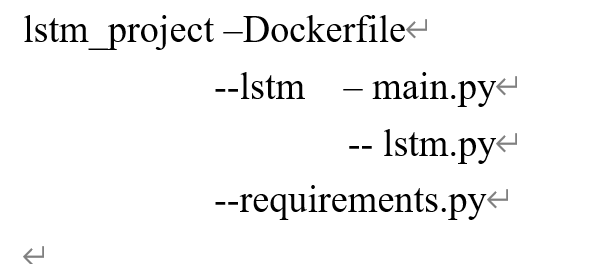
- lstm_project : 项目的顶级目录,需要cd到这个目录下进行Docker打包
- Dockerfile:后面是需要根据Dockerfile创建docker镜像
- requirements.txt 描述了python项目的依赖环境
- lstm 该目录下放置了函数的入口文件:
main.py
7.2 写一个requirements.txt
里面放所有依赖包
- 展示一下我的
requirements.txt
tensorflow-aarch64==2.7.0
bottle==0.12.19
cython==0.29.15
keras==2.7.0
matplotlib==2.2.3
pandas==1.2.5
scikit-learn==0.20.4
h5py==2.10.0
sip==5.0.1
pyyaml==6.0
pyqt5==5.14.0
netCDF4==1.5.8
seaborn==0.11.2
numpy==1.21.6
7.3 写Dockerfile
FROM python:3.7.13

WORKDIR /home/[隐私]/lstm_project

ADD . .

RUN pip install -r requirements.txt 建议用下面一种
RUN pip install -r requirements.txt -i http://mirrors.aliyun.com/pypi/simple/ --trusted-host mirrors.aliyun.com

CMD [“python”, “./lstm/main.py”]
-
FROM <基础镜像>
所谓定制镜像,那一定是以一个镜像为基础。FROM 指令用来指定以哪个镜像作为基础镜像生成新的镜像。这里我们将官方Python的3.7版本镜像作为基础镜像。 -
WORKDIR <工作目录路径>
使用 WORKDIR 指令可以来指定镜像中的工作目录(或者称为当前目录),以后各层的当前目录就被改为指定的目录。 -
ADD <源路径> <目标路径>
使用ADD指令,可以将构建上下文目录中的源路径目录复制到镜像内的 <目标路径> 位置。
第一个参数.代表Dockerfile所在的目录,即python项目dockerdemo下所有的目录(不包括docker_demo自身)。
第二个参数.代表镜像的工作目录docker_demo。所以该行命令会将python项目docker_demo目录下的所有文件复制到镜像的docker_demo目录下。这样docker镜像中就拥有了一份docker_demo python项目。
【这个指令说实话我没太明白,但是我知道结构跟这个一样的话,指令也这么写准没错!】
或者说,我是这么理解的,我们在宿主机内打包,我们的python文件是在宿主机上的,然后我们要Docker打包的话,是需要将宿主机上的文件全部拷贝到镜像中的,这个ADD指令就是做的这个事。 -
RUN pip install -r requirements.txt
RUN 指令是用来执行命令行命令的。这里直接安装requirements.txt 中指定的任何所需软件包。 -
CMD [“python”,“./lstm/main.py”]
CMD 指令是容器启动命令,这里是在容器启动时通过python运行 main.py。值得注意的是./目录指的是当前工作目录即lstm_project。
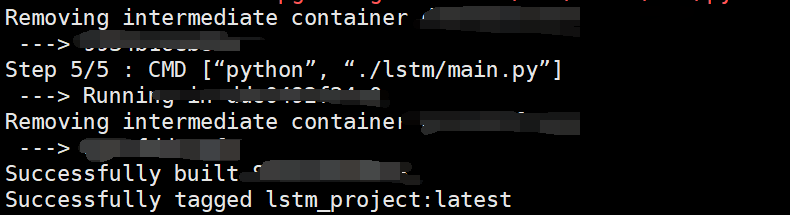
7.4 生成Docker镜像
- 请注意最后的
.
docker build -t lstm_project .
-t 参数指定了最终镜像的名字为lstm_project
最后的. 指的是将Dockerfile所在当前目录作为构建上下文目录。
- 经历了一次又一次的修改requirements.txt,终于Successfully built了!
7.5 运行Docker容器
因为刚刚生成的是Docekr镜像嘛,所以我们首先要查看一下容器的ID
docker ps -a
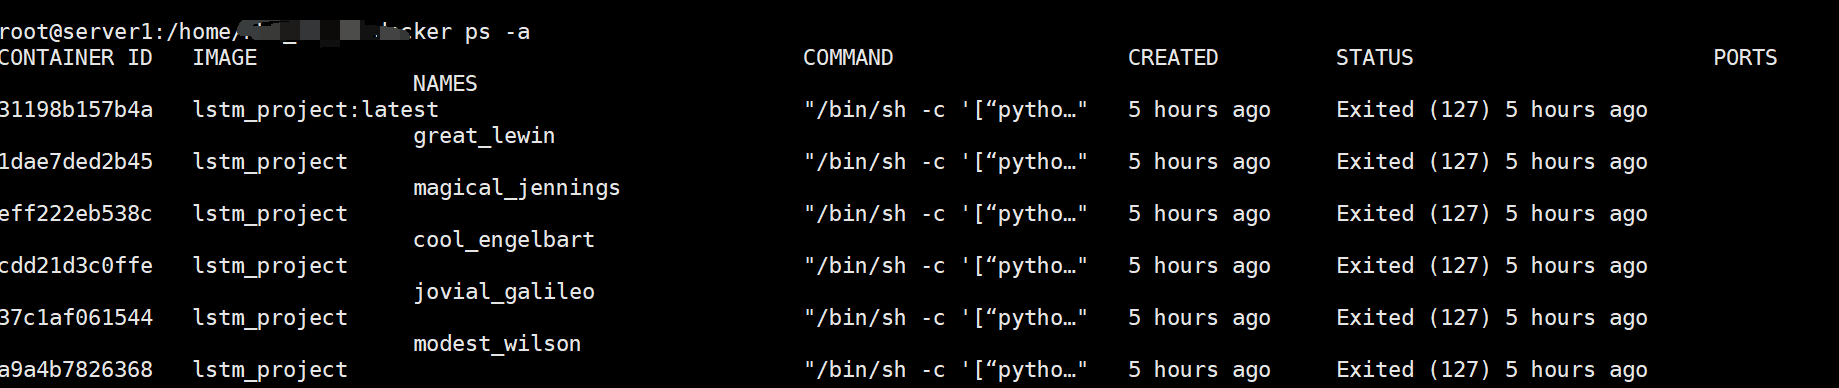
我也不知道为啥有这么多容器…算了不重要…第一个应该是最新打包的(之前打包了好几次,因为依赖包的问题出现了error 所以反复打包了…)
8 保存容器 / 镜像
8.1 比较 save、load、export、import 命令
区别:
- docker save 保存的是镜像,docker export保存的是容器
- docker save 会保留镜像的所有历史记录,docker export不会,也就是说没有commit历史
- docker load用来载入镜像包,docker import 用来载入容器包
- docker load 不能对载入的镜像重命名,但是docker import可以为新镜像指定新名称。
8.2 docker save、loader 实例
docker save -o nginx.tar nginx:latest

或者是
docker save > nginx.tar nginx:latest
其中,-o和v 表示输出到文件,nginx.tar为目标文件,nginx:latest 是源镜像名 (name:tag)
docker load -i nginx.tar

或者是
docker load < nginx.tar
其中,-i 和 < 表示从文件输入。
会成功导入镜像及相关元元素,包括tag信息。
8.3 docker import 、 export
docker export -o nginx.tar nginx-test

# 导出为tar
docker export #ID or #Name > /home/export.tar
其中, -o表示输出到文件,nginx.tar 为目标文件, nginx-test 是源容器名。
docker import [options] file|URL| - [RESOPSITORY [:TAG]]
示例:
docker import nginx-test.tar nginx:imp

或者是
cat nginx-test.tar | docker import -ngin:imp