
总体架构
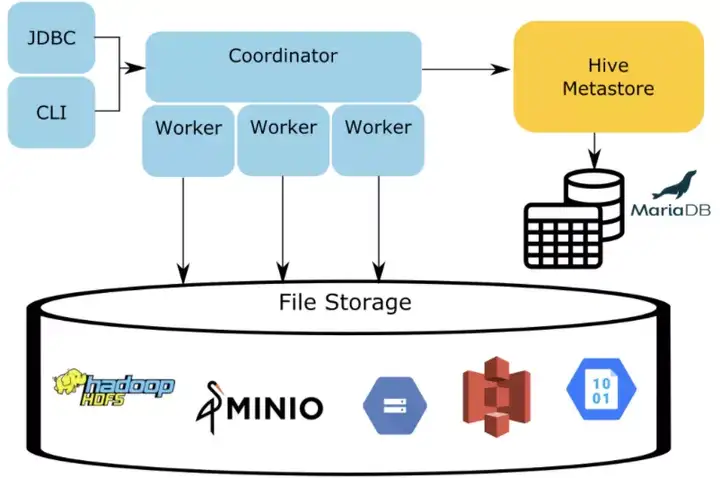
急性子,想直接实操的,先绕过这个章节,直接看后边的实操步骤。把环境运行起来再看原理。Presto 的架构如下图所示,client 的请求,会递交给 Coordinator 进行处理,而元数据信息由 HiveMetaStore(HMS) 进行管理。那么表或分区的 location 信息,也在 HMS 中存放,因此,如果想把表或分区的数据放到其它存储系统里,则不得不修改HMS的信息,这增加了 HMS 的维护成本,而且HMS是全局共享服务,它修改了,其它计算框架就没有办法保持访问原来的路径了。
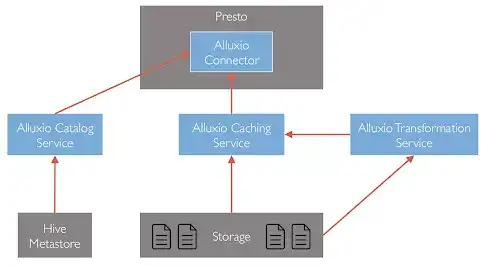
Alluxio Structure Data Service(SDS) 提供了一个位于 Presto 和底层 HMS 之间的服务,Presto 的 hive-hadoop2 connector 插件可以把 Alluxio master 当做 metadata服务,而 Alluxio master 中的 SDS 模块会与底层 HMS 通信,获取底层的 metadata,并且做一些处理,返回给 Presto 加工后的结果。Presto 拿到的位置信息,如果是 alluxio地址,则 Presto 将会从 Alluxio 读取数据,这样实现了不修改 HMS 也可以让 Presto 的访问转换到 Alluxio 的目的。
搭建过程
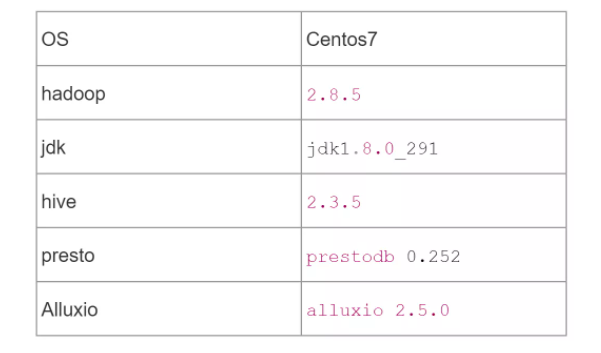
本文用以下软件环境进行搭建。由于 hive、presto、alluxio 都是以 hadoop 兼容文件系统 API 进行文件系统访问,因此底层存储,可以是本地,也可以是 hdfs 。本文重点并不是存储系统,因此使用 file sheme,以本地存储为底层存储。如果想使用 hdfs 进行搭建,可以参考“可选项”章节。
配置环境变量
1 export HADOOP_HOME=/softwares/hadoop-2.8.5
2 export JAVA_HOME=/usr/java/jdk1.8.0_291-amd64/
3 export HIVE_CONF_DIR=/softwares/apache-hive-2.3.5-bin/conf
4 export HIVE_AUX_JARS_PATH=/softwares/apache-hive-2.3.5-bin/lib
5 export HIVE_HOME=/softwares/apache-hive-2.3.5-bin
搭建过程
搭建 mysql
1 # 使用主机网络,或导出端口
2 docker run --net=host  -p 3306:3306 --name mysql -e MYSQL_ROOT_PASSWORD=123456 -d mysql:5.7
3 # 创建 hive 用户,密码为 hive
4 create database metastore;
5 grant all on metastore.* to hive@'%'  identified by 'hive';
6 grant all on metastore.* to hive@'localhost'  identified by 'hive';
7 flush privileges;
安装 Hive 和 mysql connector
1 wget https://archive.apache.org/dist/hive/hive-2.3.5/apache-hive-2.3.5-bin.tar.gz
2 tar -xzvf apache-hive-2.3.5-bin.tar.gz
3 mv apache-hive-2.3.5-bin /softwares/
4 mv mysql-connector-java-5.1.38.jar /softwares/apache-hive-2.3.5-bin/lib
以下是相关的配置文件设置。
- conf/hive-env.sh
1 export METASTORE_PORT=9083- hive-site.xml
1 <configuration>
2 <property>
3 <name>javax.jdo.option.ConnectionURL</name>
4 <value>jdbc:mysql://127.0.0.1:3306/metastore?createDatabaseIfNotExist=true&characterEncoding=UTF-8&useSSL=false</value>
5 <description>JDBC connection string used by Hive Metastore</description>
6 </property>
7 <property>
8 <name>javax.jdo.option.ConnectionDriverName</name>
9 <value>com.mysql.jdbc.Driver</value>
10 <description>JDBC Driver class</description>
11 </property>
12 <property>
13 <name>javax.jdo.option.ConnectionUserName</name>
14 <value>hive</value>
15 <description>Metastore database user name</description>
16 </property>
17 <property>
18 <name>javax.jdo.option.ConnectionPassword</name>
19 <value>hive</value>
20 <description>Metastore database password</description>
21 </property>
22 <property>
23 <name>hive.metastore.uris</name>
24 <value>thrift://127.0.0.1:9084</value>
25 <description>Thrift server hostname and port</description>
26 </property>
27 </configuration>启动 MetaStore
1 bin/schematool -dbType mysql -initSchema hive hive
2 bin/hive --service metastore -p 9083
hive 创建 schema 和 table
- /root/testdb/person/person.csv 文件
1 mary 18 1000
2 john 19 1001
3 jack 16 1002
4 luna 17 1003
1 create schema test;
2 create external table test.person(name string, age int, id int) row format delimited fields terminated by ' ' location 'file:///root/testdb/person';
搭建Presto
安装高版本 JAVA
1 # download jdk rpm package
2 yum localinstall jdk-8u291-linux-x64.rpm
3 alternatives --config java
安装 Presto
1 wget https://repo1.maven.org/maven2/com/facebook/presto/presto-server/0.252/presto-server-0.252.tar.gz
2 tar -xzvf presto-server-0.252.tar.gz
3 mv presto-server-0.252 /softwares/
4 mkdir -p /softwares/presto-server-0.252/etc/catalog
5 # 以下这些配置文件,都需要创建和配置
6 tree /softwares/presto-server-0.252/etc
7  ├── catalog
8  │   ├── hive.properties
9  │   └── jmx.properties
10 ├── config.properties
11 ├── jvm.config
12 ├── log.properties
13 └── node.properties
准备配置文件
- node.properties
1 node.environment=production
2 node.id=node01
3 node.data-dir=/softwares/presto-server-0.252/var/presto/data- config.properties
1 coordinator=true
2 node-scheduler.include-coordinator=true
3 http-server.http.port=8080
4 query.max-memory=2GB
5 query.max-memory-per-node=1GB
6 discovery-server.enabled=true
7 discovery.uri=http://localhost:8080- jvm.config
1 -server
2 -Xmx4G
3 -XX:+UseConcMarkSweepGC
4 -XX:+ExplicitGCInvokesConcurrent
5 -XX:+CMSClassUnloadingEnabled
6 -XX:+AggressiveOpts
7 -XX:+HeapDumpOnOutOfMemoryError
8 -XX:OnOutOfMemoryError=kill -9 %p
9 -XX:ReservedCodeCacheSize=150M- log.properties
1 com.facebook.presto=INF0- hive.properties
1 connector.name=hive-hadoop2
2 hive.metastore.uri=thrift://localhost:9083
运行 Presto Server
1 bin/launcher start运行 presto cli
1 wget https://repo1.maven.org/maven2/com/facebook/presto/presto-cli/0.252/presto-cli-0.252-executable.jar
2 chmod +x presto-cli-0.252-executable.jar
3 mv presto-cli-0.252-executable.jar /softwares/presto-server-0.252/
4 ./presto-cli-0.252-executable.jar --catalog hive --schema test
5 show schemas from hive;
6 show tables from hive.test;
7 select * from hive.test.person;
8 select count(*) from person;
搭建 Alluxio
安装 Alluxio[略]
- alluxio-site.properties
1 alluxio.master.hostname=localhost运行 Alluxio[略]
1 bin/alluxio-start.sh master
2 bin/alluxio table attachdb hive thrift://localhost:9083 test
重配 Presto 使用 Alluxio SDS
修改 catalog 配置
- etc/catalog/hive.properties
1 # connector 还是 hive-hadoop2 是因为 presto 的hive-hadoop2 插件已经支持了访问 Alluxio 的功能
2 connector.name=hive-hadoop2
3 hive.metastore=alluxio
4 hive.metastore.alluxio.master.address=localhost:19998
重启 Presto Server
1 bin/launcher stop
2 bin/launcher start
运行 presto cli
1 ./presto-cli-0.252-executable.jar --catalog hive --schema test
2 show schemas from hive;
3 show tables from hive.test;
4 select * from hive.test.person;
5 select count(*) from person;
观察运行完 sql,对应的person.csv文件已经完全被加载到 Alluxio 中了。
可选项
搭建 hdfs(如果需要,可以搭建hdfs)
如果希望数据放到 hdfs,则可以搭建 hdfs
1 create schema test_hdfs;
2 create external table test_hdfs.person(name string, age int, id int) row format delimited fields terminated by ' ' location 'hdfs://localhost:9000/root/testdb/person';
3 ./presto-cli-0.252-executable.jar --catalog hive --schema test_hdfs
4 show schemas from hive;
5 select * from hive.test_hdfs.person;
总 结
利用 Alluxio SDS,底层的 HMS 中的分区表的 location 无需修改,也就是 HMS 没有任何改变,其它计算引擎完全没有变化。而 Presto 通过 Alluxio SDS 提供的元数据服务,可以进行一些定制化的改造,比如某些分区或表不经Alluxio访问,可以返回 原始的 location 信息。
展 望
Alluxio SDS 在 Presto 和 HMS 之间,搭建了一个 Catalog 代理服务,基于此,Alluxio 理解了数据的格式,因此可以做一些数据格式转换,比如 csv 转 parquet,小文件合并。如果还有其它的需求和好想法,也可以进行改造和开发。此外,可以根据本文,实现一个 All-in-one 的 docker image,让更多的公司可以体验到 Alluxio SDS 功能,将会有更多的开发者一起共建这个意义重大的特性。
参 考
- https://docs.alluxio.io/os/user/stable/en/core-services/Catalog.html#using-the-alluxio-catalog-service
- https://www.alluxio.io/blog/serving
想要获取更多有趣有料的【活动信息】【技术文章】【大咖观点】,请关注[Alluxio智库]:
