前言
发现很多诸如Detectron2的开源项目官方仅提供Liunx系统的安装方式,于是愤而将工作机系统换成了Ubuntu20.04,下面记录一些常用软件的安装方式,以便再次换机时能快速迁移,后续装新的软件会持续更新。
安装yum
直接安装会报错,需要先更换apt-get源.
打开sources.list文件:
sudo gedit /etc/apt/sources.list
除原内容,添加下列内容(基本满足大部分软件需求,不会出现无法定位安装包的问题):
deb https://mirrors.tuna.tsinghua.edu.cn/ubuntu/ bionic main restricted universe multiverse
deb-src https://mirrors.tuna.tsinghua.edu.cn/ubuntu/ bionic main restricted universe multiverse
deb https://mirrors.tuna.tsinghua.edu.cn/ubuntu/ bionic-updates main restricted universe multiverse
deb-src https://mirrors.tuna.tsinghua.edu.cn/ubuntu/ bionic-updates main restricted universe multiverse
deb https://mirrors.tuna.tsinghua.edu.cn/ubuntu/ bionic-backports main restricted universe multiverse
deb-src https://mirrors.tuna.tsinghua.edu.cn/ubuntu/ bionic-backports main restricted universe multiverse
deb https://mirrors.tuna.tsinghua.edu.cn/ubuntu/ bionic-security main restricted universe multiverse
deb-src https://mirrors.tuna.tsinghua.edu.cn/ubuntu/ bionic-security main restricted universe multiverse
deb https://mirrors.tuna.tsinghua.edu.cn/ubuntu/ bionic-proposed main restricted universe multiverse
deb-src https://mirrors.tuna.tsinghua.edu.cn/ubuntu/ bionic-proposed main restricted universe multiverse
deb http://mirrors.aliyun.com/ubuntu/ bionic main restricted universe multiverse
deb http://mirrors.aliyun.com/ubuntu/ bionic-security main restricted universe multiverse
deb http://mirrors.aliyun.com/ubuntu/ bionic-updates main restricted universe multiverse
deb http://mirrors.aliyun.com/ubuntu/ bionic-proposed main restricted universe multiverse
deb http://mirrors.aliyun.com/ubuntu/ bionic-backports main restricted universe multiverse
deb-src http://mirrors.aliyun.com/ubuntu/ bionic main restricted universe multiverse
deb-src http://mirrors.aliyun.com/ubuntu/ bionic-security main restricted universe multiverse
deb-src http://mirrors.aliyun.com/ubuntu/ bionic-updates main restricted universe multiverse
deb-src http://mirrors.aliyun.com/ubuntu/ bionic-proposed main restricted universe multiverse
deb-src http://mirrors.aliyun.com/ubuntu/ bionic-backports main restricted universe multiverse
deb http://archive.ubuntu.com/ubuntu/ trusty main restricted universe multiverse
deb http://archive.ubuntu.com/ubuntu/ trusty-security main restricted universe multiverse
deb http://archive.ubuntu.com/ubuntu/ trusty-updates main restricted universe multiverse
deb http://archive.ubuntu.com/ubuntu/ trusty-proposed main restricted universe multiverse
deb http://archive.ubuntu.com/ubuntu/ trusty-backports main restricted universe multiverse
deb-src http://archive.ubuntu.com/ubuntu/ trusty main restricted universe multiverse
deb-src http://archive.ubuntu.com/ubuntu/ trusty-security main restricted universe multiverse
deb-src http://archive.ubuntu.com/ubuntu/ trusty-updates main restricted universe multiverse
deb-src http://archive.ubuntu.com/ubuntu/ trusty-proposed main restricted universe multiverse
deb-src http://archive.ubuntu.com/ubuntu/ trusty-backports main restricted universe multiverse
deb http://archive.canonical.com/ubuntu/ trusty partner
deb http://extras.ubuntu.com/ubuntu/ trusty main
deb http://ubuntu.srt.cn/ubuntu/ trusty main restricted universe multiverse
deb http://ubuntu.srt.cn/ubuntu/ trusty-security main restricted universe multiverse
deb http://ubuntu.srt.cn/ubuntu/ trusty-updates main restricted universe multiverse
deb http://ubuntu.srt.cn/ubuntu/ trusty-proposed main restricted universe multiverse
deb http://ubuntu.srt.cn/ubuntu/ trusty-backports main restricted universe multiverse
deb-src http://ubuntu.srt.cn/ubuntu/ trusty main restricted universe multiverse
deb-src http://ubuntu.srt.cn/ubuntu/ trusty-security main restricted universe multiverse
deb-src http://ubuntu.srt.cn/ubuntu/ trusty-updates main restricted universe multiverse
deb-src http://ubuntu.srt.cn/ubuntu/ trusty-proposed main restricted universe multiverse
deb-src http://ubuntu.srt.cn/ubuntu/ trusty-backports main restricted universe multiverse
deb http://mirrors.163.com/ubuntu/ trusty main restricted universe multiverse
deb http://mirrors.163.com/ubuntu/ trusty-security main restricted universe multiverse
deb http://mirrors.163.com/ubuntu/ trusty-updates main restricted universe multiverse
deb http://mirrors.163.com/ubuntu/ trusty-proposed main restricted universe multiverse
deb http://mirrors.163.com/ubuntu/ trusty-backports main restricted universe multiverse
deb-src http://mirrors.163.com/ubuntu/ trusty main restricted universe multiverse
deb-src http://mirrors.163.com/ubuntu/ trusty-security main restricted universe multiverse
deb-src http://mirrors.163.com/ubuntu/ trusty-updates main restricted universe multiverse
deb-src http://mirrors.163.com/ubuntu/ trusty-proposed main restricted universe multiverse
deb-src http://mirrors.163.com/ubuntu/ trusty-backports main restricted universe multiverse
更新apt:
sudo apt-get update
安装yum:
sudo apt install yum
安装git
安装git:
sudo apt install git
安装vim
安装vim:
sudo apt-get purge vim-common
sudo apt-get update
sudo apt-get upgrade
sudo apt-get install vim
谷歌浏览器信息迁移
谷歌浏览器的自带了自动同步功能,只需要登陆同一个谷歌账号,就可以同步收藏夹、插件等内容,不过谷歌浏览器很难直接登陆,可以通过安装这个插件进行解决。
Chrome同步助手:https://pan.baidu.com/s/1x9qf18VKI4LIaDq-O1f7XQ?pwd=8888
解压之后,将文件夹载入谷歌浏览器的拓展程序管理界面即可。
Fast Github
Fast Github用来加速Github的访问。
下载FastGithub:
wget -c https://github.com/dotnetcore/FastGithub/releases/download/2.0.4/fastgithub_linux-x64.zip
解压:
unzip fastgithub_linux-x64.zip
进入到FastGithub文件夹下:
cd fastgithub_linux-x64
运行FastGithub:
./fastgithub
百度网盘
百度网盘有提供Liunx版本:https://pan.baidu.com/download#linux
下载deb格式安装包,安装:
sudo dpkg -i baidunetdisk_4.14.5_amd64.deb
搜狗输入法
首先安装fcitx输入法框架:
sudo apt-get install fcitx
剩余操作参考:https://shurufa.sogou.com/linux/guide
然后设置fcitx为系统输入法:

设置fcitx开机自启动:
sudo cp /usr/share/applications/fcitx.desktop /etc/xdg/autostart/
卸载系统ibus输入法框架:
sudo apt purge ibus
下载deb安装包并安装
下载地址:https://shurufa.sogou.com/linux
sudo dpkg -i 安装包名
安装输入法依赖
sudo apt install libqt5qml5 libqt5quick5 libqt5quickwidgets5 qml-module-qtquick2
sudo apt install libgsettings-qt1
重启电脑即可
QQ作为社交软件,实用性不用多说。
官方有提供Liunx版本,下载地址:https://im.qq.com/linuxqq/download.html
sudo dpkg -i 安装包名
不过QQ的Liunx版本这界面基本梦回前朝,收发消息并不方便,只能当做临时文件传输工具。
卸载方式
sudo dpkg -r linuxqq
微信
同样作为社交软件,但微信没有官方开发的Liunx版本,需要借助一个wine框架。
安装wine框架:
下载:http://archive.ubuntukylin.com/software/pool/partner/ukylin-wine_70.6.3.25_amd64.deb
安装:
sudo apt-get install -f -y ./ukylin-wine_70.6.3.25_amd64.deb
下载微信:http://archive.ubuntukylin.com/software/pool/partner/ukylin-wechat_3.0.0_amd64.deb
安装:
sudo apt-get install -f -y ./ukylin-wechat_3.0.0_amd64.deb
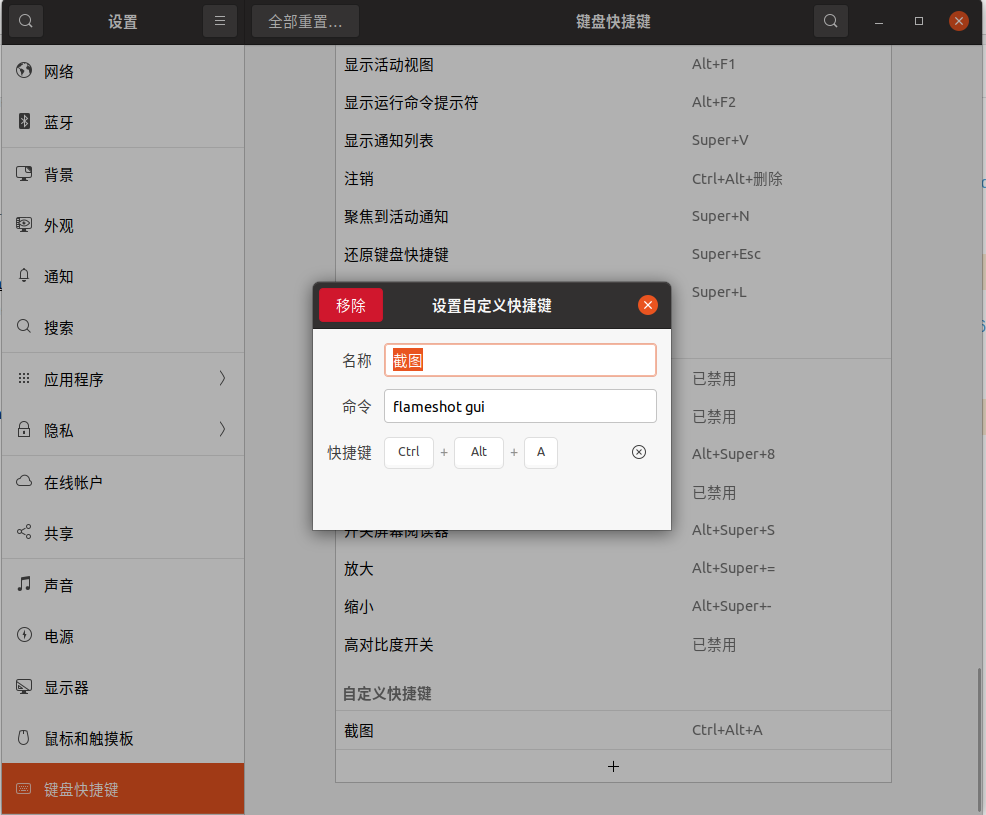
截图工具:flameshot
在Windows中我习惯snipaste这款截图软件,不过该软件没有Liunx版本,于是找到了这款替代品flameshot.
安装:
sudo apt install flameshot
安装完之后在系统中设置快捷键,这样使用习惯就完全和windows一样。
下载工具aria2
aria2是一款命令行下载工具,使用它配合其它插件可以实现命令行下载百度网盘文件。
安装:
sudo apt install aria2
配置aria2:
#新建aria2文件夹
sudo mkdir /etc/aria2
#创建session文件
sudo touch /etc/aria2/aria2.session
sudo chmod 777 /etc/aria2/aria2.session
#编辑配置文件
sudo vim /etc/aria2/aria2.conf
配置文件内容:
## '#'开头为注释内容, 选项都有相应的注释说明, 根据需要修改 ##
## 被注释的选项填写的是默认值, 建议在需要修改时再取消注释  ##

## 文件保存相关 ##

# 文件的保存路径(可使用绝对路径或相对路径), 默认: 当前启动位置
dir=~/downloads
# 启用磁盘缓存, 0为禁用缓存, 需1.16以上版本, 默认:16M
#disk-cache=32M
# 文件预分配方式, 能有效降低磁盘碎片, 默认:prealloc
# 预分配所需时间: none < falloc ? trunc < prealloc
# falloc和trunc则需要文件系统和内核支持
# NTFS建议使用falloc, EXT3/4建议trunc, MAC 下需要注释此项
#file-allocation=none
# 断点续传
continue=true

## 下载连接相关 ##

# 最大同时下载任务数, 运行时可修改, 默认:5
#max-concurrent-downloads=5
# 同一服务器连接数, 添加时可指定, 默认:1
max-connection-per-server=5
# 最小文件分片大小, 添加时可指定, 取值范围1M -1024M, 默认:20M
# 假定size=10M, 文件为20MiB 则使用两个来源下载; 文件为15MiB 则使用一个来源下载
min-split-size=10M
# 单个任务最大线程数, 添加时可指定, 默认:5
#split=5
# 整体下载速度限制, 运行时可修改, 默认:0
#max-overall-download-limit=0
# 单个任务下载速度限制, 默认:0
#max-download-limit=0
# 整体上传速度限制, 运行时可修改, 默认:0
#max-overall-upload-limit=0
# 单个任务上传速度限制, 默认:0
#max-upload-limit=0
# 禁用IPv6, 默认:false
#disable-ipv6=true
# 连接超时时间, 默认:60
#timeout=60
# 最大重试次数, 设置为0表示不限制重试次数, 默认:5
#max-tries=5
# 设置重试等待的秒数, 默认:0
#retry-wait=0

## 进度保存相关 ##

# 从会话文件中读取下载任务
input-file=/etc/aria2/aria2.session
# 在Aria2退出时保存`错误/未完成`的下载任务到会话文件
save-session=/etc/aria2/aria2.session
# 定时保存会话, 0为退出时才保存, 需1.16.1以上版本, 默认:0
#save-session-interval=60

## RPC相关设置 ##

# 启用RPC, 默认:false
enable-rpc=true
# 允许所有来源, 默认:false
rpc-allow-origin-all=true
# 允许非外部访问, 默认:false
rpc-listen-all=true
# 事件轮询方式, 取值:[epoll, kqueue, port, poll, select], 不同系统默认值不同
#event-poll=select
# RPC监听端口, 端口被占用时可以修改, 默认:6800
#rpc-listen-port=6800
# 设置的RPC授权令牌, v1.18.4新增功能, 取代 --rpc-user 和 --rpc-passwd 选项
#rpc-secret=<TOKEN>
# 设置的RPC访问用户名, 此选项新版已废弃, 建议改用 --rpc-secret 选项
#rpc-user=<USER>
# 设置的RPC访问密码, 此选项新版已废弃, 建议改用 --rpc-secret 选项
#rpc-passwd=<PASSWD>
# 是否启用 RPC 服务的 SSL/TLS 加密,
# 启用加密后 RPC 服务需要使用 https 或者 wss 协议连接
#rpc-secure=true
# 在 RPC 服务中启用 SSL/TLS 加密时的证书文件,
# 使用 PEM 格式时,您必须通过 --rpc-private-key 指定私钥
#rpc-certificate=/path/to/certificate.pem
# 在 RPC 服务中启用 SSL/TLS 加密时的私钥文件
#rpc-private-key=/path/to/certificate.key

## BT/PT下载相关 ##

# 当下载的是一个种子(以.torrent结尾)时, 自动开始BT任务, 默认:true
#follow-torrent=true
# BT监听端口, 当端口被屏蔽时使用, 默认:6881-6999
listen-port=51413
# 单个种子最大连接数, 默认:55
#bt-max-peers=55
# 打开DHT功能, PT需要禁用, 默认:true
enable-dht=false
# 打开IPv6 DHT功能, PT需要禁用
#enable-dht6=false
# DHT网络监听端口, 默认:6881-6999
#dht-listen-port=6881-6999
# 本地节点查找, PT需要禁用, 默认:false
#bt-enable-lpd=false
# 种子交换, PT需要禁用, 默认:true
enable-peer-exchange=false
# 每个种子限速, 对少种的PT很有用, 默认:50K
#bt-request-peer-speed-limit=50K
# 客户端伪装, PT需要
peer-id-prefix=-TR2770-
user-agent=Transmission/2.77
peer-agent=Transmission/2.77
# 当种子的分享率达到这个数时, 自动停止做种, 0为一直做种, 默认:1.0
seed-ratio=0
# 强制保存会话, 即使任务已经完成, 默认:false
# 较新的版本开启后会在任务完成后依然保留.aria2文件
#force-save=false
# BT校验相关, 默认:true
#bt-hash-check-seed=true
# 继续之前的BT任务时, 无需再次校验, 默认:false
bt-seed-unverified=true
# 保存磁力链接元数据为种子文件(.torrent文件), 默认:false
bt-save-metadata=true
测试:
aria2c "https://d.pcs.baidu.com/file/1b9b90ff9h47fb6e1e42d7be561e4887?fid=2054992973-250528-25833275633357&dstime=1664367834&rt=sh&sign=FDtAERVJouK-DCb740ccc5511e5e8fedcff06b081203-044K5JmLG7b%2BPYVjfx1Leu519Zg%3D&expires=8h&chkv=1&chkbd=0&chkpc=&dp-logid=517167091484948562&dp-callid=0&shareid=1069565530&r=750703337&resvsflag=1-12-0-1-1-1&vuk=2054992973&file_type=0" --out "assistant.rar" --header "User-Agent: pan.baidu.com" --header "Cookie: BDUSS=VFRWIySFdPcVhGQkhqRENyZ2UtMFI4YUM0VG5HUzIyN0Y1ZHFwZ2lsR0NLMXBqRVFBQUFBJCQAAAAAAAAAAAEAAAD6epJ4YmlsabTz0afJrgAAAAAAAAAAAAAAAAAAAAAAAAAAAAAAAAAAAAAAAAAAAAAAAAAAAAAAAAAAAAAAAAAAAAAAAIKeMmOCnjJjcH"
成功下载

视频播放软件
Ubuntu默认无法打开MP4文件,因此需要一个视频播放软件。
这里下载的是VLC视频播放器:
sudo snap install vlc
Anaconda
下载Anaconda安装脚本:https://www.anaconda.com/products/distribution#download-section
运行脚本:
bash /your_path_to/Anaconda3-2019.10-Linux-x86_64.sh
遇到信息一路回车,最后输入yes.
最后可以指定安装路径,默认路径/root/anaconda3,这里必须改为/home/username/anaconda3,username为自己的用户名,下图中没改,安装之后发现调用root文件夹内容需要管理员权限,导致用户身份无法正常使用。

添加环境变量:
export CONDA_PATH=/home/zxy/anaconda3
export PATH=${

    CONDA_PATH}/bin:$PATH
添加环境变量,也可以采用另一种方式:
sudo gedit ~/.bashrc
export PATH="/home/zxy/anaconda3/bin:$PATH"
source ~/.bashrc
查看conda版本:
conda --version
激活conda-base环境:
source ~/anaconda3/bin/activate
conda添加清华源:
conda config --add channels http://mirrors.tuna.tsinghua.edu.cn/anaconda/pkgs/free/
conda config --add channels http://mirrors.tuna.tsinghua.edu.cn/anaconda/cloud/conda-forge
conda config --add channels http://mirrors.tuna.tsinghua.edu.cn/anaconda/cloud/msys2/
Pycharm
Pycharm添加快捷图标:
Ubuntu所有的快捷图标都放置在/usr/share/applications/
创建快捷方式:
sudo gedit /usr/share/applications/pycharm.desktop
复制进以下内容:
[Desktop Entry]
Type=Application
Name=Pycharm
GenericName=Pycharm3
Comment=Pycharm3:The Python IDE
Exec="/home/zxy/soft/pycharm-2022.2.2/bin/pycharm.sh" %f
Icon=/home/zxy/soft/pycharm-2022.2.2/bin/pycharm.png
Terminal=pycharm
Categories=Pycharm;
Exec和Icon需要修改为自己pycharm的路径,保存即可。
Pycharm激活方式可参考:http://idea.hicxy.com/
Nvidia驱动
直接输入nvidia-smi找不到命令,说明显卡驱动没装好。
先去Nvidia官网根据自己显卡下载驱动安装程序:
Nvidia官网:https://www.nvidia.com/Download/index.aspx?lang=cn

安装lightdm:
sudo service lightdm stop
关闭图形界面:
sudo service lightdm stop
卸载系统中存在的驱动:
sudo apt-get remove nvidia-*
赋予执行权限:
sudo chmod a+x NVIDIA-Linux-x86_64-470.63.01.run
安装驱动:
sudo ./NVIDIA-Linux-x86_64-470.63.01.run -no-x-check -no-nouveau-check -no-opengl-files
重启图形界面:
sudo service lightdm start
验证:
nvidia-smi
成功显示:
