文章目录
环境准备
【AI】目标检测比外挂还离谱,自从用了目标检测玩游戏,感觉整个世界都变清晰了!超详细YOLO目标检测算法实战教程!
目标检测 YOLOv5 开源代码项目调试与讲解实战【土堆 x 布尔艺数】
P1-项目的部署环境搭建
本来是打算照着B站教程从Yolov5-5.0开始的, 依赖安装好后, 在运行的时候有一堆报错, 解决一个又出一个, 网上也没有什么好的解决办法, 索性直接上当时的最新版Yolov5-6.2了, 依赖安装好后, 直接就能跑起来(cpu模式), 这个流程就重新走6.2了, 但之前5.0的流程也留着没删
下载最新版 yolov5 6.2 源码, 解压到 pycharm workspace, 用 pycharm 打开, 先取消创建虚拟环境, 在 Anaconda Prompt 中创建虚拟环境
# 创建虚拟环境, 建议不要创建在项目路径下, 包括数据集也是不要放在项目路径下, 不然pycharm可能会去读这些内容, 可能会很费时间
# PyTorch当时最高支持Python3.7-3.9, Conda当时最高支持3.9, 当时base环境的Python是3.9.12, 自动下载的Python是3.9.13
# 创建虚拟环境时要指定Python版本, 且不同于base环境中Python版本, 不然不会真的创建虚拟环境, 且会污染base环境, 恶心 ...
conda create -n yolov5 python=3.9 # -n和-p不能同时设置 ...
# 激活虚拟环境. 我猜 -n 其实就是 -p 的特殊版本, 相当于指定了路径前缀 conda\envs, 两者其实是一样的
conda activate yolov5
# cd 到项目路径, 执行安装依赖包命令
cd C:\mrathena\develop\workspace\pycharm\yolov5-6.2
# 安装依赖包, 注意, 这里不要开代理工具, 不然可能失败
pip install -r requirements.txt
# 安装成功
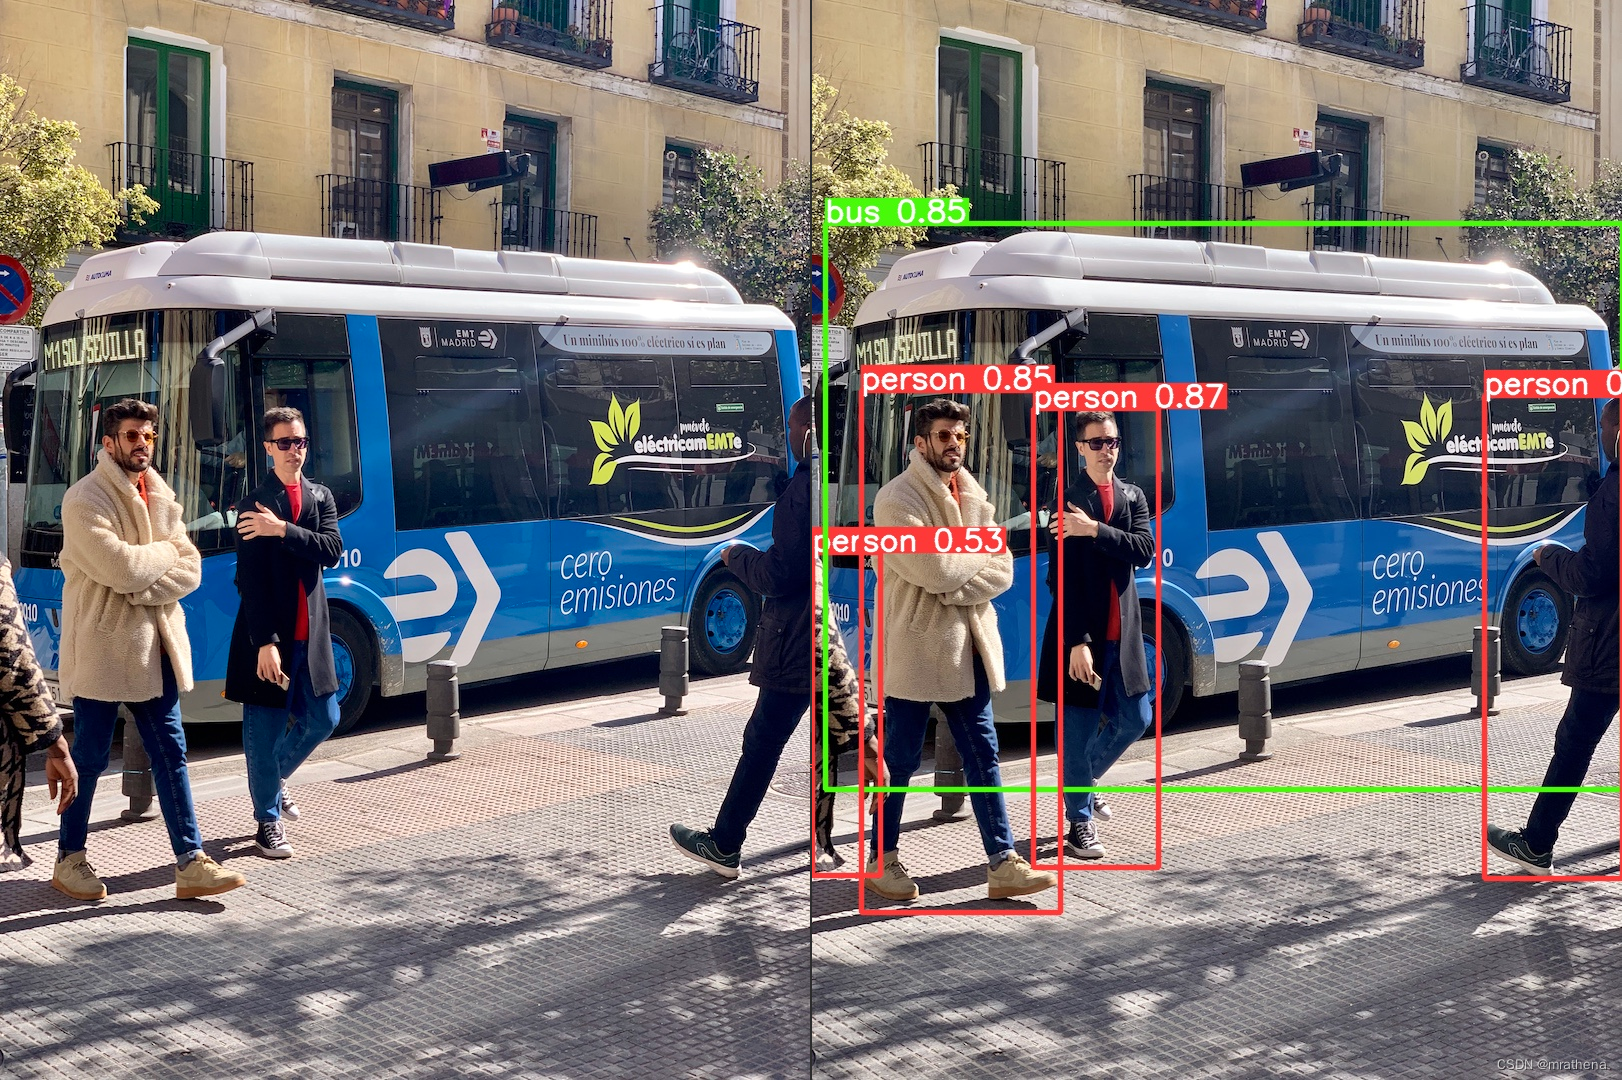
直接运行 detect.py, 运行结果, (这里我添加了一张有人的图片看检测效果)
C:\mrathena\develop\miniconda\envs\yolov5\python.exe C:/mrathena/develop/workspace/pycharm/yolov5-6.2/detect.py
detect: weights=yolov5s.pt, source=data\images, data=data\coco128.yaml, imgsz=[640, 640], conf_thres=0.25, iou_thres=0.45, max_det=1000, device=, view_img=False, save_txt=False, save_conf=False, save_crop=False, nosave=False, classes=None, agnostic_nms=False, augment=False, visualize=False, update=False, project=runs\detect, name=exp, exist_ok=False, line_thickness=3, hide_labels=False, hide_conf=False, half=False, dnn=False
YOLOv5  2022-8-17 Python-3.9.13 torch-1.12.1+cpu CPU

Fusing layers...
YOLOv5s summary: 213 layers, 7225885 parameters, 0 gradients
image 1/3 C:\mrathena\develop\workspace\pycharm\yolov5-6.2\data\images\bus.jpg: 640x480 4 persons, 1 bus, Done. (0.173s)
image 2/3 C:\mrathena\develop\workspace\pycharm\yolov5-6.2\data\images\people.jpeg: 608x640 4 persons, 1 handbag, Done. (0.202s)
image 3/3 C:\mrathena\develop\workspace\pycharm\yolov5-6.2\data\images\zidane.jpg: 384x640 2 persons, 2 ties, Done. (0.130s)
Speed: 0.3ms pre-process, 168.2ms inference, 3.7ms NMS per image at shape (1, 3, 640, 640)
Results saved to runs\detect\exp


PyTorch
YOLOv5 2022-8-17 Python-3.9.13 torch-1.12.1+cpu CPU
默认情况下, Yolo是以CPU的方式运行的, 我们要改成GPU的方式, 这样训练和检测会更快
好像先决条件是你的电脑装有包含CUDA核心的Nvidia显卡, 我这边是Nvidia 2080
看了些博客啥的, 说是在虚拟环境中安装 PyTorch 就好了, 但是网上的教程真的是五花八门, 下面这篇我觉得更可信
总结下来就是, 安装PyTorch不需要电脑上有CUDA运行环境, 因为安装时会自动下载, 确保CUDA和显卡驱动版本对应就可以了
这里的表3就是CUDA和显卡驱动的关系, 新显卡驱动向前兼容旧的CUDA, 只要显卡驱动版本大于等于516.94, 那就可以跑CUDA11.7.1, 大于等于516.01, 就可以跑11.7, 大于等于511.23, 就可以跑11.6, 大于等于465.89, 就可以跑11.3.0, 以此类推
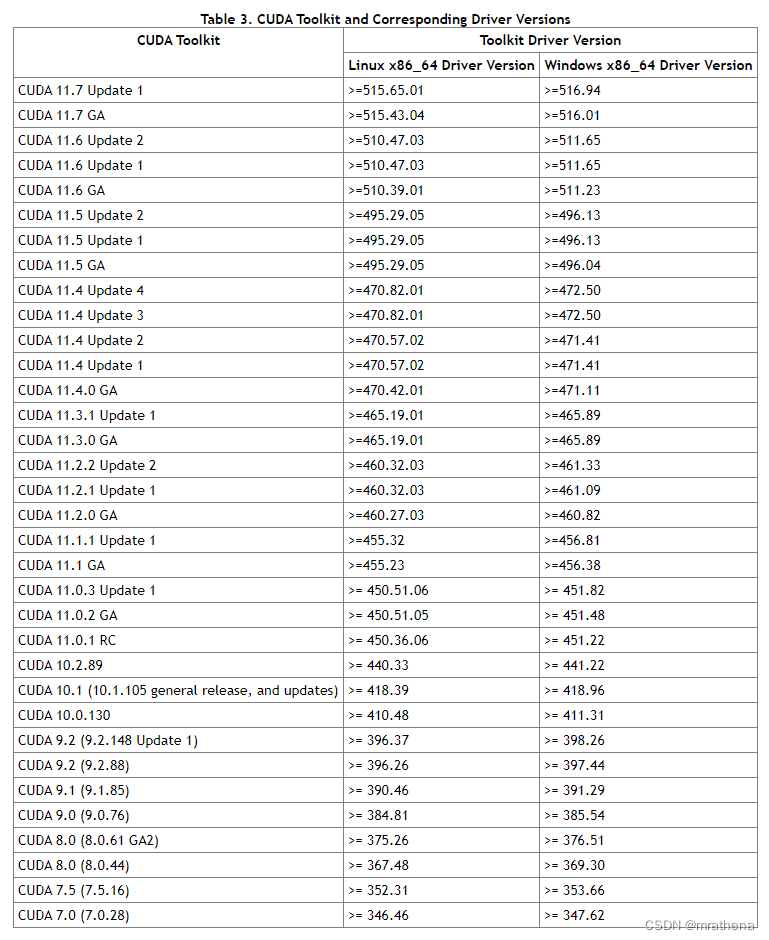
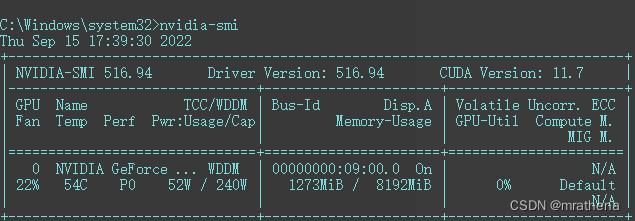
我的显卡驱动版本是516.94, 那它就支持所有版本的CUDA, 先到PyTorch官网看看, 最新的是11.6, 那就下它了
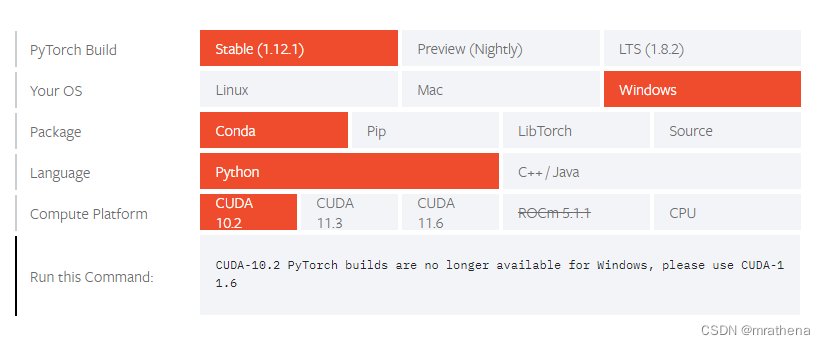
conda install pytorch torchvision torchaudio cudatoolkit=11.6 -c pytorch -c conda-forge
安装好后, 虚拟环境从1.3G变成了5.8G, 真的是 … 为什么不能搞一套类似Maven的项目管理工具呢 …
跟上官网的教程检查是否安装成功, 执行 python, 输入
import torch
torch.cuda.is_available()

看样子是CUDA可以使用了, 然后再试跑一下 detect.py, 应该是已经使用显卡在跑了
YOLOv5 2022-8-17 Python-3.9.13 torch-1.12.1 CUDA:0 (NVIDIA GeForce RTX 2080, 8192MiB)
应用模型检测
实时屏幕截图
win32 截图需要安装 pywin32, 先说结论, 如果 win32ui 无法导入, 那么可以尝试 conda 安装
我的环境是 miniconda 创建的虚拟环境, conda create -n yolov5 python-3.9, 一开始用的 pip install pywin32, 安装的是 304 版本, win32ui 无法导入, 辗转了半天, 终于在谷歌找到了 pywin32 项目的 issue#1593, 里面有大佬给出了两个 whl 安装包, 还是不行. 突然想起来想确认下 base 环境里是否有这个包, 有, 而且 import win32ui 不会报错, 凎, 终于成功了, 立马在虚拟环境中 conda install pywin32, 测试果然成功了. 不愧是经过 anaconda 测试验证发布过的包, 后面我就以 anaconda 为准了, 没有的话再用 pip
test.grab.py
import time

import cv2
import numpy as np
import mss
import win32con
import win32gui
import win32api
import win32ui


sct = mss.mss()
def grabWithMss(region):
    """
    region: tuple, (left, top, width, height)
    conda install mss / pip install mss
    """
    left, top, width, height = region
    return sct.grab(monitor={

    'left': left, 'top': top, 'width': width, 'height': height})


def grabWithWin(region):
    """
    region: tuple, (left, top, width, height)
    conda install pywin32, 用 pip 装的一直无法导入 win32ui 模块, 找遍各种办法都没用, 用 conda 装的一次成功
    """
    left, top, width, height = region
    hwin = win32gui.GetDesktopWindow()
    hwindc = win32gui.GetWindowDC(hwin)
    srcdc = win32ui.CreateDCFromHandle(hwindc)
    memdc = srcdc.CreateCompatibleDC()
    bmp = win32ui.CreateBitmap()
    bmp.CreateCompatibleBitmap(srcdc, width, height)
    memdc.SelectObject(bmp)
    memdc.BitBlt((0, 0), (width, height), srcdc, (left, top), win32con.SRCCOPY)

    signedIntsArray = bmp.GetBitmapBits(True)
    # img = np.fromstring(signedIntsArray, dtype='uint8')
    img = np.frombuffer(signedIntsArray, dtype='uint8')  # 根据警告提示修改 fromstring 为 frombuffer
    img.shape = (height, width, 4)

    srcdc.DeleteDC()
    memdc.DeleteDC()
    win32gui.ReleaseDC(hwin, hwindc)
    win32gui.DeleteObject(bmp.GetHandle())
    return img


def grab(region=None, win=False):
    """
    region: tuple, (left, top, width, height)
    """
    if region is None:
        left = win32api.GetSystemMetrics(win32con.SM_XVIRTUALSCREEN)
        top = win32api.GetSystemMetrics(win32con.SM_YVIRTUALSCREEN)
        width = win32api.GetSystemMetrics(win32con.SM_CXVIRTUALSCREEN)
        height = win32api.GetSystemMetrics(win32con.SM_CYVIRTUALSCREEN)
        region = (left, top, width, height)
    return grabWithWin(region) if win else grabWithMss(region)


# img = grab()
# img = np.array(img)
# img = cv2.cvtColor(img, cv2.COLOR_BGRA2BGR)
# cv2.imshow('', img)
# cv2.waitKey(0)


# 测试下来, mss 的比 win 的快几毫秒
# times = 100
# begin = time.perf_counter()
# for i in range(times):
#     grab(win=True)
# print(f'总耗时:{int((time.perf_counter() - begin) * 1000)}ms, 平均耗时:{int((time.perf_counter() - begin) / times * 1000)}ms')


windowName = 'Real Time Screen'
while True:
    img = grab()
    img = np.array(img)
    img = cv2.cvtColor(img, cv2.COLOR_BGRA2BGR)
    cv2.namedWindow(windowName, cv2.WINDOW_NORMAL)
    cv2.resizeWindow(windowName, 800, 450)
    cv2.imshow(windowName, img)
    # 寻找窗口, 设置置顶
    hwnd = win32gui.FindWindow(None, windowName)
    # win32gui.ShowWindow(hwnd, win32con.SW_SHOWNORMAL)
    win32gui.SetWindowPos(hwnd, win32con.HWND_TOPMOST, 0, 0, 0, 0, win32con.SWP_NOMOVE | win32con.SWP_NOACTIVATE | win32con.SWP_NOOWNERZORDER | win32con.SWP_SHOWWINDOW | win32con.SWP_NOSIZE)

    k = cv2.waitKey(1) # 0:不自动销毁, 1:1ms延迟销毁
    if k % 256 == 27:
        cv2.destroyAllWindows()
        exit('ESC ...')
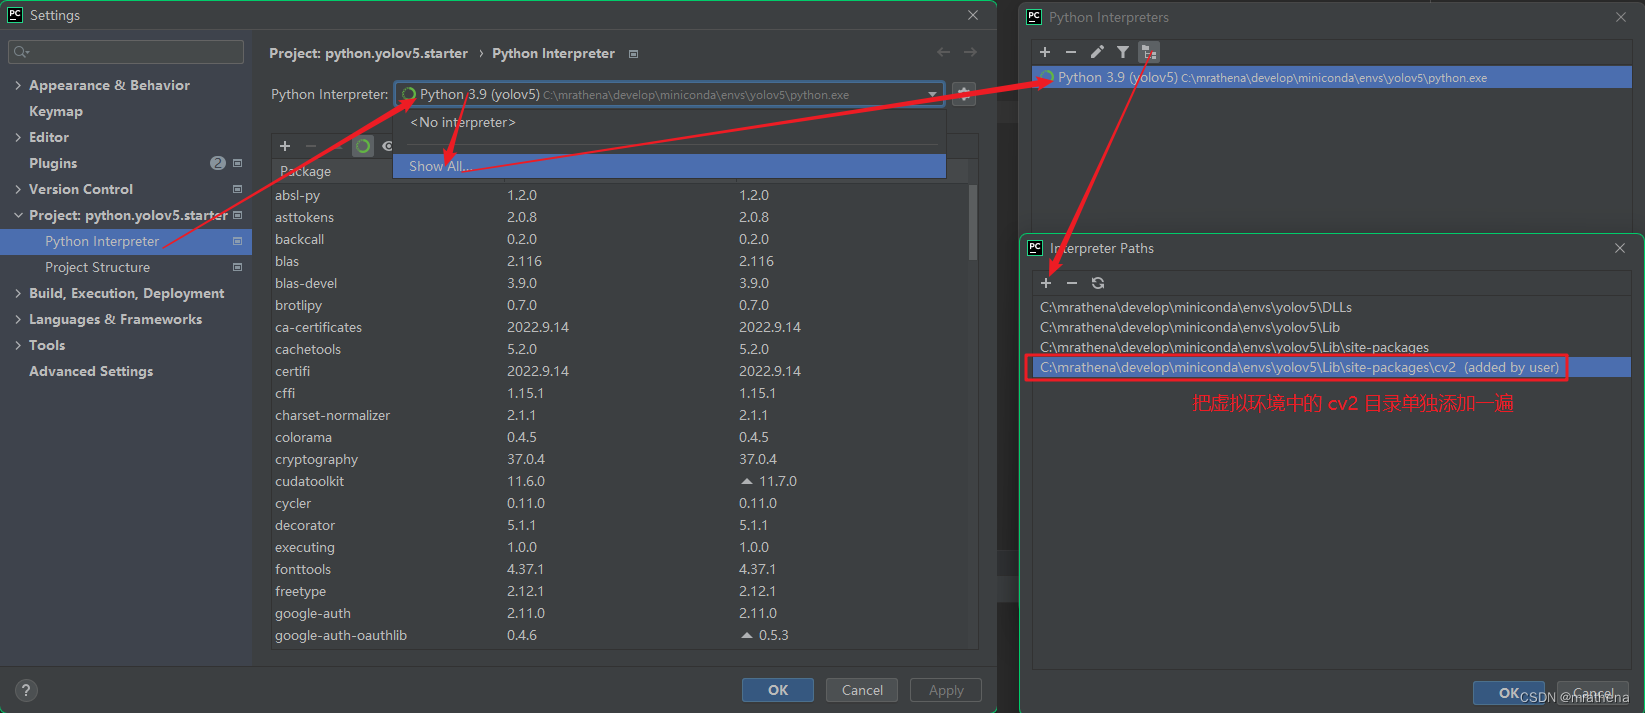
如果出现 cv2 没有提示, 无法点击 的问题, 做如下操作
实时屏幕检测
detect.py 的作用就是使用某个训练好的模型, 把某文件夹下的所有图片都检测一遍, 所以它里面肯定有使用模型和检测图片的相关代码
我们的目标就是, 从 detect.py 中找到核心代码, 实现输入一张图输出标好框的图, 后面可能改成输出检测结果矩形信息(getAims)
inference.step.1.py
import cv2
import numpy as np
import torch

from models.common import DetectMultiBackend
from utils.augmentations import letterbox
from utils.general import non_max_suppression, scale_coords
from utils.plots import Annotator, colors
from utils.torch_utils import select_device

# 拆解 detect.py 的代码, 实现 输入图片 输出推测图片 的效果
def inference():

    # 获取设备, cpu/cuda
    device = select_device('')
    print('获取设备: ' + device.type) # cuda

    # 获取模型
    model = DetectMultiBackend('D:\\resource\\develop\\python\\dataset.yolov5.6.2\\test\\runs\\train\\exp\\weights\\best.pt', device=device, dnn=False, data=None, fp16=False)
    names = model.module.names if hasattr(model, 'module') else model.names  # get class names
    print('获取模型: ' + model.weights)

    # 获取图片
    img0 = cv2.imread('../data/images/bus.jpg')
    # cv2.imshow('', img0)
    # cv2.waitKey(0)
    # cv2.destroyAllWindows()
    print('输入图片')

    # 拿到 dataset 的 im
    im = letterbox(img0, [640, 640], stride=32, auto=True)[0]
    im = im.transpose((2, 0, 1))[::-1]  # HWC to CHW, BGR to RGB
    im = np.ascontiguousarray(im)
    im = torch.from_numpy(im).to(device)
    # im = im.half() if model.fp16 else im.float()  # uint8 to fp16/32
    im = im.float()  # uint8 to fp16/32
    im /= 255  # 0 - 255 to 0.0 - 1.0
    if len(im.shape) == 3:
        im = im[None]  # expand for batch dim
    print('处理图片')

    # 推测
    model.warmup(imgsz=(1, 3, *[640, 640]))  # warmup
    pred = model(im, augment=False, visualize=False)
    # pred = non_max_suppression(pred, conf_thres, iou_thres, classes, agnostic_nms, max_det=max_det)
    pred = non_max_suppression(pred, 0.25, 0.45, None, False, max_det=1000)
    print('推测结束')

    for i, det in enumerate(pred):
        annotator = Annotator(img0, line_width=3, example=str(names))
        if len(det):
            det[:, :4] = scale_coords(im.shape[2:], det[:, :4], img0.shape).round()
            for *xyxy, conf, cls in reversed(det):
                c = int(cls)  # integer class
                hide_labels = False
                hide_conf = False
                label = None if hide_labels else (names[c] if hide_conf else f'{

      names[c]} {

      conf:.2f}')
                annotator.box_label(xyxy, label, color=colors(c, True))
        im0 = annotator.result()
        cv2.imshow('', im0)
        cv2.waitKey(0)  # 1 millisecond


if __name__ == '__main__':
    inference()
inference.step.2.py
import cv2
import numpy as np
import torch
import mss
import win32con
import win32gui

from models.common import DetectMultiBackend
from utils.augmentations import letterbox
from utils.general import non_max_suppression, scale_coords
from utils.plots import Annotator, colors
from utils.torch_utils import select_device


def loadModel(device, path):
    model = DetectMultiBackend(path, device=device, dnn=False, data=None, fp16=False)
    model.warmup(imgsz=(1, 3, *[640, 640]))  # warmup
    return model

def foo(device, img):
    # 拿到 dataset 的 im
    im = letterbox(img, [640, 640], stride=32, auto=True)[0]
    im = im.transpose((2, 0, 1))[::-1]  # HWC to CHW, BGR to RGB
    im = np.ascontiguousarray(im)
    im = torch.from_numpy(im).to(device)
    # im = im.half() if model.fp16 else im.float()  # uint8 to fp16/32
    im = im.float()  # uint8 to fp16/32
    im /= 255  # 0 - 255 to 0.0 - 1.0
    if len(im.shape) == 3:
        im = im[None]  # expand for batch dim
    return im

def inference(device, model, img):
    im = foo(device, img)
    pred = model(im, augment=False, visualize=False)
    # pred = non_max_suppression(pred, conf_thres, iou_thres, classes, agnostic_nms, max_det=max_det)
    pred = non_max_suppression(pred, 0.25, 0.45, None, False, max_det=1000)

    names = model.module.names if hasattr(model, 'module') else model.names  # get class names
    det = pred[0]
    annotator = Annotator(img, line_width=3, example=str(names))
    if len(det):
        det[:, :4] = scale_coords(im.shape[2:], det[:, :4], img.shape).round()
        for *xyxy, conf, cls in reversed(det):
            c = int(cls)  # integer class
            hide_labels = False
            hide_conf = False
            label = None if hide_labels else (names[c] if hide_conf else f'{

      names[c]} {

      conf:.2f}')
            annotator.box_label(xyxy, label, color=colors(c, True))
    return annotator.result()


sct = mss.mss()
def grab(region):
    """
    region: tuple, (left, top, width, height)
    conda install mss / pip install mss
    """
    left, top, width, height = region
    return sct.grab(monitor={

    'left': left, 'top': top, 'width': width, 'height': height})


windowName = 'Real Time Screen'

# 获取设备, cpu/cuda
device = select_device('')
# 加载模型
# model = loadModel(device, 'D:\\resource\\develop\\python\\dataset.yolov5.6.2\\test\\runs\\train\\exp\\weights\\best.pt')
model = loadModel(device, '../yolov5s.pt')

# 网上下的模型
# https://www.youtube.com/watch?v=_QKDEI8uhQQ
# https://github.com/davidhoung2/APEX-yolov5-aim-assist
# model = loadModel(device, 'model.apex.1.pt')

while True:
    # 截图
    img = grab((0, 0, 3440, 1440))
    img = np.array(img)
    img = cv2.cvtColor(img, cv2.COLOR_BGRA2BGR)

    # 推测
    img = inference(device, model, img)

    cv2.namedWindow(windowName, cv2.WINDOW_NORMAL)
    cv2.resizeWindow(windowName, 800, 450)
    cv2.imshow(windowName, img)

    # 寻找窗口, 设置置顶
    hwnd = win32gui.FindWindow(None, windowName)
    # win32gui.ShowWindow(hwnd, win32con.SW_SHOWNORMAL)
    win32gui.SetWindowPos(hwnd, win32con.HWND_TOPMOST, 0, 0, 0, 0, win32con.SWP_NOMOVE | win32con.SWP_NOACTIVATE | win32con.SWP_NOOWNERZORDER | win32con.SWP_SHOWWINDOW | win32con.SWP_NOSIZE)

    k = cv2.waitKey(1)
    if k % 256 == 27:
        cv2.destroyAllWindows()
        exit('ESC ...')
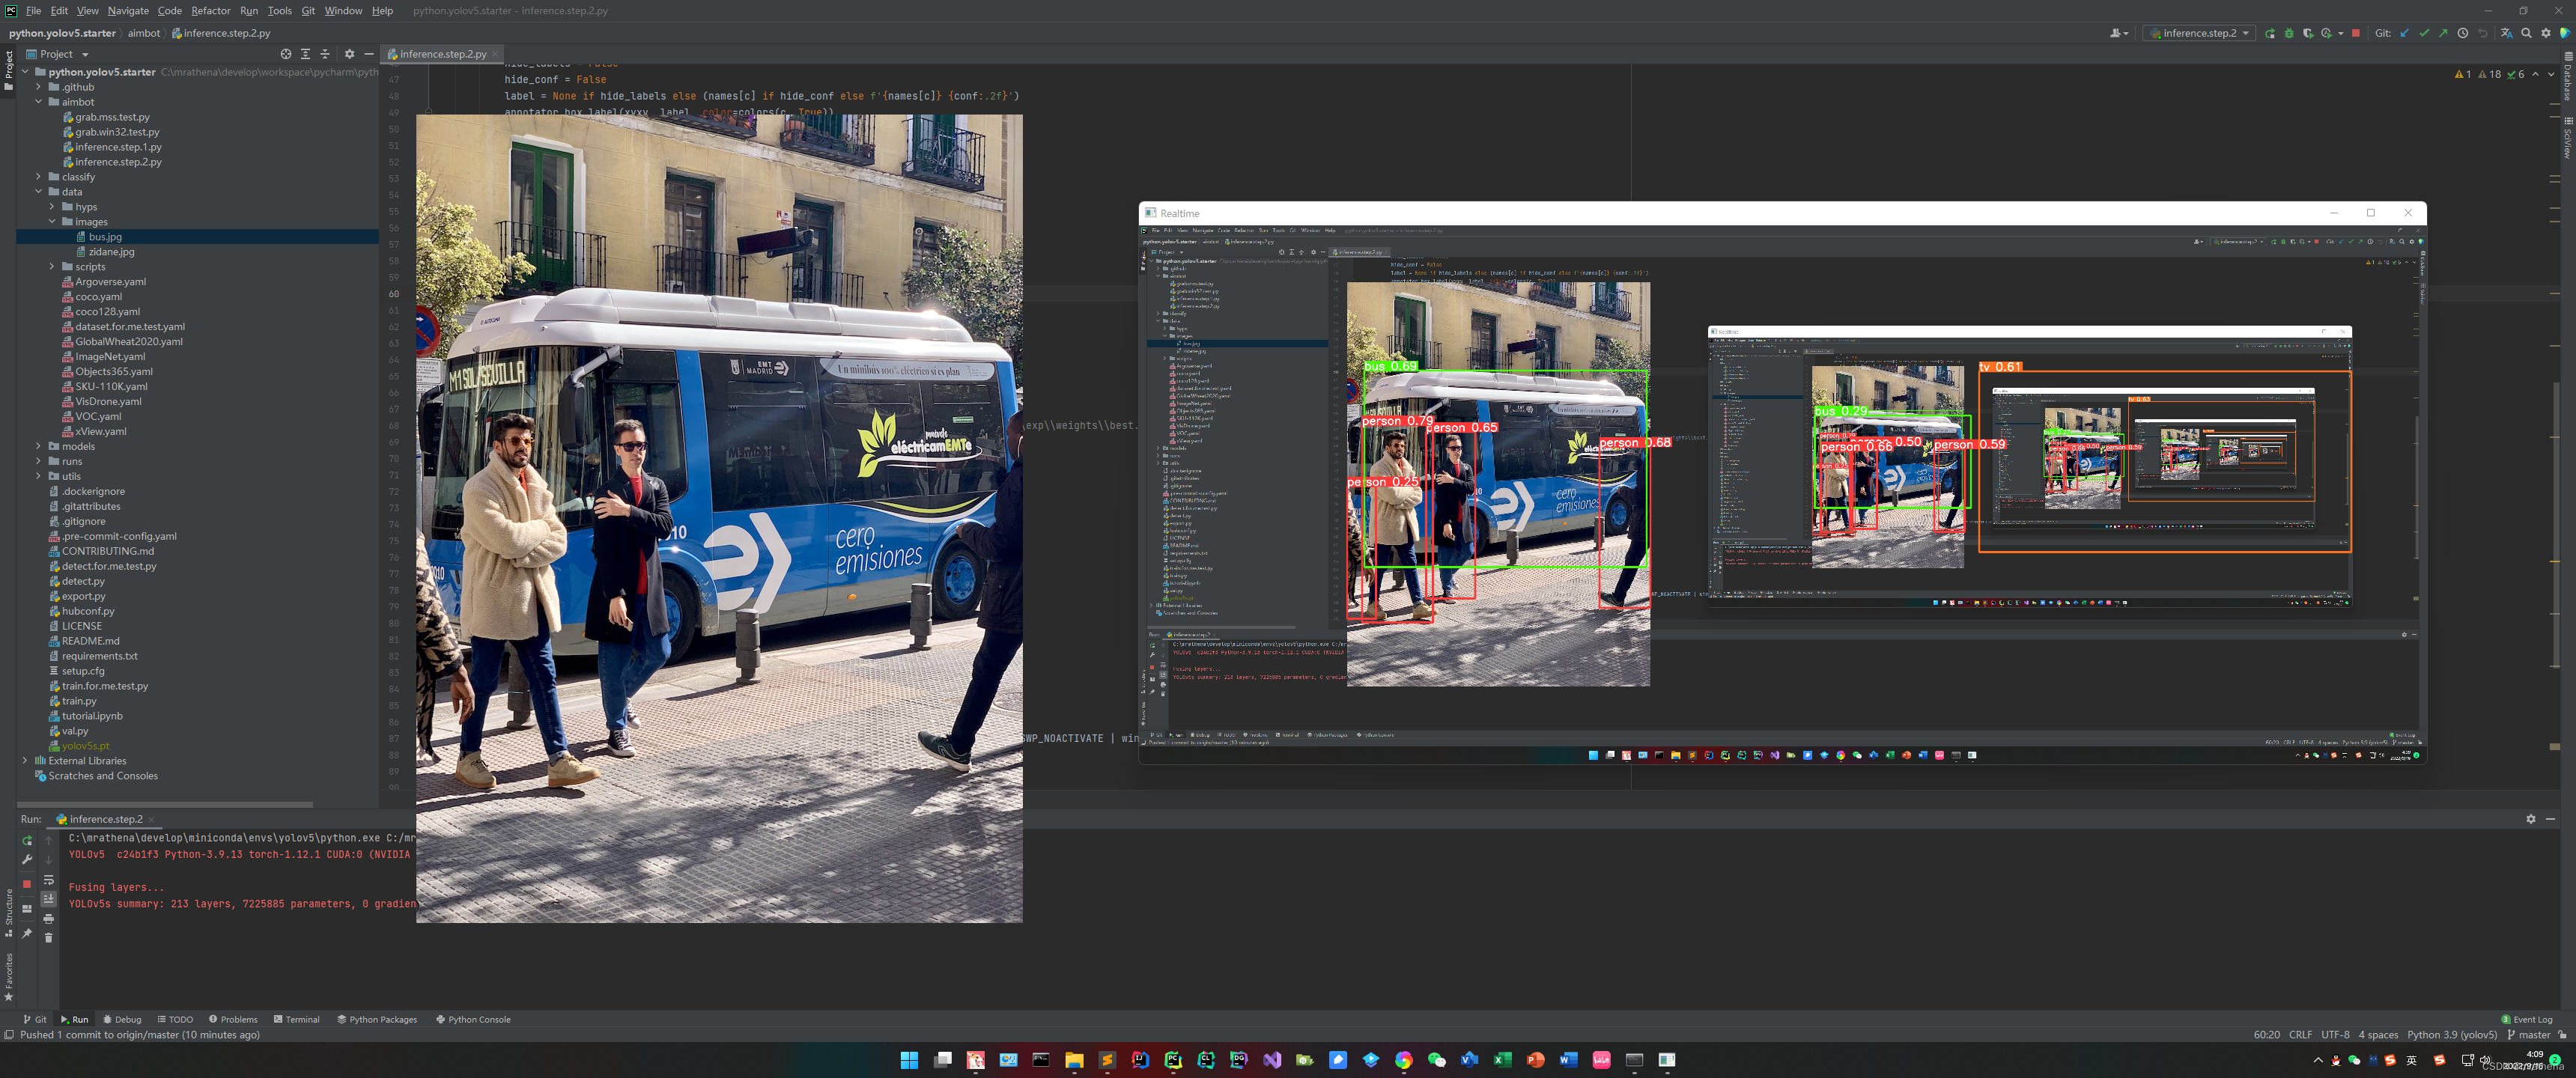
第一步算是完成了, 可以输入截图输出检测过的图, 但是如果要实现自瞄的话, 还需要多输出写内容, 比如每一个目标的坐标等信息
透明窗体绘制
另外就是在桌面看起来还比较实时, 但是在游戏里卡的要死, 尝试过截取半屏, 但效果还是不太理想, 盲猜是大屏已经让显卡力所不及, 检测更是让显卡雪上加霜, 可以试试降低特效
所以我想换个法子, 不展示图片, 而是直接做一个透明穿透的窗体覆盖在最上层, 把检测信息传进去直接画框, 试试效果怎么样
test.tkinter.py
import threading
import tkinter


def draw(canvas, x1, y1, x2, y2, width=2, color='red', text=None):
    canvas.create_rectangle(x1, y1, x2, y2, width=width, outline=color)
    if text is not None:
        canvas.create_rectangle(x1, y1 - 20, x2, y1, fill='black')
        canvas.create_text(x1, y1, anchor='sw', text=text, fill='yellow', font=('', 16))


def window():
    TRANSCOLOUR = 'gray'
    root = tkinter.Tk() # 创建
    root.attributes('-fullscreen', 1) # 全屏
    root.attributes('-topmost', -1) # 置顶
    root.wm_attributes('-transparentcolor', TRANSCOLOUR) # 设置透明且穿透的颜色
    root['bg'] = TRANSCOLOUR # 设置透明且穿透
    # 添加画布
    canvas = tkinter.Canvas(root, background=TRANSCOLOUR, borderwidth=0, highlightthickness=0)
    canvas.pack(fill=tkinter.BOTH, expand=tkinter.YES)
    canvas.pack()

    def foo():
        while True:
            for i in range(1, 1000):
                if i % 100 == 0:
                    draw(canvas, i, i, i + 100, i + 100, color='yellow', text='你好 0.89')
            canvas.delete(tkinter.ALL)

    # 创建并启动线程
    t = threading.Thread(target=foo)
    t.start()
    # 主循环
    root.mainloop()


window()
创建一个线程, 做目标检测和绘制, 可以添加一个退出的快捷键
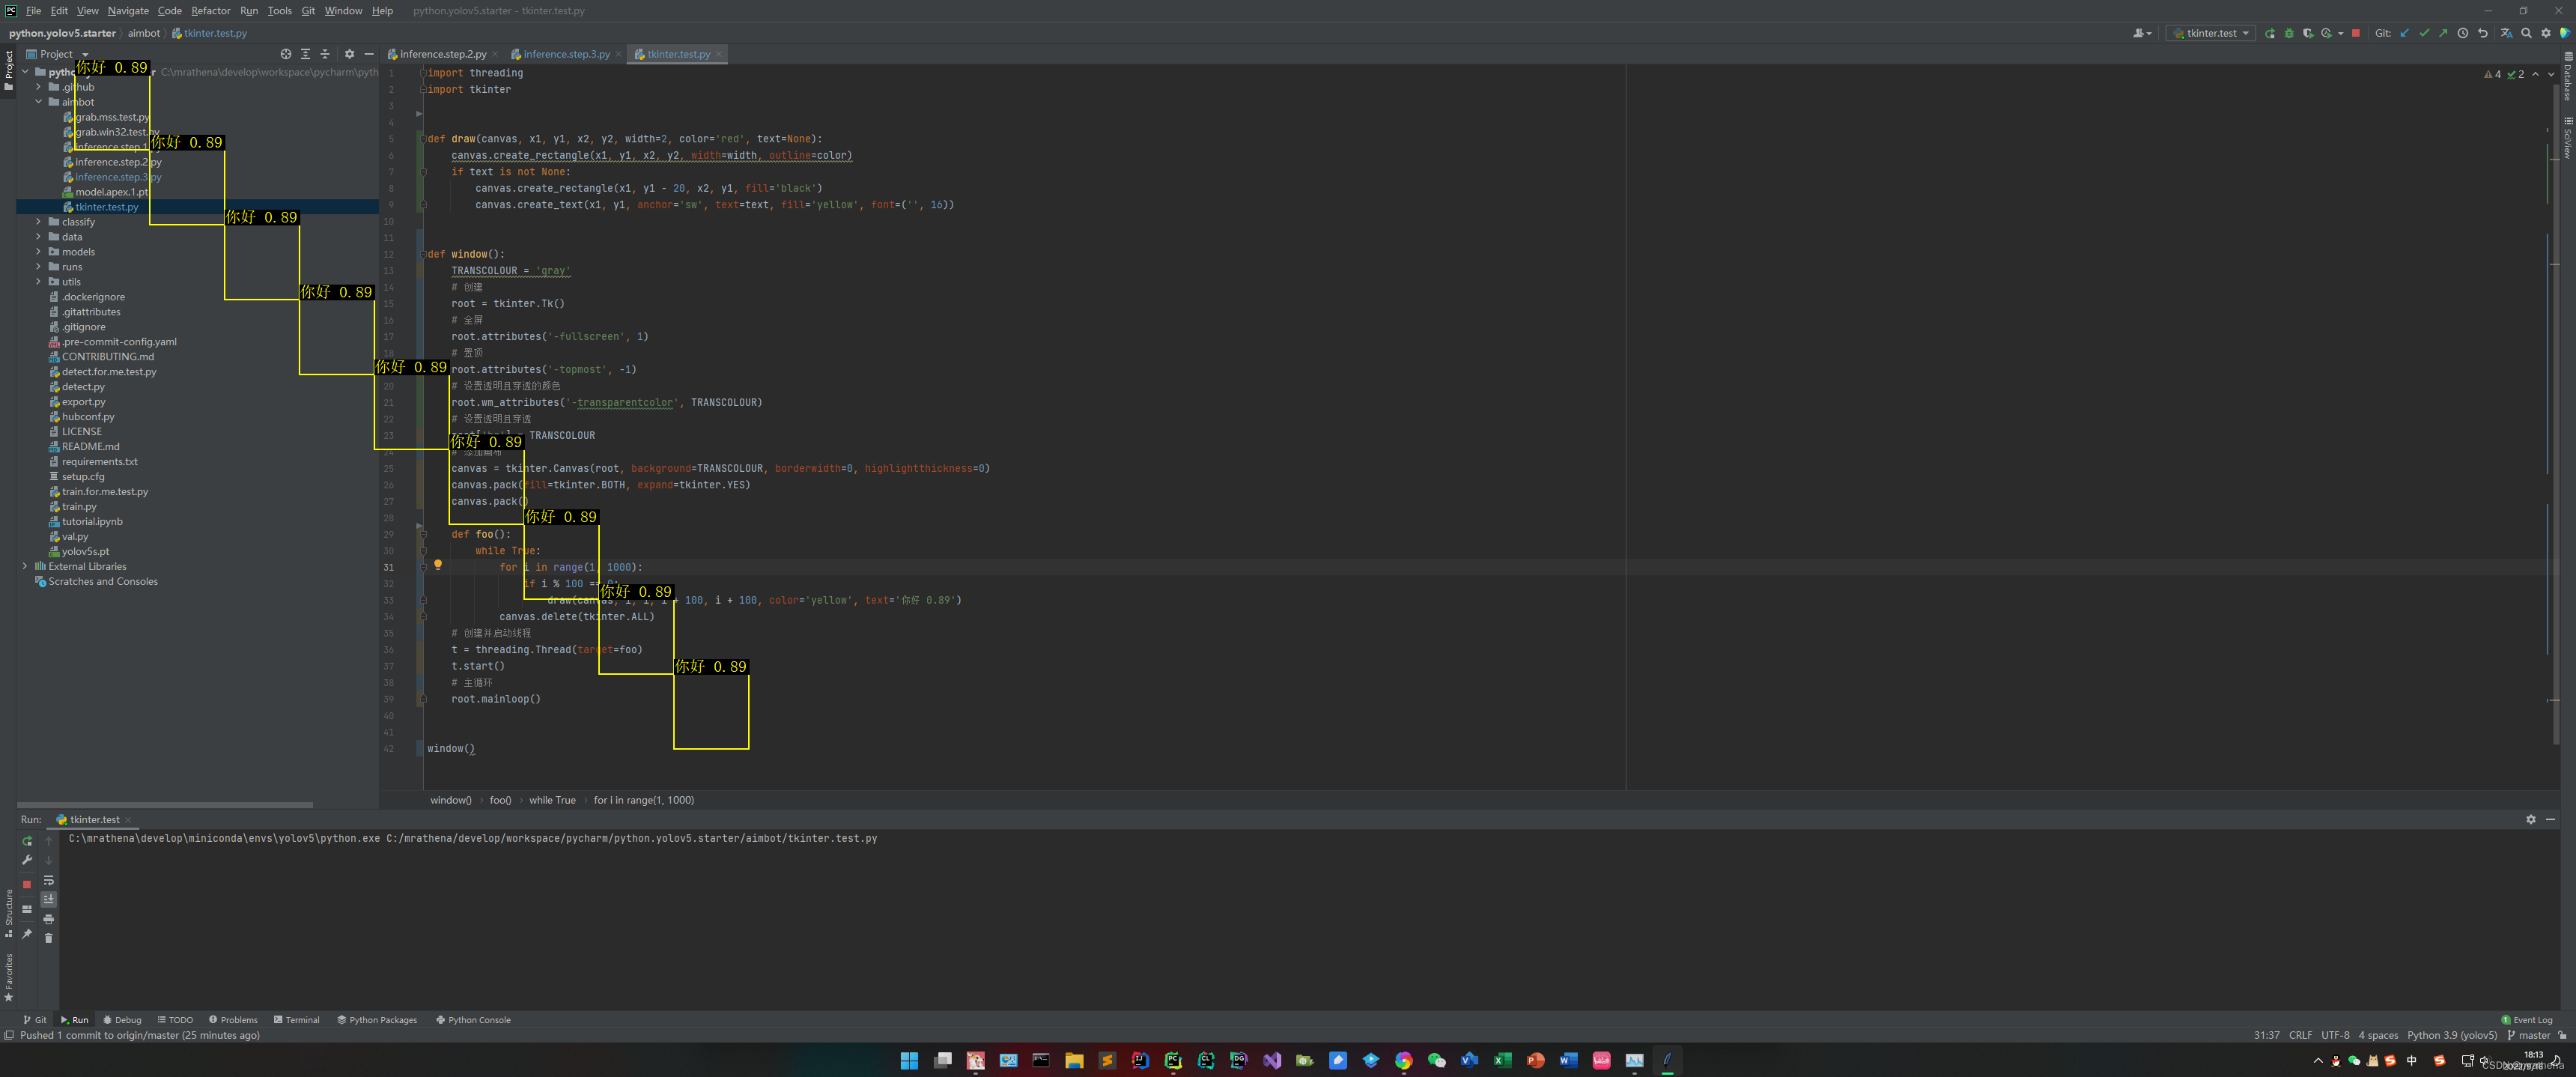
初步实现
启动后, 启动鼠标键盘快捷键监听线程, 创建透明穿透窗体, 启动子线程循环
- 鼠标侧上键: 开启 / 关闭 检测边框
- 鼠标侧下键: 开启 / 关闭 自动瞄准, 预留, 还没有实现
- 键盘 End 键: 结束程序运行
我这边设备是 AMD R7 2700X + Nvidia 2080 + 屏幕(3440*1440), 用的模型是 yolov5s.pt, 效果不太好, 这还是没有进游戏的时候
- 不开两个开关时, 流程不进检测, 相当于CPU死循环, 这时打字有卡顿现象, CPU占用10左右, GPU占用0
- 开任何一个开关后(截全屏), 流程进检测, CPU占用10左右, GPU占用50左右
- 开任何一个开关后(截中间1/9屏), 流程进检测, CPU占用10左右, GPU占用60-80(???怀疑和我用的小模型有关)
下面是各种情况的耗时(ms)
- 截中间1/9屏(没有目标): 截图7左右, 检测:10-15, 画框:0
- 截中间1/9屏(有几个目标): 截图10-15, 检测:15-20, 画框:30-10
- 截中间1/9屏(有多个目标): 截图10-15, 检测:20-25, 画框:30-70, 这个画框相当慢
- 截全屏(没有目标): 截图40-50, 检测:10-15, 画框:0
- 截全屏(有几个目标): 截图10-15, 检测:15-20, 画框:10-30, 框越大越费时
我觉得如果能控制在10ms左右就可以了. 总结就是, 目标检测比较稳定, 截图越大越耗时, 画框越多框越大越耗时
3个全局变量
- ExitFlag: 按下 Esc 后设置为 True, 用于退出子线程循环, 结束程序
- SwitchShowBox: 画框开关
- SwitchAutoAim: 自瞄开关
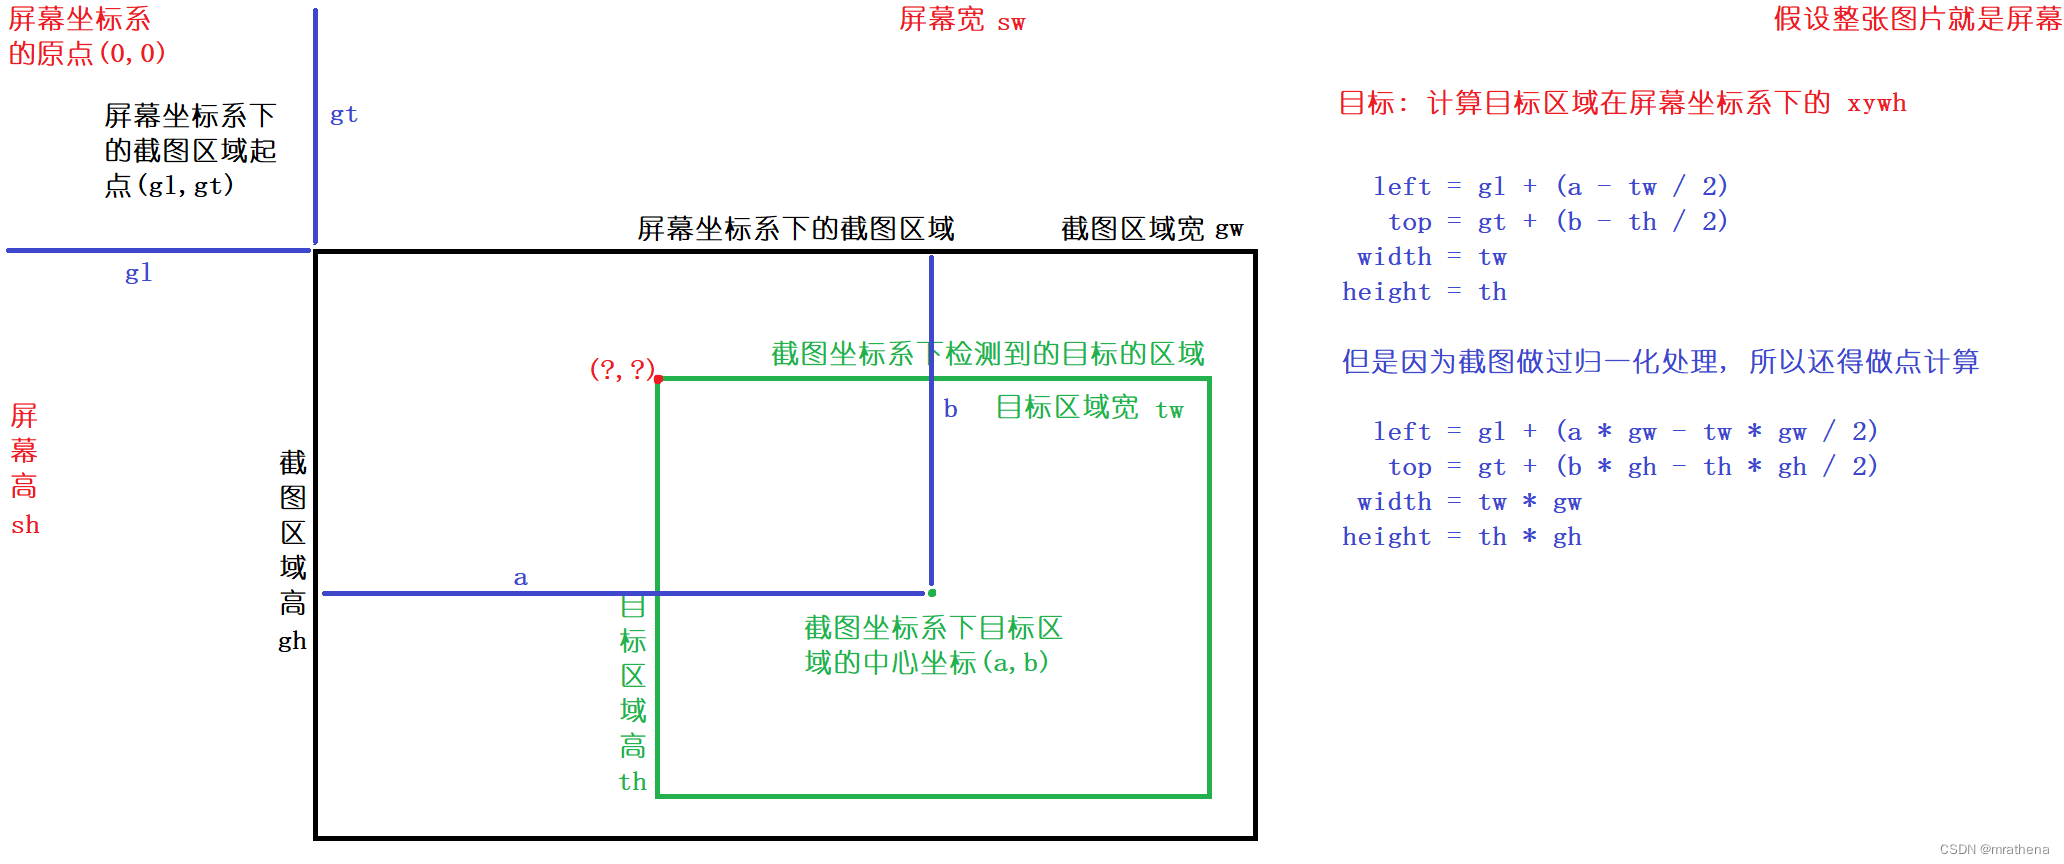
在 aimbot.py 里 getAims 方法中涉及到将截图坐标系内的目标检测矩形转换成屏幕坐标系内的 xywh, 原理如下
aimbot.py
import time

import cv2
import numpy as np
import torch
import mss
import win32con
import win32gui
import win32api
import win32print

from models.common import DetectMultiBackend
from utils.augmentations import letterbox
from utils.general import non_max_suppression, scale_coords, xyxy2xywh
from utils.plots import Annotator, colors
from utils.torch_utils import select_device


# 获取缩放后的分辨率
def getScreenResolution():
    return win32api.GetSystemMetrics(win32con.SM_XVIRTUALSCREEN), win32api.GetSystemMetrics(win32con.SM_YVIRTUALSCREEN)


# 获取真实的分辨率
def getScreenRealResolution():
    hDC = win32gui.GetDC(0)
    w = win32print.GetDeviceCaps(hDC, win32con.DESKTOPHORZRES)  # 横向分辨率
    h = win32print.GetDeviceCaps(hDC, win32con.DESKTOPVERTRES)  # 纵向分辨率
    return w, h


sct = mss.mss()


def grab(monitor):
    img = sct.grab(monitor=monitor)
    img = np.array(img)
    img = cv2.cvtColor(img, cv2.COLOR_BGRA2BGR)
    return img


def getDrivce():
    return select_device('');


def loadModel(device, path):
    model = DetectMultiBackend(path, device=device, dnn=False, data=None, fp16=False)
    model.warmup(imgsz=(1, 3, *[640, 640]))  # warmup
    return model


def foo(device, img):
    # 拿到 dataset 的 im
    im = letterbox(img, [640, 640], stride=32, auto=True)[0]
    im = im.transpose((2, 0, 1))[::-1]  # HWC to CHW, BGR to RGB
    im = np.ascontiguousarray(im)
    im = torch.from_numpy(im).to(device)
    # im = im.half() if model.fp16 else im.float()  # uint8 to fp16/32
    im = im.float()  # uint8 to fp16/32
    im /= 255  # 0 - 255 to 0.0 - 1.0
    if len(im.shape) == 3:
        im = im[None]  # expand for batch dim
    return im


def inference(device, model, img):
    im = foo(device, img)
    pred = model(im, augment=False, visualize=False)
    # pred = non_max_suppression(pred, conf_thres, iou_thres, classes, agnostic_nms, max_det=max_det)
    pred = non_max_suppression(pred, 0.25, 0.45, None, False, max_det=1000)

    names = model.module.names if hasattr(model, 'module') else model.names  # get class names
    det = pred[0]
    annotator = Annotator(img, line_width=3, example=str(names))
    if len(det):
        det[:, :4] = scale_coords(im.shape[2:], det[:, :4], img.shape).round()
        for *xyxy, conf, cls in reversed(det):
            c = int(cls)  # integer class
            hide_labels = False
            hide_conf = False
            label = None if hide_labels else (names[c] if hide_conf else f'{

      names[c]} {

      conf:.2f}')
            annotator.box_label(xyxy, label, color=colors(c, True))
    return annotator.result()


class Aimbot():
    def __init__(self, grab, model):
        # 屏幕宽高
        resolution = getScreenResolution()
        self.sw = resolution[0]
        self.sh = resolution[1]
        # 截屏范围 grab = [left, top, width, height]
        self.gl = grab[0]
        self.gt = grab[1]
        self.gw = grab[2]
        self.gh = grab[3]
        self.grab = {

    'left': self.gl, 'top': self.gt, 'width': self.gw, 'height': self.gh}
        # yolo
        self.device = getDrivce()
        self.model = loadModel(self.device, model)

    def getAims(self):
        # 不会用, 尝试了下面第一种, 效果和不写差不多
        # with torch.no_grad():
        # @torch.no_grad

        # 截图
        t1 = time.perf_counter()
        img = grab(self.grab)
        t2 = time.perf_counter()
        # 检测
        im = foo(self.device, img)

        pred = self.model(im, augment=False, visualize=False)
        # pred = non_max_suppression(pred, conf_thres, iou_thres, classes, agnostic_nms, max_det=max_det)
        pred = non_max_suppression(pred, 0.25, 0.45, None, False, max_det=1000)

        det = pred[0]
        aims = []
        if len(det):
            names = self.model.module.names if hasattr(self.model, 'module') else self.model.names  # get class names
            gn = torch.tensor(img.shape)[[1, 0, 1, 0]]  # normalization gain whwh
            det[:, :4] = scale_coords(im.shape[2:], det[:, :4], img.shape).round()

            for *xyxy, conf, cls in reversed(det):
                xywh = (xyxy2xywh(torch.tensor(xyxy).view(1, 4)) / gn).view(-1).tolist()  # normalized xywh
                c = int(cls)  # integer class

                label = f'{

      names[c]} {

      conf:.2f}'
                # 计算相对屏幕坐标系的点位
                left = self.gl + ((xywh[0] * self.gw) - (xywh[2] * self.gw) / 2)
                top = self.gt + ((xywh[1] * self.gh) - (xywh[3] * self.gh) / 2)
                width = xywh[2] * self.gw
                height = xywh[3] * self.gh

                aims.append([label, left, top, width, height])
        t3 = time.perf_counter()
        print(f'截图:{

      int((t2 - t1) * 1000)}ms, 目标检测:{

      int((t3 - t2) * 1000)}ms, 目标数量:{

      len(aims)}, 总计:{

      int((t3 - t1) * 1000)}ms')
        return aims
inference.step.3.py
import threading
import time
import tkinter
import pynput

from aimbot import Aimbot


ExitFlag = False  # 退出程序标记
SwitchShowBox = False  # 是否显框
SwitchAutoAim = False  # 是否自瞄


def onClick(x, y, button, pressed):
    # print(f'button {button} {"pressed" if pressed else "released"} at ({x},{y})')
    global ExitFlag, SwitchShowBox, SwitchAutoAim
    if ExitFlag:
        return False  # 结束监听线程
    if not pressed:
        if pynput.mouse.Button.x2 == button:
            # 侧上键
            SwitchShowBox = not SwitchShowBox
            print(f'Switch ShowBox: {

      "enable" if SwitchShowBox else "disable"}')
        elif pynput.mouse.Button.x1 == button:
            # 侧下键
            SwitchAutoAim = not SwitchAutoAim
            print(f'Switch AutoAim: {

      "enable" if SwitchAutoAim else "disable"}')


def onRelease(key):
    # print(f'{key} released')
    if key == pynput.keyboard.Key.end:
        global ExitFlag
        ExitFlag = True
        return False


mouseListener = pynput.mouse.Listener(on_click=onClick)
mouseListener.start()
keyboardListener = pynput.keyboard.Listener(on_release=onRelease)
keyboardListener.start()


def draw(canvas, x1, y1, x2, y2, width=2, color='red', text=None):
    canvas.create_rectangle(x1, y1, x2, y2, width=width, outline=color)
    if text is not None:
        canvas.create_rectangle(x1, y1 - 20, x2, y1, fill='black')
        canvas.create_text(x1, y1, anchor='sw', text=text, fill='yellow', font=('', 16))


# 主程序
TRANSCOLOUR = 'gray'
root = tkinter.Tk()  # 创建
root.attributes('-fullscreen', 1)  # 全屏
root.attributes('-topmost', -1)  # 置顶
root.wm_attributes('-transparentcolor', TRANSCOLOUR)  # 设置透明且穿透的颜色
root['bg'] = TRANSCOLOUR  # 设置透明且穿透
# 添加画布
canvas = tkinter.Canvas(root, background=TRANSCOLOUR, borderwidth=0, highlightthickness=0)
canvas.pack(fill=tkinter.BOTH, expand=tkinter.YES)
canvas.pack()

aimbot = Aimbot([0, 0, 3440, 1440], '../yolov5n.pt')
# aimbot = Aimbot([0, 0, 3440, 1440], '../yolov5s.pt')
# aimbot = Aimbot([0, 0, 3440, 1440], '../yolov5n6.pt')
# aimbot = Aimbot([3440 // 3, 1440 // 3, 3440 // 3, 1440 // 3], '../yolov5s.pt')
print("加载完成")

def foo():

    global ExitFlag, SwitchShowBox, SwitchAutoAim
    while ExitFlag is False:

        # print(f'{SwitchShowBox}, {SwitchAutoAim}')
        if (SwitchShowBox is False) & (SwitchAutoAim is False):
            continue

        t1 = time.perf_counter()
        canvas.delete(tkinter.ALL)
        t2 = time.perf_counter()
        aims = aimbot.getAims()
        t3 = time.perf_counter()
        for aim in aims:
            if SwitchShowBox:
                draw(canvas, aim[1], aim[2], aim[1] + aim[3], aim[2] + aim[4], 5, text=aim[0])
        t4 = time.perf_counter()
        # 瞄准, 预留
        t5 = time.perf_counter()

        # print(f'画布清理:{int((t2 - t1) * 1000)}ms, 目标检测:{int((t3 - t2) * 1000)}ms, 目标数量:{len(aims)}, 画框:{int((t4 - t3) * 1000)}ms, 瞄准:{int((t5 - t4) * 1000)}ms, 总计:{int((t5 - t1) * 1000)}ms, 画框开关:{SwitchShowBox}, 自瞄开关:{SwitchAutoAim}')

    # 循环结束, 程序结束
    canvas.delete(tkinter.ALL)
    # 关闭主窗口来结束主线程
    print('Esc')
    root.destroy()


# 创建并启动线程
t = threading.Thread(target=foo, daemon=True)
t.start()

# 主循环
root.mainloop()
训练模型
注意: 不一定都得自己手动标, 标图有多种方式, 如纯手动, 半手动(应用某模型先检测再微调), 伪真实(拼接图片生成数据)等, 以下是纯手动
labelimg
labelimg 是在训练模型过程中用来标记目标的工具
在虚拟环境中安装 labelimg, 用于标记, 安装完成后执行 labelimg 会打开GUI界面
pip install labelimg
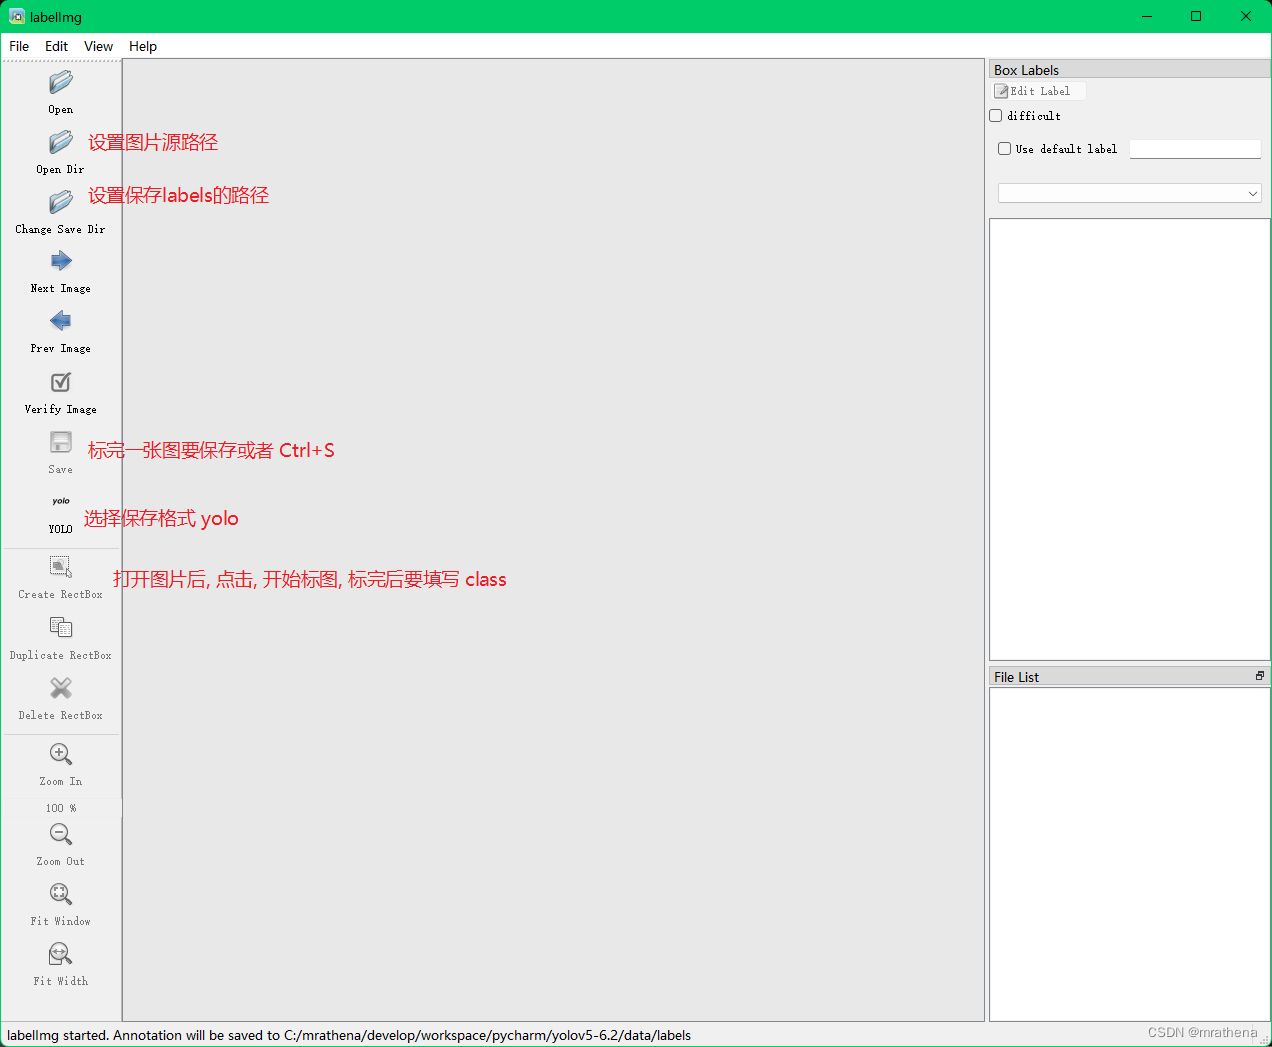
创建数据集文件夹, 我的数据集目录是 D:\resource\develop\python\dataset.yolov5.6.2, 本次训练集叫做 test, 所以在数据集下新建 test 目录
test 下创建 data/images 作为原始图片库, 创建 data/labels 作为标记信息库
然后在 labelimg 中设置好读取路径和保存路径, 开始标图
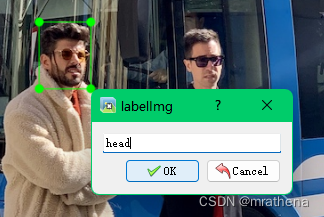
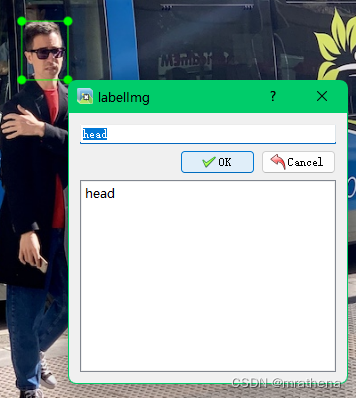

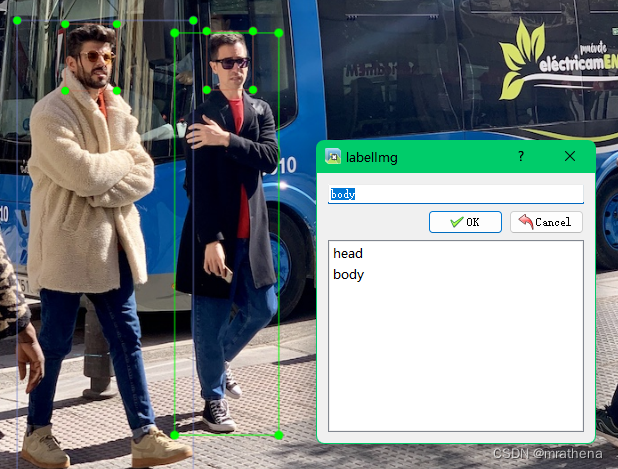
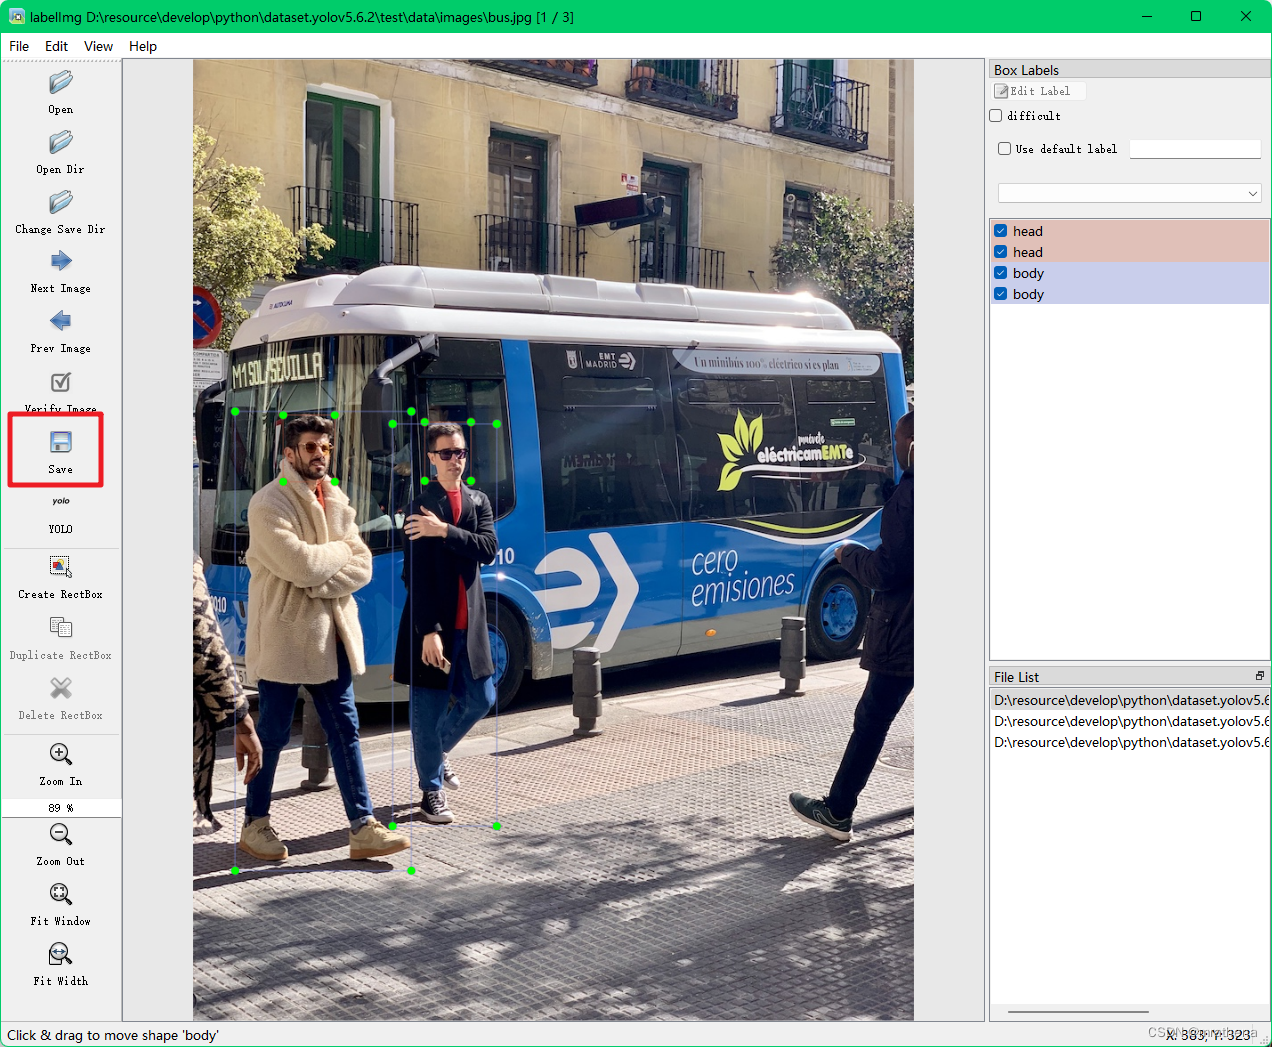
标好一张图后, 记得保存, 在 data/labels 目录下会自动生成 classes.txt 文件和图片对应的标记文件如 bus.txt

把其他图也标好, 下面是图与标记的对应, 注意图片最好不要有中文, 防止万一
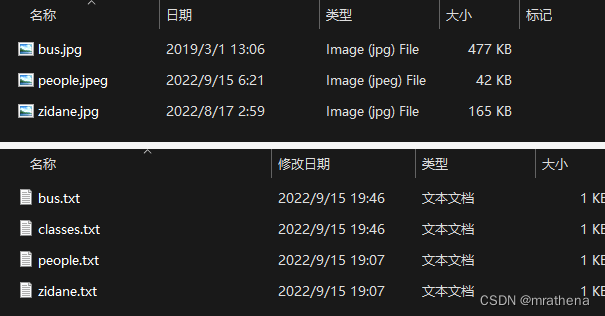
classes.txt 与 标记文件说明
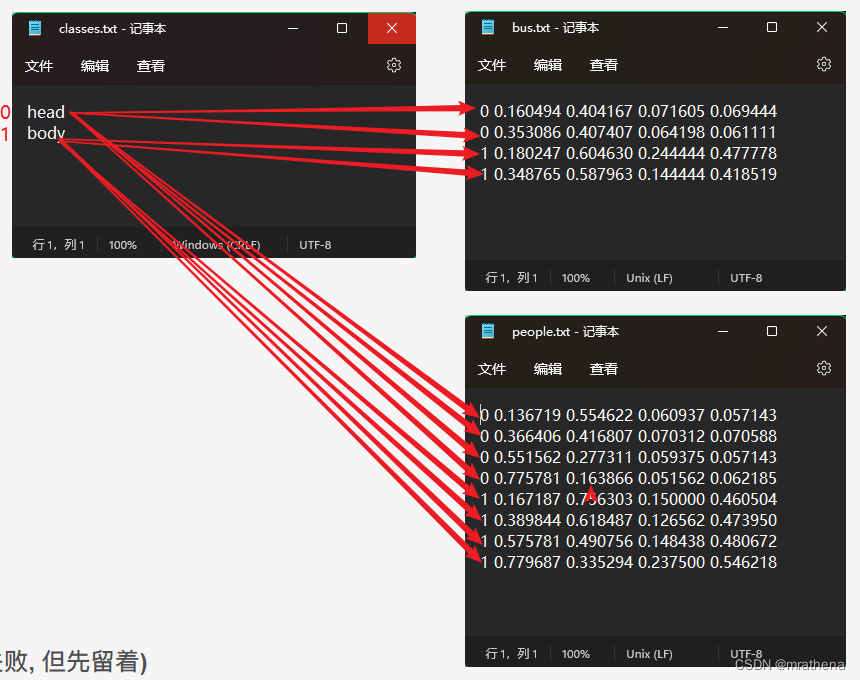
classes.txt 中就是标记时分出来的两个类目, 这里一个是 head 一个是 body, 序号从0开始, 从上到下
标记文件中一行代表图片上的一个标记, 几行就是有几个标记
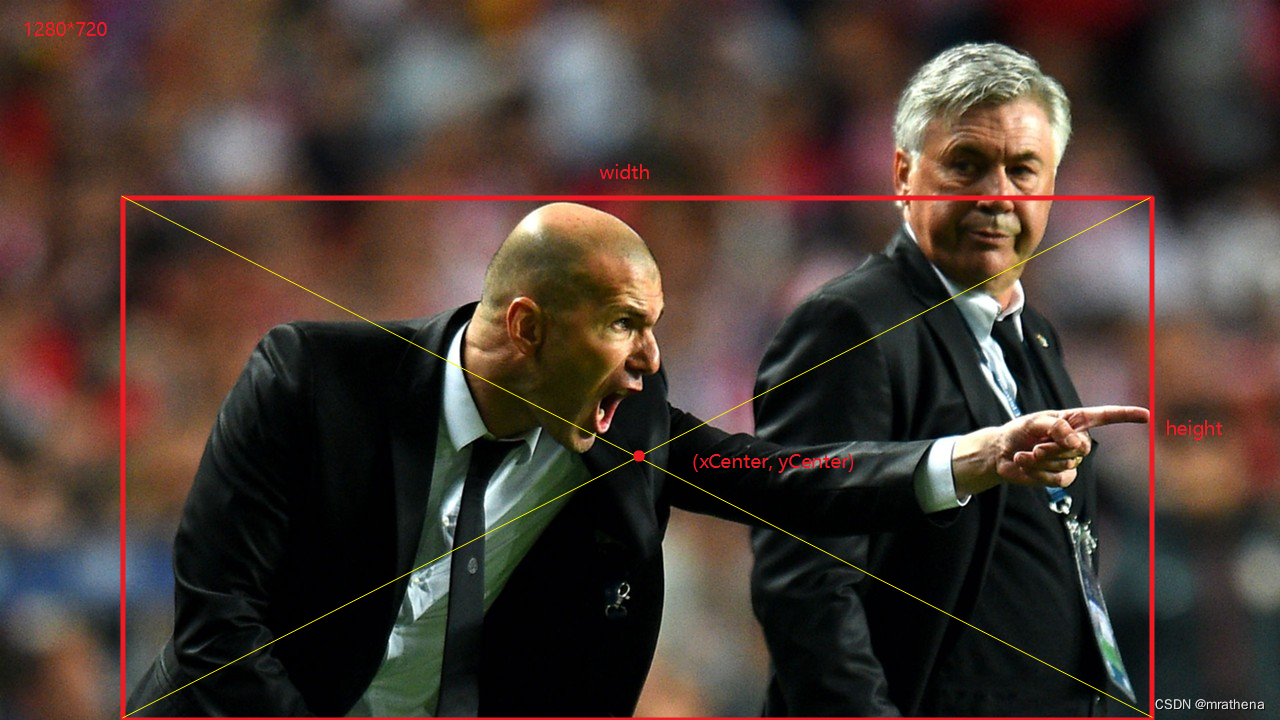
标记文件中每行有5个数据, 第一个是 类目索引, 后面4个是归一化(把长宽看成是1,其他点等比缩小)的 xCenter, yCenter, width, height
简单尝试
编写数据集配置文件
拷贝项目下的 coco128.yaml 更名为 dataset.for.me.test.yaml 并修改内容
path: D:\resource\develop\python\dataset.yolov5.6.2\test
train: data/images  # train images (relative to 'path') 128 images
val: data/labels  # val images (relative to 'path') 128 images

# Classes
nc: 2  # number of classes
names: ['head', 'body']  # class names
- path: 数据集根目录
- train: 源图片目录
- val:
- nc: 标记的类别的数目
- names: 标记的类别, classes.txt 文件从上到下按顺序一个个写过来
编写训练文件参数
拷贝项目下的 train.py 更名为 train.for.me.test.py 并修改 parse_opt 的内容
- –weights: ROOT / ‘yolov5s.pt’. 可以选择是否基于某个模型训练, 全新训练就 default=‘’
- –data: data/dataset.for.me.test.yaml
- –batch-size: GPU模式下, 每次取这么多个参数跑, 如果报错, 可以改小点
- –project: default=‘D:\resource\develop\python\dataset.yolov5.6.2\test\runs/train’, 训练结果保存位置
运行训练文件
运行报错
OMP: Error #15: Initializing libiomp5md.dll, but found libiomp5md.dll already initialized.
OMP: Hint This means that multiple copies of the OpenMP runtime have been linked into the program. That is dangerous, since it can degrade performance or cause incorrect results. The best thing to do is to ensure that only a single OpenMP runtime is linked into the process, e.g. by avoiding static linking of the OpenMP runtime in any library. As an unsafe, unsupported, undocumented workaround you can set the environment variable KMP_DUPLICATE_LIB_OK=TRUE to allow the program to continue to execute, but that may cause crashes or silently produce incorrect results. For more information, please see http://www.intel.com/software/products/support/.

搜索发现, miniconda 下有两个, 其他的有3个, 其他的应该不影响, 但是 moniconda 下为什么有两个, 我不知道, 该怎么处理, 我不知道, 但我觉得, 不知道不要瞎搞, 所以就按它说的不推荐的方式试试看吧
import os
os.environ['KMP_DUPLICATE_LIB_OK']='True'
如果运行报错
RuntimeError: DataLoader worker (pid(s) 20496) exited unexpectedly
把启动参数里的 --workers 改成 0 试试, 原因我不知道也不会看也看不懂
运行结果
C:\mrathena\develop\miniconda\envs\yolov5\python.exe C:/mrathena/develop/workspace/pycharm/yolov5-6.2/train.for.me.test.py
train.for.me.test: weights=yolov5s.pt, cfg=, data=data\dataset.for.me.test.yaml, hyp=data\hyps\hyp.scratch-low.yaml, epochs=300, batch_size=16, imgsz=640, rect=False, resume=False, nosave=False, noval=False, noautoanchor=False, noplots=False, evolve=None, bucket=, cache=None, image_weights=False, device=, multi_scale=False, single_cls=False, optimizer=SGD, sync_bn=False, workers=8, project=D:\resource\develop\python\dataset.yolov5.6.2\test\runs/train, name=exp, exist_ok=False, quad=False, cos_lr=False, label_smoothing=0.0, patience=100, freeze=[0], save_period=-1, seed=0, local_rank=-1, entity=None, upload_dataset=False, bbox_interval=-1, artifact_alias=latest
github:  YOLOv5 is out of date by 2326 commits. Use `git pull ultralytics master` or `git clone https://github.com/ultralytics/yolov5` to update.
YOLOv5  b899afe Python-3.9.13 torch-1.12.1 CUDA:0 (NVIDIA GeForce RTX 2080, 8192MiB)

hyperparameters: lr0=0.01, lrf=0.01, momentum=0.937, weight_decay=0.0005, warmup_epochs=3.0, warmup_momentum=0.8, warmup_bias_lr=0.1, box=0.05, cls=0.5, cls_pw=1.0, obj=1.0, obj_pw=1.0, iou_t=0.2, anchor_t=4.0, fl_gamma=0.0, hsv_h=0.015, hsv_s=0.7, hsv_v=0.4, degrees=0.0, translate=0.1, scale=0.5, shear=0.0, perspective=0.0, flipud=0.0, fliplr=0.5, mosaic=1.0, mixup=0.0, copy_paste=0.0
Weights & Biases: run 'pip install wandb' to automatically track and visualize YOLOv5  runs in Weights & Biases
ClearML: run 'pip install clearml' to automatically track, visualize and remotely train YOLOv5  in ClearML
TensorBoard: Start with 'tensorboard --logdir D:\resource\develop\python\dataset.yolov5.6.2\test\runs\train', view at http://localhost:6006/
Overriding model.yaml nc=80 with nc=2

                 from  n    params  module                                  arguments
  0                -1  1      3520  models.common.Conv                      [3, 32, 6, 2, 2]
  1                -1  1     18560  models.common.Conv                      [32, 64, 3, 2]
  2                -1  1     18816  models.common.C3                        [64, 64, 1]
  3                -1  1     73984  models.common.Conv                      [64, 128, 3, 2]
  4                -1  2    115712  models.common.C3                        [128, 128, 2]
  5                -1  1    295424  models.common.Conv                      [128, 256, 3, 2]
  6                -1  3    625152  models.common.C3                        [256, 256, 3]
  7                -1  1   1180672  models.common.Conv                      [256, 512, 3, 2]
  8                -1  1   1182720  models.common.C3                        [512, 512, 1]
  9                -1  1    656896  models.common.SPPF                      [512, 512, 5]
 10                -1  1    131584  models.common.Conv                      [512, 256, 1, 1]
 11                -1  1         0  torch.nn.modules.upsampling.Upsample    [None, 2, 'nearest']
 12           [-1, 6]  1         0  models.common.Concat                    [1]
 13                -1  1    361984  models.common.C3                        [512, 256, 1, False]
 14                -1  1     33024  models.common.Conv                      [256, 128, 1, 1]
 15                -1  1         0  torch.nn.modules.upsampling.Upsample    [None, 2, 'nearest']
 16           [-1, 4]  1         0  models.common.Concat                    [1]
 17                -1  1     90880  models.common.C3                        [256, 128, 1, False]
 18                -1  1    147712  models.common.Conv                      [128, 128, 3, 2]
 19          [-1, 14]  1         0  models.common.Concat                    [1]
 20                -1  1    296448  models.common.C3                        [256, 256, 1, False]
 21                -1  1    590336  models.common.Conv                      [256, 256, 3, 2]
 22          [-1, 10]  1         0  models.common.Concat                    [1]
 23                -1  1   1182720  models.common.C3                        [512, 512, 1, False]
 24      [17, 20, 23]  1     18879  models.yolo.Detect                      [2, [[10, 13, 16, 30, 33, 23], [30, 61, 62, 45, 59, 119], [116, 90, 156, 198, 373, 326]], [128, 256, 512]]
Model summary: 270 layers, 7025023 parameters, 7025023 gradients, 16.0 GFLOPs

Transferred 343/349 items from yolov5s.pt
AMP: checks passed
optimizer: SGD(lr=0.01) with parameter groups 57 weight(decay=0.0), 60 weight(decay=0.0005), 60 bias
train: Scanning 'D:\resource\develop\python\dataset.yolov5.6.2\test\data\labels.cache' images and labels... 3 found, 0 missing, 0 empty, 0 corrupt: 100%|██████████| 3/3 [00:00<?, ?it/s]
val: Scanning 'D:\resource\develop\python\dataset.yolov5.6.2\test\data\labels.cache' images and labels... 3 found, 0 missing, 0 empty, 0 corrupt: 100%|██████████| 3/3 [00:00<?, ?it/s]
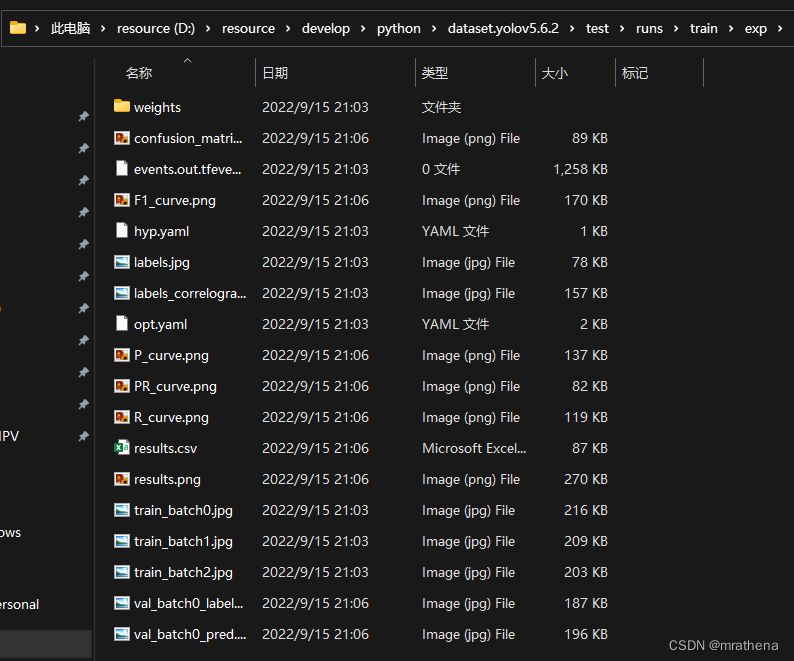
Plotting labels to D:\resource\develop\python\dataset.yolov5.6.2\test\runs\train\exp\labels.jpg...

AutoAnchor: 4.94 anchors/target, 1.000 Best Possible Recall (BPR). Current anchors are a good fit to dataset
Image sizes 640 train, 640 val
Using 3 dataloader workers
Logging results to D:\resource\develop\python\dataset.yolov5.6.2\test\runs\train\exp
Starting training for 300 epochs...

     Epoch   gpu_mem       box       obj       cls    labels  img_size
     0/299    0.621G    0.1239   0.05093    0.0282        24       640: 100%|██████████| 1/1 [00:02<00:00,  2.47s/it]
               Class     Images     Labels          P          R     [email protected] [email protected]:.95: 100%|██████████| 1/1 [00:00<00:00,  6.26it/s]
                 all          3         16    0.00131     0.0625    0.00074    0.00037

     Epoch   gpu_mem       box       obj       cls    labels  img_size
     1/299    0.774G    0.1243   0.04956   0.02861        22       640: 100%|██████████| 1/1 [00:00<00:00,  5.85it/s]
               Class     Images     Labels          P          R     [email protected] [email protected]:.95: 100%|██████████| 1/1 [00:00<00:00,  6.07it/s]
                 all          3         16    0.00342      0.188    0.00261    0.00032

...
...
...

     Epoch   gpu_mem       box       obj       cls    labels  img_size
   298/299     0.83G   0.04905   0.04686  0.006326        26       640: 100%|██████████| 1/1 [00:00<00:00,  8.85it/s]
               Class     Images     Labels          P          R     [email protected] [email protected]:.95: 100%|██████████| 1/1 [00:00<00:00, 12.50it/s]
                 all          3         16      0.942      0.956      0.981      0.603

     Epoch   gpu_mem       box       obj       cls    labels  img_size
   299/299     0.83G   0.05362   0.05724   0.01014        39       640: 100%|██████████| 1/1 [00:00<00:00,  4.93it/s]
               Class     Images     Labels          P          R     [email protected] [email protected]:.95: 100%|██████████| 1/1 [00:00<00:00, 12.50it/s]
                 all          3         16      0.942      0.951      0.981      0.631

300 epochs completed in 0.054 hours.
Optimizer stripped from D:\resource\develop\python\dataset.yolov5.6.2\test\runs\train\exp\weights\last.pt, 14.5MB
Optimizer stripped from D:\resource\develop\python\dataset.yolov5.6.2\test\runs\train\exp\weights\best.pt, 14.5MB

Validating D:\resource\develop\python\dataset.yolov5.6.2\test\runs\train\exp\weights\best.pt...
Fusing layers...
Model summary: 213 layers, 7015519 parameters, 0 gradients, 15.8 GFLOPs
               Class     Images     Labels          P          R     [email protected] [email protected]:.95: 100%|██████████| 1/1 [00:00<00:00,  9.34it/s]
                 all          3         16      0.942      0.952      0.981      0.624
                head          3          8      0.884       0.96      0.967      0.504
                body          3          8          1      0.945      0.995      0.743
Results saved to D:\resource\develop\python\dataset.yolov5.6.2\test\runs\train\exp

测试训练结果
weights 里面的 best.pt 就是本次训练出来的模型了, 测试一下
拷贝项目中的 detect.py 为 detect.for.me.test.py, 修改部分参数
- –weights: ‘D:\resource\develop\python\dataset.yolov5.6.2\test\runs\train\exp\weights\best.pt’
或者修改 inference.step.2.py 中的模型查看效果
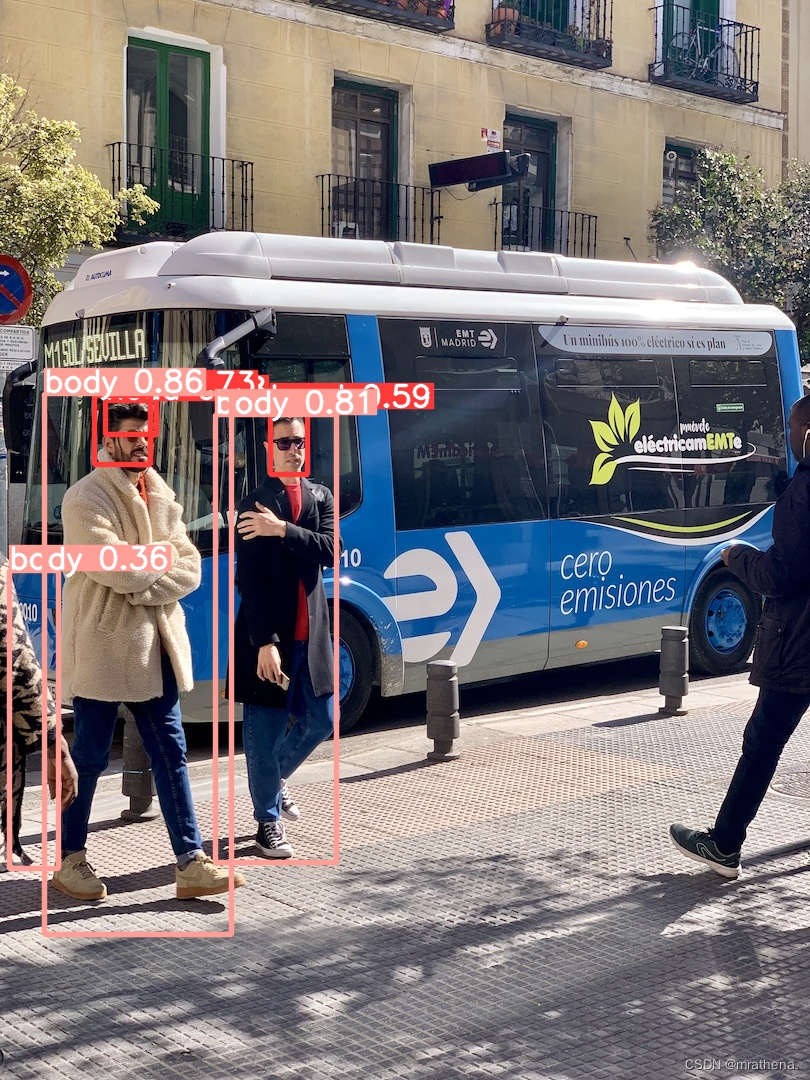
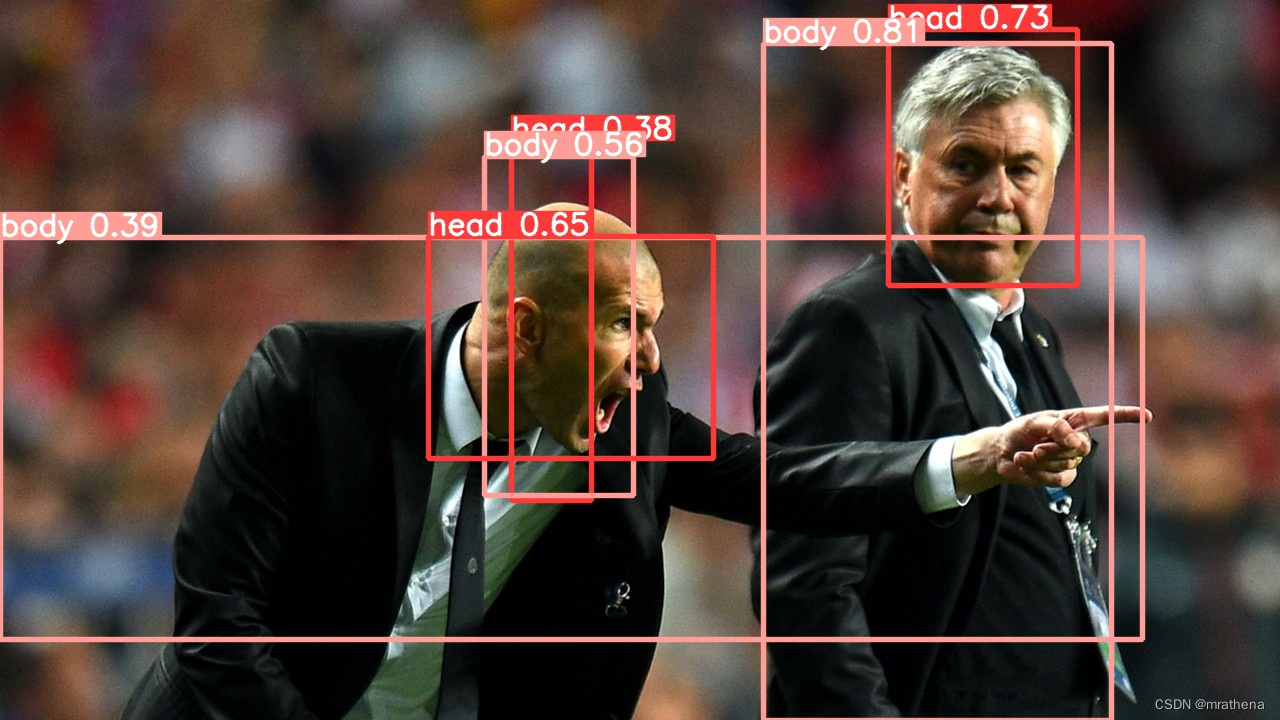
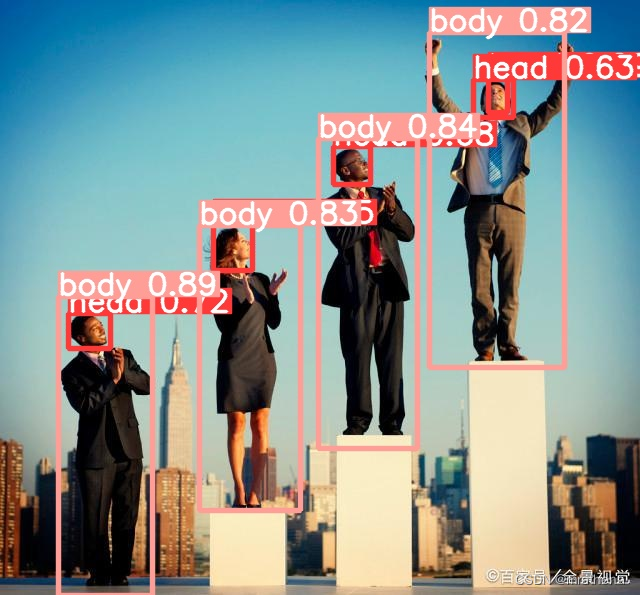
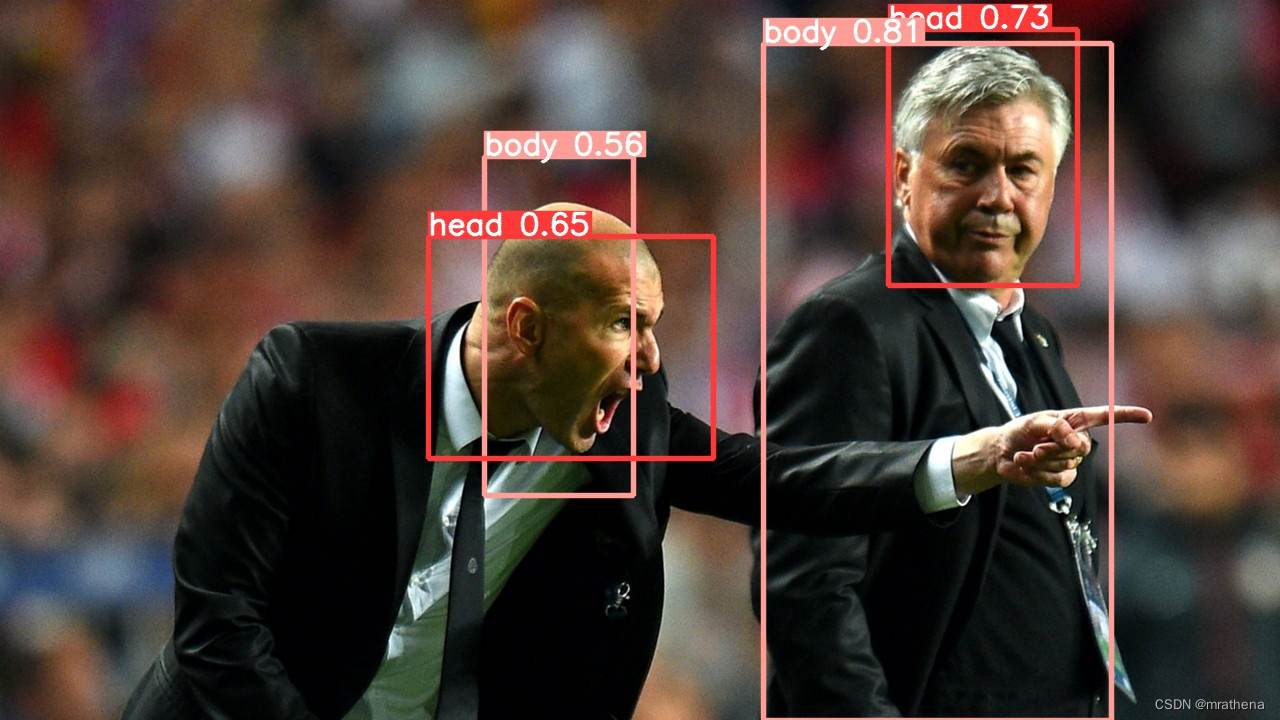
还将就, 毕竟样本也就3张图片, 就是 head 的检测有点问题, 调整下 --iou-thres 为 0 (交并比大于此值的框会被留下) 试试, 哈哈, 模型觉得脑袋更像是个 body, 无所谓了, 本来也就是个 test, 能用就行了
训练 Apex 模型
Yolov5 5.0 环境 (失败, 但先留着)
下载最新版 yolov5 源码, 解压到 pycharm workspace, 用 pycharm 打开, 先取消创建虚拟环境, 在 Anaconda Prompt 中创建虚拟环境
# 创建虚拟环境, 建议创建在项目路径下
# Python 3.8 or later with all requirements.txt dependencies installed, including torch>=1.7. To install run:
conda create -p C:\mrathena\develop\workspace\pycharm\yolov5-5.0\venv python=3.8 # -n和-p不能同时设置 ...
# 激活虚拟环境. 我猜 -n 其实就是 -p 的特殊版本, 相当于指定了路径前缀 conda\envs, 两者其实是一样的
conda activate C:\mrathena\develop\workspace\pycharm\yolov5-5.0\venv
# cd 到项目路径, 执行安装依赖包命令
cd C:\mrathena\develop\workspace\pycharm\yolov5-5.0
# 安装依赖包
pip install -r requirements.txt
Building wheel for pycocotools (pyproject.toml) ... error
error: Microsoft Visual C++ 14.0 or greater is required. Get it with "Microsoft C++ Build Tools": https://visualstudio.microsoft.com/visual-cpp-build-tools/
安装的过程中报了个错, 据说是需要使用 VC++14编译工具编译 wheel 文件, 但现在没有安装这个工具
常规的解决方法肯定是安装这个工具, 因为还有其他包可能也存在这个情况. 但是因为对c/c++不熟悉, 百度的结果也是需要安装一大堆东西, 大约6-7G的样子, 可以说把c++开发桌面程序的开发环境都准备好了 … 就为了编译一下这个包 … 感觉太恶心了
好在有老哥提供了编译并安装好的 pycocotools 的拷贝, 我们直接下载解压拷贝到虚拟环境的 Lib/site-packages 中, 就算我们成功安装了
为了解决这个问题, 或许也可以使用下面办法
- 如果 python<=3.8, 可以试试下载下方别人编译好的二进制安装包 pycocotools-windows.whl, 通过 pip install xxx.whl 来安装
- 如果 python>3.8, 或许得安装c++开发环境/那个1.1G的离线安装文件了, 真恶心
# 安装 pycocotools 报错后, 使用别人安装好的 pycocotools 替代. 下载解压拷贝到虚拟环境的 Lib/site-packages 中, 重新安装依赖包
pip install -r requirements.txt
# 安装成功
pycharm 中右下角选择 python 解释器, 使用该项目下的虚拟环境
运行 detect.py 测试效果, 报下列错误
AttributeError: Can't get attribute 'SPPF' on <module 'models.common' from 'C:\\mrathena\\develop\\workspace\\pycharm\\yolov5-5.0\\models\\common.py'>
解决方案: 到 6.0 的 /models/common.py 文件中, 找到 class SPPF 拷贝到当前版本的相同文件中, 然后引入 import warnings
什么玩意儿, 一堆问题, 恶心死了