分布式id生成算法的有很多种,Twitter的SnowFlake就是其中经典的一种。
概述
SnowFlake算法生成id的结果是一个64bit大小的整数,它的结构如下图:
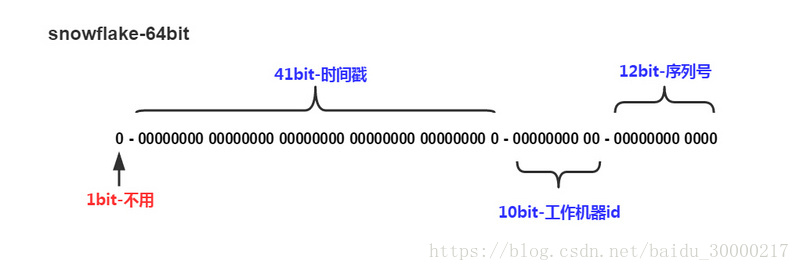
- 1位,不用。二进制中最高位为1的都是负数,但是我们生成的id一般都使用整数,所以这个最高位固定是0
41位,用来记录时间戳(毫秒)。 - 41位可以表示241−1个数字,如果只用来表示正整数(计算机中正数包含0),可以表示的数值范围是:0 至 241−1,减1是因为可表示的数值范围是从0开始算的,而不是1。
也就是说41位可以表示241−1个毫秒的值,转化成单位年则是(241−1)/(1000∗60∗60∗24∗365)=69年 - 10位,用来记录工作机器id。可以部署在210=1024个节点,包括5位datacenterId和5位workerId
5位(bit)可以表示的最大正整数是25−1=31,即可以用0、1、2、3、….31这32个数字,来表示不同的datecenterId或workerId - 12位,序列号,用来记录同毫秒内产生的不同id。12位(bit)可以表示的最大正整数是212−1=4095,即可以用0、1、2、3、….4094这4095个数字,来表示同一机器同一时间截(毫秒)内产生的4095个ID序号
由于在Java中64bit的整数是long类型,所以在Java中SnowFlake算法生成的id就是long来存储的。
SnowFlake可以保证:
1、所有生成的id按时间趋势递增
2、整个分布式系统内不会产生重复id(因为有datacenterId和workerId来做区分)
java实现如下:
public class IdWorker{

    private long workerId;  //机器Id
    private long datacenterId;  //数据库Id
    private long sequence;  //序列号

    private long twepoch = 1288834974657L;  //Id生效起始时间戳

    private long workerIdBits = 5L;     //机器Id占5位
    private long datacenterIdBits = 5L;     //数据库Id占5位
    private long maxWorkerId = -1L ^ (-1L << workerIdBits); //最大机器Id 31
    private long maxDatacenterId = -1L ^ (-1L << datacenterIdBits);     //最大数据库Id 31
    private long sequenceBits = 12L;    //最大序列号 4095

    //各部分数据偏移量
    private long workerIdShift = sequenceBits;
    private long datacenterIdShift = sequenceBits + workerIdBits;
    private long timestampLeftShift = sequenceBits + workerIdBits + datacenterIdBits;
    //序列号掩码,防止溢出
    private long sequenceMask = -1L ^ (-1L << sequenceBits);

    //当前时间戳
    private long lastTimestamp = -1L;

    public IdWorker(long workerId, long datacenterId, long sequence){
        // sanity check for workerId
        if (workerId > maxWorkerId || workerId < 0) {
            throw new IllegalArgumentException(String.format("worker Id can't be greater than %d or less than 0",maxWorkerId));
        }
        if (datacenterId > maxDatacenterId || datacenterId < 0) {
            throw new IllegalArgumentException(String.format("datacenter Id can't be greater than %d or less than 0",maxDatacenterId));
        }
        System.out.printf("worker starting. timestamp left shift %d, datacenter id bits %d, worker id bits %d, sequence bits %d, workerid %d",
                timestampLeftShift, datacenterIdBits, workerIdBits, sequenceBits, workerId);

        this.workerId = workerId;
        this.datacenterId = datacenterId;
        this.sequence = sequence;
    }

    public long getWorkerId(){
        return workerId;
    }

    public long getDatacenterId(){
        return datacenterId;
    }

    public long getTimestamp(){
        return System.currentTimeMillis();
    }

    //获取下一个可用id号,该方法是线程安全的
    public synchronized long nextId() {
        long timestamp = timeGen();

        if (timestamp < lastTimestamp) {
            System.err.printf("clock is moving backwards.  Rejecting requests until %d.", lastTimestamp);
            throw new RuntimeException(String.format("Clock moved backwards.  Refusing to generate id for %d milliseconds",
                    lastTimestamp - timestamp));
        }

        //保证在同一机器同一时间产生不同的序列号
        if (lastTimestamp == timestamp) {
            sequence = (sequence + 1) & sequenceMask;
            if (sequence == 0) {
                timestamp = tilNextMillis(lastTimestamp);
            }
        } else {
            sequence = 0;
        }

        lastTimestamp = timestamp;
        //将各部分数据放在合适的位置
        return ((timestamp - twepoch) << timestampLeftShift) |
                (datacenterId << datacenterIdShift) |
                (workerId << workerIdShift) |
                sequence;
    }

    //下一个可用的系统毫秒数
    private long tilNextMillis(long lastTimestamp) {
        long timestamp = timeGen();
        while (timestamp <= lastTimestamp) {
            timestamp = timeGen();
        }
        return timestamp;
    }

    //系统时间毫秒数
    private long timeGen(){
        return System.currentTimeMillis();
    }

    //---------------测试---------------
    public static void main(String[] args) {
        IdWorker worker = new IdWorker(1,1,1);
        for (int i = 0; i < 30; i++) {
            System.out.println(worker.nextId());
        }
    }
}本篇文章参考自《理解分布式id生成算法SnowFlake》,更详细信息请移步至该文章。