
导语 | 前面的篇章《C++异步:libunifex的scheduler实现》中其实也提到过,libunifex的scheduler实现离实用级其实还有一些差距。对比asio相关的实现,处理细节和完备度上都有较大落差,基于总览篇提到的整体实践思路,我们将更多使用asio的scheduler来作为execution的底层调度器。所以从本篇开始,我们将详细介绍asio相关的实现,本篇主要介绍asio传统的lambda post调度器。
一、asio对通用任务的支持
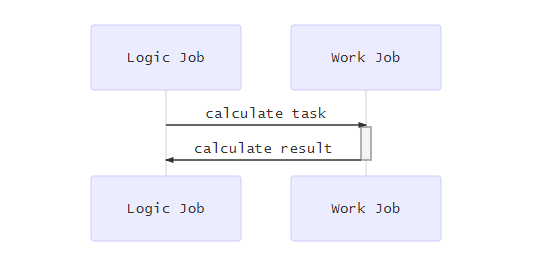
大部分时候我们使用asio更多的是将它用作一个网络库,但实际上asio本身对通用任务的支持做得也是非常棒的。利用c++11引入的lambda和函数对象,我们的通用任务可以很好的包装成lambda之后post()到某个io_context上,然后在io_context::run()的时候执行。执行流程如下图所示:
特定情况下,任务与任务之间存在依赖关系,这点上asio本身提供的strand 的支持,利用strand,我们可以在业务层尽可能少的使用锁等同步原语的情况下,对一个流水线式的组合任务进行编码,如图所示:
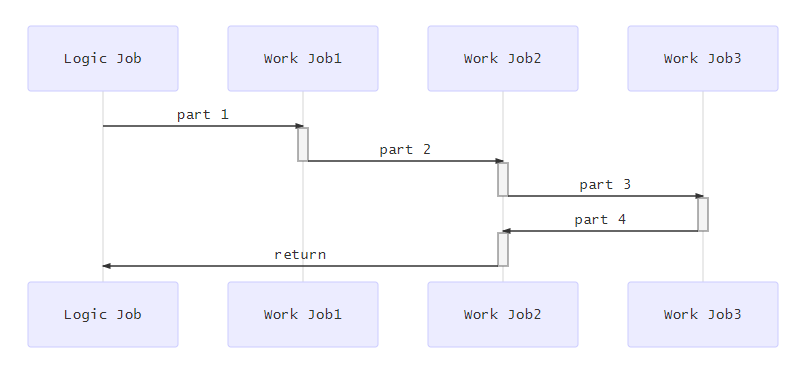
这种多part的流水线式的任务,是很适合使用strand进行封装,得到预期的结果的。使用asio作为通用的并发框架,肯定是一种可行的方式,实际上网易不少项目就是这么做的,最早是他们的服务器使用asio作为底层的并发框架,后来国内知名度较高的messiah引擎,也借鉴并发扬了这种方式,使用asio作为底层基础的并发框架。本文我们也是更多的从源码着手,集中在asio scheduler这部分的实现代码上,来深入了解它的实现和特点。
二、asio版本现状介绍
从1.17(2020)开始尝试向当时的execution提案靠拢,当时的execution也就是那版一开始就Api数量爆炸,后面引入property对api复杂度进行所谓“简化”,跟大部分想的相去甚远的那版,现在的execution提案抛弃了原先的这套规划,但asio当时努力的方向还是原版,所以代码中大量存在了property相关的设施和使用,这里简单列出一些相关的示例代码:
asio::static_thread_pool pool(1);
auto ex1 = ctx.get_executor();


// Get the number of available threads in the pool.
std::size_t n = asio::query(ex1, asio::execution::occupancy);


// Require an executor with blocking.never property.
auto ex2 = asio::require(ex1, asio::execution::blocking.never);
asio::execution::execute(ex2, []{ /*...*/ });


// Prefer an executor that uses a custom allocator.
auto ex3 = asio::prefer(ex2, asio::execution::allocator(my_allocator));
asio::execution::execute(ex3, []{ /*...*/ });
如上面的代码所示,property主要通过三个模板函数来工作:
query(): 查询某属性的值。
require(): 获取满足对应属性的对象。
prefer(): 获取包含定制内容的对象。
对于系统本身特别复杂,需要适应的场景特别多的情况,这种设计本身确实会简化部分业务侧的使用理解复杂度,原来对多种不同Api的记忆,变成了property的选择。
但其实对于库本身的实现来说,我们也容易看到,利用property对多种并发泛式进行约束的方式,本身就具备一定的复杂度,实际上并不那么成熟。对于库的构建来说,很难说它提供的是一个简单易扩展的机制。这个其实tag_invoke机制本身也有跟property相关的对比,个人认为,同样是对库的定制和对泛型的支持的目的,基于cpo的tag invoke本身应该是更值得选择的,而property本身我感觉就比cpo的理解成本要高,用于构建库代码,也会导致库代码本身的复杂度变高,在它没有成为C++标准的一部分之前,这种复杂度的引入肯定是不那么合适的。
这种复杂度的增加我们从当前asio 1.22代码仓库可以比较容易看出,主体功能变化不大(对比1.16版本),但引入了相当多的代码用于在兼容低版本c++的情况下对property等基础功能进行支持,导致整体代码复杂度剧增, 但实际带来的便利性基本看不到。如果抛开对新特性的实验本身,这些调整对asio的版本迭代来说,绝对跟优雅本身相去甚远。
对比向早期execution的靠拢,asio对c++20 coroutine的支持还是可圈可点的,这个从作者近期的实例代码讲解中也能感受到,像awaitable的“||” “&&”等支持,很好的扩展了协程中多任务处理的语义,更容易用更少的代码实现出简单易理解,易维护的异步代码。
回到scheduler本身,我们本篇的重点是asio的scheduler部分实现,这部分在asio加入property机制前后其实变化不大,但由于加入property后,相关的scheduler部分耦合了大量的property相关的机制和代码,带来了比较高的复杂度,本文我们直接选择不包含property的asio1.16的代码进行展开,方便以更低的复杂度分析相关的实现。
三、一些额外的网络知识
首先asio原本的设计是针对网络任务为主的,区别于主流的Reactor模型,asio本身的设计和架构使用了Proactor模型。
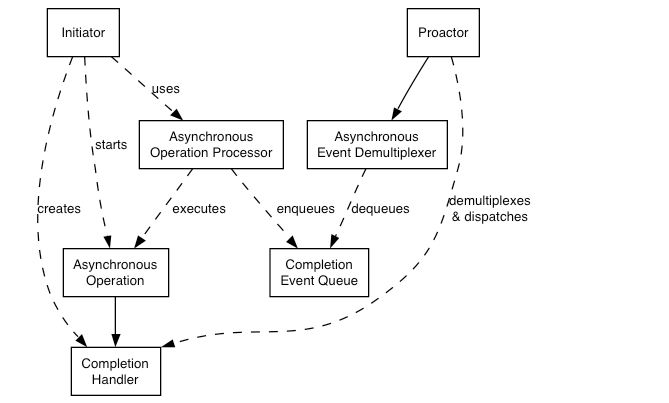
这张图可以说完全就是IOCP的一个工作情况了,新出的io_uring,概念上与此都略有出入,目前看到的最新版的1.22的实现中,io_uring的实现本身依然还是使用了跨平台的scheduler,并没有像iocp一样,利用操作系统本身提供的API完成整个scheduler的实现。
此处我们需要注意的是,真正比较完整的实现了高效的操作系统级的AysncIO,并被大家接受使用的,也就只有Windows平台的IOCP,当然,这种情况最近几年得到了改善,linux平台的新秀io_uring,也被越来越多的人关注和使用起来,不过此处我们选的是1.16的版本,并未包含io_uring的实现,我们先暂时不考虑它的存在。操作系统级的async io实现制约了asio本身Proactor模型的跨平台实现,相关的异步任务调度,也自然的分裂成了两套实现:
对于windows来说,因为IOCP的存在,asio的Proactor模型本身可以完全使用IOCP本身来实现,而对于其他平台,asio就只能选用妥协的方式,使用Reactor+外围Scheduler的模式,来模拟Proactor模型,最终实现一个业务层与IOCP使用体验完全一致的跨平台的Proactor模型。
对于我们当前的项目来说,因为优先选择的是跨平台的一致性和维护的简洁性,所以我们当前阶段,主要使用的是第2种方法中的scheduler,这也是本文分析的重点。而且Reactor本身的实现也跟scheduler的工作是解耦的,所以我们分析中可以直接略过reactor部分,只关注scheduler整体机制的实现了。
因为本篇我们主要关注asio的调度器设计部分,本章网络模型相关的只是简单给出相关的概念,了解它背后的实现思路,方便大家更好的理解它整个调度器的设计和实现思路。
四、operation的实现
作为一个比较函数式的调度器实现,首先要打理的,肯定是相关的函数对象如何投递,如何保存,如何执行了。我们先来看看这一切的基础,operation的实现。
asio的arbitrary task的投递是通过post来完成的,我们也会以此作为起点,来分析一个函数对象,是如何被asio进行处理最终存储起来的。
(一)函数对象的投递-post()过程
我们先以一个代码片断的执行过程来看一下整个post()的过程:
asio::io_context ctx{};
  auto wg = asio::make_work_guard(ctx);
  std::thread tmp_thread([&ctx] { ctx.run(); });


  std::allocator<void> alloc;
  ctx.get_executor().post([] {
    std::cout << "task run!" << std::endl;
    }, alloc);


  std::this_thread::sleep_for(1s);
上面的代码片断中,我们简单构建了一个io_context的执行环境,并向其post()了一个简单的lambda到其上执行。我们以此为基础,来分析一下具体的post()过程,主要包含以下步骤:
io_context->scheduler的传递过程
template <typename Function, typename Allocator>
void io_context::executor_type::post(Function&& f, const Allocator& a) const
{
  typedef typename std::decay<Function>::type function_type;


  // Allocate and construct an operation to wrap the function.
  typedef detail::executor_op<function_type, Allocator, detail::operation> op;
  typename op::ptr p = { detail::addressof(a), op::ptr::allocate(a), 0 };
  p.p = new (p.v) op(static_cast<Function&&>(f), a);


  ASIO_HANDLER_CREATION((this->context(), *p.p,
        "io_context", &this->context(), 0, "post"));


  io_context_.impl_.post_immediate_completion(p.p, false);
  p.v = p.p = 0;
}
中间的ASIO_HANDLER_CREATION()宏是用于辅助handler调试的,对代码的实际执行没有任何影响,我们直接忽略。
op::ptr-operation的内存分配与释放:这部分代码比较晦涩的是op::ptr相关的使用,ptr本身其实是asio通过宏生成的一个用于定制allocator的辅助结构体,我们直接展开宏来看下它的定义:
struct ptr
  {
    const Alloc* a;
    void* v;
    op* p;
    ~ptr()
    {
      reset();
    }
    static op* allocate(const Alloc& a)
{
      typedef typename ::asio::detail::get_recycling_allocator<
        Alloc, purpose>::type recycling_allocator_type;
      ASIO_REBIND_ALLOC(recycling_allocator_type, op) a1(
            ::asio::detail::get_recycling_allocator<
              Alloc, purpose>::get(a));
      return a1.allocate(1);
    }
    void reset()
{
      if (p)
      {
        p->~op();
        p = 0;
      }
      if (v)
      {
        typedef typename ::asio::detail::get_recycling_allocator<
          Alloc, purpose>::type recycling_allocator_type;
        ASIO_REBIND_ALLOC(recycling_allocator_type, op) a1(
              ::asio::detail::get_recycling_allocator<
                Alloc, purpose>::get(*a));
        a1.deallocate(static_cast<op*>(v), 1);
        v = 0;
      }
    }
  }
这个地方的recycling_allocator我们就不具体展开了,主要的作用是asio自己写了一个recycling_allocator,如果外面传入的分配器是std::allocate<>,则自动将分配器替换为asio内部实现的recycling_allocator。ASIO_REBIND_ALLOC是用于编译期判断分配器是否包含rebind_alloc<T>的类型,如果有,则使用这个作为分配器,否则还是直接使用传入的分配器,感兴趣的可以自行了解:
std::allocator_traits
以及它的member alias templates : rebind_alloc<T>
所以对于op::ptr来说,它实现了特定对象(这里就是我们的executor_op)的内存申请,以及reset()时对特定对象调用析构函数并进行内存释放操作。
库作者都比较喜欢写内存分配器,但一般位于业务层之下的库,特性需求都容易接近通用分配器,并没有太多“银弹”可供库作者摘取,正常来说,通用型的内存分配器,简单实现,也是几千行的代码量了,不是在明确业务使用场景下,没有太多取巧的方法。相关复杂度的引入感觉对于库本身不一定是好事。对于asio来说,allocator用户层可定制,基本已经就提供了业务层所有需要的内容了。
理解了op::ptr的类型定义,再来看post的主体代码,就比较好理解了:
typedef typename std::decay<Function>::type function_type;


 // Allocate and construct an operation to wrap the function.
 typedef detail::executor_op<function_type, Allocator, detail::operation> op;
 typename op::ptr p = { detail::addressof(a), op::ptr::allocate(a), 0 };
 p.p = new (p.v) op(static_cast<Function&&>(f), a);


 io_context_.impl_.post_immediate_completion(p.p, false);
 p.v = p.p = 0;
一开始我们在类型为op::ptr的临时变量p初始化的时候,传入了分配器的指针,分配好的一段内存到其中,然后我们再利用replacement new对它进行初始化,注意这个地方不要被实现绕晕了,p.p的类型就是executor_op的指针,然后executor_op负责持有函数对象,这样定制了executor_op的内存分配,就间接的把包含其中的函数对象的内存分配也一并处理了。剩下的部分就是将executor_op的指针丢给io_context.impl,其实就是scheduler,因为我们并不希望相关scope结束的时候,刚申请的executor_op被马上释放,所以这里需要将p.v和p.p都置成空。到目前为止executor_op的定义和scheduler::post_immediate_completion(),我们接下来继续展开相关的实现。
executor_op
template <typename Handler, typename Alloc,
    typename Operation = scheduler_operation>
class executor_op : public Operation
{
public:
  ASIO_DEFINE_HANDLER_ALLOCATOR_PTR(executor_op);


  template <typename H>
  executor_op(H&& h, const Alloc& allocator)
    : Operation(&executor_op::do_complete),
      handler_(static_cast<H&&>(h)),
      allocator_(allocator)
  {
  }


  static void do_complete(void* owner, Operation* base,
      const asio::error_code& /*ec*/,
      std::size_t /*bytes_transferred*/)
{
    // Take ownership of the handler object.
    executor_op* o(static_cast<executor_op*>(base));
    Alloc allocator(o->allocator_);
    ptr p = { detail::addressof(allocator), o, o };


    ASIO_HANDLER_COMPLETION((*o));


    // Make a copy of the handler so that the memory can be deallocated before
    // the upcall is made. Even if we're not about to make an upcall, a
    // sub-object of the handler may be the true owner of the memory associated
    // with the handler. Consequently, a local copy of the handler is required
    // to ensure that any owning sub-object remains valid until after we have
    // deallocated the memory here.
    Handler handler(static_cast<Handler&&>(o->handler_));
    p.reset();


    // Make the upcall if required.
    if (owner)
    {
      fenced_block b(fenced_block::half);
      ASIO_HANDLER_INVOCATION_BEGIN(());
      asio_handler_invoke_helpers::invoke(handler, handler);
      std::invoke(handler);
      ASIO_HANDLER_INVOCATION_END;
    }
  }


private:
  Handler handler_;
  Alloc allocator_;
};
当我们使用scheduler的时候继承的scheduler_operation代码如下:
// Base class for all operations. A function pointer is used instead of virtual
// functions to avoid the associated overhead.
class scheduler_operation ASIO_INHERIT_TRACKED_HANDLER
{
public:
  using operation_type = scheduler_operation;


  void complete(void* owner, const asio::error_code& ec,
      std::size_t bytes_transferred)
{
    func_(owner, this, ec, bytes_transferred);
  }


  void destroy()
{
    func_(nullptr, this, asio::error_code(), 0);
  }


protected:
  using func_type = void (*)(void*, scheduler_operation*, const asio::error_code&, std::size_t);


  scheduler_operation(func_type func)
    : next_(nullptr),
      func_(func),
      task_result_(0)
  {
  }


  // Prevents deletion through this type.
  ~scheduler_operation()
  {
  }


private:
  friend class op_queue_access;
  scheduler_operation* next_;
  func_type func_;
protected:
  friend class scheduler;
  unsigned int task_result_; // Passed into bytes transferred.
};
这个多层设计,一圈圈的代码,我们可以来看下他做的事情,他做的最重要的事情就是完成了对原始函数的类型擦除,对于原始的Func,包装之后,调度器侧看到的所有函数都是:
using func_type = void (*)(void*, scheduler_operation*, const asio::error_code&, std::size_t);这个类型, 也就是executor_op::do_complete()的类型,这样对于scheduler层面,把相应的任务看成都是scheduler_operation,并且都可以按照func_type的形式来调用就好了。执行的细节我们暂且先搁下,聊到operation的执行的时候再一并来解析。
scheduler::post_immediate_completion()
void scheduler::post_immediate_completion(
    scheduler::operation* op, bool is_continuation)
{
#if defined(ASIO_HAS_THREADS)
  if (one_thread_ || is_continuation)
  {
    if (thread_info_base* this_thread = thread_call_stack::contains(this))
    {
      ++static_cast<thread_info*>(this_thread)->private_outstanding_work;
      static_cast<thread_info*>(this_thread)->private_op_queue.push(op);
      return;
    }
  }
#else // defined(ASIO_HAS_THREADS)
  (void)is_continuation;
#endif // defined(ASIO_HAS_THREADS)


  work_started();
  mutex::scoped_lock lock(mutex_);
  op_queue_.push(op);
  wake_one_thread_and_unlock(lock);
}
这部分就比较简单了,主要是将对应的operation存储到scheduler上的op_queue中,op_queue是一个operation的链表实现,用作一个FIFO队列,相关的代码也比较简单,大家可以自己查阅。比较特殊的是is_continuation参数,如果为true,或者scheduler工作在单线程run()模式下,则会判断当前正在执行scheudler::run()的线程是不是当前线程, 如果是当前线程,则直接无锁方式将任务推送到线程的op_queue上,算是一个fast path实现了。
post()过程小结
post()的过程,总结来看,是将外部传入的函数对象做类型擦除后,利用统一的scheduler_operation类型,以及辅助的op_queue,以链表的形式存放到scheduler中,等待后续调用的一系列操作。因为涉及到allocator,线程安全等,整体的实现会稍显复杂,但仔细理解,还是比较好将整体的实现理解掌握的。
(二)run()过程分析
我们一般是通过run(),或者run_one()来驱动,内部都是调用的scheduler::do_run_one(),我们先来看一下这个函数的实现:
scheduler::do_run_one()
std::size_t scheduler::do_run_one(mutex::scoped_lock& lock,
    scheduler::thread_info& this_thread,
    const asio::error_code& ec)
{
  while (!stopped_)
  {
    if (!op_queue_.empty())
    {
     // Prepare to execute first handler from queue.
     operation* o = op_queue_.front();
     op_queue_.pop();
     bool more_handlers = (!op_queue_.empty());


        std::size_t task_result = o->task_result_;


        if (more_handlers && !one_thread_)
          wake_one_thread_and_unlock(lock);
        else
          lock.unlock();


        // Ensure the count of outstanding work is decremented on block exit.
        work_cleanup on_exit = { this, &lock, &this_thread };
        (void)on_exit;


        // Complete the operation. May throw an exception. Deletes the object.
        o->complete(this, ec, task_result);


        return 1;
    }
    else
    {
     wakeup_event_.clear(lock);
     wakeup_event_.wait(lock);
    }
  }


  return 0;
}
因为仅关注scheduler部分,为了方便理解,针对reactor的task处理,此处已经删除了,在asio的实现中,这些task也会被当成operation,并且加入到op_queue中,在do_run_one()的时候会对其执行特定的逻辑。这部分感兴趣的可以自行翻阅scheduler::init_task()相关的实现。
整体的实现还是比较简单的,此处我们可以看到,针对任务队列还有其他待执行项的情况,asio也做了一定的优化,会尝试马上唤醒可用线程执行后续的任务。另外一点是如果队列为空,则会利用wakeup_event_执行wait()操作,避免线程空转导致的Cpu浪费。对于scheduler_operation::complete()的执行,前面我们也贴出了相关的代码,这是一个类型擦除后的统一函数格式,真正调用的其实是:
static void do_complete(void* owner, Operation* base,
      const asio::error_code& /*ec*/,
      std::size_t /*bytes_transferred*/)
{
    // Take ownership of the handler object.
    executor_op* o(static_cast<executor_op*>(base));
    Alloc allocator(o->allocator_);
    ptr p = { detail::addressof(allocator), o, o };


    ASIO_HANDLER_COMPLETION((*o));


    // Make a copy of the handler so that the memory can be deallocated before
    // the upcall is made. Even if we're not about to make an upcall, a
    // sub-object of the handler may be the true owner of the memory associated
    // with the handler. Consequently, a local copy of the handler is required
    // to ensure that any owning sub-object remains valid until after we have
    // deallocated the memory here.
    Handler handler(static_cast<Handler&&>(o->handler_));
    p.reset();


    // Make the upcall if required.
    if (owner)
    {
      fenced_block b(fenced_block::half);
      ASIO_HANDLER_INVOCATION_BEGIN(());
      asio_handler_invoke_helpers::invoke(handler, handler);
      std::invoke(handler);
      ASIO_HANDLER_INVOCATION_END;
    }
  }
这个地方又再一次使用了前文提到过的ptr结构,和它的reset(),注意对于ptr,每次使用到它的场合都是将它作为一个临时变量来使用的。对于Handler本身来说,也是有一个从operation还原成栈变量,在operation析构后,再利用std::invoke()来执行的一个过程。另外利用左值,如果Handler本身支持左值构造,这个地方也会相应的节约一次copy开销。整体的实现还是比较优质的。
scheduler::run()
std::size_t scheduler::run(asio::error_code& ec)
{
  ec = asio::error_code();
  if (outstanding_work_ == 0)
  {
    stop();
    return 0;
  }


  thread_info this_thread;
  this_thread.private_outstanding_work = 0;
  thread_call_stack::context ctx(this, this_thread);


  mutex::scoped_lock lock(mutex_);


  std::size_t n = 0;
  for (; do_run_one(lock, this_thread, ec); lock.lock())
  if (n != (std::numeric_limits<std::size_t>::max)())
    ++n;
  return n;
}
注意开始处对outstanding_work_数量的判断,如果为0,则run会马上执行scheduler的stop(),并退出,这也是为什么我们之前的测试代码中会创建一个work_guard对象的原因,这样保证outstanding_work_至少是1, 不会在op_queue_为空的情况下就结束scheduler的执行。一般开启独立的工作线程,如下所示:
std::thread tmp_thread([&ctx] { ctx.run(); });我们会让线程执行scheduler::run(),这样在外围有work_guard的情况下,通过run内部的for()循环,推送到scheduler::op_queue_上的所有operation会被依次执行,从而正确驱动整个调度器的工作。这也是scheduler框架实现的时候剥离线程带来的好处,在外围我们可以根据业务的实际需要安排合适数量的线程执行scheduler::run()。
scheduler::run_one()
std::size_t scheduler::run_one(asio::error_code& ec)
{
  ec = asio::error_code();
  if (outstanding_work_ == 0)
  {
    stop();
    return 0;
  }


  thread_info this_thread;
  this_thread.private_outstanding_work = 0;
  thread_call_stack::context ctx(this, this_thread);


  mutex::scoped_lock lock(mutex_);


  return do_run_one(lock, this_thread, ec);
}
与run()的区别是run()在有work_guard存在的情况下会一直循环执行到来的任务,而run_one()在执行完一个operation后即会退出。
其他的运行模式
除了上面说到的run()和run_one(),asio还有其他的几种运行模式,这里仅简单列出,不再展开,具体的核心执行过程与do_run_one()类同,作用稍有差异,这里直接列出:
poll(): 非阻塞的执行当前op_queue_已有的任务,执行完退出。
poll_one(): 尝试非阻塞的执行一个任务。
wait_one(): 与run_one()类似, 只是多了一个对time_out的判断。
一般来说,前面几者都比较适合于与当前线程除了调度器的任务执行外,还有其他逻辑的情况。这也是比较常见的情况,比如对于游戏来说,主线程一般除了调度器的执行,还包含其他逻辑的执行,这个时候,就比较适合使用上面的几种情况来组织主循环了,下面给出一个简单的示例:
while(!stop_) {
  //Add some logic jobs here
  //...


   ctx.poll();
   std::this_thread::sleep(1ms);
}
这样我们可以在外围更好的组织整个线程的任务执行,这就是有了run(),我们为什么还会需要其他的运行模式的原因,这样整个调度器的执行有更高的自由度,可以与其他代码更好的组合协同工作。
run()过程总结
整个run()过程都是围绕调度器的任务队列(op_queue_)来进行的,通过阅读asio相关的代码,我们可以看到,asio对锁的使用非常注意,尽可能保证锁的粒度足够的小,只在有需要的地方才添加同步原语,这与当前并发编程的主流思路是契合的,非必要不上锁,上锁则需要考虑锁的粒度是否足够小,这样才能够保证性能是足够优的。
五、stand的实现
前面我们的示例中,只有一个线程在执行scheduler::run(),所以相关任务是严格按照post()的先后顺序来执行的。那么如果我们更多的利用多核, 使用多个线程执行同一个context的run(),那必然任务被哪个线程调度到并执行,会变成一个不可预测的事情,这种情况下,如果任务之间存在依赖,我们又不希望在业务侧过多的使用同步原语,那应该怎么做呢? 我们通过两段示例代码来展开这个问题的处理方案。
(一)多线程run()和strand的示例
我们先来看一下相关的示例代码:
asio::io_context ctx{};
  auto wg = asio::make_work_guard(ctx);
  std::thread tmp_thread([&ctx] { ctx.run(); });
  std::thread tmp_thread1([&ctx] { ctx.run(); });
  std::thread tmp_thread2([&ctx] { ctx.run(); });
    std::thread tmp_thread3([&ctx] { ctx.run(); });


  std::allocator<void> alloc;


  char buf[256] = {0};
  for (int i = 0; i < 10; i++) {
    sprintf_s(buf, sizeof(buf), "task id: %d run!", i);
    std::string tmpstr(buf);
    ctx.get_executor().post([tmpstr] {
        std::cout << tmpstr.c_str() << std::endl;
    }, alloc);
    }


    std::this_thread::sleep_for(5s);
能够相象得到,在多核电脑上,我们得到的输出必然不是一个整齐的从0到9的输出:
task id: 0 run!task id: 2 run!


task id: 1 run!
task id: 3 run!
task id: 5 run!
task id: 7 run!
task id: 6 run!
task id: 4 run!
task id: 8 run!
task id: 9 run!
那么如何才能保证所有task是按照post顺序依次执行的呢,答案就是本节的主角: strand
我们适当调整之前的示例代码:
asio::io_context ctx{};
  auto wg = asio::make_work_guard(ctx);
  std::thread tmp_thread([&ctx] { ctx.run(); });
  std::thread tmp_thread1([&ctx] { ctx.run(); });
  std::thread tmp_thread2([&ctx] { ctx.run(); });
    std::thread tmp_thread3([&ctx] { ctx.run(); });


  std::allocator<void> alloc;


  asio::io_context::strand strand(ctx);
  char buf[256] = {0};
  for (int i = 0; i < 10; i++) {
    sprintf_s(buf, sizeof(buf), "task id: %d run!", i);
    std::string tmpstr(buf);
    strand.post([tmpstr] {
        std::cout << tmpstr.c_str() << std::endl;
    }, alloc);
    }


    std::this_thread::sleep_for(5s);
调整后的执行结果为:
task id: 0 run!
task id: 1 run!
task id: 2 run!
task id: 3 run!
task id: 4 run!
task id: 5 run!
task id: 6 run!
task id: 7 run!
task id: 8 run!
task id: 9 run!
我们发现所有task已经按照post顺序逐一打印了,这是如何做到的呢? 接下来我们将对strand的实现进行分析。
(二)strand的实现细节
因为strand的特殊性,肯定是没有办法直接使用前面介绍的普通任务的post()机制和相关的operation包装来完成相关的封装的,我们分为三个部分来分析strand的实现:
strand相关的operation定义
strand上的task的投递
strand上的task的执行
strand相关的operation定义
// The underlying implementation of a strand.
  class strand_impl
    : public operation
  {
  public:
    strand_impl(): operation(&strand_service::do_complete), locked_(false)
  private:
    // Only this service will have access to the internal values.
    friend class strand_service;
    friend struct on_do_complete_exit;
    friend struct on_dispatch_exit;


    // Mutex to protect access to internal data.
    asio::detail::mutex mutex_;


    // Indicates whether the strand is currently "locked" by a handler. This
    // means that there is a handler upcall in progress, or that the strand
    // itself has been scheduled in order to invoke some pending handlers.
    bool locked_;


    // The handlers that are waiting on the strand but should not be run until
    // after the next time the strand is scheduled. This queue must only be
    // modified while the mutex is locked.
    op_queue<operation> waiting_queue_;


    // The handlers that are ready to be run. Logically speaking, these are the
    // handlers that hold the strand's lock. The ready queue is only modified
    // from within the strand and so may be accessed without locking the mutex.
    op_queue<operation> ready_queue_;
  };
这部分代码本身注释比较多, 我们主要关注几点:
构造函数处, 我们将strand_impl的complete关联到了strand_service::do_complete()处。
首先strand的operation本身是带锁的,后面也会提到,相关的锁粒度非常小。
strand的operation包含两个队列,一个ready_queue_和一个waiting_queue_。
一个locked_标志,这些共同配合,使得strand能够达成最小粒度锁的实现。
注释比较详细,结合相关的post和complete过程理解更佳。
strand上的task投递
strand::post()的执行过程如下:
strand::post()开始执行。
内部会触发strand_service::post()的执行。
会继续触发strand_service::do_post()的执行。
我们挨级分析相关的实现重点:
level 1: strand::post():
template <typename Function, typename Allocator>
 void post(Function&& f, const Allocator& a) const
{
 typename std::decay<Function>::type tmp(static_cast<Function&&>(f));
 service_.post(impl_, tmp);
 (void)a;
 }
这里就是很简单的将Function类型退化后,继续调用strand_service::post(),注意此处直接抛弃了外部传递的allocator,应该是1.16版本实现不完整,直接没给strand的operation匹配正确的allocator,翻阅1.22的代码实现,这部分的allocator是有被正确处理的,对于我们来说这处细节影响不大,我们直接忽略。
level 2: strand_service::post():
template <typename Handler>
void strand_service::post(strand_service::implementation_type& impl,
    Handler& handler)
{
  bool is_continuation =
    asio_handler_cont_helpers::is_continuation(handler);


  // Allocate and construct an operation to wrap the handler.
  typedef completion_handler<Handler> op;
  typename op::ptr p = { asio::detail::addressof(handler),
    op::ptr::allocate(handler), 0 };
  p.p = new (p.v) op(handler);


  ASIO_HANDLER_CREATION((this->context(),
        *p.p, "strand", impl, 0, "post"));


  do_post(impl, p.p, is_continuation);
  p.v = p.p = 0;
}
这部分代码基本就是我们之前分析过的scheduler::post()的翻版了,略有差异的地方是此处使用的不是execution_op,而是使用了另外一个类型 completion_handler\<Handler\>,该类型的实现与execution_op基本没有太大的差别,除了completion_handler本身不保存外部传入的Alloc这点外。它本身也是完成对传入的Function的类型擦除,提供一个统一类型的do_completion()接口,方便scheduler侧对相应的task进行延迟调用,相关的实现对比之前讲述的post()部分可以比较好的理解,这里不再赘述了。
level 3: strand_service::do_post():
void strand_service::do_post(implementation_type& impl,
    operation* op, bool is_continuation)
{
  impl->mutex_.lock();
  if (impl->locked_)
  {
    // Some other handler already holds the strand lock. Enqueue for later.
    impl->waiting_queue_.push(op);
    impl->mutex_.unlock();
  }
  else
  {
    // The handler is acquiring the strand lock and so is responsible for
    // scheduling the strand.
    impl->locked_ = true;
    impl->mutex_.unlock();
    impl->ready_queue_.push(op);
    io_context_.post_immediate_completion(impl, is_continuation);
  }
}
这部分也有很详细的注释, 详细解释了分支的处理情况:
impl(就是strand独有的strand_impl这个operation) locked_标识为true,则将任务推送至waiting_queue_。
impl locked_标识为false,则将任务推送至read_queue_,并将locked_标识置为true。
此处我们需要注意第2种情况锁的释放时机,锁是在标识设置完成后立即解锁的,然后马上执行io_context::post_immediate_completion()将impl本身推送至scheduler等待执行。实际上我们也可以很直白的来理解它,当strand刚开始工作时,我们推送一个任务,必然走的是2这个分支,如果推送的任务没有得到及时的执行,那么locked_标识依然还是true,则后续推送的任务会被加入到waiting_queue_,而因为waiting_queue_本身是带锁的,这也不难理解,为什么通过strand投递任务后,所有任务的执行都会是有序的了。实际过程会比这段描述的更复杂一点,后续讲述执行的过程中会逐步展开。post_immediate_completion()的代码实现前面scheduler部分我们已经具体展开了,此处就不再细说了。
strand上的task执行
前面介绍strand_impl的时候我们也提到过,strand_impl构造的时候将自己的comple()调用挂接到了strand_service::do_complete()处,前面我们已经介绍过了scheduler中任务的执行时机(run中会通过调用do_run_one(),获取到一个operation进行执行),我们此处直接从strand_service::do_complete()进行分析:
void strand_service::do_complete(void* owner, operation* base,
    const asio::error_code& ec, std::size_t /*bytes_transferred*/)
{
  if (owner)
  {
    strand_impl* impl = static_cast<strand_impl*>(base);


    // Indicate that this strand is executing on the current thread.
    call_stack<strand_impl>::context ctx(impl);


    // Ensure the next handler, if any, is scheduled on block exit.
    on_do_complete_exit on_exit;
    on_exit.owner_ = static_cast<io_context_impl*>(owner);
    on_exit.impl_ = impl;


    // Run all ready handlers. No lock is required since the ready queue is
    // accessed only within the strand.
    while (operation* o = impl->ready_queue_.front())
    {
      impl->ready_queue_.pop();
      o->complete(owner, ec, 0);
    }
  }
}
因为关联strand_service::do_comple()的operation只会是strand_impl,所以此处一开始我们就将base转换到了该类型。剩下的代码就比较简单了,对于所有ready_queue_中的operation,我们挨个取出并执行。比较特殊的地方是on_do_comple_exit这个scope对象,我们仔细分析,发现我们的waiting_queue_并没有被处理,这其实就是由on_do_comple_exit这个scope对象通过RAII来完成的操作:
struct strand_service::on_do_complete_exit
{
  io_context_impl* owner_;
  strand_impl* impl_;


  ~on_do_complete_exit()
  {
    impl_->mutex_.lock();
    impl_->ready_queue_.push(impl_->waiting_queue_);
    bool more_handlers = impl_->locked_ = !impl_->ready_queue_.empty();
    impl_->mutex_.unlock();


    if (more_handlers)
      owner_->post_immediate_completion(impl_, true);
  }
};
通过scope对象on_do_complete_exit,我们完成了将所有waiting_queue_包含的operation向ready_queue_转移的过程,并且在ready_queue_非空的情况,我们会再次通过post_immediate_completion()将当前impl推送的scheduler中等待再次执行。
(三)strand小结
strand机制利用内部小粒度的锁换来业务层可以用更简单的方式来处理并发任务的关联执行,本身还是很巧妙的,这种方式也有助于业务层写出易理解维护的代码,同时小粒度的锁本身也会有比较好的性能表现。
六、timer实现
前面我们讲了基本的任务调度支持,实际业务使用中,还会有很多跟时间相关的任务,所以一般的调度器也会包含定时器的支持,我们先整体性的了解一下asio这部分的实现:

暗红色部分是我们主要关注的部分,timer调度器部分有比较多特定操作系统专有的实现,这个地方我们直接选可以跨平台的winrt_timer_scheduler实现来讲述。
整体结构分为三层: 从下到上依次是:
Core部分的timer_queue实现
中间的timer调度器实现(多选一)
业务层使用的service和timer实现
下文我们将逐层展开,讲述相关的实现。
(一)Core部分-timer_queue的实现
asio的timer_queue实现与libevent一样,使用了min-heap(小根堆)的实现。
min-heap实现简述
首先,因为min-heap是一个完全二叉树,所以我们可以直接使用数组来对其进行表示,因为结构的特殊性,我们很容易知道,对于任意非0节点i:
其父节点为(i-1)/2
左儿子为 2*(i+1) - 1
右儿子为 2*(i+1)
这样对于任意索引的节点,我们都可以很好的利用以上规律定位其父节点,以及左,右儿子,完成想要的操作。
另外min-heap的实现会保证根节点就是最小元,用于定时器,则是最近需要被执行的节点了,利用这点,我们能够很快的找出已经超时的节点进行后续的处理。
另外对于一个容器,我们也需要了解它的增删操作是如何完成的。
增加节点:
在队列尾部先加入相关元素。
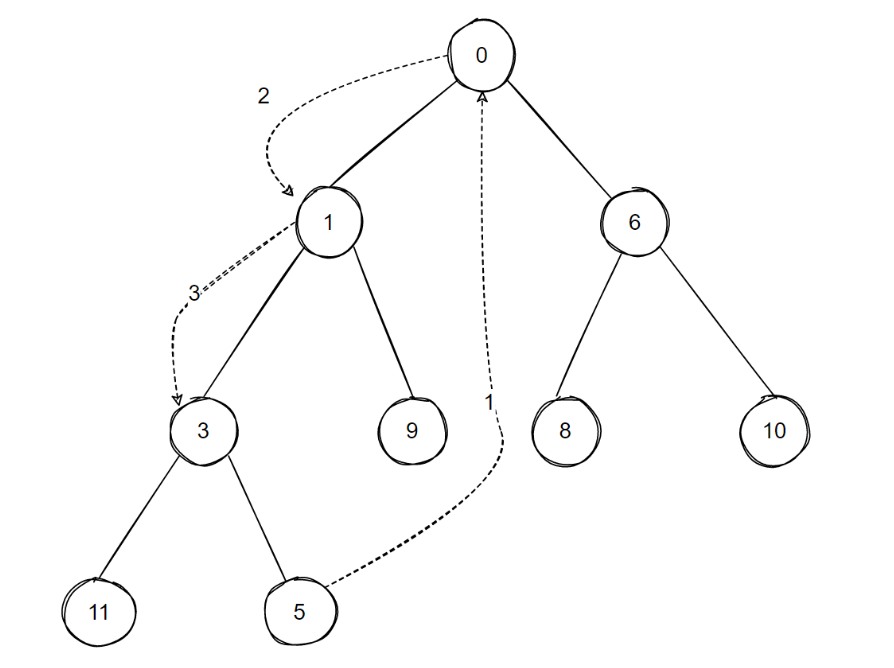
根据当前元素的大小,逐步执行shift-up操作,直到找到一个合适的位置。(满足min-heap约束)
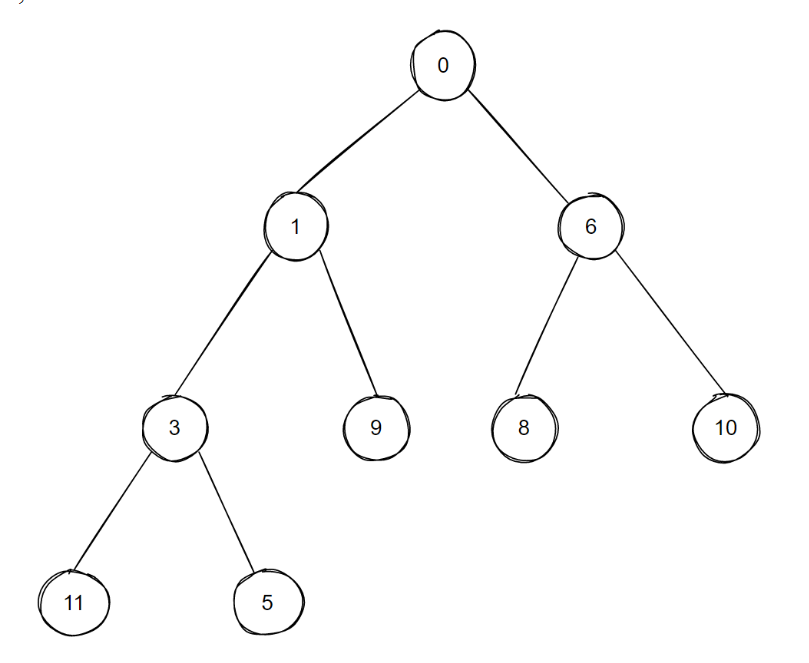
举例来说:
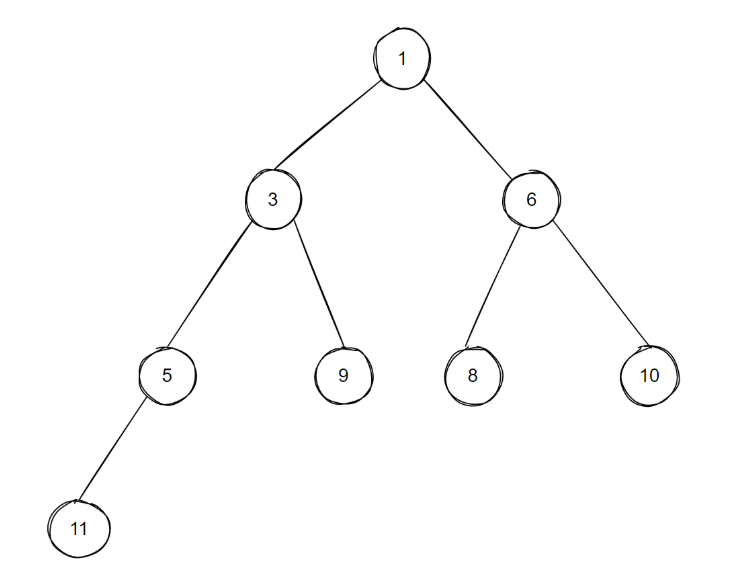
对于上图这样一个已有的min-heap,当我们插入一个新的值为0的节点时,整个min-heap的调整过程是:

最后得到的min-heap如下:
删除节点(以根节点为例):
先将队尾元素与根节点交换。
然后执行shift-down操作, 直到找到合适的位置。
接上面的例子,我们删除0号节点,则有如下的情况 :
最后形成的小根堆为:
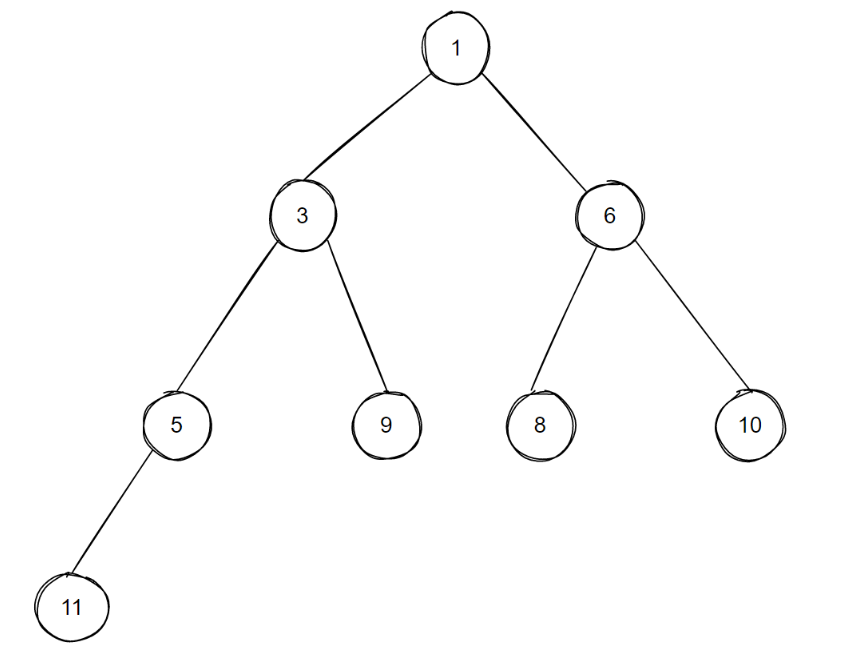
注意:图画的比较简单,大家纸上画一下整体过程效果更佳。
asio相关的代码实现
template <typename Time_Traits>
class timer_queue
  : public timer_queue_base
{
public:
  // The time type.
  using time_type = typename Time_Traits::time_type;


  // The duration type.
  using duration_type = typename Time_Traits::duration_type;


  // Per-timer data.
  class per_timer_data
  {
  public:
    per_timer_data() :
      heap_index_((std::numeric_limits<std::size_t>::max)()),
      next_(0), prev_(0)
    {
    }
  private:
    friend class timer_queue;


    // The operations waiting on the timer.
    op_queue<wait_op> op_queue_;


    // The index of the timer in the heap.
    std::size_t heap_index_;


    // Pointers to adjacent timers in a linked list.
    per_timer_data* next_;
    per_timer_data* prev_;
  };


private:
  // The head of a linked list of all active timers.
  per_timer_data* timers_;


  struct heap_entry
  {
    // The time when the timer should fire.
    time_type time_;


    // The associated timer with enqueued operations.
    per_timer_data* timer_;
  };


  // The heap of timers, with the earliest timer at the front.
  std::vector<heap_entry> heap_;
};
整个timer_queue的成员还是比较好理解的,需要注意的是heap_entry内部持有的只是per_timer_data的指针,另外per_timer_data本身是以链表结构来组织的,这样在小根堆排序的过程中数据交换量比较少,另外就是小根堆重构后,不需要反向外部持有per_timer_data的地方进行调整,两级结构的封装会带来一定的便利性。另外就是增删用到的内部函数:
// Move the item at the given index up the heap to its correct position.
  void up_heap(std::size_t index)
{
    while (index > 0)
    {
      std::size_t parent = (index - 1) / 2;
      if (!Time_Traits::less_than(heap_[index].time_, heap_[parent].time_))
        break;
      swap_heap(index, parent);
      index = parent;
    }
  }


  // Move the item at the given index down the heap to its correct position.
  void down_heap(std::size_t index)
{
    std::size_t child = index * 2 + 1;
    while (child < heap_.size())
    {
      std::size_t min_child = (child + 1 == heap_.size()
          || Time_Traits::less_than(
            heap_[child].time_, heap_[child + 1].time_))
        ? child : child + 1;
      if (Time_Traits::less_than(heap_[index].time_, heap_[min_child].time_))
        break;
      swap_heap(index, min_child);
      index = min_child;
      child = index * 2 + 1;
    }
  }


  // Swap two entries in the heap.
  void swap_heap(std::size_t index1, std::size_t index2)
{
    heap_entry tmp = heap_[index1];
    heap_[index1] = heap_[index2];
    heap_[index2] = tmp;
    heap_[index1].timer_->heap_index_ = index1;
    heap_[index2].timer_->heap_index_ = index2;
  }
通过这几个函数,我们就能很简单的实现timer的新增删除等功能了,比如对于新增timer:
// Add a new timer to the queue. Returns true if this is the timer that is
 // earliest in the queue, in which case the reactor's event demultiplexing
 // function call may need to be interrupted and restarted.
 bool enqueue_timer(const time_type& time, per_timer_data& timer, wait_op* op)
{
 // Enqueue the timer object.
 if (timer.prev_ == 0 && &timer != timers_)
 {
  if (this->is_positive_infinity(time))
  {
    // No heap entry is required for timers that never expire.
    timer.heap_index_ = (std::numeric_limits<std::size_t>::max)();
  }
  else
  {
    // Put the new timer at the correct position in the heap. This is done
    // first since push_back() can throw due to allocation failure.
    timer.heap_index_ = heap_.size();
    heap_entry entry = { time, &timer };
    heap_.push_back(entry);
    up_heap(heap_.size() - 1);
  }


  // Insert the new timer into the linked list of active timers.
  timer.next_ = timers_;
  timer.prev_ = 0;
  if (timers_)
    timers_->prev_ = &timer;
  timers_ = &timer;
 }


 // Enqueue the individual timer operation.
 timer.op_queue_.push(op);


 // Interrupt reactor only if newly added timer is first to expire.
 return timer.heap_index_ == 0 && timer.op_queue_.front() == op;
 }
这段代码功能还是挺好理解的:
time为positive_infinity的情况,直接不创建heap_entry,仅将heap_index_设置为最大的size_t。
正常情况则如前面示例中提到的, 创建新的heap_entry并加入到数组尾部。
使用up_heap()调整heap_entry到合适的位置。
timer链表的处理。
返回新的timer是否是根节点(如果是根节点, 则表示整个timer_queue的最小expired时间有调整, 外围的Timer Scheduler需要做额外的处理)。
其他的cancel_timer()与move_timer()的实现也比较简单,这里就不一一列出了,感兴趣的读者可以自行翻阅,理解min-heap的原理的话,这部分代码基本没有什么理解难度。
当然,只有一个timer_queue,肯定是不够的,我们还得有地方驱动timer_queue的执行,对应的operation超时后才会得到处理。这就是下一部分Timer Scheduler涉及的内容。
(二)Timer Scheduler-winrt_timer_scheduler实现
前面的图中:

我们能看到,asio自带的timer scheduler实现有很多,我们直接打开timer_scheduler.h文件也能看到:
#if defined(ASIO_WINDOWS_RUNTIME)
# include "asio/detail/winrt_timer_schedupp"
#elif defined(ASIO_HAS_EPOLL)
# include "asio/detail/epoll_reactor.hpp"
#elif defined(ASIO_HAS_KQUEUE)
# include "asio/detail/kqueue_reactor.hpp"
#elif defined(ASIO_HAS_DEV_POLL)
# include "asio/detail/dev_poll_reactor.hpp"
#else
# include "asio/detail/select_reactor.hpp"
#endif
我们可以根据内容简单的推断:
Windows下一般是直接使用iocp context作为timer scheduler。
linux下是使用epoll_reactor作为timer scheduler。
mac和ios下一般是kqueue_reactor。
其他情况是select_reactor。
winrt_timer_scheduler其实是个cross platform的实现,不依赖任何特定平台的特性。
选择winrt_timer_scheduler的原因
如上节提到的,asio默认有好些timer scheduler实现,那我们为什么偏好于使用比较冷门的winrt_timer_scheduler呢? 主要是以下几个原因:
跨平台实现,不依赖特定平台的特殊Api,所有平台表现一致。
定制性,像游戏类的业务,一般都会有自己的虚拟时间,直接选择绑定系统时间的操作系统级实现,不一定是好的选择。
如果我们仅用asio scheduler部分的能力,与reactor等实现共用Api并不是一个很好的选择。
当然,使用平台无关的winrt_timer_scheduler也会存在一点额外的开销,区别于系统Api直接通知,winrt_timer_scheduler需要额外的线程来完成从timer_queue中取出超时的任务,并投递operation回io_context执行它们。
winrt_timer_scheduler实现
winrt_timer_scheduler对应的核心实现其实就是它的线程工作函数:
void winrt_timer_scheduler::run_thread()
{
  asio::detail::mutex::scoped_lock lock(mutex_);
  while (!stop_thread_)
  {
    const long max_wait_duration = 5 * 60 * 1000000;
    long wait_duration = timer_queues_.wait_duration_usec(max_wait_duration);
    event_.wait_for_usec(lock, wait_duration);
    event_.clear(lock);
    op_queue<operation> ops;
    timer_queues_.get_ready_timers(ops);
    if (!ops.empty())
    {
      lock.unlock();
      scheduler_.post_deferred_completions(ops);
      lock.lock();
    }
  }
}
winrt_timer_scheduler创建的时候就会创建一个独立的线程来执行run_thread()函数,相关的实现也很简单,从timer_queues_上收集所有已经超时的operation,并将这些operation再通过前面提到的通用scheduler上,这样在io_context::run()执行的时候,这些已经超时的operation就会得到执行。需要注意的是以下几点:
operation最终是回归context::run()的线程进行执行的。
此处的timer_queues是一个timer_queue_set,仅仅是一个多timer_queue的容器,存在的作用是外围多个特化的deadline_timer_service时,每个service会创建一个timer_queue。
循环开始处的等待,我们前面已经知道min-heap根节点的特性,所以此处取出根节点就能知道最大的等待时间,大部分时候都能保证这个专有的timer线程不会空耗cpu。
关于第3点,有一种情况,我们新插入的定时任务是需要马上被执行的,这种情况winrt_time_scheduler也是有相关的处理的:
template <typename Time_Traits>
void winrt_timer_scheduler::schedule_timer(timer_queue<Time_Traits>& queue, const typename Time_Traits::time_type& time, typename timer_queue<Time_Traits>::per_timer_data& timer, wait_op* op) {
  asio::detail::mutex::scoped_lock lock(mutex_);


  if (shutdown_) {
    scheduler_.post_immediate_completion(op, false);
    return;
  }


  bool earliest = queue.enqueue_timer(time, timer, op);
  scheduler_.work_started();
  if (earliest) event_.signal(lock);
}
enque_timer()时我们之前也提到过,会通过返回值告知调用者对应新建的节点是不是根节点,也就是此处的earliest,如果是根节点,测会执行event_.signal(),这样线程就会被强制唤醒,不会出现原有的等待值不合理,导致新加入的定时任务不会被及时调度到的问题。
这里也能体现出min-heap实现对定时器场合的适用性,操作和获取根节点的成本都比较低,这样就为我们在外围实现高效的timer scheduler提供了便利。
epoll_reactor timer部分支持浅析
我们虽然没有使用依赖操作依赖实现的定时调度来进行讲解,不过这里列举epoll_reactor相关的实现,方便大家了解这些平台专有实现与winrt_timer_scheduler之间的差异,加深对两者优缺点的理解。
当我们使用epoll_reactor作为timer scheduler的时候,整体系统的工作流程图如下:
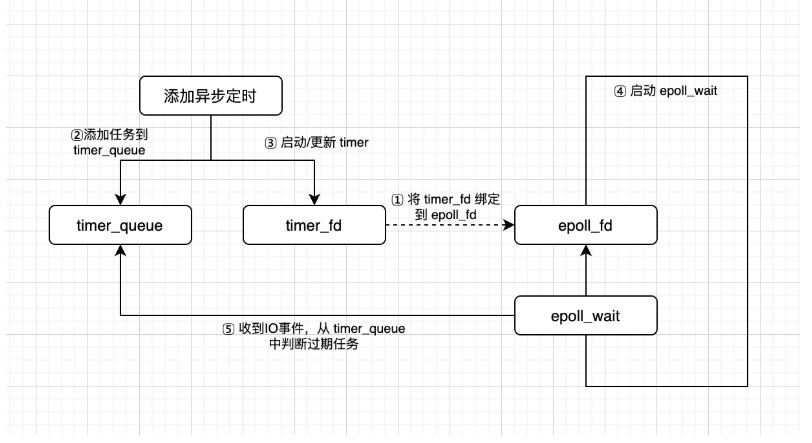
图引用自 深入学习定时器
timer_fd是linux2.6.25加入的功能,这样定时任务也能像其它handler一样接受epoll的调度了。区别于winrt_timer_scheduler使用一个额外的线程,使用timer_fd的话,我们则可以利用reactor本身来完成相关的超时等待,不需要额外的线程。另外,我们肯定也只需要关注最近超时的那个任务(如果最近超时的任务都没超时,其他任务肯定都没超时了),所以timer_fd也只需要一个:
// Add the timer descriptor to epoll.
 if (timer_fd_ != -1)
 {
 ev.events = EPOLLIN | EPOLLERR;
 ev.data.ptr = &timer_fd_;
 epoll_ctl(epoll_fd_, EPOLL_CTL_ADD, timer_fd_, &ev);
 }
接下来我们来看一下简化的epoll_reactor::run()实现
void epoll_reactor::run(long usec, op_queue<operation>& ops)
{
 int timeout;
 if (usec == 0)
   timeout = 0;
 else
 {
   timeout = (usec < 0) ? -1 : ((usec - 1) / 1000 + 1);
 }


 bool check_timers = false
 // Block on the epoll descriptor.
 epoll_event events[128];
 int num_events = epoll_wait(epoll_fd_, events, 128, timeout);

 // Dispatch the waiting events.
 for (int i = 0; i < num_events; ++i)
 {
   void* ptr = events[i].data.ptr;
   if (ptr == &timer_fd_)
   {
     check_timers = true;
   }
 }


 if (check_timers)
 {
   mutex::scoped_lock common_lock(mutex_);
   timer_queues_.get_ready_timers(ops);


   itimerspec new_timeout;
   itimerspec old_timeout;
   int flags = get_timeout(new_timeout);
   timerfd_settime(timer_fd_, flags, &new_timeout, &old_timeout);
 }
}
最后我们还是利用timer_queue来获取所有已经超时的任务,但相比较独立的线程驱动,此处共用io_context内部持有的reactor即可完成所有操作了,另外因为只是多出一个timer_fd,对应的开销基本也是可以忽略的。需要注意的是每次timer_fd触发后,我们需要重新对timer_fd设置超时时间。 使用像epoll_reactor这种来驱动超时,优缺点都很明显:
优点: 高性能。
缺点:
特定系统专供实现。
定制性差,时间强行跟系统进行绑定了,不方便支持虚拟时间等概念。
(三)Logic部分-deadline_timer_service与basic_waitable_timer
这部分是业务使用时直接能接触到的部分,内部实现主要是处理operation的传递,以及对上面介绍的Time Scheduler的一层Wrapper,这部分我们在前面展开的已经比较多了,大量实现是比较类同的,感兴趣的读者可以自行阅读相关代码,有前面的基础,这部分代码理解起来也是比较快的,我们这里就不逐一展开讲述了。asio预定义的几种定时器:
using system_timer = basic_waitable_timer<std::chrono::system_clock>;
using steady_timer = basic_waitable_timer<std::chrono::steady_clock>;
using high_resolution_timer = basic_waitable_timer<
    std::chrono::high_resolution_clock>;
都是利用std::chrono就能很好的支持的定时器,同时也能看出模板化clock后带来的好处,我们可以很好的支持各种不同类型的时间了。asio默认还有一个deadline_timer的实现,区别于上面介绍的三种,deadline_timer本身是依赖boost的datetime库来实现的,功能与上面介绍的几种定时器都大同小异,我们就不再介绍了。定时器的使用也是很简单的:
asio::steady_timer t(ctx);
  t.expires_after(1s);
  t.async_wait([](asio::error_code ec) {
    std::cout << "timeout!" << std::endl;
  });
除了上面的异步等待模式,定时器同样也支持同步的wait(),同步的wait()就比较简单了,内部是一个sleep()循环,直到定时器超时。新版本的asio其实定时器也支持协程模式,这部分内容比较独立,考虑在单独的文章中进行分析,本篇先不展开了。
(四)timer小结
对比libunifex的实现,asio对timer的实现处理的非常通用,timer本身也能跟各种逻辑很好的搭配,同时对各类时间体系也有非常好的适配性,这些都体现了它本身工业级库的实现水平,很多设计确实还是可圈可点,值得学习借鉴的。
七、总结
Asio作为广为人知的网络库,单就的scheduler部分来说,使用比较现代化的c++特性,整体围绕operation进行组织,提供了可以执行任意任务的 scheduler,又在此基础上实现了可以在业务层尽量避免直接使用同步原语的strand,然后又提供了相对高效的timer实现,整体的性能,易用性,完成度可以说都达到了一个比较完美的程度,首先它自己对各种网络api的支持,其次上面说到的一些工业项目对其scheduler部分的成功使用,都说明它是一个成熟度相当高,泛用性非常好的一个库,很长一段时间应该都会被广泛使用了。
参考资料:
1.asio官网
2.探索libevent
3.深入学习定时器
4.spiritsaway-asio实现浅析