文章目录
- 1. 传统 创建线程的两种方式
- 2. 传统 定时器技术
- 3. 传统线程 互斥技术
- 4. 传统线程 同步通信技术
- 5. 线程范围内 共享变量 概念和作用
- 6. ThreadLocal类及应用技巧
- 7. 多个线程之间 共享数据的方式
- 8. Java 原子性类的应用
- 9. Java 线程并发库的应用(线程池)
- 10. Callable 与 future的应用
- 11. 线程锁的技术
- 12. Java 读写锁技术的使用
- 13. Java 条件阻塞condition的应用
- 14. Semaphore(信号灯)同步工具
- 15. CyclicBarrier 同步工具
- 16. CountDownLatch 同步工具
- 17. Exchanger 同步工具
- 18. Java 阻塞队列的应用
1. 传统 创建线程的两种方式
一种继承Thread,一种是实现Runnable两种方式。
问题:如果匿名类实现了Runnable又覆盖了Thread的run方法,会执行谁的run方法?
public static void main(String[] args) {


	new Thread(new Runnable() {


		public void run() {


			// TODO Auto-generated method stub
			System.out.println("Runnable:执行了runnable");
		}

	}) {


		@Override
		public void run() {


			// TODO Auto-generated method stub
			System.out.println("Thread:执行了run方法");
		}
	}.start();

	//因为后来重写的run()方法覆盖了。因此这里执行的是Thread的run方法。
}
2. 传统 定时器技术
定时器的使用:
public static void main(String[] args) throws IOException, InterruptedException {
new Timer().schedule(new TimerTask() {
@Override
public void run() {
System.out.println("炸弹定时器1~~~~");
new Timer().schedule(new TimerTask() {
@Override
public void run() {
System.out.println("炸弹定时器2~~~");
}
},2000);
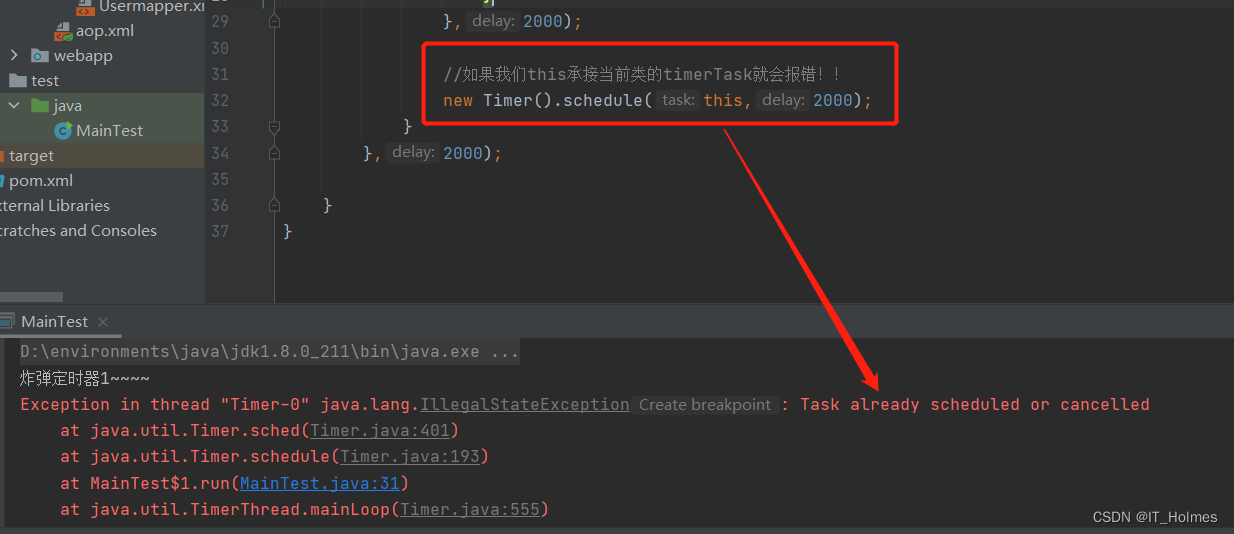
//如果我们this承接当前类的timerTask就会报错!!
new Timer().schedule(this,2000);
}
},2000);
}
为了解决上面的问题,我们可以通过创建对象的形式来解决:
class MyTimerTask extends TimerTask{


	@Override
	public void run() {


		//我们可以直接new一个对象来重复调用就可以了。
		new Timer().schedule(new MyTimerTask(),2000);
	}
}
3. 传统线程 互斥技术
synchronized 同步锁:
- 同步监听器,就是要上锁的对象!!一般设置为this。
对于同步监听器的理解,就是类似一种锁机制。多个线程调用的时候,经过synchronized同步锁,先是查看同步监听器有没有被上锁抢占。如果有,就等待;如果没有,就抢占。(重点!!!)
也就说同步监听器是多个线程共有的一个东西,自然this就是最好的选择。this就是指的就是当前对象。
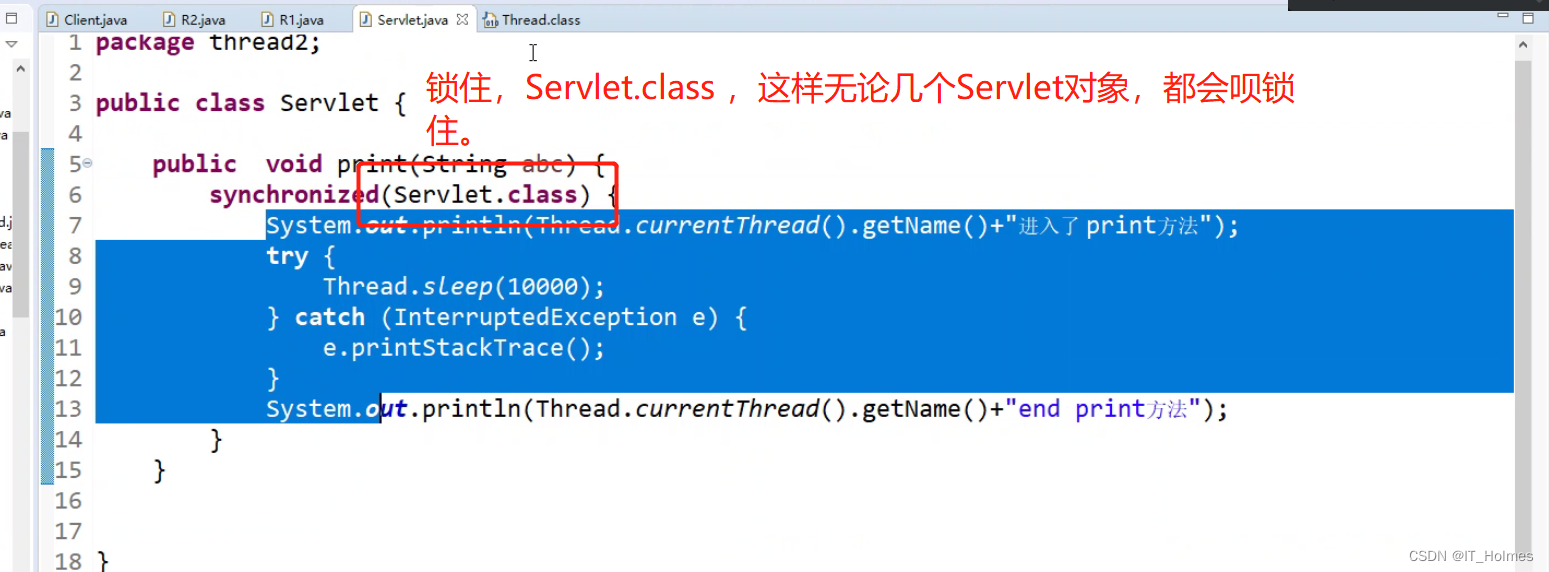
如果同步监听器设置为了对象的class,给class字节码对象上了锁,那么就算是多个对象情况下,也会被同步锁阻塞。因为,对象.class文件被上锁了,本身就没法使用class文件调用了。
import com.itholmes.config.User;
import org.springframework.context.support.ClassPathXmlApplicationContext;
import org.springframework.scheduling.support.CronTrigger;
import sun.applet.Main;

import java.io.*;
import java.util.Date;
import java.util.Timer;
import java.util.TimerTask;
import java.util.concurrent.Callable;

public class MainTest {


	public static void main(String[] args) throws IOException, InterruptedException {


		new MainTest().init();
	}

	private void init(){


		//这里因为Outputer是内部类,不能直接再static方法里面显示,因此我们就可以通过创建一个方法,通过对象来调用。
		Outputer outputer = new Outputer();

		new Thread(new Runnable() {


			@Override
			public void run() {


				while (true){


					try {


						Thread.sleep(10);
					} catch (InterruptedException e) {


						e.printStackTrace();
					}
					outputer.output("123456");

					// 这样就不可以了!!!就算有多个线程都是调用,他们都不是用的同一个outpuer对象。
					// 也就是多线程需要加锁的地方就是多个线程同时操作一个对象或者一部分代码的时候的情况。
					//new Outputer().output("123123");
				}
			}
		}).start();

		new Thread(new Runnable() {


			@Override
			public void run() {


				while (true){


					try {


						Thread.sleep(10);
					} catch (InterruptedException e) {


						e.printStackTrace();
					}
					outputer.output("2344");
				}
			}
		}).start();

	}

	//了解静态内部类 和 普通内部类一些区别:https://blog.csdn.net/qq_37768971/article/details/101166164
	static class Outputer{


		//方法synchronized的同步监听器是this,这里的this指向的是当前output对象。
		public synchronized void output(String name){


			int len = name.length();

			for (int i=0;i<len;i++){


				System.out.print(name.charAt(i));
			}
			System.out.println();

		}

		//同样,方法synchronized的同步监听器是this,然而这里的this指向的是OutPuter.class。
		public static synchronized void output2(String name){


			int len = name.length();

			for (int i=0;i<len;i++){


				System.out.print(name.charAt(i));
			}
			System.out.println();

		}

	}

}
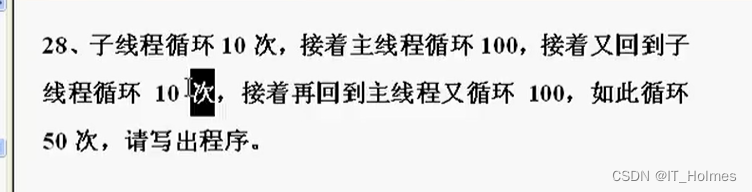
4. 传统线程 同步通信技术
解决一个问题:
public class ThreadTest {


    public static void main(String[] args) {


        /**
         *  对于同步的多线程:
         *      第一点:一般都是通过一个类,就像下面的business对象一样,我们直接将同步锁 和 wait ,notify等封装到对象方法里面。
         *      这样无论是同步技术实现,还是同步监听器都好设置。
         *
         *      第二点:同步锁要写到类中,不要写到线程的run方法中。
         *
         *      第三点:一定用while,不要用if。
         */
        Business business = new Business();

        new Thread(new Runnable() {


            @Override
            public void run() {


                for (int j = 0;j<50;j++){


                    business.sub(j);
                }
            }
        }).start();

        for (int j = 0;j<50;j++){


            business.main(j);
        }

    }

}

class Business{


    private Boolean bShouldSub = true;

    public synchronized void sub(int j){


        //用while,不要用if , while有循环效果!if有可能伪唤醒。
        //if (!bShouldSub){


        while (!bShouldSub){


            try {


                this.wait();
            } catch (InterruptedException e) {


                e.printStackTrace();
            }
        }
        for (int i=0;i<10;i++){


            System.out.println("50循环的第"+j+",子线程第"+i+"次循环。");
        }
        bShouldSub = false;
        this.notifyAll();
    }
    public synchronized void main(int j){


        //用while,不要用if , while有循环效果!if有可能伪唤醒。
        while (bShouldSub){


            try {


                this.wait();
            } catch (InterruptedException e) {


                e.printStackTrace();
            }
        }

        for (int i = 0; i < 100; i++) {


            System.out.println("100循环的第" + j + ",主线程第" + i + "次循环。");
        }
        bShouldSub = true;
        this.notifyAll();
    }
}
重点:
- 第一点:一般都是通过一个类,就像下面的business对象一样我们直接将同步锁 和 wait ,notify等封装到对象方法里面。这样无论是同步技术实现,还是同步监听器都好设置。
- 第二点:同步锁要写到类中,不要写到线程的run方法中。
- 第三点:一定用while,不要用if。用if就有可能伪唤醒。
5. 线程范围内 共享变量 概念和作用
理解下面的data 和 map:
- 也就是通过map存thread的方式来达到共享变量。
import java.util.HashMap;
import java.util.Map;
import java.util.Random;

public class ThreadScopeShareData {


    //private static int data = 0; 如果有这种static成员变量就容易出现共享混淆的一个问题。

    //这样我们就可以通过Thread + xxx 的方法来实现,这也就是数据库池经常用到的一种方式。
    private static Map<Thread,Integer> threadData = new HashMap<>();

    public static void main(String[] args) {


        for (int i=0;i<2;i++){


            new Thread(new Runnable() {


                @Override
                public void run() {


                    //让data随机等于一个int类型数据。
                    int data = new Random().nextInt();

                    System.out.println(Thread.currentThread().getName()
                            + "has put data: " + data);

                    threadData.put(Thread.currentThread(),data);
                    new A().get();
                    new B().get();
                }
            }).start();
        }
    }

    static class A {


        public void get(){


            Integer data = threadData.get(Thread.currentThread());
            System.out.println("A from" + Thread.currentThread().getName() + " get data: "+data);
        }
    }

    static class B{


        public void get(){


            Integer data = threadData.get(Thread.currentThread());
            System.out.println("B from" + Thread.currentThread().getName() + " get data: "+data);
        }
    }

}
6. ThreadLocal类及应用技巧
ThreadLocal使用起来,就是多线程使用的时候,每个线程都会操作自己线程对应的那个值。
ThreadLocal原理:
- 就是key + value 的map,key是各自的线程对象本身。每次get获取就要通过线程对象来获取(注意:并不是将线程对象最为参数传递)。这就是一种容器效果。
- 由于每一条线程均含有各自私有的ThreadLocalMap容器,这些容器相互独立互不影响,因此不会存在线程安全性问题,从而也无需使用同步机制来保证多条线程访问容器的互斥性。
ThreadLocal.clear()方法可以清空,释放内存。
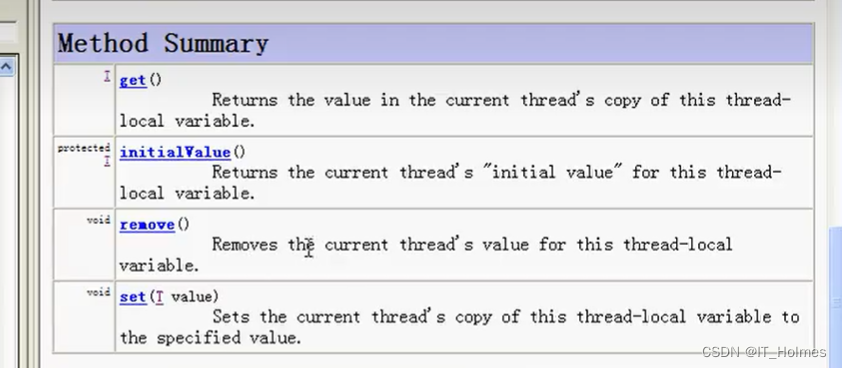
(remove方法可以拿掉当前线程的内容。)
import java.util.Random;

public class ThreadScopeShareData {


    /**
     * ThreadLocal类,多线程之间是不会相互冲突的。
     * 这里是有泛型的,不仅仅用于integer。
     */
    static ThreadLocal<Integer> x = new ThreadLocal();
    static ThreadLocal<MyThreadScopeData> myThreadScopeData = new ThreadLocal<>();

    public static void main(String[] args) {


        for (int i=0;i<2;i++){


            new Thread(new Runnable() {


                @Override
                public void run() {


                    //让data随机等于一个int类型数据。
                    int data = new Random().nextInt();

                    System.out.println(Thread.currentThread().getName()
                            + "has put data: " + data);

                    //这里的是当前线程内定义的data。
                    x.set(data);

                   MyThreadScopeData.getInstance().setName("name"+data);
                   MyThreadScopeData.getInstance().setAge(data);

                    new A().get();
                    new B().get();
                }

            }).start();
        }
    }

    static class A {


        public void get(){


            //这里获取就是当前线程获取的数据。
            Integer data = x.get();
            System.out.println("A from" + Thread.currentThread().getName() + " get data: "+data);

            MyThreadScopeData myData = MyThreadScopeData.getInstance();
            System.out.println("A from " + Thread.currentThread().getName() + "getMyData: " + myData.getName() + ","
            + myData.getAge());
        }
    }

    static class B{


        public void get(){


            Integer data = x.get();
            System.out.println("B from" + Thread.currentThread().getName() + " get data: "+data);

            MyThreadScopeData myData = MyThreadScopeData.getInstance();
            System.out.println("B from " + Thread.currentThread().getName() + "getMyData: " + myData.getName() + ","
                    + myData.getAge());
        }
    }

}

class MyThreadScopeData{


    private MyThreadScopeData(){

    }

    private static ThreadLocal<MyThreadScopeData> map = new ThreadLocal();

    /**
     *    通过这种 懒汉式 + ThreadLocal来实现。
     *    这种方式ThreadLocal代码,在类中就会隐藏起来。
     */
    public static MyThreadScopeData getInstance(){


        MyThreadScopeData instance = map.get();
        if (instance==null){


            instance = new MyThreadScopeData();
            map.set(instance);
        }
        return instance;
    }

    private String name;

    private int age;

    public String getName() {


        return name;
    }

    public void setName(String name) {


        this.name = name;
    }

    public int getAge() {


        return age;
    }

    public void setAge(int age) {


        this.age = age;
    }
}
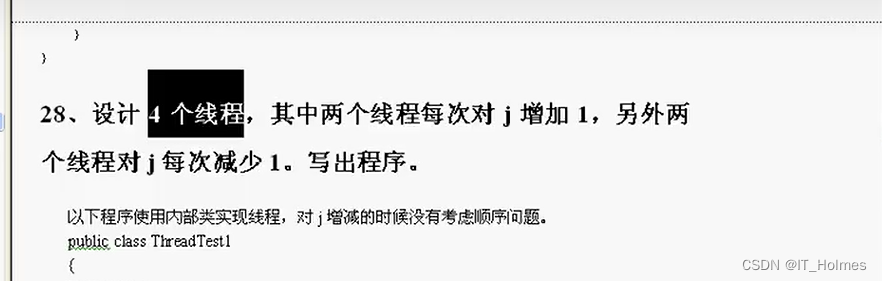
7. 多个线程之间 共享数据的方式
public class MultiThreadShareData {


    private static ShareData1 data1 = new ShareData1();

    public static void main(String[] args) {


        ShareData1 data2 = new ShareData1();
        //第一种方式:通过类的方式。
        new Thread(new MyRunable1(data2)).start();
        new Thread(new MyRunable2(data2)).start();


        //第二种方式:通过匿名内部类的方式。
        new Thread(new Runnable() {


            @Override
            public void run() {


                data1.decrement();
            }
        }).start();

        new Thread(new Runnable() {


            @Override
            public void run() {


                data1.increment();
            }
        }).start();

    }

}

class MyRunable1 implements Runnable{


    private ShareData1 data1;

    public MyRunable1(ShareData1 data1){


        this.data1 = data1;
    }

    @Override
    public void run() {


        data1.decrement();
    }

}

class MyRunable2 implements Runnable{


    private ShareData1 data1;

    public MyRunable2(ShareData1 data1){


        this.data1 = data1;
    }

    @Override
    public void run() {


        data1.increment();
    }

}

class ShareData1{


    private int j = 0;

    public synchronized void increment(){


        j++;
    }

    public synchronized void decrement(){


        j--;
    }
}
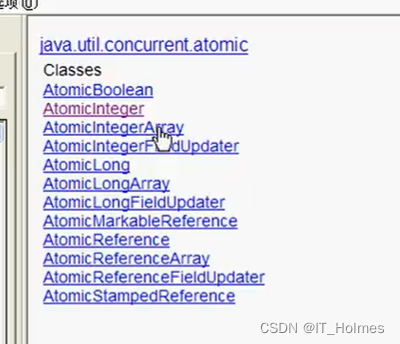
8. Java 原子性类的应用
这些原子性类的应用都封装到java.util.concurrent ,java.util.concurrent.atomic。
AtomicInterger类:addAndGet,decrementAndGet。
对应的其他几种类型:
9. Java 线程并发库的应用(线程池)
线程池和应用类Executors类:
- Executors类的使用。
- 四种线程池的创建和使用。
import java.util.concurrent.ExecutorService;
import java.util.concurrent.Executors;
import java.util.concurrent.TimeUnit;

public class ThreadPoolTest {


    public static void main(String[] args) {


        /**
         *  1. newFixedThreadPool 固定的线程池
         *  特点:线程个数是固定的,设置了3就一直又三个线程再跑。
         */
        //ExecutorService threadPool = Executors.newFixedThreadPool(3);
        /**
         *  2. newCachedThreadPool 缓存的线程池
         *  特点:这个线程池可以的线程数是动态变化的。可以无线扩大。
         */
        //ExecutorService threadPool = Executors.newCachedThreadPool();
        /**
         *  3. newSingleThreadExecutor 单线程的线程池
         *  特点:这个线程池里面只有一个线程,如果这个线程死掉了,会立刻重新启动一个线程来替代原来的线程执行下去。
         *
         *  有些面试题:如果实现线程死掉后重新启动?
         *            答:线程都已经死掉了,可以说是没法恢复了。只能重新创建一个新的线程来代替它。
         */
        ExecutorService threadPool = Executors.newSingleThreadExecutor();

        //循环向threadPool里面提交10个任务。
        for (int i=1;i<=10;i++){


            final int task = i;
            threadPool.execute(new Runnable() {


                @Override
                public void run() {


                    for (int j=1;j<=10;j++){


                        try {


                            Thread.sleep(20);
                        } catch (InterruptedException e) {


                            e.printStackTrace();
                        }
                        System.out.println(Thread.currentThread().getName() + " is looping of " + j + " for task " + task);
                    }
                }
            });

        }
        System.out.println("threadPool中已经包含了10个任务!");

        threadPool.shutdown(); //shutdown是等着threadPool里面的任务执行完就结束这个threadPool
        //threadPool.shutdownNow(); //shutdownNow是threadPool直接结束里面的任务,不管里面的有没有完成。

        /**
         *  4. newScheduledThreadPool 定时器线程池
         *    两个方法:schedule 和 scheduleAtFixedRate的使用。
         *
         *    由于没有date参数,因此我们指定固定日志只能通过:
         *    date.getTime() - System.currentTimeMillis()来创建定时任务。
         */
        Executors.newScheduledThreadPool(3).schedule(new Runnable() {


            @Override
            public void run() {


                System.out.println("bombing");
            }
        },10, TimeUnit.SECONDS); //10秒后打印执行run方法里面的内容。

        Executors.newScheduledThreadPool(3).scheduleAtFixedRate(new Runnable() {


            @Override
            public void run() {


                System.out.println("bombing");
            }
        },10,5, TimeUnit.SECONDS); //10秒后打印执行run方法里面的内容,每隔5秒运行一次。
    }

}
10. Callable 与 future的应用
submit方法的使用 和 ExecutorCompletionService对象(take方法的使用):
import java.util.Random;
import java.util.concurrent.*;

public class CallableAndFuture {


    public static void main(String[] args) {


        ExecutorService threadPool = Executors.newSingleThreadExecutor();

        //对于有返回值的callable使用submit方法、
        Future<String> future = threadPool.submit(new Callable<String>() {


            @Override
            public String call() throws Exception {


                Thread.sleep(2000);
                return "hello";
            }
        });

        try {


            //下面代码的意思就是:10秒钟内拿不到结果就抛出异常TimeoutException。
            String s = future.get(10,TimeUnit.SECONDS);
            System.out.println("拿到结果:"+s);
        } catch (InterruptedException e) {


            e.printStackTrace();
        } catch (ExecutionException e) {


            e.printStackTrace();
        } catch (TimeoutException e) {


            e.printStackTrace();
        }

        threadPool.shutdown();


        /**
         *  对于想要实现一组callable,谁先返回就先执行谁的。
         */
        ExecutorService fixedThreadPool = Executors.newFixedThreadPool(10);
        CompletionService completionService = new ExecutorCompletionService(fixedThreadPool);

        for (int i=1;i<=10;i++){


            final int seq = i;
            completionService.submit(new Callable() {


                @Override
                public Integer call() throws Exception {


                    Thread.sleep(new Random().nextInt(5000));
                    return seq;
                }
            });
        }

        for (int i=0;i<10;i++){


            try {


                System.out.println(completionService.take().get());
            } catch (InterruptedException e) {


                e.printStackTrace();
            } catch (ExecutionException e) {


                e.printStackTrace();
            }
        }

    }
}
11. 线程锁的技术
接下来锁的一些技术,一般都在java.util.concurrent包的下面。
就是lock的使用,需要注意的是:unlock方法一定写到try - catch的finally里面。
什么是 “可重入锁”,可重入就是说某个线程已经获得某个锁,可以再次获取锁而不会出现死锁
import java.io.IOException;
import java.util.concurrent.locks.Lock;
import java.util.concurrent.locks.ReentrantLock;

public class LockTest {


	public static void main(String[] args) throws IOException, InterruptedException {


		new LockTest().init();
	}

	private void init(){


		Outputer outputer = new Outputer();

		new Thread(new Runnable() {


			@Override
			public void run() {


				while (true){


					try {


						Thread.sleep(10);
					} catch (InterruptedException e) {


						e.printStackTrace();
					}
					outputer.output("123456");
				}
			}
		}).start();

		new Thread(new Runnable() {


			@Override
			public void run() {


				while (true){


					try {


						Thread.sleep(10);
					} catch (InterruptedException e) {


						e.printStackTrace();
					}
					outputer.output("2344");
				}
			}
		}).start();

	}

	static class Outputer{


		/**
		 *  ReentrantLock 就是可重入锁。
		 */
		Lock lock = new ReentrantLock();

		public void output(String name){


			int len = name.length();

			lock.lock();
			try {


				for (int i=0;i<len;i++){


					System.out.print(name.charAt(i));
				}
				System.out.println();
			}catch (Exception e){


				e.printStackTrace();
			}finally {


				//这里的unlock一定要写到try catch的final里面。
				lock.unlock();
			}

		}

	}

}
12. Java 读写锁技术的使用
读写锁:分为读锁 和 写锁。多个读锁不互斥,读锁与写锁互斥,写锁与写锁互斥。
示例:
import java.util.Random;
import java.util.concurrent.locks.ReentrantReadWriteLock;

public class ReadWriteLockTest {


    public static void main(String[] args) {


        Queue3 q3 = new Queue3();

        for (int i=0;i<3;i++){


            new Thread(){


                @Override
                public void run() {


                    q3.get();
                }
            }.start();

            new Thread(){


                @Override
                public void run() {


                    while (true){


                        q3.put(new Random().nextInt(10000));
                    }
                }
            }.start();
        }


    }
}

class Queue3{


    private Object data = null;

    private ReentrantReadWriteLock rwl = new ReentrantReadWriteLock();

    public void get(){


        rwl.readLock().lock();
        try {


            System.out.println(Thread.currentThread().getName() + " be ready to read data!");
            Thread.sleep((long)(Math.random()*1000));
            System.out.println(Thread.currentThread().getName() + " have read data : " + data);
        } catch (InterruptedException e) {


            e.printStackTrace();
        }finally {


            rwl.readLock().unlock();
        }
    }

    public void put(Object data){


        rwl.writeLock().lock();
        try {


            System.out.println(Thread.currentThread().getName() + " be ready to write data!");
            Thread.sleep((long) (Math.random()*1000));
            this.data = data;
            System.out.println(Thread.currentThread().getName()  + " have write data : " + data);
        } catch (InterruptedException e) {


            e.printStackTrace();
        }finally {


            rwl.writeLock().unlock();
        }
    }

}
读写锁的应用场景:
- 见下面代码,面试题:要求代码实现多个对象的缓存效果。
import java.util.HashMap;
import java.util.Map;
import java.util.concurrent.locks.ReadWriteLock;
import java.util.concurrent.locks.ReentrantReadWriteLock;

public class CacheDemo {


    private Map<String,Object> cache = new HashMap();

    public static void main(String[] args) {


    }

    private ReadWriteLock rwl = new ReentrantReadWriteLock();

    /**
     *  读写锁的应用场景:
     */
    public Object getData(String key){


        rwl.readLock().lock();
        Object value = null;
        try {


            value = cache.get(key);
            if (value == null){


                /**
                 * 这样就是当我们读取cache里面有内容,有对应的数据,就不需要上写锁。这样其他线程之间的读锁也能够正常读取数据。
                 * 如果cache里面没有对应的数据,就应该上写锁,其他线程就必须要等待。
                 */
                rwl.readLock().unlock();
                rwl.writeLock().lock();
                try {


                    /**
                     *  这里之所以要加上value == null是因为,下面的写锁释放后,按照代码逻辑应该是走读锁去,
                     *  但是如果是多线程那么就有可能多个线程都在等待,例如:多个写锁都在等待,那么写锁也会抢占。
                     *  因为我们加了value = null这样就算继续走写锁,也不会有什么影响了。
                     */
                    if (value == null){


                        /**
                         * 实际这里应该查询数据库系统
                         * 这里就用到了读写锁。
                         */
                        value = "query database";
                    }
                }catch (Exception e){


                    e.printStackTrace();
                }finally {


                    rwl.writeLock().unlock();
                }
                rwl.readLock().lock();
            }
        }catch (Exception e){


            e.printStackTrace();
        }finally {


            rwl.readLock().unlock();
        }

        return value;
    }

}
13. Java 条件阻塞condition的应用
wait 和 notify必须要在synchronized(同步监视器必须为this)里面写:
-
调用的时候也是用的this.wait()等等。
-
wait/notify使用的时候需要配合synchronized一起使用,因为这两个方法是Object类中的方法,说明是基于对象而存在的,可能有多个线程一起调用这两个方法。所以无论是执行对象的wait、notify还是notifyAll方法,必须保证当前运行的线程取得了该对象的控制权(monitor),任何一个时刻,对象的控制权(monitor)只能被一个线程拥有。
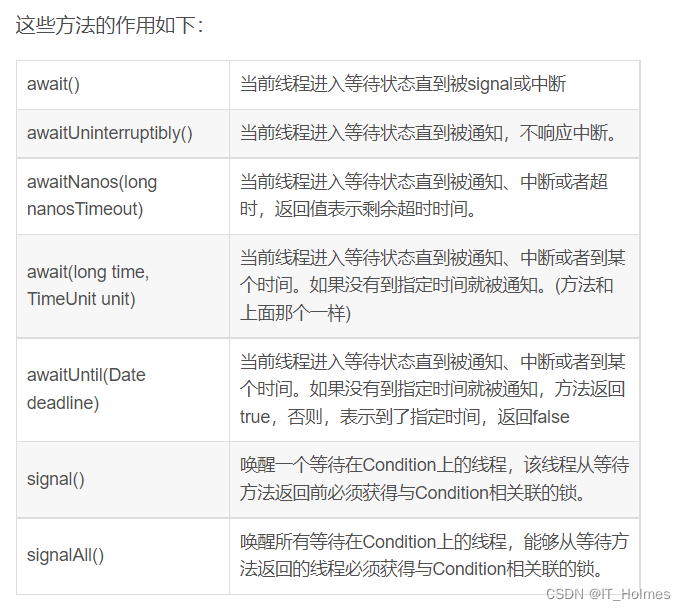
Condition条件阻塞:
- wait/notify/notifyAll都是Java底层级别的方法,它是与对象对象监视器配合完成线程等待/通知机制。
- 但是更高级别的Condition具有更高的可扩展性,它是与Lock配合完成线程的等待/通知机制。
- 其实效果和Object中的wait一样,其他线程调用await方法的时候会进入等待队列,只不过这个的等待队列在Condition对象内部,由Condition自身来维护,signal就是唤醒一个等待在Condition上的线程。
condition要比wait/notify优秀很多:
- Condition可以支持多个等待队列,new 多个Condition即可(即多种等待条件,而wait只能支持一种)
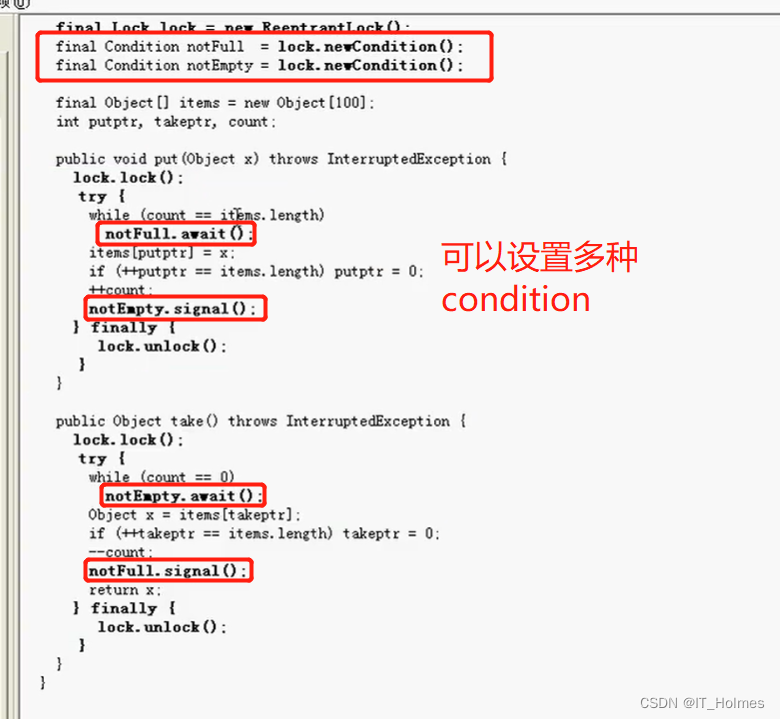
示例:
- 就是可以创建多个condition条件阻塞,从而这样轮流来解锁的一种场景。
import java.util.concurrent.locks.Condition;
import java.util.concurrent.locks.Lock;
import java.util.concurrent.locks.ReentrantLock;

public class ConditionCommunication {


    public static void main(String[] args) {


        Business business = new Business();

        new Thread(new Runnable() {


            @Override
            public void run() {


                for (int j = 0;j<50;j++){


                    business.sub(j);
                }
            }
        }).start();

        new Thread(new Runnable() {


            @Override
            public void run() {


                for (int j = 0;j<50;j++){


                    business.sub2(j);
                }
            }
        }).start();

        new Thread(new Runnable() {


            @Override
            public void run() {


                for (int j = 0;j<50;j++){


                    business.sub3(j);
                }
            }
        }).start();

    }


    static class Business{


        Lock lock = new ReentrantLock();

        Condition condition = lock.newCondition();
        Condition condition2 = lock.newCondition();
        Condition condition3 = lock.newCondition();

        private int bShouldSub = 1;

        public void sub(int j){


            lock.lock();
            try {


                while (bShouldSub != 1){


                    try {


                        //this.wait();
                        condition.await();
                    } catch (Exception e) {


                        e.printStackTrace();
                    }
                }
                for (int i=0;i<10;i++){


                    System.out.println("sub: 50循环的第"+j+",子线程第"+i+"次循环。");
                }
                bShouldSub = 2;

                condition2.signal();
            }finally {


                lock.unlock();
            }
        }

        public void sub2(int j){


            lock.lock();
            try {


                while (bShouldSub != 2){


                    try {


                        //this.wait();
                        condition2.await();
                    } catch (Exception e) {


                        e.printStackTrace();
                    }
                }
                for (int i=0;i<10;i++){


                    System.out.println("sub2: 50循环的第"+j+",子线程第"+i+"次循环。");
                }
                bShouldSub = 3;

                condition3.signal();
            }finally {


                lock.unlock();
            }
        }

        public void sub3(int j){


            lock.lock();
            try {


                while (bShouldSub != 3){


                    try {


                        //this.wait();
                        condition3.await();
                    } catch (Exception e) {


                        e.printStackTrace();
                    }
                }
                for (int i=0;i<10;i++){


                    System.out.println("sub3: 50循环的第"+j+",子线程第"+i+"次循环。");
                }
                bShouldSub = 1;

                condition.signal();
            }finally {


                lock.unlock();
            }
        }

    }


}
14. Semaphore(信号灯)同步工具
Semaphore可以维护当前访问自身的线程个数,并提供了同步机制。使用Semaphore可以控制同时访问资源的线程个数。
例如:实现一个文件允许的并发访问数。

示例:
- Semaphore对象可以传入参数,来决定是按照先来后到的顺序,还是来按照抢占的原则。
import java.util.concurrent.ExecutorService;
import java.util.concurrent.Executors;
import java.util.concurrent.Semaphore;

public class SemaphoreTest {


    public static void main(String[] args) {


        ExecutorService service = Executors.newCachedThreadPool();

        //信号量
        final Semaphore sp = new Semaphore(3);

        for (int i=0;i<10;i++){


            Runnable runnable = new Runnable() {


                @Override
                public void run() {


                    try {


                        //获得信号量灯
                        sp.acquire();
                    } catch (InterruptedException e) {


                        e.printStackTrace();
                    }
                    System.out.println("线程" + Thread.currentThread().getName() +
                                "进入,当前已有" + (3-sp.availablePermits()));
                    try {


                        Thread.sleep((long)(Math.random()*10000));
                    } catch (InterruptedException e) {


                        e.printStackTrace();
                    }
                    System.out.println("线程" + Thread.currentThread().getName() + "即将离开");

                    //释放信号量灯
                    sp.release();

                    System.out.println("线程" + Thread.currentThread().getName() +
                            "已离开,当前已有" + (3-sp.availablePermits()));

                }
            };

            service.execute(runnable);

            service.shutdown();
        }
    }

}
其他应用场合:

15. CyclicBarrier 同步工具
CyclicBarrier比较好理解:
- 就像下图举的例子一样:

- 熟练使用cyclicBarrier .await()方法。
import java.util.concurrent.CyclicBarrier;
import java.util.concurrent.ExecutorService;
import java.util.concurrent.Executors;

public class CyclicBarrierTest {


    public static void main(String[] args) {


        ExecutorService service = Executors.newCachedThreadPool();

        //等三个线程都跑完,在执行下面的
        final CyclicBarrier cb = new CyclicBarrier(3);

        for (int i=0;i<3;i++){


            Runnable runnable = new Runnable() {


                @Override
                public void run() {


                    try {


                        Thread.sleep((long) Math.random()*10000);
                        System.out.println("线程" + Thread.currentThread().getName() +
                                "即将到达集合地点1,当前已有" + (cb.getNumberWaiting() + 1));

                        /**
                         * 多个线程都到达了这里才能继续往下面走。
                         * 就是在这里等待的意思,一旦所有线程都达到了该位置就立刻走下面的代码
                         */
                        cb.await();

                        Thread.sleep((long) Math.random()*10000);
                        System.out.println("线程" + Thread.currentThread().getName() +
                                "即将到达集合地点2,当前已有" + (cb.getNumberWaiting() + 1));

                        cb.await();

                        Thread.sleep((long) Math.random()*10000);
                        System.out.println("线程" + Thread.currentThread().getName() +
                                "即将到达集合地点3,当前已有" + (cb.getNumberWaiting() + 1));

                        cb.await();
                    } catch (Exception e) {


                        e.printStackTrace();
                    }
                }
            };
            service.execute(runnable);
        }

        service.shutdown();
    }
}
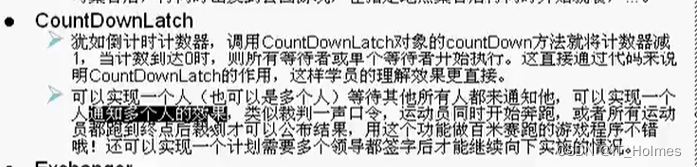
16. CountDownLatch 同步工具
CountDownLatch:就和倒计时计时器一样。
示例:
import java.util.concurrent.CountDownLatch;
import java.util.concurrent.ExecutorService;
import java.util.concurrent.Executors;

public class CountdownLatchTest {


    public static void main(String[] args) {


        ExecutorService service = Executors.newCachedThreadPool();
        final CountDownLatch cdOrder = new CountDownLatch(1);
        final CountDownLatch cdAnswer = new CountDownLatch(3);

        for (int i=0;i<3;i++){


            Runnable runnable = new Runnable() {


                @Override
                public void run() {


                    try {


                        System.out.println("线程" + Thread.currentThread().getName() + "正准备接受命令");

                        /**
                         * 所有线程都在这里等待,等到cdOrder计时器被减到0
                         */
                        cdOrder.await();
                        System.out.println("线程" + Thread.currentThread().getName() + "已接受命令");

                        Thread.sleep((long) Math.random()*10000);
                        System.out.println("线程" + Thread.currentThread().getName() + "回应命令处理结果");

                        cdAnswer.countDown();
                    } catch (InterruptedException e) {


                        e.printStackTrace();
                    }
                }
            };
            service.execute(runnable);
        }

        try {


            Thread.sleep((long) (Math.random()*10000));

            System.out.println("线程" + Thread.currentThread().getName() + "即将发布命令");
            /**
             * cdOrder这里计时器减1
             */
            cdOrder.countDown();
            System.out.println("线程" + Thread.currentThread().getName() + "已发送命令,正在等待结果");

            /**
             * 这里就是三个线程都会执行一个countDown减1操作,知道为0.就会继续执行下面代码。
             */
            cdAnswer.await();
            System.out.println("线程" + Thread.currentThread().getName() + "已收到所有响应结果");
        } catch (InterruptedException e) {


            e.printStackTrace();
        }

        service.shutdown();
    }
}
17. Exchanger 同步工具
Exchanger作用:让两个线程之间可以交换数据。

示例:
import java.util.concurrent.Exchanger;
import java.util.concurrent.ExecutorService;
import java.util.concurrent.Executors;

public class ExchangerTest {


    public static void main(String[] args) {


        ExecutorService service = Executors.newCachedThreadPool();
        final Exchanger exchanger = new Exchanger();
        service.execute(new Runnable() {


            @Override
            public void run() {


                try {


                    String data1 = "zxx";
                    System.out.println("线程" + Thread.currentThread().getName()
                        + "正在把数据" + data1 + "换出去");

                    Thread.sleep((long) (Math.random()*10000));

                    /**
                     * 多个线程这里就会等待交换数据。
                     */
                    String data2 = (String) exchanger.exchange(data1);
                    System.out.println("线程" + Thread.currentThread().getName() +
                            "换回的数据为data2:" + data2);
                } catch (InterruptedException e) {


                    e.printStackTrace();
                }
            }
        });

        service.execute(new Runnable() {


            @Override
            public void run() {


                try {


                    String data1 = "lhm";
                    System.out.println("线程" + Thread.currentThread().getName()
                            + "正在把数据" + data1 + "换出去");

                    Thread.sleep((long) (Math.random()*10000));


                    String data2 = (String) exchanger.exchange(data1);
                    System.out.println("线程" + Thread.currentThread().getName() +
                            "换回的数据为data2:" + data2);
                } catch (InterruptedException e) {


                    e.printStackTrace();
                }
            }
        });

    }
}
18. Java 阻塞队列的应用
队列包含固定长度的队列和不固定长度的队列。
阻塞队列两个附加操作(实现阻塞功能):
- 支持阻塞的插入方法put: 队列满时,队列会阻塞插入元素的线程,直到队列不满。
- 支持阻塞的移除方法take: 队列空时,获取元素的线程会等待队列变为非空。
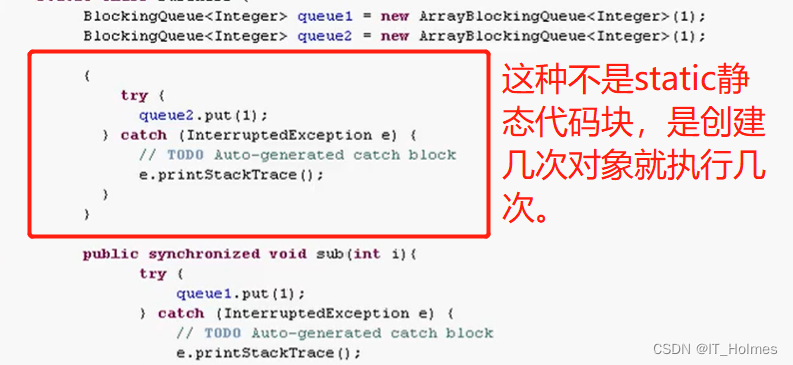
小知识点:
import java.util.concurrent.ArrayBlockingQueue;
import java.util.concurrent.BlockingQueue;

public class BlockingQueueTest {


    public static void main(String[] args) {


        //定义一个阻塞队列
        final BlockingQueue queue = new ArrayBlockingQueue(3);

        for (int i=0;i<2;i++){


            new Thread(new Runnable() {


                @Override
                public void run() {


                    while (true){


                        try {


                            Thread.sleep((long) (Math.random()*10000));
                            System.out.println(Thread.currentThread().getName() + "准备放数据。");

                            //
                            queue.put(1);
                            System.out.println(Thread.currentThread().getName() + "已经放了数据" +
                                    "队列目前有" + queue.size() + "个数据。");
                        } catch (InterruptedException e) {


                            e.printStackTrace();
                        }
                    }
                }
            }).start();
        }

        new Thread(new Runnable() {


            @Override
            public void run() {


                while (true){


                    try {


                        Thread.sleep(1000);
                        System.out.println(Thread.currentThread().getName() + "准备取数据。");

                        queue.take();
                        System.out.println(Thread.currentThread().getName() + "已经取走数据," +
                                "队列目前有" + queue.size() + "个数据。");
                    } catch (InterruptedException e) {


                        e.printStackTrace();
                    }
                }
            }
        }).start();

    }
}