一、嵌入式的启动过程
uboot ---> kernel ----> 根文件系统 ---> 应用程序加载 挂载 调用
二、什么是u-boot?
1.uboot是通用的引导程序。全称(Universal Boot Loader)1)通用性
.支持多种硬件
MIPS、x86、ARM、NIOS、XScale等诸多常用系列的处理器
.支持多种操作系统
OpenBSD Linux android WinCE
2)BootLoader
.Boot 启动及初始化
.CPU级别的初始化:时钟、看门狗、DDR2、Uart
.板级的初始化:DM9000、USB、I2C等
.Loader 引导系统
.将Nand Flash当中的kernel拷贝到DDR2内存当中
.向kernel传递启动参数,会放在0x30000100地址处
bootargs=root=/dev/mtdblock4 rootfstype=yaffs2 init=/sbin/init console=ttySAC0,115200
.启动内核,在代码表现为函数指针。
3)带有调试功能
.loady tftp go
2.uboot不是Linux的一部分,我们也可以设计一个Bootloader。
3.uboot是一个复杂的裸机程序。
4.uboot一般分为两个阶段:BL1,BL2.
三、uboot的命令
1.查看u-boot支持的命令
GEC210 # ?
或
GEC210 # help
2.ping
一定要使用uboot主动去ping IP地址,因为默认情况当中网络驱动是关闭。
GEC210 # ping 192.168.1.214
dm9000 i/o: 0x88000300, id: 0x90000a46
DM9000: running in 16 bit mode
MAC: 00:40:5c:26:0a:5b
operating at 100M full duplex mode
host 192.168.1.214 is alive (而且ping通了也跟以前不太一样)
GEC210 # ping 192.168.1.254
dm9000 i/o: 0x88000300, id: 0x90000a46
DM9000: running in 16 bit mode
MAC: 00:40:5c:26:0a:5b
operating at 100M full duplex mode
ping failed; host 192.168.1.254 is not alive
3.setenv 用于设置环境变量
bootargs=root=/dev/mtdblock4 rootfstype=yaffs2 init=/linuxrc console=ttySAC0,115200
bootcmd=nand read 0x30008000 0x600000 0x500000 ;bootm 0x30008000
bootdelay=3
baudrate=115200
ethaddr=00:40:5c:26:0a:5b
gatewayip=192.168.0.1
netmask=255.255.0.0
serverip=192.168.1.2
ipaddr=192.168.1.9
GEC210 # setenv ipaddr 192.168.1.111
GEC210 # saveenv
Saving Environment to SMDK bootable device...
Erasing Nand...
Writing to Nand...
Saved enviroment variables
4.bdinfo 用于查看开发板信息
GEC210 # bdinfo
arch_number = 0x00000998 //机器码
boot_params = 0x30000100 //存放启动参数的位置,给Linux 访问
DRAM bank = 0x00000000 //通道0
-> start = 0x30000000 //通道0内存起始地址为0x30000000,256MB
-> size = 0x10000000
DRAM bank = 0x00000001 //通道1内存起始地址为0x40000000,256MB
-> start = 0x40000000
-> size = 0x10000000
ethaddr = 00:40:5C:26:0A:5B //网络的MAC地址信息
ip_addr = 192.168.1.111 //网卡的IP地址信息
baudrate = 115200 bps //串口波特率115200bps
5.bootcmd uboot启动完之后要接着做的事情
bootcmd=nand read 0x30008000 0x600000 0x500000 ;bootm 0x30008000
1)nand read 0x30008000 0x600000 0x500000
从Nand Flash起始地址0x600000读取0x500000字节大小内容拷贝到0x30008000.
2)bootm 0x30008000
在0x30008000地址上启动内核
有些时候不需要启动内核,只需要调试代码。
setenv bootcmd 'tftp 0x40000000 start.bin;go 0x40000000'
saveenv
setenv bootcmd 'nand read 0x30008000 0x600000 0x500000 ;bootm 0x30008000'
saveenv
6.reset 用于复位开发板
7.启动参数
bootargs=root=/dev/mtdblock4 rootfstype=yaffs2 init=/init console=ttySAC0,115200
1)root=/dev/mtdblock4
挂载的是Nand Flash当中第4个分区
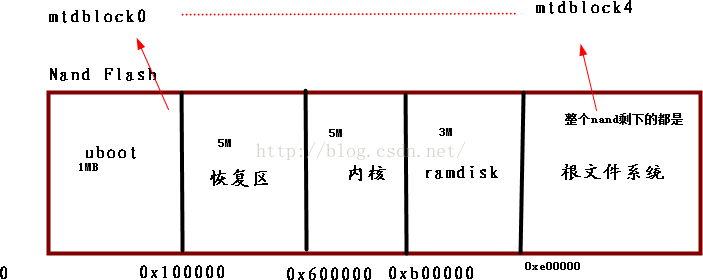
2)rootfstype=yaffs2
根文件系统类型
3)init=/init
init是Linux启动的第一个进程,也是所有进程的父进程,PID=1,也是唯一的一个Linux内核发起的进程。
U-boot会自己寻找启动进程,即使设置的时候启动失败
四、uboot的编译
0.u-boot官网http://www.denx.de/wiki/U-Boot/WebHome
ftp://ftp.denx.de/pub/u-boot/
1.交叉编译工具
arm-2009q3.tar.bz2
2.安装交叉编译工具
/usr/local/arm/arm-2009q3
3.进入uboot-gec210目录,直接输入make命令显示以下错误信息。
root@ubuntu:~/uboot-gec210# make
System not configured - see README
make: *** [all] Error 1
README[行226]
Selection of Processor Architecture and Board Type:
---------------------------------------------------
For all supported boards there are ready-to-use default
configurations available; just type "make <board_name>_config".
Building the Software:[行2542]
======================
Building U-Boot has been tested in several native build environments
and in many different cross environments. Of course we cannot support
all possibly existing versions of cross development tools in all
(potentially obsolete) versions. In case of tool chain problems we
recommend to use the ELDK (see http://www.denx.de/wiki/DULG/ELDK)
which is extensively used to build and test U-Boot.
If you are not using a native environment, it is assumed that you
have GNU cross compiling tools available in your path. In this case,
you must set the environment variable CROSS_COMPILE in your shell.
Note that no changes to the Makefile or any other source files are
necessary. For example using the ELDK on a 4xx CPU, please enter:
$ CROSS_COMPILE=ppc_4xx-
$ export CROSS_COMPILE
U-Boot is intended to be simple to build. After installing the
sources you must configure U-Boot for one specific board type. This
is done by typing:
make NAME_config
where "NAME_config" is the name of one of the existing configu-
rations; see the main Makefile for supported names.
4.输入make gec210_nand_config指定开发板平台
root@ubuntu:~/uboot-gec210# make gec210_nand_config
Configuring for gec210_nand board...
在Makefile当中会找到对应的标签
gec210_nand_config : unconfig
@$(MKCONFIG) $(@:_config=) arm s5pc11x gec210 samsung s5pc110
@echo "TEXT_BASE = 0xc3e00000" > $(obj)board/samsung/gec210/config.mk
5.修改Makefile指定当前的交叉编译工具。
在Makefile的第147行添加以下检查编译工具
CROSS_COMPILE = /usr/local/arm/arm-2009q3/bin/arm-none-linux-gnueabi-
6.编译uboot
root@ubuntu:~/uboot-gec210# make -j 2 //使用双线程去编译uboot源码
编译成功之后,会在u-boot的顶层目录生成u-boot.bin
7.固化u-boot.bin
tftp 0x40000000 u-boot.bin //将u-boot.bin下载到内存0x40000000地址处
nand erase 0x0 0x100000 //将Nand Flash起始地址0擦除0x100000字节大小的空间
nand write 0x40000000 0x0 0x100000 //将内存地址0x40000000地址处内容写入到Nand Flash起始地址0,大小为0x100000.
五、uboot的移植
1.概念粤嵌公司向三星公司购买芯片的时候,提供关于芯片操作方法
1)源码包
.uboot
.kernel
.rootfs
2)硬件设计文件
.S5PV210芯片手册
.官方的原理图、PCB封装
粤嵌公司基于这些资料进行二次修改,我们称之为“移植”。
三星公司提供的u-boot源码包:android_uboot_smdkv210.tar.bz2
2.编译过程
1)解压到家目录
root@ubuntu:~# tar -jxf /mnt/hgfs/share/android_uboot_smdkv210.tar.bz2
2)指定开发板类型
root@ubuntu:~/u-boot-samsung-dev# make smdkv210single_config
在Makfile里面行2581
smdkv210single_config : unconfig
@$(MKCONFIG) $(@:_config=) arm s5pc11x smdkc110 samsung s5pc110
@echo "TEXT_BASE = 0xc3e00000" > $(obj)board/samsung/smdkc110/config.mk
3)修改Makefile指定当前的交叉编译工具
行147:CROSS_COMPILE = /usr/local/arm/arm-2009q3/bin/arm-none-linux-gnueabi-
六、开发板变砖的时候急救方法
1.使用USB线更新Nand Flash中的u-boot准备工作:
1)打开DNW.exe软件
.配置好串口信息
.配置好下载地址
iRAM:0xd0020010初始化CPU、USB、串口、时钟等
DDR2:0x23e00000u-boot的运行地址
2)安装好USB驱动且当前操作系统是32位
3)关闭360、手机管家
2.使用SD卡进行更新u-boot
1)打开SD-Flasher.exe,选择u-boot.bin
2)在PC机接上SD卡,若发现当前状态是Available是NO的时候,当前SD卡不能制作,解决方案如下:
.需要重新格式化SD卡
.点击reformat按钮
.点击relayout按钮
3)如果当前在PC机接上SD卡,若发现当前状态是Available是YES的时候,不需要进行格式化。
4)点击Fuse按钮,进行SD烧写u-boot.bin
七、开发板对比
SMDKV210 GEC210
DDR2 1GB 512MB
NOR FLASH 8MB -
Nand FLASH 128MB512MB
SRAM 16MB -
电源管理IC 1 -
猜想:
1)是否一些硬件初始化不正确,是否要删减代码?
2)串口问题:
a.串口号
b.串口波特率
八、源码架构
1.lib_xxx支持不同架构的CPU源代码
2.CPU
该源码支持哪些CPU,与我们相关的 cpu/s5pc11x
3.board
该代码支持哪些开发板,与我们相关的board/samsung/smdkc110
4.common
一些公共的源代码,u-boot常用的命令,与硬件平台无关
5.drivers
板级的驱动源代码:i2c rtc wdt mmc....
6.fs
文件系统的源代码:fat yaffs2 ....
7.include
头文件,大部分头文件跟芯片配置相关,与我们相关的是include/configs/smdkv210single.h
8.net
网络相关的源代码
九、移植步骤
小技巧:如果修改特定以的字符串,使用grep命令进行这个目录搜索!
grep "字符串" -r -n .
1)修改串口控制台
gec210 :串口0(SERIAL1)
smdkv210:串口2(SERIAL3)
修改文件:/include/configs/smdkv210single.h
行145
/*
* select serial console configuration
*/
#define CONFIG_SERIAL3 1
改为:
#define CONFIG_SERIAL1 1/* we use UART0 on gec210 */
2)从三星官方原理图看到具有电源管理IC芯片,屏蔽电源管理IC代码,发现该代码是阻塞等待。
gec210 :没有板载这个芯片
smdkv210:有
修改文件:/board/samsung/smdkc110/lowlevel_init.S
行117:
bl PMIC_InitIp
改为
//bl PMIC_InitIp
3)修改自定义名称
SMDKV210# ---> StephenWen#
修改文件:include/configs/smdkv210single.h,修改247行内容
#define CFG_PROMPT "SMDKV210 # " /* Monitor Command Prompt */
修改为:
#define CFG_PROMPT "StephenWen # " /* Monitor Command Prompt */
4)屏蔽NOR FLASH代码
修改文件:lib_arm/board.c
将行239代码修改如下:
static void display_flash_config (ulong size)
{
//puts ("Flash: ");
//print_size (size, "\n");
}