我们知道,首次执行 vite 时,服务启动后会对 node_modules 模块和配置 optimizeDeps 的目标进行预构建。本节我们就去探索预构建的流程。
按照惯例,先准备好一个例子。本文我们用 vue 的模板去初始化 DEMO:
pnpm create vite my-vue-app -- --template vue
项目创建好之后,我们再安装 lodash-es 这个包,去研究 vite 是如何将几百个文件打包成一个文件的:
pnpm add lodash-es -P
DEMO 代码量比较多,这里就不贴代码了,嫌麻烦的童鞋可以 fork Github repository 。
流程概览
当我们服务启动之后,除了会调用插件容器的 buildStart 钩子,还会执行预构建 runOptimize:
// ...
const listen = httpServer.listen.bind(httpServer)
httpServer.listen = (async (port: number, ...args: any[]) => {
  if (!isOptimized) {
    try {
      // 插件容器初始化
      await container.buildStart({})
      // 预构建
      await runOptimize()
      isOptimized = true
    } catch (e) {
      httpServer.emit('error', e)
      return
    }
  }
  return listen(port, ...args)
}) as any
// ...

const runOptimize = async () => {
  server._isRunningOptimizer = true
  try {
    // 依赖预构建
    server._optimizeDepsMetadata = await optimizeDeps(
      config,
      config.server.force || server._forceOptimizeOnRestart
    )
  } finally {
    server._isRunningOptimizer = false
  }
  server._registerMissingImport = createMissingImporterRegisterFn(server)
}
入口处将配置 config 和是否强制缓存的标记(通过 --force 传入或者调用 restart API)传到 optimizeDeps。optimizeDeps 逻辑比较长,我们先通过流程图对整个流程有底之后,再按照功能模块去阅读源码。
简述一下整个预构建流程:
- 首先会去查找缓存目录(默认是 node_modules/.vite)下的 _metadata.json 文件;然后找到当前项目依赖信息(xxx-lock 文件)拼接上部分配置后做哈希编码,最后对比缓存目录下的 hash 值是否与编码后的 hash 值一致,一致并且没有开启 force 就直接返回预构建信息,结束整个流程;
- 如果开启了 force 或者项目依赖有变化的情况,先保证缓存目录干净(node_modules/.vite 下没有多余文件),在 node_modules/.vite/package.json 文件写入
type: module配置。这就是为什么 vite 会将预构建产物视为 ESM 的原因。 - 分析入口,依次查看是否存在 optimizeDeps.entries、build.rollupOptions.input、*.html,匹配到就通过 dev-scan 的插件寻找需要预构建的依赖,输出 deps 和 missing,并重新做 hash 编码;
- 最后使用 es-module-lexer 对 deps 模块进行模块化分析,拿到分析结果做预构建。构建结果将合并内部模块、转换 CommonJS 依赖。最后更新 data.optimizeDeps 并将结果写入到缓存文件。
剥丝抽茧
全流程上我们已经清楚了,接下来我们就深入上述流程图中绿色方块(逻辑复杂)的代码。因为步骤之间的代码关联比较少,在分析下面逻辑时会截取片段代码
计算依赖 hash
export async function optimizeDeps(
  config: ResolvedConfig,
  force = config.server.force,
  asCommand = false,
  newDeps?: Record<string, string>, // missing imports encountered after server has started
  ssr?: boolean
): Promise<DepOptimizationMetadata | null> {
  // ...
	// 缓存文件信息
  const dataPath = path.join(cacheDir, '_metadata.json')
  // 获取依赖的hash,这里的依赖是 lock 文件、以及 config 的部分信息
  const mainHash = getDepHash(root, config)
  // 定义预编译优化的元数据
  const data: DepOptimizationMetadata = {
    hash: mainHash,
    browserHash: mainHash,
    optimized: {}
  }

  // 不强制刷新
  if (!force) {
    let prevData: DepOptimizationMetadata | undefined
    try {
      // 读取 metadata 信息
      prevData = JSON.parse(fs.readFileSync(dataPath, 'utf-8'))
    } catch (e) {}
    // hash is consistent, no need to re-bundle
    if (prevData && prevData.hash === data.hash) {
      log('Hash is consistent. Skipping. Use --force to override.')
      return prevData
    }
  }

  // 存在缓存目录,清空目录
  if (fs.existsSync(cacheDir)) {
    emptyDir(cacheDir)
  } else {
    // 创建多层级缓存目录
    fs.mkdirSync(cacheDir, { recursive: true })
  }
  // 缓存目录的模块被识别成 ESM
  writeFile(
    path.resolve(cacheDir, 'package.json'),
    JSON.stringify({ type: 'module' })
  )

  // ...
}

// 所有可能的依赖 lock 文件,分别对应 npm、yarn、pnpm 的包管理
const lockfileFormats = ['package-lock.json', 'yarn.lock', 'pnpm-lock.yaml']

/**
 * 获取依赖的 hash 值
 *
 * @param {string} root 根目录
 * @param {ResolvedConfig} config 服务配置信息
 * @return {*}  {string}
 */
function getDepHash(root: string, config: ResolvedConfig): string {
  // 获取 lock 文件的内容
  let content = lookupFile(root, lockfileFormats) || ''
  // 同时也将跟部分会影响依赖的 config 的配置一起加入到计算 hash 值
  content += JSON.stringify(
    {
      mode: config.mode,
      root: config.root,
      resolve: config.resolve,
      assetsInclude: config.assetsInclude,
      plugins: config.plugins.map((p) => p.name),
      optimizeDeps: {
        include: config.optimizeDeps?.include,
        exclude: config.optimizeDeps?.exclude
      }
    },
    (_, value) => {
      // 常见的坑:https://developer.mozilla.org/zh-CN/docs/Web/JavaScript/Reference/Global_Objects/JSON/stringify
      if (typeof value === 'function' || value instanceof RegExp) {
        return value.toString()
      }
      return value
    }
  )
  // 通过 crypto 的 createHash 进行 hash 加密
  return createHash('sha256').update(content).digest('hex').substring(0, 8)
}
上述代码先去 cacheDir 目录下获取 _metadata.json 的信息,然后计算当前依赖的 hash 值,计算过程主要是通过 xxx-lock 文件,结合 config 中跟依赖相关的部分配置去计算 hash 值。最后判断如果服务没有开启 force (即刷新缓存的参数)时,去读取缓存元信息文件中的 hash 值,结果相同就直接返回缓存元信息文件即 _metadata.json 的内容;
否则就判断是否存在 cacheDir(默认情况下是 node_modules/.vite),存在就清空目录文件,不存在就创建缓存目录;最后在缓存目录下创建 package.json 文件并写入 type: module 信息,这就是为什么预构建后的依赖会被识别成 ESM 的原因。
在开启了 force 参数或者依赖前后的 hash 值不相同时,就会去扫描并分析依赖,这就进入下一个阶段。
依赖搜寻,智能分析
	// ... 接上述代码


	let deps: Record<string, string>, missing: Record<string, string>
  // 没有新的依赖的情况,扫描并预构建全部的 import
  if (!newDeps) {
    ;({ deps, missing } = await scanImports(config))
  } else {
    deps = newDeps
    missing = {}
  }

  // update browser hash
  data.browserHash = createHash('sha256')
    .update(data.hash + JSON.stringify(deps))
    .digest('hex')
    .substring(0, 8)

  // 遗漏的包
  const missingIds = Object.keys(missing)
  if (missingIds.length) {
    throw new Error(
      `The following dependencies are imported but could not be resolved:\n\n  ${missingIds
        .map(
          (id) =>
            `${colors.cyan(id)} ${colors.white(
              colors.dim(`(imported by ${missing[id]})`)
            )}`
        )
        .join(`\n  `)}\n\nAre they installed?`
    )
  }

  // 获取 optimizeDeps?.include 配置
  const include = config.optimizeDeps?.include
  if (include) {
    // 创建模块解析器
    const resolve = config.createResolver({ asSrc: false })
    for (const id of include) {
      // normalize 'foo   >bar` as 'foo > bar' to prevent same id being added
      // and for pretty printing
      const normalizedId = normalizeId(id)
      if (!deps[normalizedId]) {
        const entry = await resolve(id)
        if (entry) {
          deps[normalizedId] = entry
        } else {
          throw new Error(
            `Failed to resolve force included dependency: ${colors.cyan(id)}`
          )
        }
      }
    }
  }

  const qualifiedIds = Object.keys(deps)

  if (!qualifiedIds.length) {
    writeFile(dataPath, JSON.stringify(data, null, 2))
    log(`No dependencies to bundle. Skipping.\n\n\n`)
    return data
  }

  const total = qualifiedIds.length
  // pre-bundling 的列表最多展示 5 项
  const maxListed = 5
  // 列表数量
  const listed = Math.min(total, maxListed)
  // 剩余的数量
  const extra = Math.max(0, total - maxListed)
  // 预编译依赖的信息
  const depsString = colors.yellow(
    qualifiedIds.slice(0, listed).join(`\n  `) +
      (extra > 0 ? `\n  (...and ${extra} more)` : ``)
  )
  // CLI 下才需要打印
  if (!asCommand) {
    if (!newDeps) {
      // This is auto run on server start - let the user know that we are
      // pre-optimizing deps
      logger.info(colors.green(`Pre-bundling dependencies:\n  ${depsString}`))
      logger.info(
        `(this will be run only when your dependencies or config have changed)`
      )
    }
  } else {
    logger.info(colors.green(`Optimizing dependencies:\n  ${depsString}`))
  }

	// ...
上述代码很长,关键都在 scanImports 函数,这个涉及到 esbuild 插件和 API,我们待会拎出来分析。其他部分的代码我们通过一张流程图来讲解:
-
开始通过 scanImports 找到全部入口并扫描全部的依赖做预构建;返回 deps 依赖列表、missings 丢失的依赖列表;
-
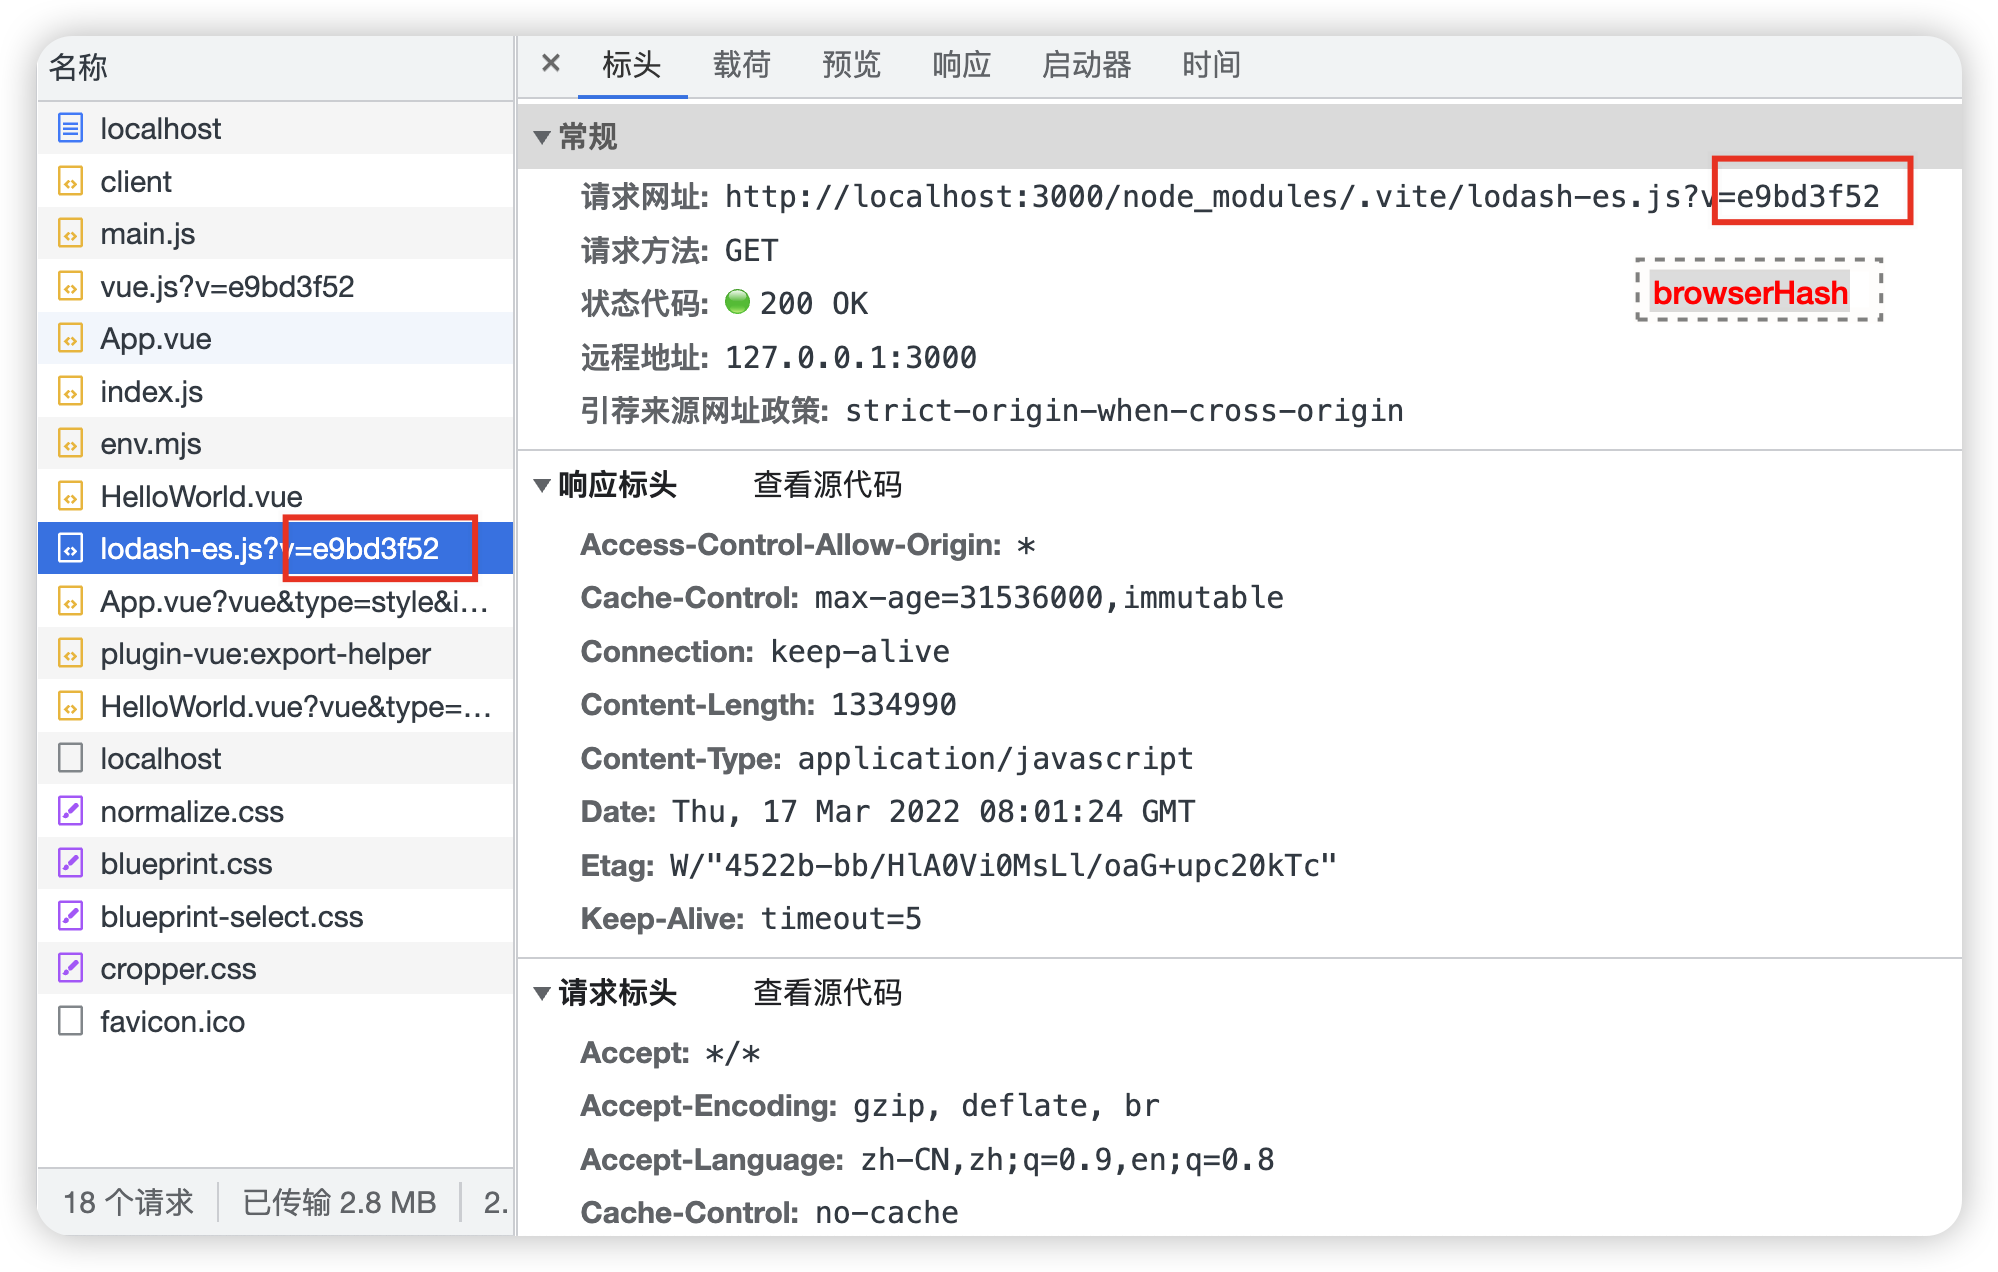
基于 deps 做 hash 编码,编码结果赋给 data.browserHash,这个结果就是浏览器发起这些资源的 hash 参数;
-
对于使用了 node_modules 下没有定义的包,会发出错误信息,并终止服务;举个例子,我引入
abcd包:import { createApp } from 'vue' // 引用一个不存在的包 import getABCD from 'abcd' import App from './App.vue' import '../lib/index' const s = getABCD('abc') console.log(s) createApp(App).mount('#app')然后执行 dev:
-
将 vite.config.ts 中的 optimizeDeps.include 数组中的值添加到 deps 中,也举个例子:
// vite.config.js
import { defineConfig } from 'vite'
import path from 'path'
import vue from '@vitejs/plugin-vue'

export default defineConfig({
  plugins: [vue()],

  optimizeDeps: {
    include: [
      path.resolve(process.cwd(), './lib/index.js')
    ]
  }
})

// ./lib/index.js 文件
import { sayHello } from './foo'

sayHello()

// ./lib/foo.js
export function sayHello () {
  console.log('hello vite prebundling')
}
上述代码我们将 ./lib/index.js 这个文件添加到预构建的 include 配置中,lib 下的两个文件内容也已经明确了。接下来执行 dev 后,我们从终端上就可以看到这个结果:
我们的 lib/index.js 已经被添加到预构建列表。最后再看一下 node_modules/.vite,有一个 _Users_yjcjour_Documents_code_vite_examples_vue-demo_lib_index_js.js 文件,并且已经被构建,还有 sourcemap 文件,这就是 optimizeDeps.include 的作用。具体如何构建这个文件的我们在 导出分析 去梳理。
- 最后根据 deps 的长度去计算命令行中显示的预构建信息,并打印。
上述整个流程逻辑比较简单,就梳理一个主流程并实际展示了部分配置的作用。还有一个关键的环节我们略过了——scanImports。
/**
 * 扫描全部引入
 * @param {ResolvedConfig} config
 */
export async function scanImports(config: ResolvedConfig): Promise<{
  deps: Record<string, string>
  missing: Record<string, string>
}> {
  const start = performance.now()

  let entries: string[] = []

  // 预构建自定义条目
  const explicitEntryPatterns = config.optimizeDeps.entries
  // rollup 入口点
  const buildInput = config.build.rollupOptions?.input

  // 自定义条目优先级最高
  if (explicitEntryPatterns) {
    entries = await globEntries(explicitEntryPatterns, config)
  // 其次是 rollup 的 build 入口
  } else if (buildInput) {
    const resolvePath = (p: string) => path.resolve(config.root, p)
    // 字符串,转成数组
    if (typeof buildInput === 'string') {
      entries = [resolvePath(buildInput)]
    // 数组,遍历输出路径
    } else if (Array.isArray(buildInput)) {
      entries = buildInput.map(resolvePath)
    // 对象,返回对象的value数组
    } else if (isObject(buildInput)) {
      entries = Object.values(buildInput).map(resolvePath)
    } else {
      throw new Error('invalid rollupOptions.input value.')
    }
  // 默认情况下,Vite 会抓取你的 index.html 来检测需要预构建的依赖项
  } else {
    entries = await globEntries('**/*.html', config)
  }

  // 合法的入口文件只能是存在的 js、html、vue、svelte、astro 文件
  entries = entries.filter(
    (entry) =>
      (JS_TYPES_RE.test(entry) || htmlTypesRE.test(entry)) &&
      fs.existsSync(entry)
  )

  // 找不到需要预构建的入口
  if (!entries.length) {
    if (!explicitEntryPatterns && !config.optimizeDeps.include) {
      config.logger.warn(
        colors.yellow(
          '(!) Could not auto-determine entry point from rollupOptions or html files ' +
            'and there are no explicit optimizeDeps.include patterns. ' +
            'Skipping dependency pre-bundling.'
        )
      )
    }
    return { deps: {}, missing: {} }
  } else {
    debug(`Crawling dependencies using entries:\n  ${entries.join('\n  ')}`)
  }

  // 依赖
  const deps: Record<string, string> = {}
  // 缺失的依赖
  const missing: Record<string, string> = {}
  // 创建插件容器,为什么这里需要单独创建一个插件容器?而不是使用 createServer 时创建的那个
  const container = await createPluginContainer(config)
  // 创建 esbuild 扫描的插件
  const plugin = esbuildScanPlugin(config, container, deps, missing, entries)
  // 外部传入的 esbuild 配置
  const { plugins = [], ...esbuildOptions } =
    config.optimizeDeps?.esbuildOptions ?? {}

  // 遍历所有入口全部进行预构建
  await Promise.all(
    entries.map((entry) =>
      build({
        absWorkingDir: process.cwd(),
        write: false,
        entryPoints: [entry],
        bundle: true,
        format: 'esm',
        logLevel: 'error',
        plugins: [...plugins, plugin],
        ...esbuildOptions
      })
    )
  )

  debug(`Scan completed in ${(performance.now() - start).toFixed(2)}ms:`, deps)

  return {
    deps,
    missing
  }
}
扫描入口先从 optimizeDeps.entries 获取;如果没有就去获取 build.rollupOptions.input 配置,处理了 input 的字符串、数组、对象形式;如果都没有,就默认寻找 html 文件。然后传入 deps、missing 调用 esbuildScanPlugin 函数生成扫描插件,并从 optimizeDeps.esbuildOptions 获取外部定义的 esbuild 配置,最后调用 esbuild.build API 进行构建。整个流程汇总成一张图如下:
重点来了,使用 vite:dep-scan 插件扫描依赖,并将在 node_modules 中的依赖定义在 deps 对象中,缺失的依赖定义在 missing 中。接着我们就进入该插件内部,一起学习 esbuild 插件机制:
// 匹配 html <script type="module"> 的形式
const scriptModuleRE =
  /(<script\b[^>]*type\s*=\s*(?:"module"|'module')[^>]*>)(.*?)<\/script>/gims
// 匹配 vue <script> 的形式
export const scriptRE = /(<script\b(?:\s[^>]*>|>))(.*?)<\/script>/gims
// 匹配 html 中的注释
export const commentRE = /<!--(.|[\r\n])*?-->/
// 匹配 src 的内容
const srcRE = /\bsrc\s*=\s*(?:"([^"]+)"|'([^']+)'|([^\s'">]+))/im
// 匹配 type 的内容
const typeRE = /\btype\s*=\s*(?:"([^"]+)"|'([^']+)'|([^\s'">]+))/im
// 匹配 lang 的内容
const langRE = /\blang\s*=\s*(?:"([^"]+)"|'([^']+)'|([^\s'">]+))/im
// 匹配 context 的内容
const contextRE = /\bcontext\s*=\s*(?:"([^"]+)"|'([^']+)'|([^\s'">]+))/im

/**
 * esbuid 扫描依赖插件
 *
 * @param {ResolvedConfig} config 配置信息
 * @param {PluginContainer} container 插件容器
 * @param {Record<string, string>} depImports 预构建的依赖
 * @param {Record<string, string>} missing 缺失的依赖
 * @param {string[]} entries optimizeDeps.entries 的数据
 * @return {*}  {Plugin}
 */
function esbuildScanPlugin(
  config: ResolvedConfig,
  container: PluginContainer,
  depImports: Record<string, string>,
  missing: Record<string, string>,
  entries: string[]
): Plugin {
  const seen = new Map<string, string | undefined>()

  const resolve = async (id: string, importer?: string) => {
    const key = id + (importer && path.dirname(importer))
    if (seen.has(key)) {
      return seen.get(key)
    }
    // 使用 vite 插件容的解析能力,获取具体的依赖信息
    const resolved = await container.resolveId(
      id,
      importer && normalizePath(importer)
    )
    const res = resolved?.id
    seen.set(key, res)
    return res
  }

  // 获取 optimizeDeps.include 配置
  const include = config.optimizeDeps?.include
  // 排除预构建到包内的文件
  const exclude = [
    ...(config.optimizeDeps?.exclude || []),
    '@vite/client',
    '@vite/env'
  ]

  // 将 external 设置为 true 以将模块标记为外部,这意味着它不会包含在包中,而是会在运行时导入
  const externalUnlessEntry = ({ path }: { path: string }) => ({
    path,
    external: !entries.includes(path)
  })

  // 返回 esbuild 的插件
  return {
    name: 'vite:dep-scan',
    setup(build) {
      console.log('build options ------->', build.initialOptions)

    	// ...省略大量 onResolve 和 onLoad 的回调
    }
  }
}
阅读 esbuild 的 dep-scan 插件代码需要 esbuild plugin 的前置知识,对比于 rollup,esbuild 插件有很多相似之处,因为 API 简单也会更加好理解。
上述代码先定义了一堆正则表达式,具体的匹配内容已经在注释中声明。可以看到,扫描依赖核心就是对依赖进行正则匹配(esbuild 的 onResolve),然后对于语法不支持的文件做处理(esbuild onLoad)。接下来我们就从 DEMO 入手,来完整地执行一遍 esbuild 的构建流程。这样读者既能深入了解 vite 预构建时模块的构建流程,也能学会 esbuild 插件的开发。我们先来看一下 DEMO 的模块依赖图:
对于本文示例而言,entries 就只有根目录的 index.html,所以首先会进入 html 流程:
// const htmlTypesRE = /\.(html|vue|svelte|astro)$/,这些格式的文件都被归类成 html 类型
build.onResolve({ filter: htmlTypesRE }, async ({ path, importer }) => {
  console.log('html type resolve --------------->', path)
  return {
    path: await resolve(path, importer),
    // 将满足这类正则的文件全部归类成 html
    namespace: 'html'
  }
})

// extract scripts inside HTML-like files and treat it as a js module
// 匹配上述归类成 html 的模块,namespace 是对应的
build.onLoad(
  { filter: htmlTypesRE, namespace: 'html' },
  async ({ path }) => {
    console.log('html type load  --------------->', path)
    let raw = fs.readFileSync(path, 'utf-8')
    // Avoid matching the content of the comment
    // 注释文字全部删掉
    raw = raw.replace(commentRE, '<!---->')
    // 是不是 html 文件,也可能是 vue、svelte 等
    const isHtml = path.endsWith('.html')
    // 是 html 文件就用 script module 正则,否则就用 vue 中 script 的匹配规则,具体见正则表达式
    const regex = isHtml ? scriptModuleRE : scriptRE
    // 注意点:对于带 g 的正则匹配,如果像匹配多个结果需要重置匹配索引
    // https://developer.mozilla.org/zh-CN/docs/Web/JavaScript/Reference/Global_Objects/RegExp/lastIndex
    regex.lastIndex = 0
    let js = ''
    let loader: Loader = 'js'
    let match: RegExpExecArray | null
    while ((match = regex.exec(raw))) {
			// openTag 开始标签的内容(包含属性)
      const [, openTag, content] = match
      // 找到 type 的值
      const typeMatch = openTag.match(typeRE)
      const type =
            typeMatch && (typeMatch[1] || typeMatch[2] || typeMatch[3])
      // 匹配语言,比如 vue-ts 中经常写的 <script lang="ts">
      const langMatch = openTag.match(langRE)
      const lang =
            langMatch && (langMatch[1] || langMatch[2] || langMatch[3])
      // skip type="application/ld+json" and other non-JS types
      if (
        type &&
        !(
          type.includes('javascript') ||
          type.includes('ecmascript') ||
          type === 'module'
        )
      ) {
        continue
      }
      // 等于这些结果,都用当前lang的解析器,esbuild 都支持这些 loader
      if (lang === 'ts' || lang === 'tsx' || lang === 'jsx') {
        loader = lang
      }
      // 匹配 src,例子中的 index.html 匹配上了就转成 import '/src/main.js'
      const srcMatch = openTag.match(srcRE)
      if (srcMatch) {
        const src = srcMatch[1] || srcMatch[2] || srcMatch[3]
        js += `import ${JSON.stringify(src)}\n`
      } else if (content.trim()) {
        // moduleScripts:`<script context="module">` in Svelte and `<script>` in Vue
        // localScripts:`<script>` in Svelte and `<script setup>` in Vue
        const contextMatch = openTag.match(contextRE)
        const context =
              contextMatch &&
              (contextMatch[1] || contextMatch[2] || contextMatch[3])

        // localScripts
        if (
          (path.endsWith('.vue') && setupRE.test(openTag)) ||
          (path.endsWith('.svelte') && context !== 'module')
        ) {
          // append imports in TS to prevent esbuild from removing them
          // since they may be used in the template
          const localContent =
                content +
                (loader.startsWith('ts') ? extractImportPaths(content) : '')

          localScripts[path] = {
            loader,
            contents: localContent
          }
          // 加上 virtual-module: 前缀
          js += `import ${JSON.stringify(virtualModulePrefix + path)}\n`
        } else {
          js += content + '\n'
        }
      }
    }

  	// ...
    return {
      loader,
      contents: js
    }
  }
)
当入口是 index.html 时,命中了 build.onResolve({ filter: htmlTypesRE }, ...) 这条解析规则,通过 resolve 处理后返回 index.html 的绝对路径,并将 namespace 标记为 html,也就是归成 html 类。后续匹配上 html 的 load 钩子,就会进入回到函数中。
build.onLoad({ filter: htmlTypesRE, namespace: 'html' }, ...) 也是通过 filter 和 namespace 去匹配文件。读取 index.html 文件内容之后,通过大量的正则表达式去匹配引入内容。重点在于 <script type="module" src="/src/main.js"></script> 这段代码会被解析成 import '/src/main.js',这就会进入下一个 resolve、load 过程。在进入 JS_TYPE 的解析之前,有一个全匹配 resolver 先提出来:
build.onResolve(
  {
    filter: /.*/
  },
  async ({ path: id, importer }) => {
    console.log('all resloved --------------->', id)
    // 使用 vite 解析器来支持 url 和省略的扩展
    const resolved = await resolve(id, importer)
    if (resolved) {
      // 外部依赖
      if (shouldExternalizeDep(resolved, id)) {
        return externalUnlessEntry({ path: id })
      }

      // 扩展匹配上了 htmlTypesRE,就将其归类于 html
      const namespace = htmlTypesRE.test(resolved) ? 'html' : undefined

      return {
        path: path.resolve(cleanUrl(resolved)),
        namespace
      }
    } else {
      // resolve failed... probably unsupported type
      return externalUnlessEntry({ path: id })
    }
  }
)

build.onLoad({ filter: JS_TYPES_RE }, ({ path: id }) => {
  console.log('js load --------------->', id)
  // 获取文件的后缀扩展
  let ext = path.extname(id).slice(1)
  // 如果是 mjs,将 loader 重置成 js
  if (ext === 'mjs') ext = 'js'

  let contents = fs.readFileSync(id, 'utf-8')

  // 通过 esbuild.jsxInject 来自动为每一个被 ESbuild 转换的文件注入 JSX helper
  if (ext.endsWith('x') && config.esbuild && config.esbuild.jsxInject) {
    contents = config.esbuild.jsxInject + `\n` + contents
  }

  // import.meta.glob 的处理
  if (contents.includes('import.meta.glob')) {
    return transformGlob(contents, id, config.root, ext as Loader).then(
      (contents) => ({
        loader: ext as Loader,
        contents
      })
    )
  }
  return {
    loader: ext as Loader,
    contents
  }
})
/.*/ 全匹配的 resolver 通过 resolve 函数获取完整地依赖路径,比如这里的 /src/main.js 就会被转成完整的绝对路径。然后再来到 JS_TYPES_RE 的 loader,最终输出文件内容 contents 和对应的解析器。/src/main.js 文件内容:
import { createApp } from 'vue'
import App from './App.vue'
import '../lib/index'

createApp(App).mount('#app')
接着就会处理 vue、./App.vue、../lib/index 3个依赖。
对于 vue 依赖,会跟 [/^[\w@][^:]/](regex101.com/r/5A7KFx/1) 匹配。
// bare imports: record and externalize ----------------------------------
build.onResolve(
  {
    // avoid matching windows volume
    filter: /^[\w@][^:]/
  },
  async ({ path: id, importer }) => {
    console.log('bare imports --------------->', id)
    // 首先判断是否在外部入口列表中
    if (moduleListContains(exclude, id)) {
      return externalUnlessEntry({ path: id })
    }
    // 缓存,对于在node_modules或者optimizeDeps.include中已经处理过的依赖,直接返回
    if (depImports[id]) {
      return externalUnlessEntry({ path: id })
    }
    const resolved = await resolve(id, importer)
    if (resolved) {
      // 对于一些特殊的场景,也会将其视作 external 排除掉
      if (shouldExternalizeDep(resolved, id)) {
        return externalUnlessEntry({ path: id })
      }
      // 判断是否在node_modules或者optimizeDeps.include中的依赖
      if (resolved.includes('node_modules') || include?.includes(id)) {
        // 存到depImports中,这个对象就是外部传进来的deps,最后会写入到缓存文件中的对象
        // 如果是这类依赖,直接将其视作为“外部依赖”,不在进行接下来的resolve、load
        if (OPTIMIZABLE_ENTRY_RE.test(resolved)) {
          depImports[id] = resolved
        }
        return externalUnlessEntry({ path: id })
      } else {
        const namespace = htmlTypesRE.test(resolved) ? 'html' : undefined
        // linked package, keep crawling
        return {
          path: path.resolve(resolved),
          namespace
        }
      }
    } else {
      missing[id] = normalizePath(importer)
    }
  }
)
经过上述解析,vue 依赖会被视作 external dep,并将它缓存到 depImports,因为对于 node_modules 或者 optimizeDeps.include 中的依赖,只需抓取一次即可。
对于 ./App.vue,首先会进入 html type resolve,然后进入 html load load 的回调中。跟 index.html 不同的时,此时是 .vue 文件,在执行 match = regex.exec(raw) 的时候匹配到 <script setup> 没有 src 路径,会进入 else 逻辑。将 App.vue 中的 script 内容提取出来,存到 localScripts 中。最终生成的对象:
localScripts = {
  '/Users/yjcjour/Documents/code/vite/examples/vue-demo/src/App.vue': {
    	loader: 'js',
      // vue 中 <script setup> 内容
      contents: `
        // This starter template is using Vue 3 <script setup> SFCs
        // Check out https://v3.vuejs.org/api/sfc-script-setup.html#sfc-script-setup
        import HelloWorld from './components/HelloWorld.vue'
        import _ from 'lodash-es'

        console.log(_.trim('   hello '))`
  }
}
这次 App.vue 执行 load 后返回以下内容:
{
  loader: 'js',
  contents: 'import "virtual-module:/Users/yjcjour/Documents/code/vite/examples/vue-demo/src/App.vue"
'
}
从而继续执行 virtualModuleRE 的爬取:
// virtualModuleRE -> /^virtual-module:.*/
// 匹配虚拟的这些模块,比如 `<script>` in Svelte and `<script setup>` in Vue 都会生成虚拟模块
build.onResolve({ filter: virtualModuleRE }, ({ path }) => {
  console.log('virtual module resolved -------------->', path)
  return {
    // strip prefix to get valid filesystem path so esbuild can resolve imports in the file
    path: path.replace(virtualModulePrefix, ''),
    namespace: 'local-script'
  }
})

build.onLoad({ filter: /.*/, namespace: 'local-script' }, ({ path }) => {
  // 即返回上述
  return localScripts[path]
})
virtual-module 的解析就是直接从 localScripts 获取内容:
import HelloWorld from './components/HelloWorld.vue'
import _ from 'lodash-es'

console.log(_.trim('   hello '))`
又会接着处理 ./components/HelloWorld.vue、lodash-es 依赖,这两个依赖跟 App.vue 和 vue 的处理过程都是一样的,这里就不详细说明了。
最后对于 ./lib/index,跟上述解析 /src/main.js 的流程也是一致的。我们可以将整个依赖抓取和解析的过程用下图总结:
通过 resolve 依赖,load 解析,esbuild 就扫描完整个应用的依赖。具体的处理路径通过在源码中打上日志,我们可以看到以下的处理路径:
路径结果跟我们的分析是一样的。插件执行结束,作为参数传入的 deps、missing 也完成了它们的收集(在对 /^[\w@][^:]/ 做依赖分析时会给这两个对象挂属性)。
// deps
{
  'lodash-es': '/Users/yjcjour/Documents/code/vite/examples/vue-demo/node_modules/lodash-es/lodash.js',
	'vue': '/Users/yjcjour/Documents/code/vite/examples/vue-demo/node_modules/vue/dist/vue.runtime.esm-bundler.js'
}

// missing
{}
再结合开头的的流程,将 optimizeDeps.include 定义的项添加到 deps ,最终生成 deps 会添加上 lib/index 这条数据:
// deps
{
  'lodash-es': '/Users/yjcjour/Documents/code/vite/examples/vue-demo/node_modules/lodash-es/lodash.js',
	'vue': '/Users/yjcjour/Documents/code/vite/examples/vue-demo/node_modules/vue/dist/vue.runtime.esm-bundler.js',
  // optimizeDeps.include 定义的预构建项
  '/Users/yjcjour/Documents/code/vite/examples/vue-demo/lib/index.js': '/Users/yjcjour/Documents/code/vite/examples/vue-demo/lib/index.js'
}
有了完整的 deps 信息,就可以开始执行真正的预构建。
执行预构建、输出结果
在开始这部分的分析之前,我们先安装一个纯 commonjs 的依赖 fs-extra。之后在 main.js 中引入这个包:
import { createApp } from 'vue'
import * as fsExtra from 'fs-extra'
import App from './App.vue'
import '../lib/index'

createApp(App).mount('#app')
console.log(fsExtra)
然后在下述代码打上断点:
	// esbuild generates nested directory output with lowest common ancestor base
  // this is unpredictable and makes it difficult to analyze entry / output
  // mapping. So what we do here is:
  // 1. flatten all ids to eliminate slash
  // 2. in the plugin, read the entry ourselves as virtual files to retain the
  //    path.

	// 拍平的依赖IDs
  const flatIdDeps: Record<string, string> = {}
  // id <--> export
  const idToExports: Record<string, ExportsData> = {}
  // 拍平的id <--> export
  const flatIdToExports: Record<string, ExportsData> = {}

  const { plugins = [], ...esbuildOptions } =
    config.optimizeDeps?.esbuildOptions ?? {}

  await init
  for (const id in deps) {
    const flatId = flattenId(id)
    const filePath = (flatIdDeps[flatId] = deps[id])
    const entryContent = fs.readFileSync(filePath, 'utf-8') // 读取依赖内容
    let exportsData: ExportsData
    try {
      // 使用 es-module-lexer 对模块的导入、导出做解析
      exportsData = parse(entryContent) as ExportsData
    } catch {
      // ...
    }

    // ss -> export start  se -> export end
    for (const { ss, se } of exportsData[0]) {
      // 截取 export、import 整个表达式
      const exp = entryContent.slice(ss, se)
      // 存在复合写法 -> export * from 'xxx',打上 hasReExports 的标志符号
      if (/export\s+\*\s+from/.test(exp)) {
        exportsData.hasReExports = true
      }
    }
    idToExports[id] = exportsData
    flatIdToExports[flatId] = exportsData
  }

	// 组合环境变量
  const define: Record<string, string> = {
    'process.env.NODE_ENV': JSON.stringify(config.mode)
  }
  for (const key in config.define) {
    const value = config.define[key]
    define[key] = typeof value === 'string' ? value : JSON.stringify(value)
  }

  const start = performance.now()

  // 执行预编译
  const result = await build({
    // 绝对路径的工作目录(项目根目录)
    absWorkingDir: process.cwd(),
    // 入口点
    entryPoints: Object.keys(flatIdDeps),
    // 集合,将全部文件构建后内联到入口文件
    bundle: true,
    // 输出文件格式,支持 iife、cjs、esm
    format: 'esm',
    // 打包后的支持的环境目标
    target: config.build.target || undefined,
    // 排除某些依赖的打包
    external: config.optimizeDeps?.exclude,
    // 日志级别,只显示错误信息
    logLevel: 'error',
    // 代码拆分
    splitting: true,
    sourcemap: true,
    // 构建输出目录,默认是 node_modules/.vite
    outdir: cacheDir,
    // 忽略副作用注释
    ignoreAnnotations: true,
    // 输出构建文件
    metafile: true,
    // 全局声明
    define,
    // 插件
    plugins: [
      ...plugins,
      esbuildDepPlugin(flatIdDeps, flatIdToExports, config, ssr)
    ],
    ...esbuildOptions
  })

  // 执行构建传入了 metafile: true,这里能够拿到构建信息
  const meta = result.metafile!

  // the paths in `meta.outputs` are relative to `process.cwd()`
  // 缓存目录
  const cacheDirOutputPath = path.relative(process.cwd(), cacheDir)

  // 更新 optimized 信息,全部写入到 data.optimized 中
  for (const id in deps) {
    const entry = deps[id]
    data.optimized[id] = {
      file: normalizePath(path.resolve(cacheDir, flattenId(id) + '.js')),
      src: entry,
      needsInterop: needsInterop(
        id,
        idToExports[id],
        meta.outputs,
        cacheDirOutputPath
      )
    }
  }

  // 预编译结果写入metadata文件
  writeFile(dataPath, JSON.stringify(data, null, 2))

  debug(`deps bundled in ${(performance.now() - start).toFixed(2)}ms`)
  return data
在执行预构建前,先将存在多层级的 dep 拍平,目的是为了产物能够更明确和简单。然后遍历 deps 做 import、export 的解析。对于有 export * from 'xx' 的表达式,会打上 hasReExports 标记;对于本文 DEMO 而言,执行完 deps 的分析之后 flatIdDeps、 idToExports、flatIdToExports 的结果如截图所示:
从结果可以清楚地看到变量的含义:
- flatIdDeps:拍平之后的 id 跟具体依赖路径的映射;
- idToExports:依赖 id 的 imports、 exports 信息;
- flatIdToExports:拍平 id 的 imports、exports 信息;
将以上变量传到 esbuildDepPlugin 创建预构建插件,再将环境变量等信息全部传入,执行真正的预构建。此时 esbuild.build 需要重点关注参数有:
- entryPoints: Object.keys(flatIdDeps),就是上述拍平的依赖 id;
- outdir: cacheDir,将产物输出到缓存目录,默认是 node_modules/.vite;
- plugins: [ ...plugins, esbuildDepPlugin(flatIdDeps, flatIdToExports, config, ssr) ] 使用预构建插件。
紧接着我们进入 esbuildDepPlugin 插件内部,看预构建执行之前做了什么事情?
export function esbuildDepPlugin(
  qualified: Record<string, string>,
  exportsData: Record<string, ExportsData>,
  config: ResolvedConfig,
  ssr?: boolean
): Plugin {
  // 默认 esm 默认解析器
  const _resolve = config.createResolver({ asSrc: false })

  // node 的 cjs 解析器
  const _resolveRequire = config.createResolver({
    asSrc: false,
    isRequire: true
  })

  const resolve = (
    id: string,
    importer: string,
    kind: ImportKind,
    resolveDir?: string
  ): Promise<string | undefined> => {
    let _importer: string
    // explicit resolveDir - this is passed only during yarn pnp resolve for
    // entries
    if (resolveDir) {
      _importer = normalizePath(path.join(resolveDir, '*'))
    } else {
      // map importer ids to file paths for correct resolution
      _importer = importer in qualified ? qualified[importer] : importer
    }
    // kind 是 esbuild resolve 回调中的一个参数,表示模块类型,总共有 7 种类型
    // https://esbuild.github.io/plugins/#on-resolve-arguments
    // 以require开头的表示cjs、否则用esm的解析器
    const resolver = kind.startsWith('require') ? _resolveRequire : _resolve
    return resolver(id, _importer, undefined, ssr)
  }

  return {
    name: 'vite:dep-pre-bundle',
    setup(build) {
      console.log('dep-pre-bundle -------->, ', build.initialOptions)
      // ...

      /**
       * 解析入口
       *
       * @param {string} id
       * @return {*}
       */
      function resolveEntry(id: string) {
        const flatId = flattenId(id)
        if (flatId in qualified) {
          return {
            path: flatId,
            namespace: 'dep'
          }
        }
      }

      build.onResolve(
        { filter: /^[\w@][^:]/ },
        async ({ path: id, importer, kind }) => {
          // ...

          // ensure esbuild uses our resolved entries
          let entry: { path: string; namespace: string } | undefined
          // if this is an entry, return entry namespace resolve result
          if (!importer) {
            if ((entry = resolveEntry(id))) return entry
						// ...
          }

          // use vite's own resolver
          const resolved = await resolve(id, importer, kind)
          if (resolved) {
            if (resolved.startsWith(browserExternalId)) {
              return {
                path: id,
                namespace: 'browser-external'
              }
            }
            if (isExternalUrl(resolved)) {
              return {
                path: resolved,
                external: true
              }
            }
            return {
              path: path.resolve(resolved)
            }
          }
        }
      )

      const root = path.resolve(config.root)
      build.onLoad({ filter: /.*/, namespace: 'dep' }, ({ path: id }) => {
        console.log('dep load --------->', id)
        const entryFile = qualified[id]

        // 相对根目录的路径
        let relativePath = normalizePath(path.relative(root, entryFile))
        // 自动加上路径前缀
        if (
          !relativePath.startsWith('./') &&
          !relativePath.startsWith('../') &&
          relativePath !== '.'
        ) {
          relativePath = `./${relativePath}`
        }

        let contents = ''
        // 获取文件的 import、export 信息
        const data = exportsData[id]
        const [imports, exports] = data
        if (!imports.length && !exports.length) {
          // cjs
          contents += `export default require("${relativePath}");`
        } else {
          if (exports.includes('default')) {
            contents += `import d from "${relativePath}";export default d;`
          }
          if (
            data.hasReExports ||
            exports.length > 1 ||
            exports[0] !== 'default'
          ) {
            contents += `\nexport * from "${relativePath}"`
          }
        }

        let ext = path.extname(entryFile).slice(1)
        if (ext === 'mjs') ext = 'js'
        return {
          loader: ext as Loader,
          contents,
          resolveDir: root
        }
      })

      // ...
    }
  }
}
首先,上述 flatIdDeps 作为入口,先依次执命中 /^[\w@][^:]/ filter 的解析,最后都会通过 resolveEntry 套上 namespace: dep 的类型。然后执行 namespace: dep 的 load 回调。接下来的流程通过一张图去展示:
流程可以概括成两大步:
- 计算依赖相较于 root 项目根目录的相对路径,并做规范化——添加相对路径符号;
- 根据 exportsData 也就是上面的 flatIdToExports 变量获取 imports、exports 信息;然后做了三层判断:
- 如果满足 !imports.length && !exports.length,说明这是一个 CJS 模块,就会输出
export default require("${relativePath}");,对于 DEMO 而言,fs-extra 就是这种情况,最后输出的 contents 是'export default require("./node_modules/fs-extra/lib/index.js");'; - 不是 CJS,就判断是否存在默认导出(export default),有的话就会在 contents 上拼接
import d from "${relativePath}";export default d;;对于 DEMO 而言,lodash-es 因为有默认导出,同时也会执行 c 的流程,最终生成的 contents 如'import d from "./node_modules/lodash-es/lodash.js";export default d;\nexport * from "./node_modules/lodash-es/lodash.js"'; - 在上一步的基础上,如果有其他的导出表达式比如
export { compile };,就会加多一层复合导出,将模块的内容全部导出,即\nexport * from "${relativePath}",对于 DEMO 而言,vue 和 lib/index.js 会执行这个逻辑,最后返回'\nexport * from "./node_modules/vue/dist/vue.runtime.esm-bundler.js"'和'\nexport * from "./lib/index.js"'。
- 如果满足 !imports.length && !exports.length,说明这是一个 CJS 模块,就会输出
第一层依赖4个入口就处理完成了,接下来就会对递归搜寻依赖的依赖。
完成整个预构建的依赖查找之后,就会执行构建,构建后的 metafile 信息如下:
input 信息太长,只打印了搜查的依赖总长度是 692,最后构建的产物从上图能够看到对于 lodash-es 这种包,会将依赖全部打成一个包,减少 http 次数。
最后的最后,将 deps 信息更新到 data.optimized 并写入到缓存文件目录。整个预构建流程就结束了。
关注我们
大家的支持是我们继续前进的动力,快来关注我们深信服前端团队吧~
同时,如果对我们感兴趣的话,欢迎加入我们,投递简历到 [email protected]。