
01
Authing 是什么?
Authing 是国内首款以开发者为中心的全场景身份云产品,集成了所有主流身份认证协议,为企业和开发者提供完善安全的用户认证和访问管理服务。
以「API First」作为产品基石,把身份领域所有常用功能都进行了模块化的封装,通过全场景编程语言 SDK 将所有能力 API 化提供给开发者。同时,用户可以灵活的使用 Authing 开放的 RESTful APIs 进行功能拓展,满足不同企业不同业务场景下的身份管理需求。
Authing 构建了 APN(Authing Partner Network),集成了市面上主流应用,以帮助企业管理员和开发者更简单、高效的完成应用单点登录,为企业和开发者提供完善安全的用户认证和访问管理服务。
Discourse 是 Stack Overflow 的联合创始人 Jeff Atwood 推出的一个新的开源论坛项目,其目的是为了改变十年未变的论坛软件,摒弃了传统论坛的话题讨论形式、拥有自学习系统、全 Web 应用同时适用于桌面和移动终端。
本文,将以 Discourse 为例,详细描述 Authing 单点登录集成步骤。
传统系统 SSO 单点登录改造
首先,需要对原有系统的用户体系进行改造,使其能够适应通用的用户认证标准协议(如 OAuth)。如果系统体量较大,甚至还需要考虑将原有业务中的用户体系抽出,专门做成单点登录的用户中心。需要进行设计、编码、测试、升级、扩容等一系列复杂的开发运维操作,才能够实现。
该方式耗时间,耗精力,耗成本,风险大(需要在业务领域之外不断去踩坑)。
Authing SSO 集成
如果您的应用是基于 Authing 提供的身份系统进行开发,那么恭喜你,可以使用较少的代码(或者配置)即可轻松几步,快速完成单点登录的集成。
该方式低成本,无须额外设计和开发,采用标准协议,轻松打通。
02
Discourse 安装
参考资料
Discourse 官方 Docker 仓库:
https://github.com/discourse/discourse_docker
安装指南文档:
https://github.com/discourse/discourse/blob/main/docs/INSTALL-cloud.md
建议将 Discourse Docker 仓库 Fork,并在本地先进行开发调试确认无误后再进行产品环境的安装。
下面是简单的安装步骤说明及配置中常见问题的 FAQ。
注意:请在 Linux 服务器或者 macOS 下进行安装(Windows 需要自行摸索一下)。
拉取 Discourse Docker 仓库
git clone https://github.com/discourse/discourse_docker.git /var/discourse
cd /var/discourse
使用自动化配置脚本:
./discourse-setup
非 root 用户的话,需要在前面加sudo运行。根据提示一步一步输入配置项,完成安装配置。默认的配置在本地运行的时候大概率会运行不起来。
打开 containers/app.yml 配置文件进行配置调整,如果手动配置,也可以执行:
cp samples/standalone.yml containers/app.yml
复制一个示例模板作为开始。
应用配置
在开始配置之前,先确保域名已经绑定到服务器上(DNS 中的 A 记录绑定),或者本地修改/etc/hosts文件(不要使用 example.com 或者需要强制 https 的域名后缀作为本地开发调试,如:.app、.dev等)。
环境变量设置参考:
env:
  LC_ALL: en_US.UTF-8
  LANG: en_US.UTF-8
  LANGUAGE: en_US.UTF-8
  EMBER_CLI_PROD_ASSETS: 1

  # DISCOURSE_DEFAULT_LOCALE: en

  ## How many concurrent web requests are supported? Depends on memory and CPU cores.
  ## will be set automatically by bootstrap based on detected CPUs, or you can override
  #UNICORN_WORKERS: 3

  ## TODO: The domain name this Discourse instance will respond to
  ## Required. Discourse will not work with a bare IP number.
  DISCOURSE_HOSTNAME: 'discourse.local'

  ## Uncomment if you want the container to be started with the same
  ## hostname (-h option) as specified above (default "$hostname-$config")
  # DOCKER_USE_HOSTNAME: true

  ## TODO: List of comma delimited emails that will be made admin and developer
  ## on initial signup example '[email protected],[email protected]'
  DISCOURSE_DEVELOPER_EMAILS: '[email protected]'

  ## TODO: The SMTP mail server used to validate new accounts and send notifications
  # SMTP ADDRESS, username, and password are required
  # WARNING the char '#' in SMTP password can cause problems!
  DISCOURSE_SMTP_ADDRESS: smtp.mail.qq.com
  DISCOURSE_SMTP_PORT: 25
  DISCOURSE_SMTP_USER_NAME: [email protected]
  DISCOURSE_SMTP_PASSWORD: "password"
  DISCOURSE_SMTP_ENABLE_START_TLS: fales       # (optional, default true)
  DISCOURSE_SMTP_AUTHENTICATION: plain
  DISCOURSE_SMTP_OPENSSL_VERIFY_MODE: none

  DISCOURSE_NOTIFICATION_EMAIL: [email protected]

  ## If you added the Lets Encrypt template, uncomment below to get a free SSL certificate
  #LETSENCRYPT_ACCOUNT_EMAIL: [email protected]

  ## The http or https CDN address for this Discourse instance (configured to pull)
  ## see https://meta.discourse.org/t/14857 for details
  #DISCOURSE_CDN_URL: https://discourse-cdn.example.com

  ## The maxmind geolocation IP address key for IP address lookup
  ## see https://meta.discourse.org/t/-/137387/23 for details
  #DISCOURSE_MAXMIND_LICENSE_KEY: 1234567890123456
简单说明:
UNICORN_WORKERS:根据 CPU 数量决定 Worker 数量或者手动配置
DISCOURSE_HOSTNAME:正确配置域名
DISCOURSE_SMTP_XXX:
正确配置 SMTP 邮件发送服务,不然会收不到验证码和通知邮件
插件配置:
## Plugins go here
## see https://meta.discourse.org/t/19157 for details
hooks:
  after_code:
    - exec:
        cd: $home/plugins
        cmd:
          - git clone https://github.com/discourse/docker_manager.git
          - git clone https://github.com/discourse/discourse-oauth2-basic.git
          - git clone https://github.com/angelim/discourse_user_auto_activation.git
这三个插件的作用:
Docker 管理,自带默认
OAuth 2 集成,用于与 Authing SSO 连接实现单点登录
自动激活(邮箱)插件,可选
启动论坛服务
提醒:先配置好 SSL 证书再启动服务(参考 FAQ SSL 证书配置,或者使用 Let’s Encrypt 签发证书)。
配置完成后制作镜像:
./launcher bootstrap app
./launcher start app
如果已经初始化过,可以通过重新制作镜像的方式:
./launcher rebuild app
过程漫长,耐心等待。下面整理了我在调试过程中遇到的一些问题和一些提示。
FAQ
域名配置
主要修改模板:
templates:
  - "templates/postgres.template.yml"
  - "templates/redis.template.yml"
  - "templates/web.template.yml"
  - "templates/web.ratelimited.template.yml"
## Uncomment these two lines if you wish to add Lets Encrypt (https)
  - "templates/web.ssl.template.yml"
  #- "templates/web.letsencrypt.ssl.template.yml"
-
如果需要 SSL 支持,
"templates/web.ssl.template.yml"
这个模板文件需要引入。 -
如果需要免费的域名证书更新,
"templates/web.letsencrypt.ssl.template.yml"
这个模板需要引入。
同时根据需要,将端口开放出来:
## which TCP/IP ports should this container expose?
## If you want Discourse to share a port with another webserver like Apache or nginx,
## see https://meta.discourse.org/t/17247 for details
expose:
  - "80:80"   # http
  - "443:443" # https
SSL 证书配置
首先确认一下文件目录的映射是否正确:
## The Docker container is stateless; all data is stored in /sharedvolumes: - volume: host: /var/discourse/shared/standalone guest: /shared - volume: host: /var/discourse/log/var-log guest: /var/log
类似这样的目录映射,将证书文件放置到对应的 ssl 目录下,检查这两个文件路径是否正确:
/var/discourse/shared/standalone/ssl/ssl.crt
/var/discourse/shared/standalone/ssl/ssl.key
自签证书参考:
openssl genrsa -aes256 -passout pass:gsahdg -out ssl.pass.key 4096
openssl rsa -passin pass:gsahdg -in ssl.pass.key -out ssl.key
openssl req -new -key ssl.key -out ssl.csr
# You are about to be asked to enter information that will be incorporated
# into your certificate request.
# What you are about to enter is what is called a Distinguished Name or a DN.
# There are quite a few fields but you can leave some blank
# For some fields there will be a default value,
# If you enter '.', the field will be left blank.
# -----
# Country Name (2 letter code) []:CN
# State or Province Name (full name) []:Jiangsu
# Locality Name (eg, city) []:Nanjing
# Organization Name (eg, company) []:Xibang Tech
# Organizational Unit Name (eg, section) []:
# Common Name (eg, fully qualified host name) []:discourse.local
# Email Address []:[email protected]

# Please enter the following 'extra' attributes
# to be sent with your certificate request
# A challenge password []:
openssl x509 -req -sha256 -days 365 -in ssl.csr -signkey ssl.key -out ssl.crt
自签证书需要信任,在 macOS 下就是双击打开 .crt 文件,选择信任始终信任,过程中需要输入两次密码即可。
- 禁用 SSL
该步骤并非必要,如果懒得配置 SSL 本地自签名证书(比如我),可以将原有的配置考出,把 SSL 部分给注释掉。
# 先将配置从镜像拷贝出来

docker cp app:/etc/nginx/conf.d/discourse.conf ./discourse.conf

# 修改配置后执行

docker cp ./discourse.conf app:/etc/nginx/conf.d/discourse.conf
docker exec app nginx -s reload
其中主要修改的部分为,将 https 请求跳回 http:
# attempt to preserve the proto, must be in http context
map $http_x_forwarded_proto $thescheme {
  default $scheme;
  https http;
}
将 80 跳转到 443 的逻辑删除:
server {
  listen 80;
  # 将跳转的部分删除,并与 listen 443 的 `server` 合并
}
- Build 或启动失败
-
执行
git clone命令之后出错;
该情况出现在国内服务器拉取镜像。可以在码云或者其他国内 Git 服务商上导入 Github 的仓库,然后用国内镜像地址。 -
域名无法访问;
检查配置或本地 HOSTS,是否已经绑定好域名。 -
启动成功但无法访问;
该情况一般仅在本地调试时出现,域名虽然是可以随意起,但要注意规则(比如没有配置 SSL 证书 nginx-error 日志会有,比如.dev域名我在本地测试时使用自签 SSL 证书就始终无法访问但 nginx-access 日志却显示正常)。
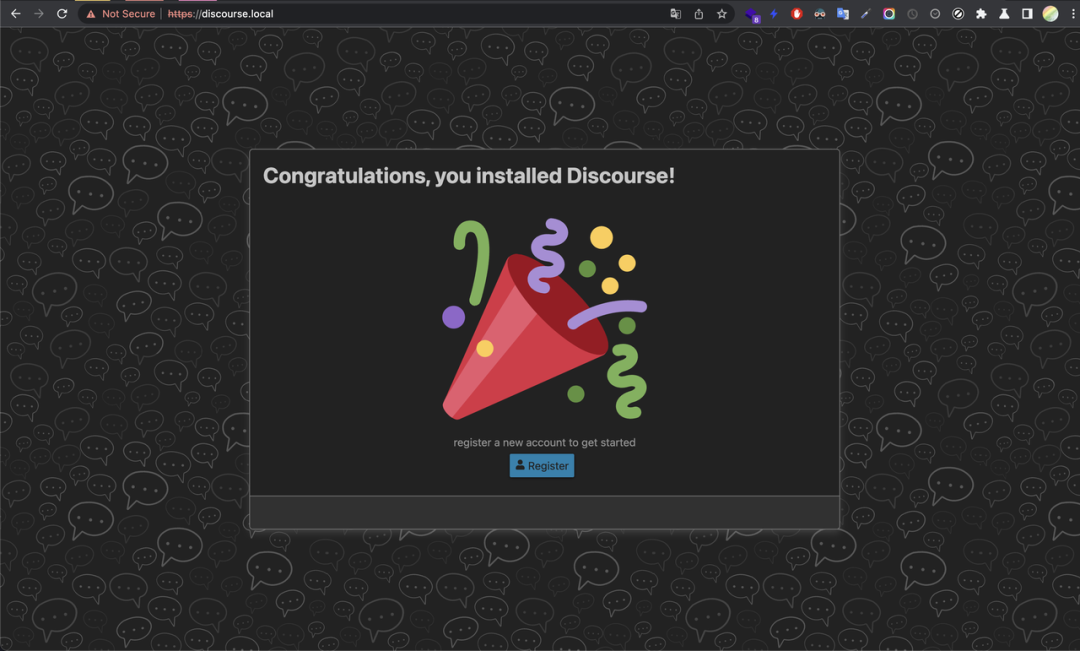
访问论坛并进行初始化配置
访问 localhost 或者你配置的域名,注册管理员用户并进行初始化配置。
通过邮件验证链接重新进入后,开始初始化配置。11 个步骤设置完后,进入管理后台-设置,左侧边栏选择「登录」。
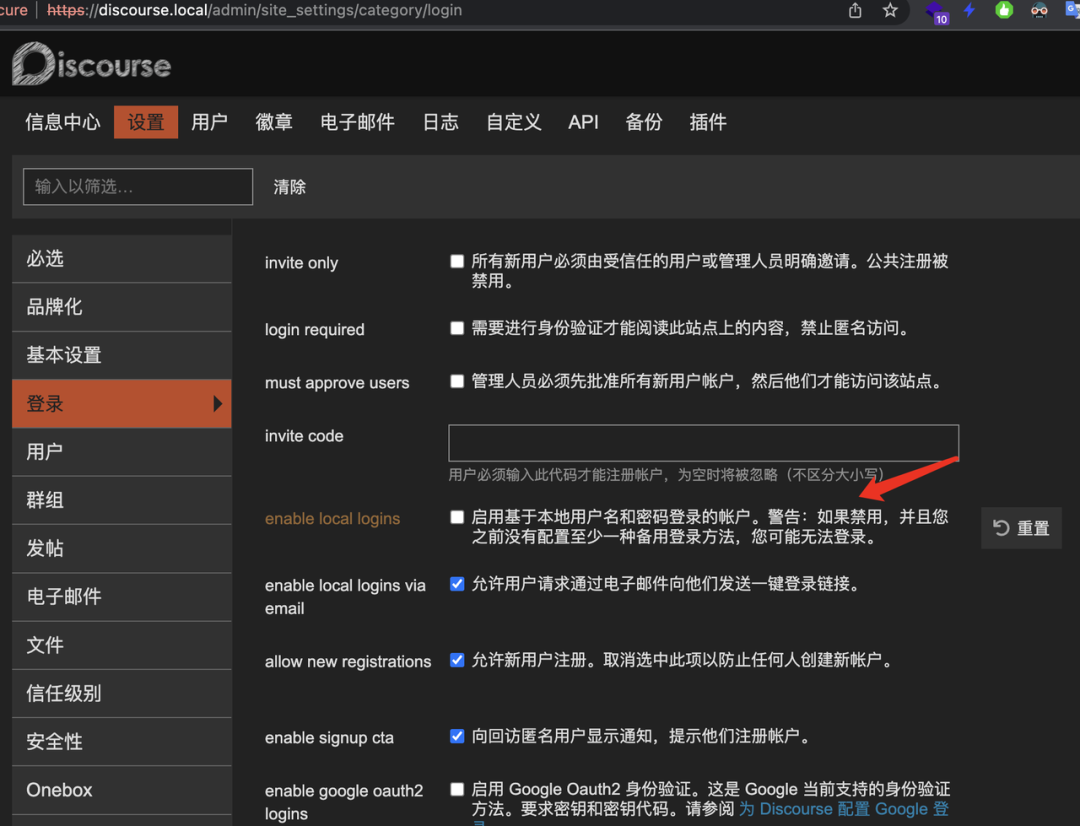
关闭本地登录(建议稳妥起见,在单点登录配置完成后关闭也可以)。
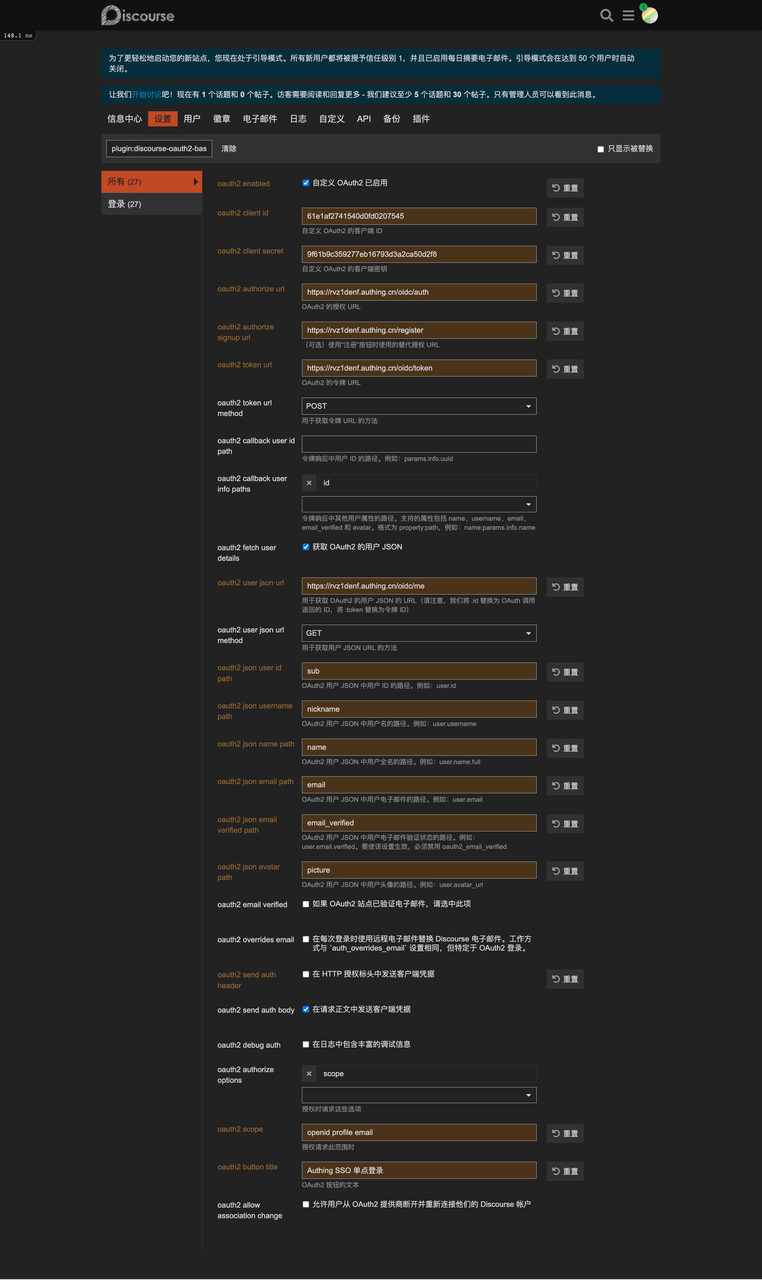
进入插件设置:
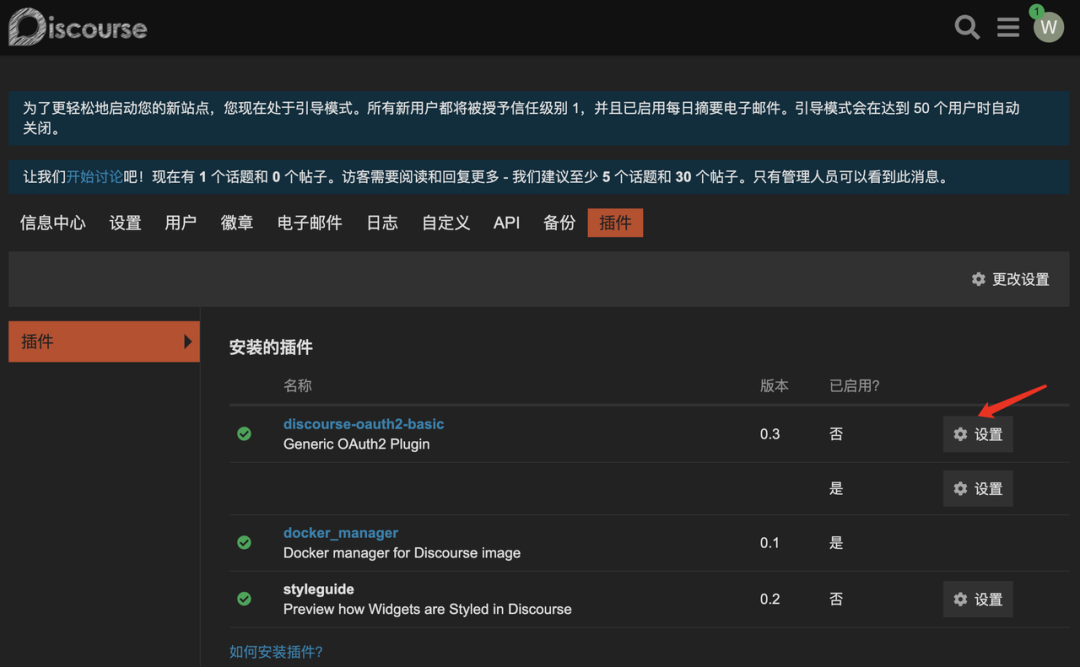
点击设置后停留在当前配置页面(稍后继续设置)。在新窗口中打开 Authing 控制台。
03
Authing SSO 单点登录集成
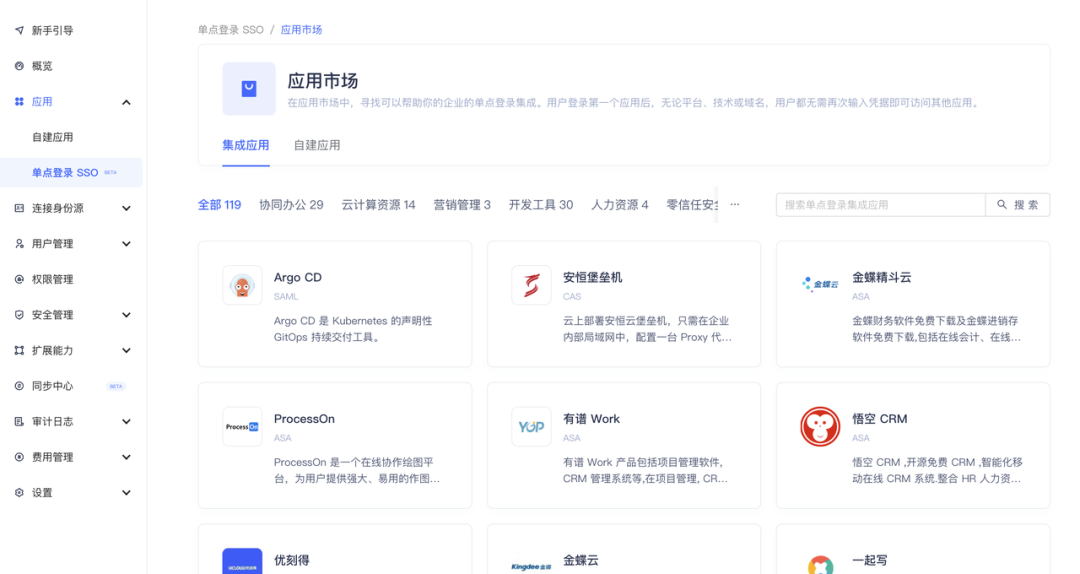
在单点登录 SSO 应用市场中搜索 Discourse。点击获取应用进入配置。
第一步是填写论坛名称,第二步进行登录配置。
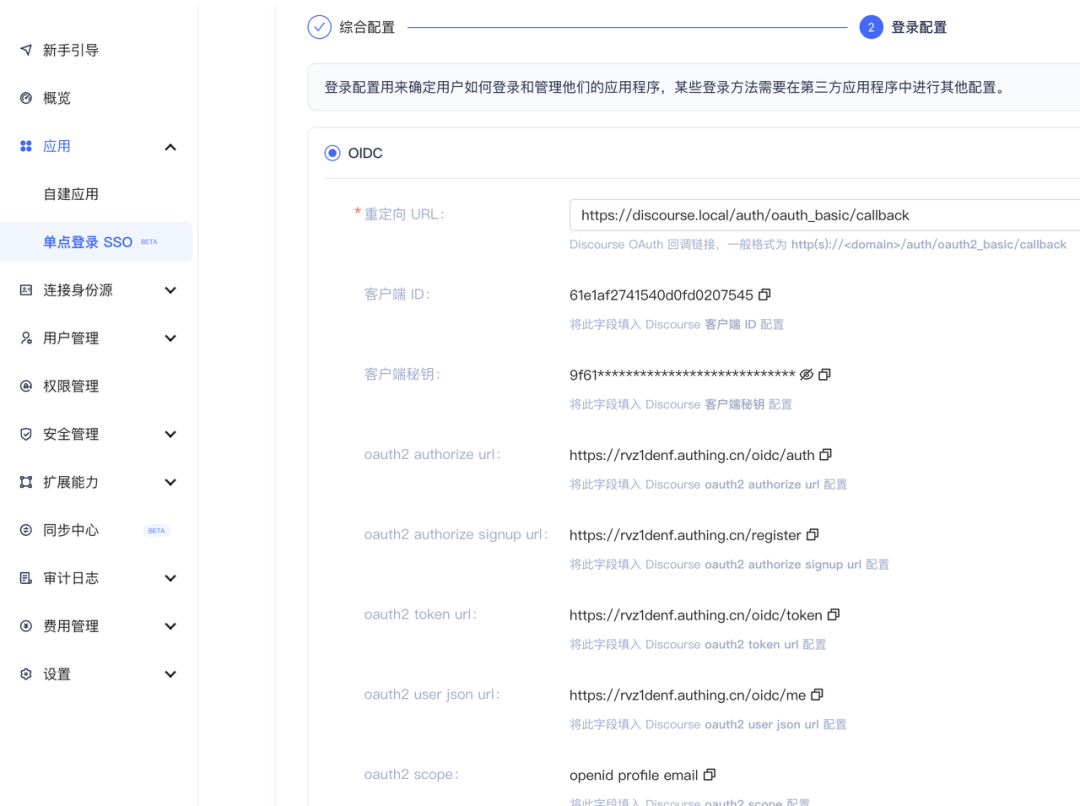
只需要填入一个 Redirect URI (注意一下这里是区分 http/https 的,如果不对就会报 redirect_uri_mismatch 错误),其他配置项对应复制填入到 Discourse 插件配置中。
示例:
http://discourse.local/auth/oauth2_basic/callback(替换你的域名,后边路径保持一致)。
另外还需要配置的项目为:
oauth2 json user id path:
填入 sub
oauth2 json username path:
填入 nickname 或者 username
oauth2 json name path:
填入 name
oauth2 json email path:
填入 email
oauth2 json email verified path:填入 email_verified
oauth2 json avatar path:
填入 picture
oauth2 send auth header 在 HTTP 授权标头中发送客户端凭据:取消勾选
保存插件配置。
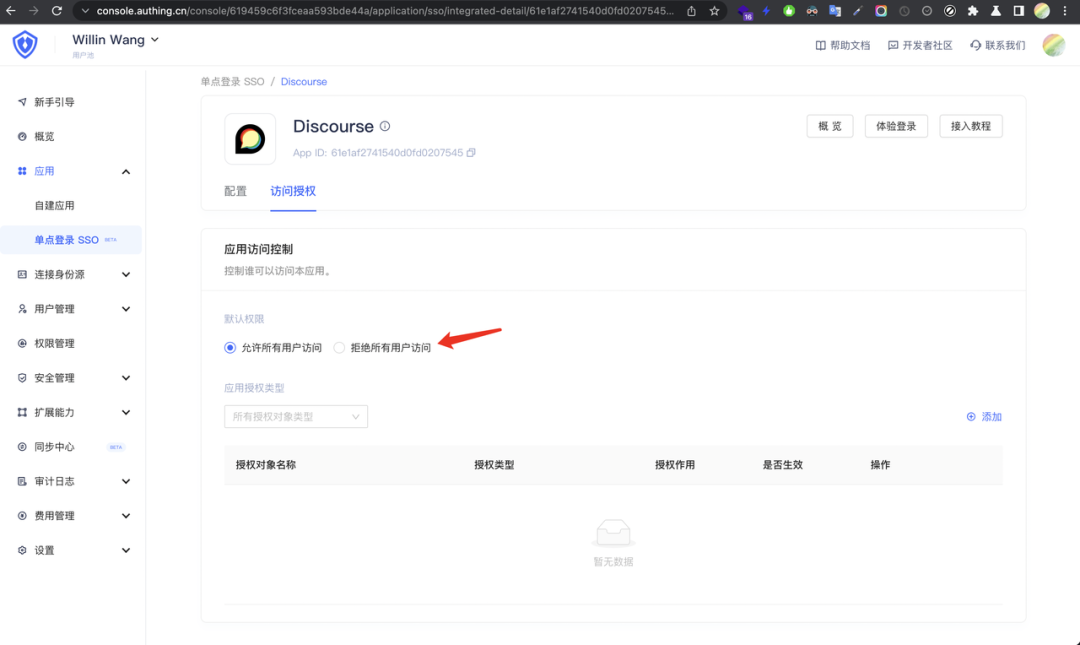
保存访问授权之后,可以在新的隐私窗口测试一下。
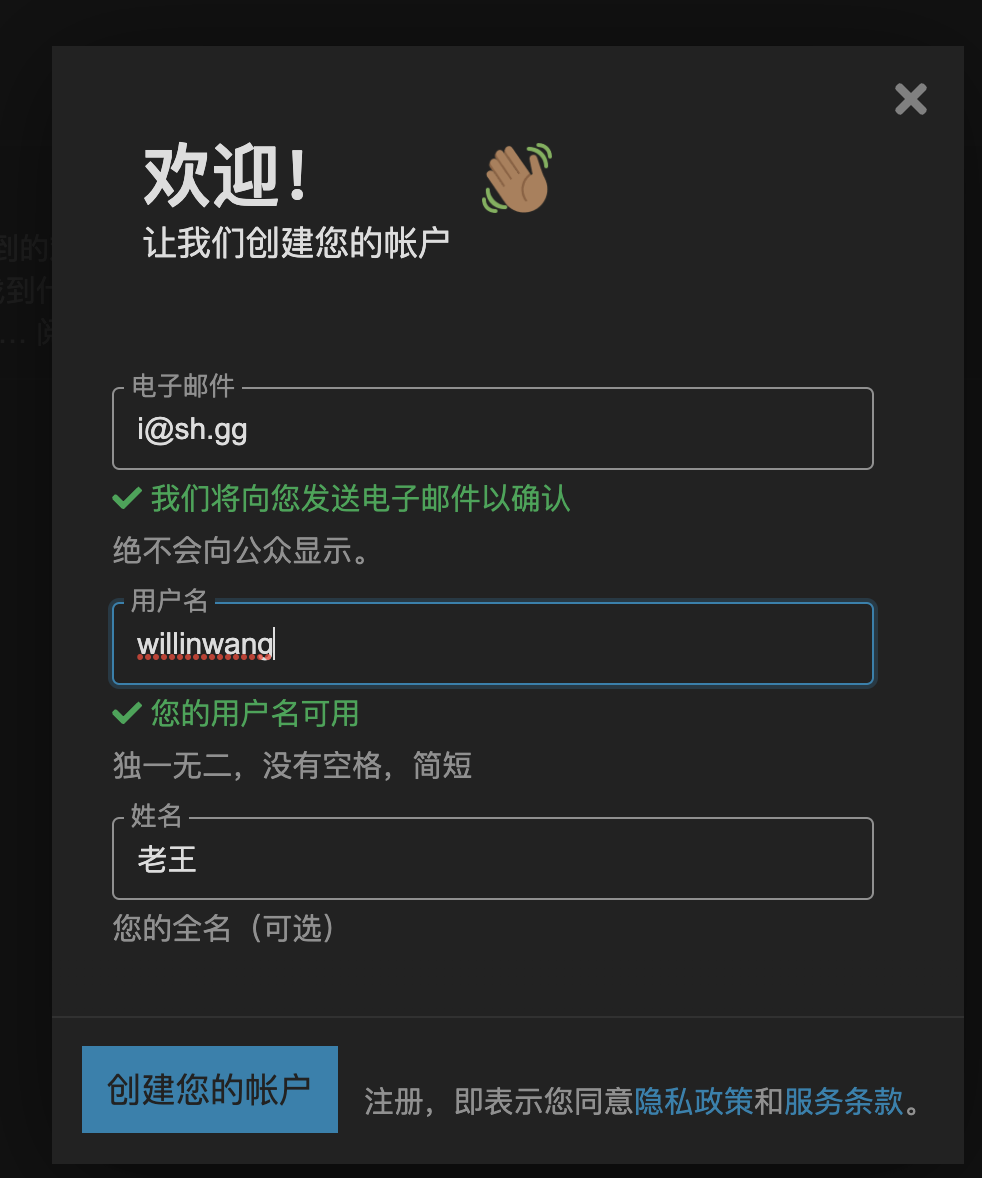
自动将 Authing 用户信息带入论坛。测试成功。
同时管理员账户(邮箱与 Authing 用户相同)即可无缝衔接至 Authing SSO 单点登录方式。
至此完成,大功告成。
延伸
通过 Authing SSO 还可以通过无代码的方式接入:
协同工具:如禅道、ProcessOn、石墨文档、Notion、Tower、Teambition、飞书、Confluence 等
云计算资源:如阿里云、腾讯云、AWS、百度智能云、金山云、华为云等
开发者工具:如 Gitlab、Jira、Coding.net、Bitbucket、Jenkins 等
(目前应用商店里提供)其他共计 120 种服务/平台/软件
同时还可以以低代码/零代码的形式,接入各类系统、软件,目前支持的自建应用支持的协议有:
OAuth 2.0
SAML 2
CAS
使用 Authing SSO,可以轻松集成 NodeBB 论坛、Wordpress 站点等等等等……的单点登录。
Authing 是国内首款以开发者为中心的全场景身份云产品,集成了所有主流身份认证协议,为企业和开发者提供完善安全的用户认证和访问管理服务,是腾讯云原生加速器首批成员。
Authing 被科技部认定为「2021 国家高新技术企业」,被中国信息通信研究院评选为「国内身份管理与访问控制领域创新企业」。
2021 年 8 月,Authing 入选福布斯亚洲的“最值得关注公司”百强榜单,创始人谢扬也入选福布斯亚洲 30 Under 30。2021 年 9 月,Authing 作为独家身份供应商顺利入选中国信息通信研究院“卓信大数据计划”的第三批成员单位。
Authing 已为中国石油、国家电网、招商银行、日本丰田、德高集团、元气森林、PingCAP、Ubras 等国内外优秀企业打造了卓越的开发方式、高效的办公流程和安全的 IT 管理体系。