入门
- @RestContrller :此注解标记的类下的 所有 方法均会返回一个 domain 对象以代替视图@Controller、@ResponseBody 的缩写使用 Jackson2 以及 MappingJackson2HttpMessageConverter 类自动转换对象为 JSON
- @SpringBootApplication:快捷注释,包含以下内容@Configuration:将该类标记为上下文 bean 对象的源@EnableAutoConfiguration:@ComponentScan
Spring Boot ?
- Spring Boot 基于 spring framework之上,可以整合所有spring 生态的技术
- 快速构建生产级别的 spring 应用
- spring boot 是整合 spring 技术栈的一站式框架、脚手架
系统要求

IDEA 的支持
- 编写 application.properties 是智能提示
- 应用启动后的实时监控:可以实时监控到当前容器中的所有 bean
第一个 Spring boot 应用
创建 pom
<parent> <groupId>org.springframework.boot</groupId> <artifactId>spring-boot-starter-parent</artifactId> <version>2.4.3</version></parent><dependencies> <dependency> <groupId>org.springframework.boot</groupId> <artifactId>spring-boot-starter-web</artifactId> </dependency></dependencies>
- 因为我们需要开发 web 应用测试,所有选择 starter-web
- spring-boot-starter-parent 工程设置了很多参数、插件、资源打包设置等
- 修改 java 版本:<properties> <java.version>1.8</java.version> </properties>因为 父工程已经使用 ${java.version} 设置了 java 的编译版本目前测试无法使用 maven-compiler-3.8 编译 jdk 11 版本的项目,原因未知,切换为 jdk 8 即正常
编写测试代码
- 编写入口@SpringBootApplication public class App { public static void main(String[] args) { SpringApplication.run(App.class, args); } }
- 编写 Controller 类@RestController public class HelloController { @RequestMapping(“/”) String home() { return “Hello World!”; } }
测试运行
. ____ _ __ _ _ /\\ / ___'_ __ _ _(_)_ __ __ _ \ \ \ \( ( )\___ | '_ | '_| | '_ \/ _` | \ \ \ \ \\/ ___)| |_)| | | | | || (_| | ) ) ) ) ' |____| .__|_| |_|_| |_\__, | / / / / =========|_|==============|___/=/_/_/_/ :: Spring Boot :: (v2.4.3)2021-02-24 23:08:21.251 INFO 3240 --- [ main] per.fkrobin.study.App : Starting App using Java 1.8.0_281 on DESKTOP-SKF5ODM with PID 3240 (D:\Projects\javaProjects\SpringBootStudy\HelloSpringBoot\target\classes started by 22136 in D:\Projects\javaProjects\SpringBootStudy)2021-02-24 23:08:21.254 INFO 3240 --- [ main] per.fkrobin.study.App : No active profile set, falling back to default profiles: default2021-02-24 23:08:21.824 INFO 3240 --- [ main] o.s.b.w.embedded.tomcat.TomcatWebServer : Tomcat initialized with port(s): 8080 (http)
浏览器打开 http://localhost:8080
可执行的 Jar
- 添加 插件<build> <plugins> <plugin> <groupId>org.springframework.boot</groupId> <artifactId>spring-boot-maven-plugin</artifactId> </plugin> </plugins> </build>
- 执行 mvn clean package
- java -jar xxxxx.jar 文件,若一切正常,结果将是相同的
自动配置
Maven 依赖管理
每一个 Spring boot 应用都会有一个 parent 父工程
<parent> <groupId>org.springframework.boot</groupId> <artifactId>spring-boot-starter-parent</artifactId> <version>2.4.3</version></parent>
spring-boot-starter-parent的父工程
<parent> <groupId>org.springframework.boot</groupId> <artifactId>spring-boot-dependencies</artifactId> <version>2.4.3</version></parent>
spring-boot-dependencies这个工程中定义几乎所有的 常用工具包版本及其依赖,如spring-boot-starter-web :
<dependency> <groupId>org.springframework.boot</groupId> <artifactId>spring-boot-starter-web</artifactId> <version>2.4.3</version></dependency>
所以我们使用 spring-boot-starter-web 不再需要书写版本号,如果需要更换版本号,可以查看 spring-boot-dependencies 中对应依赖的版本书写定义,然后在自己项目中 进行重新赋值
- IDEA pom 文件中 右键选中 Diagrams->Show Diagrams 可以查看依赖树
常用组件自动配置
-
自动配好SpringMVC
-
引入SpringMVC全套组件
-
自动配好SpringMVC常用组件(功能)
-
自动配好Web常见功能,如:字符编码问题、DispacherServlet、multipart文件上传等
-
SpringBoot帮我们配置好了所有web开发的常见场景
-
默认的包结构
-
主程序所在包及其下面的所有子包里面的组件都会被默认扫描进来
-
无需以前的包扫描配置
-
想要改变扫描路径,@SpringBootApplication(scanBasePackages= “com.atguigu” ),或者使用@ComponentScan 指定扫描路径
自动配置原理
SpringApplication
在此类初始化时,就会去 spring-boot、spring-boot-auto-configure 加载 spring-factories文件,文件中定义了 所有的 Spring 场景下的工厂,如 各种 xxxAutoConfiguration 类、Listener、Filter 等等,并缓存下来。在接下来调用 run 运行时,会根据条件注入、Filter 等过滤掉其中不需要用到的 工厂 、bean。下面是主要代码
try { ApplicationArguments applicationArguments = new DefaultApplicationArguments(args); ConfigurableEnvironment environment = prepareEnvironment(listeners, bootstrapContext, applicationArguments); configureIgnoreBeanInfo(environment); Banner printedBanner = printBanner(environment); context = createApplicationContext(); context.setApplicationStartup(this.applicationStartup); prepareContext(bootstrapContext, context, environment, listeners, applicationArguments, printedBanner); // 实例化 bean 到容器之中的过程都是在此完成的 refreshContext(context); afterRefresh(context, applicationArguments); stopWatch.stop(); if (this.logStartupInfo) { new StartupInfoLogger(this.mainApplicationClass).logStarted(getApplicationLog(), stopWatch); } listeners.started(context); callRunners(context, applicationArguments);}catch (Throwable ex) { handleRunFailure(context, ex, listeners); throw new IllegalStateException(ex);}
其中 实例化 bean 到容器中华的一些列操作都是 springframework.beans 包中的相关类完成的,需要了解其原理才能看懂代码
@SpringBootApplication
查看此注解可以发现,在去掉一些定义即文档配置后,此注解实际就是@SpringBootConfiguration , @EnableAutoConfiguration , @ComponentScan 结合:
@SpringBootConfiguration@EnableAutoConfiguration@ComponentScan(excludeFilters = { @Filter(type = FilterType.CUSTOM, classes = TypeExcludeFilter.class), @Filter(type = FilterType.CUSTOM, classes = AutoConfigurationExcludeFilter.class) })public @interface SpringBootApplication{}
@SpringBootConfiguration
- 实际为 @Configuration 注解的替代,无区别
- 每个应用中应该保持只有一个 @SpringBootConfiguration 注解
- 用于自动查找配置
@Configurationpublic @interface SpringBootConfiguration { boolean proxyBeanMethods() default true;}
@ComponentScan
和 Spring 中一样,用于包扫描
@EnableAutoConfiguration
所有自动配置的核心,实际上都和此注解有关
@AutoConfigurationPackage@Import(AutoConfigurationImportSelector.class)public @interface EnableAutoConfiguration {}
@Import(AutoConfigurationImportSelector.class)
- 利用 getAutoConfigurationEntry(annotationMetadata); 给容器中批量导入一些组件
- 调用 List configurations = getCandidateConfigurations(annotationMetadata, attributes) 获取到所有需要导入到容器中的配置类
- 利用工厂加载 Map<String, List> loadSpringFactories(@Nullable ClassLoader classLoader); 得到所有的组件
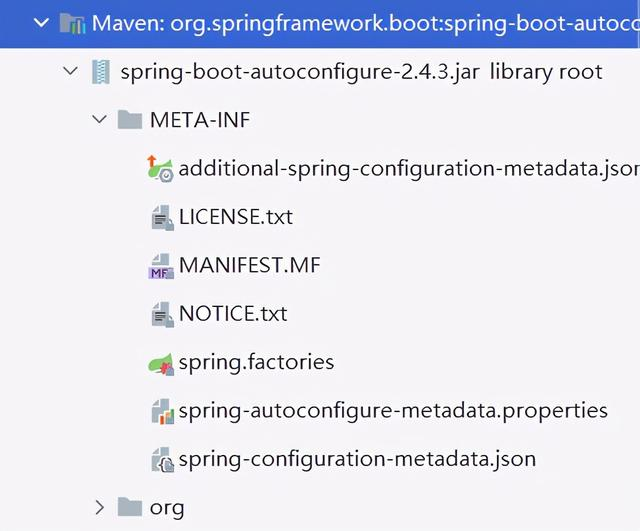
- 从 META-INF/spring.factories 位置来加载一个文件。 默认扫描我们当前系统里面所有 META-INF/spring.factories 位置的文件spring-boot-autoconfigure-x.x.x.jar以及 spring-boot-x.x.x.jar 里面有 META-INF/spring.factories
- 根据 spring.factories 中配置的 AutoConfigurationImportFilter 来过滤无需加载的 bean# Auto Configuration Import Filters org.springframework.boot.autoconfigure.AutoConfigurationImportFilter=\org.springframework.boot.autoconfigure.condition.OnBeanCondition,\org.springframework.boot.autoconfigure.condition.OnClassCondition,\org.springframework.boot.autoconfigure.condition.OnWebApplicationCondition
Spring boot 的使用
@Configuration
- 被 @Configuration 注解的类本身也是一个 bean, run.getBean(MyConfig.class) ;
- proxyBeanMethods :指示被 @Configuration 注解的类是否需要方法代理,如果是,,那么被**@Bean** 注解过的方法都会被代理,无论调用多少次,方法都会放回容器中已存在的对象,否则使用方法返回的对象
- Full 模式: proxyBeanMethods 为 true,需要判断,启动慢
- Lite 模式: proxyBeanMethods 为 false,无需判断,启动快
- 建议:当如果其他 bean 之间有相互依赖时,使用 Full 模式,否则使用 Lite
@Import
public @interface Import { Class<?>[] value();}
在容器中创建 value 数组指定的所有 类的实例,默认名字为 全限定类型(包路径+类名)
@ImportResource
- 将 xml 书写的相关配置进行导入,以进行兼容: @ImportResource(“classpath:beans.xml”)
@Condition
- 按条件注入
- 存在大量派生 注解,@ConditionalOnBean @ConditionalOnMissingClass
@ConfiguraProperties
将properties文件中的内容翻译为一个 Java Bean 的过程被称为 配置绑定
- 用于类上,指定前缀后,只要类中的属性在 配置文件中定义过,就能自动注入user.name="tom"user.age=23 user.address=“Shanghai”@Component @ConfigurationProperties(prefix = “user”) public class User { private String name; private int age; private String address; }
spring-boot-configuration-processor
- 在使用此注解时,如果没有配置 spring-boot-configuration-processor 依赖,IDEA 会有红色的警告提示
- 在 application.properties 编写配置时,会看到 IDEA 中有很多的提示,此提示就是事先在 spring-boot-auto-configure 定义好的元数据 spring-configuration-metadata.json 文件:

- 内容大概是这样的:

- 所以此依赖的作用就是为我们自定义的属性生成元数据,这样我们之后在 application.properties 中间配置时就会有提示了
- 此组件生效需要先编译运行一次 程序,之后会在 classpath:META-INF 路径下会生成 spring-configuration-metadata.json 文件
使用方式
- @EnableConfigurationProperties :指定开启某个/些类的属性注入功能,并注入一个 bean 到容器中
- @Component+@ConfigurationProperties
- @Configuration + @EnableConfigurationProperties
此方式创建的 bean 是 首字母小写的类名 + 全限定类名
开发 Web 应用
Spring MVC 自动配置
- 包含 ContentNegotiatingViewResolver 和 BeanNameViewResolver Bean。
- 支持提供静态资源,包括对 Webjars 的支持
- 自动注册 Converter,GenericConverter 和 Formatter Bean。
- 对 HttpMessageConverters 的支持
- 自动注册 MessageCodesResolver。
- index.html、favicon.icon 支持
- 自动使用 ConfigurableWebBindingInitializer Bean(在本文档后面介绍)。
静态资源访问
- 默认的静态资源文件存放在: /static (or /public or /resources or /META-INF/resources ) 下
- 默认资源路径被映射到 /,可以通过配置属性文件修改spring.mvc.static-path-pattern=/resources/
- 原理寻找是否有 Controller 能够处理此请求,若有,直接调用方法处理。若不能处理,则交给静态资源处理器。静态资源处理器找到对应资源,则返回,否则返回 404 页面,因此如果一个 controller的方法映射和一个静态资源 映射到相同路径, Spring boot 会返回 controller 方法执行的结果但是如果有多个相同的 controller 方法映射到同一 URL, String Boot 则会直接抛出异常
- 自定义静态资源路径:spring: web: resources: static-locations: - classpath:/xixi
- 禁用静态资源规则spring: resources: add-mappings: false 禁用所有静态资源规则禁用之后就再也无法访问到静态资源
- webjars用于将前端资源打包为 jar 使用,如使用 Maven 导入 JQuery,就会得到 包含 JQuery 的 jar 包默认将所有 webjar 映射到 /webjars/** 路径下访问规则:/webjars/ jquery/3.5.1/jquery.js 后面地址要按照依赖里面的包路径
欢迎页
- 静态资源路径下放置 index.html 文件
- 编写能处理 /index 请求的 controller
- 配置静态资源访问路径映射后,index.html 放在静态资源路径下无法自动识别为欢迎页
- 欢迎页功能必须同时保证 静态资源 URL 映射为默认 /** ,且在静态资源路径下存在 index.html 文件
favicon
目前官方文档已经取消了介绍自定义网页图标的部分,但功能依然存在
- 将 favicon.icon 放在 静态资源路径下即可
- 同欢迎页一样,存在 bug,静态资源访问路径映射更改后功能失效
Rest 支持
Spring boot 支持 RestFul 的设计风格,支持 GET、POST、DELETE、PUT、PATCH 等请求方式。由于表单只支持 GET、POST 方式,因此 Spring boot 使用了一个HiddenHttpMethodFilter 的过滤器来实现请求方法的过滤、更改,流程:
- HiddenHttpMethodFilter 过滤器将拦截带有 methodParam (默认为_method)的参数的请求
- 读取 methodParam 的值,并使用一个 ServletRequestWrapper 包装重写 getMethod() 方法,使其返回期望的请求方法
- 如果是以其他方式直接发送的 PUT 等方式的请求,如:PostMan、IDEA Request 生成,则HiddenHttpMethodFilter 会直接放行
因此,如果我们想自定义相关的操作,可以自己添加一个 HiddenHttpMethodFilter 的 bean,并修改相关属性,如 methdoParam
用法
- 开启页面表单的 REST 功能HTML 表单只能发送 GET、POST 请求,如果需要发送 PUT、DELETE、PATCH 请求,需要开启页面表单的 REST 功能:spring: mvc: hiddenmethod: filter: enabled: true #开启页面表单的Rest功能,即开启 HiddenHttpMethodFilter 的过滤器功能
- form 表单的请求方式必须为 POST
- HTML5 表单中附带一个 name 为 _method 的 input(type 一般设置为 hidden),value 设置为真正的请求方式(大小写无所谓)
- 编写 controllerGET:@RequestMapping(name=“/user”, method=RequestMethod.GET)、@GetMapping(“/user”)POST:@RequestMapping(name=“/user”, method=RequestMethod.POST)@PostMapping(“/user”)DELETE:@RequestMapping(name=“/user”, method=RequestMethod.DELETE)@DeleteMapping(“/user”)PUT:@RequestMapping(name=“/user”, method=RequestMethod.PUT)@PutMapping(“/user”)PATCH :@RequestMapping(name=“/user”, method=RequestMethod.PATCH )@atchMapping(“/user”)
请求参数映射
相关注解:@PathVariable、@RequestHeader、@ModelAttribute、@RequestParam、@MatrixVariable、@CookieValue、@RequestBody
@RequestParam
List<String>Map<String, String>
public @interface RequestParam { @AliasFor("name") String value() default ""; @AliasFor("value") String name() default ""; // 参数是否是必须的。如果为是,参数缺失时将会导致异常;否则将传入 null boolean required() default true; String defaultValue() default ValueConstants.DEFAULT_NONE;}
@RequestMapping("/rp1")public String testRequestParam(@RequestParam String name, @RequestParam Integer id, @RequestParam("hobby")List<String> hobbies) { return name + " " + id + "hobbies: " + hobbies;}
@PathVariable
Map<String, String>
public @interface PathVariable { @AliasFor("name") String value() default ""; @AliasFor("value") String name() default ""; boolean required() default true;}
例子:
@RequestMapping("/param/{id}")public String testPathVariable(@PathVariable Integer id) { return "testPathVariable: " + id;}@RequestMapping("/param/{id}/owner/{username}")public String testPathVariable2(@PathVariable Integer id, @PathVariable String username) { return String.format("testPathVariable2: id: %d, username: %s", id, username);}@RequestMapping("/param/{id}/owner/{username}/{age}")public String testPathVariable3(@PathVariable Map<String, String> map) { return String.format("testPathVariable2: %s", map.toString());}
@RequestHeader
- 获取 name 指定的请求头,如 accept
- 方法参数为 Map<String, String> 可以获取所有的请求头
public @interface RequestHeader { @AliasFor("name") String value() default ""; @AliasFor("value") String name() default ""; boolean required() default true; String defaultValue() default ValueConstants.DEFAULT_NONE;}
@RequestMapping("/param/rh1")public String testRequestHeader(@RequestHeader("user-Agent") String userAgent) { return String.format("testRequestHeader: user-Agent: %s", userAgent);}@RequestMapping("/param/rh2")public String testRequestHeaders(@RequestHeader Map<String, String> headers) { return String.format("testRequestHeader: %s", headers.toString());}
@CookieValue
- 可以获取指定 name 的 cookie
- 可以将指定 name 的cookie 封装为 javax.servlet.http.Cookie 对象
public @interface CookieValue { @AliasFor("name") String value() default ""; @AliasFor("value") String name() default ""; boolean required() default true; String defaultValue() default ValueConstants.DEFAULT_NONE;}
例子:
@RequestMapping("/cookie")public String testCookie(@CookieValue("Idea-80024e6a") String idea) { return idea;}@RequestMapping("/cookie2")public String testCookie2(@CookieValue("Idea-80024e6a") Cookie cookie) { return cookie.getName() + " " + cookie.getValue();}
@RequestBody
- 请求方式不能是 必须是 POST【GET方式没有请求体】
例子
@RequestMapping("/rb1")public String testRequestBody(@RequestBody String body) { return body;}
@RequestAttribute
- 获取 request 域中的属性
public @interface RequestAttribute { @AliasFor("name") String value() default ""; @AliasFor("value") String name() default ""; boolean required() default true;}
例子:
@GetMapping("/attribute1")public void testRequestAttribute0(HttpServletRequest request, HttpServletResponse response) throws ServletException, IOException { request.setAttribute("name", "ZhangSan"); request.getRequestDispatcher("/ra1").forward(request, response);}@RequestMapping("/ra1")public String testRequestAttribute1(@RequestAttribute String name) { return name;}
@MatrixVariable
- Spring boot 默认 禁用 矩阵变量功能
- 开启矩阵变量功能,我们需要自己实现 WebMvc的相关配置,继承 WebMvcConfigurer 并覆盖 configurePathMatch 方法
- WebMvcAutoConfiguration 类并非时条件注入,所以可以直接再加一个配置进行 configurePathMatch 方法的覆盖@Configuration(proxyBeanMethods = false) public class WebConfig implements****WebMvcConfigurer { @Override public void configurePathMatch(PathMatchConfigurer configurer) { UrlPathHelper helper = new UrlPathHelper(); // 设置不移除URL中的分号helper.setRemoveSemicolonContent(false); configurer.setUrlPathHelper(helper); } }
- UrlPathHelperremovSemicolonContent
- 矩阵变量:以分号分隔的 k-v 对 ,/user/{path;low=34;brand=byd,audi,yd}
- 一个 key 有多个 value 时,用逗号分隔
- /boss/1;age=20/2;age=20
public @interface MatrixVariable { @AliasFor("name") String value() default ""; @AliasFor("value") String name() default ""; String pathVar() default ValueConstants.DEFAULT_NONE; boolean required() default true; String defaultValue() default ValueConstants.DEFAULT_NONE;}
例子:
@ResponseBody@RequestMapping("/mv/{sell}")public String testMatrixVar(@MatrixVariable("low") Integer low, @MatrixVariable("brand") List<String> brads) { return brads.toString() + " " + low;}
存在多个相同名字的 key 时,可以使用 pathVar 指定是哪一个路径变量下的变量
@ResponseBody@RequestMapping("/mv2/{boss}/{emp}")public String testMatrixVar2(@MatrixVariable(name = "age", pathVar = "boss") Integer age1, @MatrixVariable(name = "age", pathVar = "emp") Integer age2) { return age1.toString() + " " + age2;}
附录
forward 和 include
-
forward:转发,将请求转发到另一个请求路径
-
include:包含,可以用于包含另一个资源,也会将请求转发到新资源,但是新资源的响应和旧响应会合并在一起响应到客户端
-
应用
-
登录成功:forward welcome.html
-
登录失败:include login.html
RestFul
RestFul是一种程序编程风格和开发方式,基于 HTTP
REST 指的是一组架构约束条件和原则。满足这些约束条件和原则的应用程序或设计就是 RESTful。
Web 应用程序最重要的 REST 原则是,客户端和服务器之间的交互在请求之间是无状态的。从客户端到服务器的每个请求都必须包含理解请求所必需的信息。如果服务器在请求之间的任何时间点重启,客户端不会得到通知。此外,无状态请求可以由任何可用服务器回答,这十分适合云计算之类的环境。客户端可以缓存数据以改进性能。
在服务器端,应用程序状态和功能可以分为各种资源。资源是一个有趣的概念实体,它向客户端公开。资源的例子有:应用程序对象、数据库记录、算法等等。每个资源都使用 URI (Universal Resource Identifier) 得到一个唯一的地址。所有资源都共享统一的接口,以便在客户端和服务器之间传输状态。使用的是标准的 HTTP 方法,比如 GET、PUT、POST 和 DELETE。Hypermedia 是应用程序状态的引擎,资源表示通过超链接互联。
特点
- 每一个URI代表1种资源;
- 客户端使用 GET、POST、PUT、DELETE 4个表示操作方式的动词对服务端资源进行操作
- GET用来获取资源
- POST用来新建资源(也可以用于更新资源)
- PUT用来更新资源
- DELETE用来删除资源
- 通过操作资源的表现形式来操作资源;
- 资源的表现形式是XML或者HTML;
- 客户端与服务端之间的交互在请求之间是无状态的,从客户端到服务端的每个请求都必须包含理解请求所必需的信息。
eg: 同样访问 /user 的 URL,不同的请求方式对应不同的操作:
- GET:获取 user
- POST:保存 user
- DELETE:删除 user
- PUT:更新 user
请求处理原理
-
HandlerAdapter:因为需要封装各种请求信息到方法参数,因此 Spring MVC 设计了 HandlerAdapter 来处理一系列类似的方法,负责解析参数、参数上的注解、参数名字,并传入值
-
RequestMappingHandlerAdapter:处理 @RequestMapping 注解的方法
-
HandlerFunctionHandlerAdapter
-
HttpRequestHandlerAdapter
-
SimpleControllerHandlerAdapter
Model 属性合并到 request
使用例子:
- Map<String, Object> 、Model、HttpServletRequest 都可以用于操作 request 对象
@RequestMapping("/request0")public String testRequest(Map<String, Object> map, Model model, HttpServletRequest request) { map.put("map", "v1"); model.addAttribute("model", "v2"); request.setAttribute("request", "v3"); return "forward:/param/request1";}@ResponseBody@RequestMapping("/request1")public Map<String, Object> testRequest1(HttpServletRequest request) { Map<String, Object> map = new HashMap<>(); map.put("map", request.getAttribute("map")); map.put("model", request.getAttribute("model")); map.put("request", request.getAttribute("request")); return map;}
流程
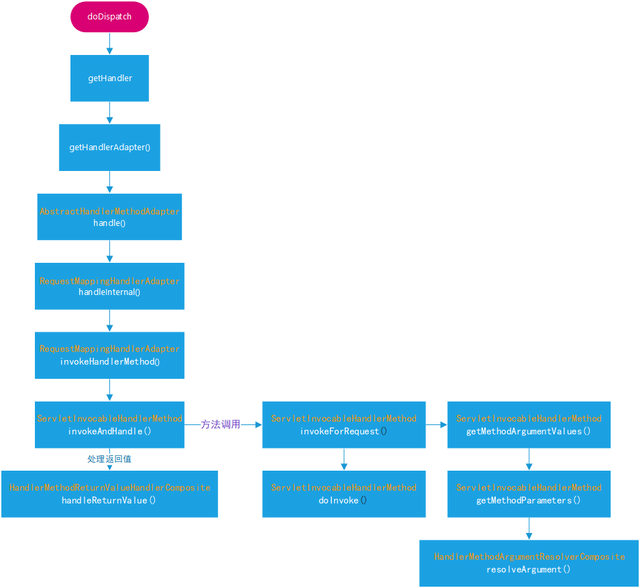
// 获取 handlermappedHandler = getHandler(processedRequest);// 获取 handlerAdapterHandlerAdapter ha = getHandlerAdapter(mappedHandler.getHandler());//拦截器preHandle方法preHandle(processRequest, response);//调用处理器handle(processedRequest, response, mappedHandler.getHandler());//拦截器 postHandle 方法postHandle(processedRequest, response, mv);//处理分发结果,包括 ModelAndView 或 ExceptionprocessDispatchResul(processedRequest, response, mappedHandler, mv, dispatchException); // 渲染给定的 ModelAndView,这是请求处理的最后一步 render(mv, request, response); // 视图解析,循环调用所有配置的视图解析器解析视图 InternalResourceView view = resolveViewName(viewName, mv.getModelInternal(), locale, request); // 视图渲染, view.render(); // 合并静态属性、Model、pathVars createMergedOutputModel(model, request, response); // 实际实现渲染的方法 renderMergedOutputModel(mergedModel, getRequestToExpose(request), response); // 将合并后的 Model 中的所有属性全部转移到 Request 中 exposeModelAsRequestAttributes(model, request); // 分发请求 RequestDispatcher rd = getRequestDispatcher(request, dispatcherPath); //rd.include(request, response); rd.forward(request, response); // 拦截器 afterCompletion 方法 mappedHandler.triggerAfterCompletion(request, response, null);
Handler
-
所有预设的 HandlerMapping
-
RequestMappingHandlerMapping:保存了所有 @RequestMapping 和 handler 的映射规则
-
WelcomPageHandlerMapping:处理欢迎页的映射
-
BeanNameUrlHandlerMapping
-
RoutedFunctionMapping
-
SimpleUrlHandlerMapping
//循环调用所有预设的 HandlerMapping 的 getHandler 方法,并返回第一个不为 null 的值HandlerExecutionChain handler = mapping.getHandler(request); getHandler(HttpServletRequest request); getHandlerInternal(request); // 寻找能够处理请求的方法,可能存在多个,如果多个方法映射到同一路径,Spring boot 会直接抛出异常 lookupHandlerMethod(lookupPath, request); return bestMatch.getHandlerMethod(); // 将 String 类型的 bean 实例化为一个实际对象 return handlerMethod.createWithResolvedBean(); // 执行链,包含 handler method 和所有的拦截器 HandlerExecutionChain executionChain = getHandlerExecutionChain(handler, request); return executionChain;return handler;
HandlerAdapter
-
由于需要对 handler 进行多种参数的封装,为了更好管理,Spring MVC 设计了多种 Adapter 用于处理不同类型的 handler
-
RequestMappingHandlerAdapter支持 @RequestMapping 注解的 HandlerMethod
-
HandlerFunctionAdapter支持 HandlerFunction 的HandlerAdapter实现。
-
HttpRequestHandlerAdapter :支持实现LastModified接口的处理程序。
-
SimpleControllerHandlerAdapter支持 Controller 的子类
// 获取 handler 对应的适配器getHandlerAdapter(Object handler); adapter.supports(handler); return (handler instanceof HandlerMethod && supportsInternal((HandlerMethod) handler));
RequestMappingHandlerAdapter 的 handle 方法的实现:
handle(HttpServletRequest request, HttpServletResponse response, Object handler); return handleInternal(request, response, (HandlerMethod) handler); ModelAndView mav = invokeHandlerMethod(request, response, handlerMethod); ServletInvocableHandlerMethod invocableMethod = createInvocableHandlerMethod(handlerMethod); invocableMethod.setHandlerMethodArgumentResolvers(this.argumentResolvers); invocableMethod.setHandlerMethodReturnValueHandlers(this.returnValueHandlers); invocableMethod.invokeAndHandle(webRequest, mavContainer); Object returnValue = invokeForRequest(webRequest, mavContainer, providedArgs); returnValueHandlers.handleReturnValue(returnValue, getReturnValueType(returnValue), mavContainer, webRequest); return getModelAndView(mavContainer, modelFactory, webRequest); return mav;
ServletInvocableHandlerMethod
invokeForRequest(webRequest, mavContainer, providedArgs); // 获取所有方法参数值 Object[] args = getMethodArgumentValues(request, mavContainer, providedArgs); MethodParameter[] parameters = getMethodParameters(); // 用于获取参数名称 parameter.initParameterNameDiscovery(this.parameterNameDiscoverer); args[i] = this.resolvers.resolveArgument(parameter, mavContainer, request, this.dataBinderFactory); HandlerMethodArgumentResolver resolver = getArgumentResolver(parameter); // 迭代 List<HandlerMethodArgumentResolver> resolver.supportsParameter(parameter); return resolver; return resolver.resolveArgument(parameter, mavContainer, webRequest, binderFactory); return doInvoke(args);
例子 RequestHeaderMapMethodArgumentResolver :
public boolean supportsParameter(MethodParameter parameter) { // 只要保证有 @RequestHeader 注解,并且参数类型为 Map 及其子类 return (parameter.hasParameterAnnotation(RequestHeader.class) && Map.class.isAssignableFrom(parameter.getParameterType()));}resolveArgument(parameter, mavContainer, webRequest, binderFactory); //MultiValueMap<String, String> result; // 因此参数 Map 必须是 String,String 类型 Map<String, String> result = new LinkedHashMap<>();
POJO 类型封装
- ServletModelAttributeMethodProcessor
*** WebDataBinder:包含120+ 中 Converter ,用于各种数据类型之间的转化* 用在参数上的 @ModelAttribute 注解与没有注解的 POJO 类型(非简单类型)被认为是相同的【指处理方式相同】**
public boolean supportsParameter(MethodParameter parameter) { return (parameter.hasParameterAnnotation(ModelAttribute.class) || (this.annotationNotRequired && !BeanUtils.isSimpleProperty(parameter.getParameterType())));}public static boolean isSimpleProperty(Class<?> type) { Assert.notNull(type, "'type' must not be null"); return isSimpleValueType(type) || (type.isArray() && isSimpleValueType(type.getComponentType()));}public static boolean isSimpleValueType(Class<?> type) { return (Void.class != type && void.class != type && (ClassUtils.isPrimitiveOrWrapper(type) || Enum.class.isAssignableFrom(type) || CharSequence.class.isAssignableFrom(type) || Number.class.isAssignableFrom(type) || Date.class.isAssignableFrom(type) || Temporal.class.isAssignableFrom(type) || URI.class == type || URL.class == type || Locale.class == type || Class.class == type));}// ModelAttributeMethodProcessorresolveArgument(parameter, mavContainer, webRequest, binderFactory); // 创建一个空的 domain 对象 attribute = createAttribute(name, parameter, binderFactory, webRequest); WebDataBinder binder = binderFactory.createBinder(webRequest, attribute, name); bindRequestParameters(binder, webRequest); ServletRequestDataBinder servletBinder = (ServletRequestDataBinder) binder; // 底层在对无法绑定的属性、错误属性等剔除后,将数据类型转换后绑定到 attribute 上 servletBinder.bind(servletRequest); // 将请求中的所有参数全部转换为 PropertyValue,并加入 List 保存 MutablePropertyValues mpvs = new MutablePropertyValues(request.getParameterMap()); doBind(mpvs); // DataBinder 移除缺失的必填字段,并抛出错误 doBind(mpvs); applyPropertyValues(mpvs); getPropertyAccessor().setPropertyValues(mpvs, isIgnoreUnknownFields(), isIgnoreInvalidFields()); // 迭代 mpvs 中的所有 PropertyValue //setPropertyValue(pv); 调用重载方法 setPropertyValue(pv.getName(), pv.getValue()); nestedPa.setPropertyValue(tokens, new PropertyValue(propertyName, value)); processLocalProperty(tokens, pv); valueToApply = convertForProperty(tokens.canonicalName, oldValue, originalValue, ph.toTypeDescriptor()); ph.setValue(valueToApply);
convertForProperty(tokens.canonicalName, oldValue, originalValue, ph.toTypeDescriptor());return convertIfNecessary(propertyName, oldValue, newValue, td.getType(), td); return this.typeConverterDelegate.convertIfNecessary(propertyName, oldValue, newValue, requiredType, td); return (T) conversionService.convert(newValue, sourceTypeDesc, typeDescrip