【Android】安卓四大组件之Service
1、Service的介绍
1.1 什么是service
Service即服务,用大白话讲就是——长期运行在后台的程序,如果我们说的官方一点,那么就是用于执行长期运行的任务,并且没有与用户交互的功能。
每一个service都和activity一样,需要在manifest.xml中配置,赋予其生命。使用<service>标签即可配置
在activity类中,可以使用Context.startService()方法来开启服务,使用Context.stopService()方法来关闭服务。同时,我们还可以通过绑定的方式来开启服务,通过解除绑定的方式来关闭服务。
1.2 为什么需要使用service
第一个原因:服务适用于执行长期后台运行的操作,有时候我们没有用户交互的界面,但是该程序仍然需要执行。
最常见的例子有如下几种:
音乐APP,我们播放歌曲的时候,可以进行看小说、浏览网页等等操作。后台下载,我们在后台下载的时候,并没有明显的交互,但是仍然可以挂在后台下载。
在了解第二个原因之前,我们需要给几个概念:
前台进程:最顶部直接跟用户交互的进程。比如说我们操作的Activity界面.可见进程:可见但不操作的进程,比如说我们在一个Activity的顶部弹出一个Dialog,这个Dialog就是前台进程,但是这个Activity则是可见进程。服务进程:服忙碌的后台进程,虽然是在后台,但是它在运行。后台进程:后台进程就是退隐到后台,不做事的进程。空进程:没有任何东西在上面跑着的进程,仅作缓存作用。
如果内存不够了,首先杀的是空进程,要是还不够就杀后台进程,要是还不够,那么就杀服务,但是服务被杀死以后,等内存够用了,服务又会自动跑起来了。
如果我们需要长期后台操作的任务,使用Service就可以了
2、Service的生命周期方法
和activity一样,service也有它的生命周期
2.1 最基本的生命周期
我们这里使用最基本的三个生命周期方法:
onCreate(),创建服务时调用onStartCommand(Intent intent, int flags, int startId),开启服务时调用onDestroy(),销毁服务时调用
我们来模拟服务开启和停止:
- 开启service的方法是:startService()
- 停止service的方法是:stopService()
首先创建一个带有两个button的页面,这两个button分别绑定开启服务和停止服务的方法。
记得要去manifest.xml中注册service噢,我这里创建了一个FirstService类extends了Service
<service android:name=".study.test.services.FirstService"/>
前端xml页面代码:
<?xml version="1.0" encoding="utf-8"?>
<LinearLayout xmlns:android="http://schemas.android.com/apk/res/android"
    xmlns:app="http://schemas.android.com/apk/res-auto"
    xmlns:tools="http://schemas.android.com/tools"
    android:layout_width="match_parent"
    android:layout_height="match_parent"
    android:orientation="vertical"
    tools:context=".study.test.ServiceActivity">

    <Button
        android:layout_width="match_parent"
        android:layout_height="wrap_content"
        android:text="点我开启服务"
        android:id="@+id/bt_startService"/>
    <Button
        android:layout_width="match_parent"
        android:layout_height="wrap_content"
        android:text="点我关闭服务"
        android:id="@+id/bt_stopService"/>

</LinearLayout>
然后是activity代码
public class ServiceActivity extends AppCompatActivity implements OnClickListener {


    private static final String TAG = "ServiceActivity";
    private Button stop;
    private Button start;

    @Override
    protected void onCreate(Bundle savedInstanceState) {


        super.onCreate(savedInstanceState);
        setContentView(R.layout.activity_service);
        initView();
    }

    public void initView() {


        start = this.findViewById(R.id.bt_startService);
        stop = this.findViewById(R.id.bt_stopService);
        start.setOnClickListener(this);
        stop.setOnClickListener(this);
    }


    @Override
    public void onClick(View v) {


        if (v == start) {


            Log.d(TAG,"114514");
            Intent serviceIntent = new Intent();
            serviceIntent.setClass(this, FirstService.class);
            this.startService(serviceIntent);
        } else if (v == stop) {


            Log.d(TAG,"1919810");
            Intent serviceIntent = new Intent();
            serviceIntent.setClass(this, FirstService.class);
            this.stopService(serviceIntent);
        }
    }
}
最后是service的代码:
// 继承service
public class FirstService extends Service {


    private static final String TAG = "FirstService";

    @Nullable
    @Override
    public IBinder onBind(Intent intent) {


        return null;
    }

    // create的周期方法
    @Override
    public void onCreate() {


        Log.d(TAG,"create !");
        super.onCreate();
    }

    // start的周期方法
    @Override
    public int onStartCommand(Intent intent, int flags, int startId) {


        Log.d(TAG,"start !");
        return super.onStartCommand(intent, flags, startId);
    }

    // destroy的周期方法
    @Override
    public void onDestroy() {


        Log.d(TAG,"destroy !");
        super.onDestroy();
    }
}
我们来测试一下,效果如下:(注意控制台的log输出)
通过观察可以发现,第一次开启服务会调用onCreate()方法和onStartCommand()方法,第二次开启,仅仅调用onStartCommand()方法,因为该服务已经被create过了。点击停止服务,会调用onDestroy()方法,第二次暂停没有反映,因为服务已经被销毁过了!
2.2 Service绑定的生命周期
我们可以发现,在实现Service的类中,会默认重写一个onBind()的方法:
- 这个方法的作用就是,用来绑定服务,接下来的一小节我们会讲。
- 我们只需要知道,这个方法是activity类中使用
bindService()方法后的回调方法,会让我们activity中的ServiceConnection类调用onServiceConnected()方法,从而获取一个实现IBinder接口的service对象。
public IBinder onBind(Intent intent) {


    return null;
}
还有一个onUnBinde()的方法,就如同字面意思一样,就是解除绑定的回调方法:
- 这个方法就是在activity类中调用
unbindService()方法后的一个回调方法
public boolean onUnbind(Intent intent) {


    Log.d(TAG, "开始解除绑定!onUnbind...");
    return super.onUnbind(intent);
}
3、Service的绑定
前面的开启服务方式,我们会发现——无法进行各个类之间的交互,这就是一个缺点。
所以,我们可以是用绑定服务的方式来进行交互:
- 使用
bindService(Intent service, ServiceConnection conn, int flags)方法来进行绑定 - 使用
unbindService(ServiceConnection conn)来解除绑定
我们来讲一下ServiceConnection这个类,这就是一个服务连接类,如果new一个对象,需要重写两个方法:
-
onServiceConnected(ComponentName name, IBinder service)方法- 该方法是service绑定成功的回调方法,会给一个实现IBinder接口的service对象
- 还会返回一个ComponentName对象,可以获取service的name信息
-
onServiceDisconnected(ComponentName name)方法- 该方法时service非正常解除绑定的回调方法,在
连接正常关闭的情况下是不会被调用的。
- 该方法时service非正常解除绑定的回调方法,在
- 该方法只在Service 被破坏了或者被杀死的时候调用。 例如, 系统资源不足, 要关闭一些Services, 刚好连接绑定的 Service 是被关闭者之一, 这个时候onServiceDisconnected() 就会被调用。
绑定服务的方式和开启服务的方式的区别:
bindService开启的服务,在系统里是看不到服务在运行的:startService启动的服务,则会在设置-应用里看到
最后注意一点,使用绑定服务的方式,在Context(Activity)被销毁之前,一定要解除绑定,否则会泄露!
3.1 尝试绑定一个Service类中的内部类?
我们来写一个例子,来实现调用服务类内部的一个private方法
首先还是xml前端页面
<?xml version="1.0" encoding="utf-8"?>
<LinearLayout xmlns:android="http://schemas.android.com/apk/res/android"
    xmlns:app="http://schemas.android.com/apk/res-auto"
    xmlns:tools="http://schemas.android.com/tools"
    android:layout_width="match_parent"
    android:layout_height="match_parent"
    android:orientation="vertical"
    tools:context=".study.test.ServiceActivity">


    <Button
        android:layout_width="match_parent"
        android:layout_height="wrap_content"
        android:text="点我开启服务"
        android:id="@+id/bt_startService"/>
    <Button
        android:layout_width="match_parent"
        android:layout_height="wrap_content"
        android:text="点我关闭服务"
        android:id="@+id/bt_stopService"/>
    <Button
        android:layout_width="match_parent"
        android:layout_height="wrap_content"
        android:text="点我绑定服务"
        android:id="@+id/bt_bindService"/>
    <Button
        android:layout_width="match_parent"
        android:layout_height="wrap_content"
        android:text="点我解绑服务"
        android:id="@+id/bt_unbindService"/>
    <Button
        android:layout_width="match_parent"
        android:layout_height="wrap_content"
        android:text="调用服务内部方法"
        android:id="@+id/bt_serviceMethod"/>


</LinearLayout>
然后是我们的service类:
- 重点是我们创建了一个内部类CommunicateBinder继承了Binder,然后写了一个callInnerMethod()方法调用内部private的innerMethod()方法
- 我们的目的是在activity启动服务后可以获取到这个内部类CommunicateBinder的实例化对象,从而调用callInnerMethod()方法来实现调用FirstService中的private的innerMethod()方法
- 需要注意的是我们在onBind()触发方法中return了一个new CommunicateBinder()——一个实例化对象
public class FirstService extends Service {


    private static final String TAG = "FirstService";

    public class CommunicateBinder extends Binder {


        public void callInnerMethod(){


            innerMethod();
        }
    }

    private void innerMethod() {


        Log.d(TAG,"内部方法!innerMethod...");
        Toast.makeText(this, "inner method!", Toast.LENGTH_SHORT).show();
    }

    @Nullable
    @Override
    public IBinder onBind(Intent intent) {


        Log.d(TAG,"开始绑定!onBind...");
        return new CommunicateBinder();
    }

    // create的周期方法
    @Override
    public void onCreate() {


        Log.d(TAG,"服务创建!onCreate...");
        super.onCreate();
    }

    // start的周期方法
    @Override
    public int onStartCommand(Intent intent, int flags, int startId) {


        Log.d(TAG,"服务开启!onStart...");
        return super.onStartCommand(intent, flags, startId);
    }

    // destroy的周期方法
    @Override
    public void onDestroy() {


        Log.d(TAG,"服务销毁!destroy...");
        super.onDestroy();
    }

    @Override
    public boolean onUnbind(Intent intent) {


        Log.d(TAG, "开始解除绑定!onUnbind...");
        return super.onUnbind(intent);
    }
}
然后是activity类:
- 我们在类中写入了一个成员变量,是ServiceConnection类的对象conn
- 在conn的重写的onServiceConnected()方法中,我们可以知道其中的第二个参数service其实就是我们刚刚在Service类中的return的new CommunicateBinder()的一个实例化对象,我们创建一个成员变量private FirstService.CommunicateBinder communicateBinder并给他赋值
- 我们在绑定服务按钮触发时,启动了bindService(serviceIntent, conn,BIND_AUTO_CREATE);这个方法,用来绑定一个service,这时候就会去调用conn中的onServiceConnected()方法了
- 我们在解除绑定服务按钮触发的时候,使用unbindService(conn)方法关闭service连接,并且将我们的communicateBinder对象置空
public class ServiceActivity extends Activity implements OnClickListener {


    private static final String TAG = "ServiceActivity";
    private Button stop;
    private Button start;
    private Button bind;
    private Button unbind;
    private Button method;
    private boolean isService = false;
    private FirstService.CommunicateBinder communicateBinder;
    private ServiceConnection conn = new ServiceConnection() {


        @Override
        public void onServiceConnected(ComponentName name, IBinder service) {


            if (service instanceof FirstService.CommunicateBinder) {


                Log.d(TAG,name.toString()+"服务绑定!onServiceConnected...");
                communicateBinder = (FirstService.CommunicateBinder) service;
            }
        }

        @Override
        public void onServiceDisconnected(ComponentName name) {


            Log.d(TAG,"服务在不知情情况下解绑!onServiceDisconnected...");
            communicateBinder = null;
        }
    };

    @Override
    protected void onCreate(Bundle savedInstanceState) {


        super.onCreate(savedInstanceState);
        setContentView(R.layout.activity_service);
        initView();
    }

    public void initView() {


        start = this.findViewById(R.id.bt_startService);
        stop = this.findViewById(R.id.bt_stopService);
        bind = this.findViewById(R.id.bt_bindService);
        unbind = this.findViewById(R.id.bt_unbindService);
        method = this.findViewById(R.id.bt_serviceMethod);
        start.setOnClickListener(this);
        stop.setOnClickListener(this);
        bind.setOnClickListener(this);
        unbind.setOnClickListener(this);
        method.setOnClickListener(this);
    }


    @Override
    public void onClick(View v) {


        Intent serviceIntent = new Intent();
        serviceIntent.setClass(this, FirstService.class);
        if (v == start) {


            this.startService(serviceIntent);
        } else if (v == stop) {


            this.stopService(serviceIntent);
        } else if (v == bind) {


            isService = this.bindService(serviceIntent, conn,BIND_AUTO_CREATE);
        } else if (v == unbind) {


            if (isService && conn != null) {


                isService = false;
                this.unbindService(conn);
                communicateBinder = null;
            }
        } else if (v == method) {


            if (communicateBinder != null) {


                communicateBinder.callInnerMethod();
            }
        }
    }

}
效果如下:(注意看控制台的输出)
- 我们点击绑定服务后,可以调用服务内部的方法
- 解除绑定服务后,无法调用服务内部方法
3.2 用接口来减少暴露风险
我们会发现,在上面的代码中,绑定的一个服务内部类是public的,也就是说,我们可以在任何地方new一个内部类出来,这当然是非常不安全的。
如果我们把这个内部类改为一个private的类,让其更安全,那么我们如何调用其中的方法呢?
答案不难想到,就是使用接口
我们写一个接口类:
public interface ICommunication {


    void sayHello();
}
之后再让我们的内部类implements这个ICommunication接口,并让他成为private的内部类,这样我们进行重写sayHello()方法,用雷调用Service类中的内部方法就可以啦!
private class CommunicateBinder extends Binder implements ICommunication {


    @Override
    public void sayHello(){


        innerMethod();
    }
}
完整的代码如下:
Service类
public class FirstService extends Service {


    private static final String TAG = "FirstService";

    private class CommunicateBinder extends Binder implements ICommunication {


        @Override
        public void sayHello(){


            innerMethod();
        }
    }

    private void innerMethod() {


        Log.d(TAG,"内部方法!innerMethod...");
        Toast.makeText(this, "inner method!", Toast.LENGTH_SHORT).show();
    }

    @Nullable
    @Override
    public IBinder onBind(Intent intent) {


        Log.d(TAG,"开始绑定!onBind...");
        return new CommunicateBinder();
    }

    // create的周期方法
    @Override
    public void onCreate() {


        Log.d(TAG,"服务创建!onCreate...");
        super.onCreate();
    }

    // start的周期方法
    @Override
    public int onStartCommand(Intent intent, int flags, int startId) {


        Log.d(TAG,"服务开启!onStart...");
        return super.onStartCommand(intent, flags, startId);
    }

    // destroy的周期方法
    @Override
    public void onDestroy() {


        Log.d(TAG,"服务销毁!destroy...");
        super.onDestroy();
    }

    @Override
    public boolean onUnbind(Intent intent) {


        Log.d(TAG, "开始解除绑定!onUnbind...");
        return super.onUnbind(intent);
    }
}
Activity类
public class ServiceActivity extends Activity implements OnClickListener {


    private static final String TAG = "ServiceActivity";
    private Button stop;
    private Button start;
    private Button bind;
    private Button unbind;
    private Button method;
    private boolean isService = false;
    private ICommunication iCommunication;
    private ServiceConnection conn = new ServiceConnection() {


        @Override
        public void onServiceConnected(ComponentName name, IBinder service) {


            Log.d(TAG,name.toString()+"服务绑定!onServiceConnected...");
            if (service instanceof ICommunication) {


                iCommunication = (ICommunication) service;
            }
        }
        @Override
        public void onServiceDisconnected(ComponentName name) {


            Log.d(TAG,"服务在不知情情况下解绑!onServiceDisconnected...");
            iCommunication = null;
        }
    };

    @Override
    protected void onCreate(Bundle savedInstanceState) {


        super.onCreate(savedInstanceState);
        setContentView(R.layout.activity_service);
        initView();
    }

    public void initView() {


        start = this.findViewById(R.id.bt_startService);
        stop = this.findViewById(R.id.bt_stopService);
        bind = this.findViewById(R.id.bt_bindService);
        unbind = this.findViewById(R.id.bt_unbindService);
        method = this.findViewById(R.id.bt_serviceMethod);
        start.setOnClickListener(this);
        stop.setOnClickListener(this);
        bind.setOnClickListener(this);
        unbind.setOnClickListener(this);
        method.setOnClickListener(this);
    }

    @Override
    public void onClick(View v) {


        Intent serviceIntent = new Intent();
        serviceIntent.setClass(this, FirstService.class);
        if (v == start) {


            this.startService(serviceIntent);
        } else if (v == stop) {


            this.stopService(serviceIntent);
        } else if (v == bind) {


            isService = this.bindService(serviceIntent, conn,BIND_AUTO_CREATE);
        } else if (v == unbind) {


            if (isService && conn != null) {


                isService = false;
                this.unbindService(conn);
                iCommunication = null;
            }
        } else if (v == method) {


            if (iCommunication != null) {


                iCommunication.sayHello();
            }
        }
    }
}
当然,效果与上面调用的效果一样,所以就不演示啦
3.3 绑定服务的总结
绑定服务的特点:
- 绑定服务在系统设置里是
没有显进服务正在运行 - 如果onBind方法返回的是null,那么
onServiceConnected方法不会被调用 - 绑定服务
必须解绑后再退出activity - 服务在解除绑定以后会停止运行,执行
unBind方法后再执行onDestroy方法 - 绑定服务开启的服务,
只可以解绑一次,多次解绑会抛异常,所以我们可以设置一个boolean变量来控制 - 绑定的connection要跟解绑的connection要
对应,否则没法解绑
startService和bindService的区别:
startService启动服务,是长期运行的,只有stopService才会停止服务。bindService来启动服务,不是长期运行的,不用的时候,需要调用unBindService,否则会导致context泄漏,当context销毁的时候,则会停止服务运行。startService来启动服务可以长期运行,但是不可以交互通讯bindService的方式来启动服务则可以交互通讯
我们使用服务的混合开启方式,达到互补的效果:
- 第一步:startService–>这一步是为了服务可以长期后台运行
- 第二步:bindService–>这一步的目录是为了拿到服务的控制binder
- 第三步:调用服务里的方法
- 第四步:unBindService—>解绑服务,否则无法停止服务的(但是服务仍然在后台运行)
- 第五步:在不需要服务的时候停止服务stopService
需要注意的是:
- 如果我们使用了混合开启的方法,startService了之后去bindService,如果这个时候unBindService而直接stopService是没有效果的,我们只能先通过unBindService,再去stopService
4、AIDL
AIDL就是Android接口定义语言,简单来说,其功能就是帮我们把service的interface和implement通过一个文件实现了。它的运行机制是如何的呢?其实就是通过我们写的aidl文件,让其内部构建编译成一个类,其中实现了接口的定义和实现调用。
我们下面通过一个例子来认识AIDL:
- 我们在生活中经常见到一个例子,就是我们需要付款的时候,例如在淘宝这个APP购买了东西,它会调用支付宝这个APP进行付款。
- 明明是两个不同的APP,这么相互关联了起来呢?
- 从底层实现我们可以用AIDL来实现这一套service。
- 我们先可以写一个类似于支付宝的付款页面,在其中构建起我们需要的服务
- 再写一个类似于淘宝付款的页面,在其中调用上面支付宝的服务
效果如下:
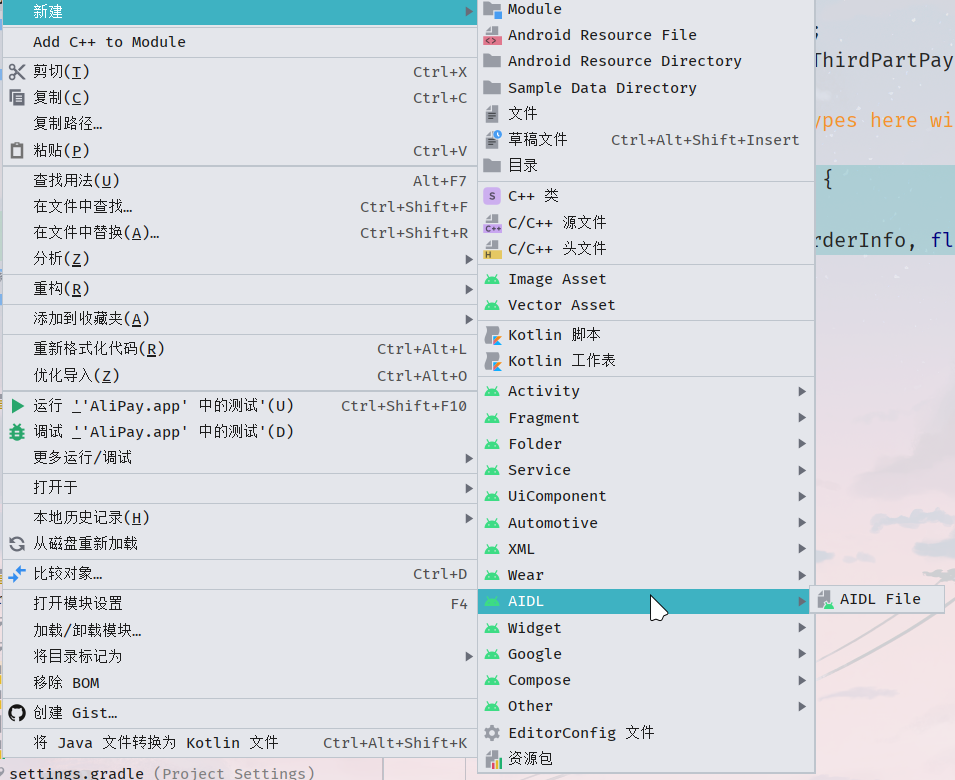
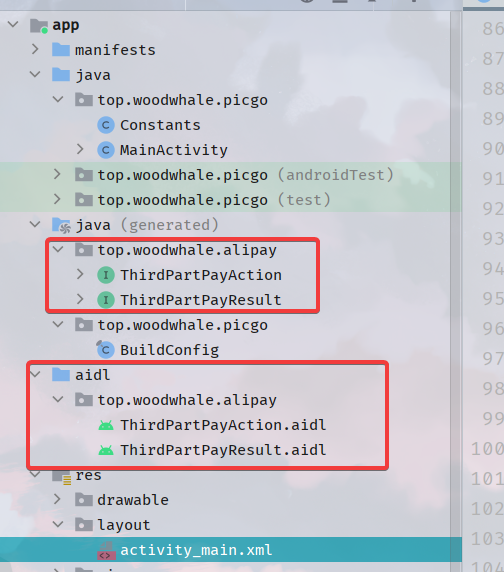
4.1 新建AIDL文件
想要创建AIDL文件很简单,右键文件夹,选择新建,选择AIDL就可以了
之后就会在文件夹中出现一个AIDL的文件夹
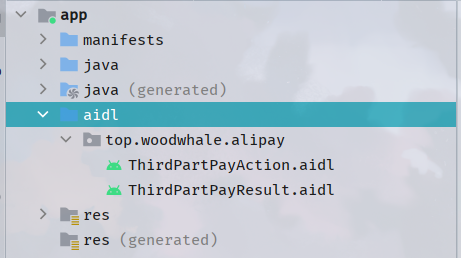
这里我们建立了两个aidl文件,分别用来进行支付服务和支付结果返回服务
首先是支付结果返回服务:
- 我们拥有两个方法,一个是支付成功,一个是支付失败
- 我们发现onPayFailed方法中,第两个参数都是in,这是啥玩意呢?其实是
定向TAG AIDL中的定向TAG表示了在跨进程通信中数据的流向,其中 in 表示数据只能由客户端流向服务端, out 表示数据只能由服务端流向客户端,而 inout 则表示数据可在服务端与客户端之间双向流通。- 其中,
数据流向是针对在客户端中的那个传入方法的对象而言的。in 为定向 tag 的话表现为服务端将会接收到客户端传来的对象的完整数据,但是客户端传入的那个对象不会因为服务端对传参的修改而发生变动;out 的话表现为服务端将会接收到那个对象的参数为空的对象,但是在服务端对接收到的空对象有任何修改之后客户端将会同步变动;inout 为定向 tag 的情况下,服务端将会接收到客户端传来对象的完整信息,并且客户端将会同步服务端对该对象的任何变动。
// ThirdPartPayResult.aidl
package top.woodwhale.alipay;

// Declare any non-default types here with import statements

interface ThirdPartPayResult {


    void onPaySuccess();
    void onPayFailed(in int errorCode, in String msg);
}
其次是支付服务:
- 需要注意,因为aidl文件不是java文件,所以
没有智能填充,我们需要手打 - 导包
improt也需要自己来完成! - 默认的数据流向是
in - 支付服务只需要一个requestPay方法,用来进行支付,传入一个支付信息、支付金额和一个支付的ThirdPartPayResult支付结果
// ThirdPartPayAction.aidl
package top.woodwhale.alipay;
import top.woodwhale.alipay.ThirdPartPayResult;

// Declare any non-default types here with import statements

interface ThirdPartPayAction {


    // 支付请求
    void requestPay(String orderInfo, float payMoney, ThirdPartPayResult callBack);
}
写完这两个aidl文件,我们知道:
- 我们需要完成的是:第三方需要支付的时候,会拉起一个支付宝的支付服务请求,支付宝这个app会自己调用自己写的支付方法
- 支付宝在调用完自己写的支付方法之后就会获得一个支付结果,让第三方app调用那边第三方写的支付成功onPaySuccess方法或者支付失败onPayFailed方法
结构示意图如下:

其中支付宝这个APP,不仅对第三方服务进行了绑定,还和自己的activity进行了绑定
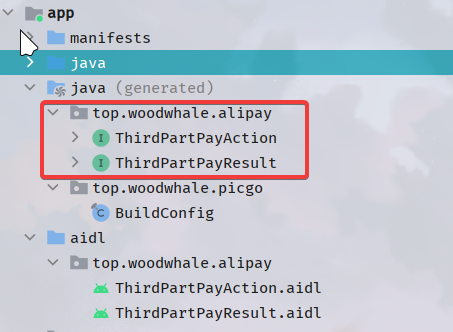
最后,在我们写完了这两个aidl接口之后,我们点击项目中的构建,就会惊奇的发现,项目帮我们自己写了两个类:
-
构建按钮
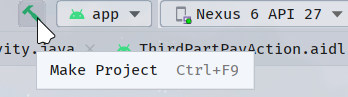
-
项目帮我们构建的类(其实就是将interface和impl的作用构建在了一个类中,方便我们调用)
4.2 支付宝APP的Service类
首先,在manifest中开启service
- 需要记住这个action
- 还需要记住当前这个支付宝APP的包名,这样第三方APP才可以使用Intent来调用这个服务
<service android:name=".PayService"
         android:exported="true">
    <intent-filter>
        <action android:name="top.woodwhale.alipay.THIRD_PART_PAY"/>
        <category android:name="android.intent.category.DEFAULT" />
    </intent-filter>
</service>
为了方便我们使用常量,就首先构建一个常量类Constants:
// 常量类
public class Constants {


    // action name
    public static final String THIRD_PART_PAY = "top.woodwhale.alipay.THIRD_PART_PAY";
    // Extra key
    public static final String KEY_BILL_INFO = "key_bill_info";
    // Extra key
    public static final String KEY_PAY_MONEY = "key_pay_money";
}
刚刚我们提到了,支付宝这个APP对两个服务进行了绑定,所以我们需要写两个类来分别完成不同的绑定对象返回:
-
首先是第三方过来调用的绑定类:(继承了刚刚构建出来的ThirdPartPayAction.Stub)
// 第三方接口实现 private class ThirdPartPayImpl extends ThirdPartPayAction.Stub { private ThirdPartPayResult mCallBack; @Override public void requestPay(String orderInfo, float payMoney, ThirdPartPayResult callBack) throws RemoteException { this.mCallBack = callBack; // 第三方应用发起请求,打开一个支付界面 Intent intent = new Intent(PayService.this,PayActivity.class); // 将第三方的支付信息和支付金额传递过去 intent.putExtra(Constants.KEY_BILL_INFO,orderInfo); intent.putExtra(Constants.KEY_PAY_MONEY,payMoney); // 因为是第三方APP调用了这个方法,属于在activity上下文之外,这种情况调用startActivity需要FLAG_ACTIVITY_NEW_TASK属性 intent.setFlags(Intent.FLAG_ACTIVITY_NEW_TASK); startActivity(intent); } // 支付成功,回调第三方那边的onPaySuccess方法 public void paySuccess() { try { mCallBack.onPaySuccess(); } catch (RemoteException e) { e.printStackTrace(); } } // 支付失败,回调第三方那边的onPayFailed方法 public void payFailed(int errorCode, String msg) { try { mCallBack.onPayFailed(errorCode, msg); } catch (RemoteException e) { e.printStackTrace(); } } } -
其次是,支付宝对自己支付行为的绑定类
private ThirdPartPayAction thirdPartPayAction;

// 自己这个APP的绑定的一个服务类
public class PayAction extends Binder {


    public void pay(float payMoney)  {


        Log.d(TAG,"pay money is --> " + payMoney);
        // 支付方法
        if (thirdPartPay != null) {


            thirdPartPay.paySuccess();
        }
    }

    public void onUserCancel(){


        // 用户点击退出
        if (thirdPartPay != null) {


            thirdPartPay.payFailed(1,"user cancel pay...");
        }
    }
}
我们可以发现,两个类处理的是两个不同的服务。
然后我们需要对服务进行绑定:(调用onBind方法)
private ThirdPartPayAction thirdPartPayAction;

@Nullable
@Override
public IBinder onBind(Intent intent) {


    String action = intent.getAction();
    Log.d(TAG,"onBind --> action -->" + action);
    if (action != null && action.equals(Constants.THIRD_PART_PAY)) {


        // 这个是第三方要求进行支付
        thirdPartPay = new ThirdPartPayImpl();
        return thirdPartPay;
    }
    // 不是第三方就是调用PayAction
    return new PayAction();
}
实现了如上功能,这个Service差不多就实现了
完整的代码:
package top.woodwhale.alipay;

import ...;

public class PayService extends Service {


    private static final String TAG = "PayService";
    private ThirdPartPayImpl thirdPartPay;

    // 第三方接口实现
    private class ThirdPartPayImpl extends ThirdPartPayAction.Stub {


        private ThirdPartPayResult mCallBack;
        @Override
        public void requestPay(String orderInfo, float payMoney, ThirdPartPayResult callBack) throws RemoteException {


            this.mCallBack = callBack;
            // 第三方应用发起请求,打开一个支付界面
            Intent intent = new Intent(PayService.this,PayActivity.class);
            // 将第三方的支付信息和支付金额传递过去
            intent.putExtra(Constants.KEY_BILL_INFO,orderInfo);
            intent.putExtra(Constants.KEY_PAY_MONEY,payMoney);
            // 因为是第三方APP调用了这个方法,属于在activity上下文之外,这种情况调用startActivity需要FLAG_ACTIVITY_NEW_TASK属性
            intent.setFlags(Intent.FLAG_ACTIVITY_NEW_TASK);
            startActivity(intent);
        }

        // 支付成功,回调第三方那边的onPaySuccess方法
        public void paySuccess()  {


            try {


                mCallBack.onPaySuccess();
            } catch (RemoteException e) {


                e.printStackTrace();
            }
        }

        // 支付失败,回调第三方那边的onPayFailed方法
        public void payFailed(int errorCode, String msg)  {


            try {


                mCallBack.onPayFailed(errorCode, msg);
            } catch (RemoteException e) {


                e.printStackTrace();
            }
        }
    }

    // 自己这个APP的绑定的一个服务类
    public class PayAction extends Binder {


        public void pay(float payMoney)  {


            Log.d(TAG,"pay money is --> " + payMoney);
            // 支付方法
            if (thirdPartPay != null) {


                thirdPartPay.paySuccess();
            }
        }

        public void onUserCancel(){


            // 用户点击退出
            if (thirdPartPay != null) {


                thirdPartPay.payFailed(1,"user cancel pay...");
            }
        }
    }

    @Nullable
    @Override
    public IBinder onBind(Intent intent) {


        String action = intent.getAction();
        Log.d(TAG,"onBind --> action -->" + action);
        if (action != null && action.equals(Constants.THIRD_PART_PAY)) {


            // 这个是第三方要求进行支付
            thirdPartPay = new ThirdPartPayImpl();
            return thirdPartPay;
        }
        // 不是第三方就是调用PayAction
        return new PayAction();
    }
}
4.3 支付宝APP前端页面编写
简单的一个布局,其中的文字会在方法中进行修改:
<?xml version="1.0" encoding="utf-8"?>
<LinearLayout xmlns:android="http://schemas.android.com/apk/res/android"
    android:layout_width="match_parent"
    android:orientation="vertical"
    android:padding="10dp"
    android:layout_height="match_parent">
    <TextView
        android:id="@+id/tv_order_info"
        android:text="快餐:新疆拌粉"
        android:layout_width="match_parent"
        android:layout_height="wrap_content"
        android:textSize="20sp"
        />
    <TextView
        android:text="金额:18元"
        android:textSize="20sp"
        android:id="@+id/tv_pay_money"
        android:layout_width="match_parent"
        android:layout_height="wrap_content"
        android:layout_marginTop="10dp"
        />
    <EditText
        android:hint="请输入支付密码"
        android:inputType="numberPassword"
        android:layout_width="match_parent"
        android:layout_height="wrap_content"
        android:id="@+id/et_pay_password_input"/>
    <Button
        android:id="@+id/bt_commit"
        android:layout_width="match_parent"
        android:layout_height="wrap_content"
        android:text="确认支付"/>

</LinearLayout>
页面效果如下:
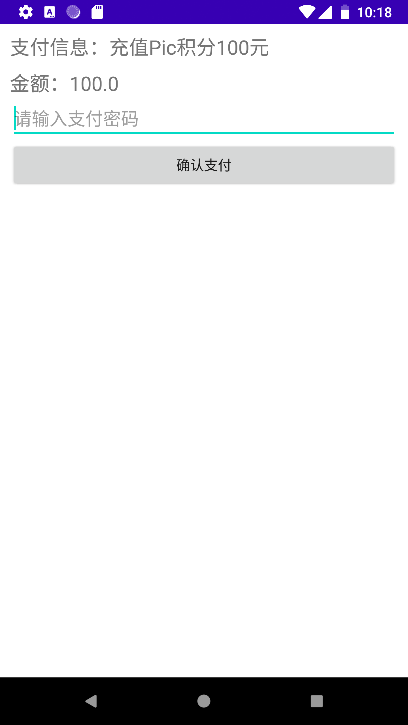
4.4 支付宝APP的Activity类
在支付宝的activity中,我们需要完成支付宝自己对自己的服务绑定,会返回一个PayAction对象
具体看代码:
- 首先创建成员变量serviceConnection,使用onServiceConnected回调方法将返回的payAction对象提取成一个成员变量
- 再对这个activity进行绑定服务
- 在这个activity被销毁的时候,一定要解绑服务
- initView方法就是对第三方调用进行支付信息和支付金额处理,然后判断密码进行支付处理
public class PayActivity extends Activity {


    private static final String TAG = "PayActivity";
    private boolean isBound;
    private PayService.PayAction payAction;

    private ServiceConnection serviceConnection = new ServiceConnection() {


        @Override
        public void onServiceConnected(ComponentName name, IBinder service) {


            // 绑定成功就获取成员变量
            payAction = (PayService.PayAction) service;
        }

        @Override
        public void onServiceDisconnected(ComponentName name) {


            payAction = null;
        }
    };

    /**
     * activity创建
     * @param savedInstanceState 保存的数据
     */
    @Override
    protected void onCreate(@Nullable Bundle savedInstanceState) {


        super.onCreate(savedInstanceState);
        setContentView(R.layout.activity_pay);
        // activity也要和服务进行通讯,告诉服务支付结果,所以我们也要绑定服务
        doBindService();
        // 将第三方的信息传递过来显示
        initView();
    }

    /**
     * 取消
     */
    @Override
    public void onBackPressed() {


        super.onBackPressed();
        // 如果按下了返回,那么就是取消支付了
        if (payAction != null) {


            payAction.onUserCancel();
        }
    }

    /**
     * 初始化界面
     */
    private void initView() {


        Intent intent = getIntent();
        // 第三方的支付信息
        String orderInfo = intent.getStringExtra(Constants.KEY_BILL_INFO);
        // 第三方的支付金额
        float payMoney = intent.getFloatExtra(Constants.KEY_PAY_MONEY, 0);
        TextView tvOrderInfo = findViewById(R.id.tv_order_info);
        tvOrderInfo.setText("支付信息:"+orderInfo);
        TextView tvPayMoney = findViewById(R.id.tv_pay_money);
        tvPayMoney.setText("金额:"+payMoney);
        EditText etPassword = findViewById(R.id.et_pay_password_input);
        Button btCommit = findViewById(R.id.bt_commit);
        // 绑定监听器
        btCommit.setOnClickListener(new View.OnClickListener() {


            @Override
            public void onClick(View v) {


                // 点击提交
                String pwd = etPassword.getText().toString().trim();
                // 如果密码正确就支付,否则提示错误
                if (payAction != null && pwd.equals("114514")) {


                    payAction.pay(payMoney);
                    Toast.makeText(PayActivity.this, "支付成功!", Toast.LENGTH_SHORT).show();
                    // 支付成功就把当前的支付页面给关闭
                    finish();
                    Log.d(TAG,"pay finished...");
                } else {


                    Toast.makeText(PayActivity.this, "密码错误!", Toast.LENGTH_SHORT).show();
                }
            }
        });
    }

    /**
     * 绑定服务
     */
    private void doBindService() {


        Intent intent = new Intent(this,PayService.class);
        isBound = bindService(intent, serviceConnection, BIND_AUTO_CREATE);
    }

    /**
     * 销毁activity时需要清除绑定连接
     */
    @Override
    protected void onDestroy() {


        super.onDestroy();
        // 在销毁的时候,解除绑定,并且将conn置空,isBound为false
        if (serviceConnection != null && isBound) {


            unbindService(serviceConnection);
            serviceConnection = null;
            isBound = false;
        }
    }
}
至此,对于支付宝这个APP的编写就算完成了,完成了处理第三方APP的实现,完成了对自己支付服务的实现
接下来,我们会写一个类似于淘宝支付的APP,来调用我们写的这个支付宝APP的服务,看看它是如何完成支付请求和返回支付结果的。
4.5 淘宝APP的前端编写
我们在Android studio中新建一个项目(APP),先对前端进行编写
<?xml version="1.0" encoding="utf-8"?>
<LinearLayout xmlns:android="http://schemas.android.com/apk/res/android"
    xmlns:app="http://schemas.android.com/apk/res-auto"
    xmlns:tools="http://schemas.android.com/tools"
    android:layout_width="match_parent"
    android:orientation="vertical"
    android:layout_height="match_parent"
    android:padding="10dp"
    tools:context=".MainActivity">

    <TextView
        android:layout_width="match_parent"
        android:layout_height="wrap_content"
        android:gravity="center"
        android:text="Pic积分"
        android:textSize="40sp" />

    <TextView
        android:layout_width="match_parent"
        android:layout_height="wrap_content"
        android:gravity="center"
        android:text="0"
        android:textSize="30sp"
        android:textColor="#ff0000"
        android:layout_marginTop="20dp"
        android:id="@+id/tv_integral"/>

    <Button
        android:layout_width="match_parent"
        android:layout_height="wrap_content"
        android:text="点击充值100积分"
        android:layout_marginTop="20dp"
        android:id="@+id/bt_recharge"/>


</LinearLayout>
效果如下:
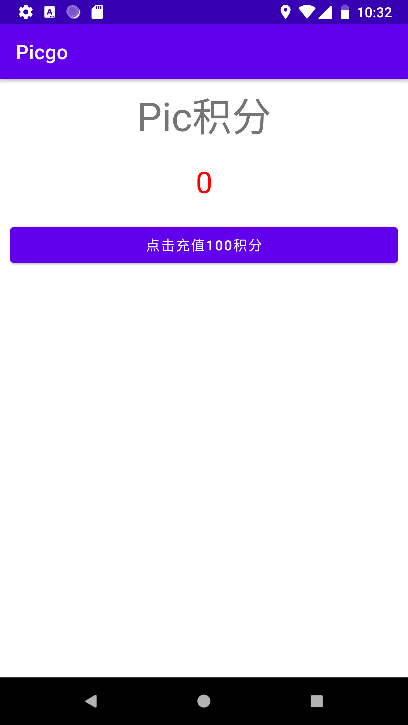
我们的构想是,点击这个支付按钮,就会跳转到我们的支付宝APP进行支付。
4.6 淘宝APP的Activity类
因为我需要调用支付宝APP的服务,需要用到支付宝的AIDL,所以我们将支付宝的AIDL复制到淘宝中,并点击构建
构建完成之后,我们就可以使用支付宝的接口了
首先还是编写一个常量类Constants:
public class Constants {


    // action name
    public static final String THIRD_PART_PAY = "top.woodwhale.alipay.THIRD_PART_PAY";
    // 支付宝 packagename
    public static final String PACKAGE = "top.woodwhale.alipay";
}
然后就是对activity进行编写:
- 我们梳理一下逻辑,我们需要绑定支付宝的服务,需要创建隐式Intent对象绑定支付宝,之后使用bindService方法绑定服务
- 创建一个成员变量conn是ServiceConnection类的对象,重写其中的onServiceConnected回调方法,使用ThirdPartPayAction.Stub.asInterface(service)方法转换service对象,我们就可以得到支付宝给我们的thirdPartPayAction对象
- thirdPartPayAction对象可以调用requestPay()方法进行支付请求
- 我们在requestPay()方法中传入Res类对象是继承ThirdPartPayResult.Stub ,实现了接口中的onPaySuccess()方法和onPayFailed()方法
- 在这两个结果回调方法中,我们进行不同的处理,比如成功了就将界面的UI更新一下,失败了输出一个Log
public class MainActivity extends AppCompatActivity {


    private static final String TAG = "MainActivity";
    private TextView integral;
    private Button recharge;
    private boolean isBound;
    private ThirdPartPayAction thirdPartPayAction;

    private ServiceConnection conn = new ServiceConnection() {


        @Override
        public void onServiceConnected(ComponentName name, IBinder service) {


            Log.d(TAG,"onServiceConnected...");
            thirdPartPayAction = ThirdPartPayAction.Stub.asInterface(service);
        }

        @Override
        public void onServiceDisconnected(ComponentName name) {


            Log.d(TAG,"onServiceDisconnected...");
            conn = null;
        }
    };

    private class Res extends ThirdPartPayResult.Stub {


        @Override
        public void onPaySuccess() {


            // 支付成功回调,修改UI界面
            // 但是需要注意:service的调度的是服务子线程,我们一般更新UI界面和toast一个弹窗都是在主线程中进行的
            integral.setText("100");
            Log.d(TAG,"onPaySuccess...");
        }

        @Override
        public void onPayFailed(int errorCode, String msg)  {


            // 支付失败回调,提示错误
            Log.d(TAG,"onPayFailed... errCode --> " +errorCode + "msg --> " + msg);
        }

    }

    @Override
    protected void onCreate(Bundle savedInstanceState) {


        super.onCreate(savedInstanceState);
        setContentView(R.layout.activity_main);

        // 绑定支付服务,在开发中其实这部分是由集成SDK完成的
        bindAliPayService();

        // 找到组件并且设置监听
        initView();
    }

    private void bindAliPayService() {


        Intent intent = new Intent();
        intent.setAction(Constants.THIRD_PART_PAY);
        intent.addCategory(Intent.CATEGORY_DEFAULT);
        intent.setPackage(Constants.PACKAGE);
        isBound = bindService(intent, conn, BIND_AUTO_CREATE);
    }

    private void initView() {


        integral = findViewById(R.id.tv_integral);
        recharge = findViewById(R.id.bt_recharge);
        recharge.setOnClickListener(new View.OnClickListener() {


            @Override
            public void onClick(View v) {


                // 进行充值服务
                try {


                    if (thirdPartPayAction != null) {


                        thirdPartPayAction.requestPay("充值Pic积分100元",100, new Res());
                    }
                } catch (RemoteException e) {


                    e.printStackTrace();
                }
            }
        });
    }

    @Override
    protected void onDestroy() {


        super.onDestroy();
        if (isBound && conn != null) {


            Log.d(TAG,"unbindService...");
            unbindService(conn);
            conn = null;
            isBound = false;
        }
    }
}
至此,我们的淘宝APP就完成了。
4.7 效果预览
后话
对于service来说,还有一个实际开发中用的多的intentService来实现,同样是继承了Service这个类,但是他是用来处理多线程的,其特点如下:
- 它本质是一种特殊的Service,继承自Service并且本身就是一个抽象类
- 它可以用于在后台执行耗时的异步任务,当任务完成后会自动停止
- 它拥有较高的优先级,不易被系统杀死(继承自Service的缘故),因此比较适合执行一些高优先级的异步任务
- 它内部通过HandlerThread和Handler实现异步操作
- 创建IntentService时,只需实现onHandleIntent和构造方法,onHandleIntent为异步方法,可以执行耗时操作
相关的内容可以去自行搜索学习,这里就当拓展内容不写啦