引言
主要探索alloc底层实现原理
准备
- 底层探索的三个方法:
- 方法一:下符号断点,会找到断点所在的源码库名,然后苹果官网下载源码深入研究
- 方法二:在断点出按住control +step into 走到断点出 下符号断点找出源码库名
- 方式三:Xcode设置汇编查看流程
- 源码
alloc&&init探索
本文基于objc4-818源码
alloc- 开辟申请内存
- 伴随初始化isa
init- 工厂设计 交由子类自定义重写
init&new- new内部是calloc init
- 建议用init,因为new固定调用init
alloc流程
源码探究
-
main函数中的LGPerson类的alloc方法进入alloc方法的源码实现
+ (id)alloc {
    return _objc_rootAlloc(self);
}
-
- 跳转至
_objc_rootAlloc的源码实现
- 跳转至
id
_objc_rootAlloc(Class cls)
{
    return callAlloc(cls, false/*checkNil*/, true/*allocWithZone*/);
}
-
- 跳转至
callAlloc的源码实现
- 跳转至
static ALWAYS_INLINE id
callAlloc(Class cls, bool checkNil, bool allocWithZone=false)// alloc 源码 第三步
{
#if __OBJC2__ //有可用的编译器优化
    /*
     参考链接:https://www.jianshu.com/p/536824702ab6
     */

    // checkNil 为false,!cls 也为false ,所以slowpath 为 false,假值判断不会走到if里面,即不会返回nil
    if (slowpath(checkNil && !cls)) return nil;

    //判断一个类是否有自定义的 +allocWithZone 实现,没有则走到if里面的实现
    if (fastpath(!cls->ISA()->hasCustomAWZ())) {
        return _objc_rootAllocWithZone(cls, nil);
    }
#endif

    // No shortcuts available. // 没有可用的编译器优化
    if (allocWithZone) {
        return ((id(*)(id, SEL, struct _NSZone *))objc_msgSend)(cls, @selector(allocWithZone:), nil);
    }
    return ((id(*)(id, SEL))objc_msgSend)(cls, @selector(alloc));
}
-
- 跳转至
_objc_rootAllocWithZone的源码实现
- 跳转至
id
_objc_rootAllocWithZone(Class cls, malloc_zone_t *zone __unused)// alloc 源码 第四步
{
    // allocWithZone under __OBJC2__ ignores the zone parameter
    //zone 参数不再使用 类创建实例内存空间
    return _class_createInstanceFromZone(cls, 0, nil,
                                         OBJECT_CONSTRUCT_CALL_BADALLOC);
}
-
- 跳转至
_class_createInstanceFromZone的源码实现,这部分是alloc源码的核心操作.
- 跳转至
static ALWAYS_INLINE id
_class_createInstanceFromZone(Class cls, size_t extraBytes, void *zone,
                              int construct_flags = OBJECT_CONSTRUCT_NONE,
                              bool cxxConstruct = true,
                              size_t *outAllocatedSize = nil)// alloc 源码 第五步
{
    ASSERT(cls->isRealized()); //检查是否已经实现

    // Read class's info bits all at once for performance
    //一次性读取类的位信息以提高性能
    bool hasCxxCtor = cxxConstruct && cls->hasCxxCtor();
    bool hasCxxDtor = cls->hasCxxDtor();
    bool fast = cls->canAllocNonpointer();
    size_t size;

    //1.计算需要开辟的内存大小,传入的extraBytes 为 0
    size = cls->instanceSize(extraBytes);
    if (outAllocatedSize) *outAllocatedSize = size;

    id obj;
    if (zone) {
        obj = (id)malloc_zone_calloc((malloc_zone_t *)zone, 1, size);
    } else {
        //2.申请内存
        obj = (id)calloc(1, size);
    }
    if (slowpath(!obj)) {
        if (construct_flags & OBJECT_CONSTRUCT_CALL_BADALLOC) {
            return _objc_callBadAllocHandler(cls);
        }
        return nil;
    }

    if (!zone && fast) {
        //3.将 cls类 与 obj指针(即isa) 关联
        obj->initInstanceIsa(cls, hasCxxDtor);
    } else {
        // Use raw pointer isa on the assumption that they might be
        // doing something weird with the zone or RR.
        obj->initIsa(cls);
    }

    if (fastpath(!hasCxxCtor)) {
        return obj;
    }

    construct_flags |= OBJECT_CONSTRUCT_FREE_ONFAILURE;
    return object_cxxConstructFromClass(obj, cls, construct_flags);
}
核心代码
-
- cls->instanceSize:先计算出需要的内存空间大小
-
- calloc:向系统申请开辟内存,返回地址指针
-
- obj->initInstanceIsa:类与isa关联
cls->instanceSize 计算所需内存大小
-
instanceSize的源码
size_t instanceSize(size_t extraBytes) const {
    //编译器快速计算内存大小
    if (fastpath(cache.hasFastInstanceSize(extraBytes))) {
        return cache.fastInstanceSize(extraBytes);
    }

    // 计算类中所有属性的大小 + 额外的字节数0
    size_t size = alignedInstanceSize() + extraBytes;
    // CF requires all objects be at least 16 bytes.
    //如果size 小于 16,最小取16
    if (size < 16) size = 16;
    return size;
}
-
- 断点调试,会执行到
cache.fastInstanceSize方法,快速计算内存大小.
- 断点调试,会执行到
size_t fastInstanceSize(size_t extra) const
{
    ASSERT(hasFastInstanceSize(extra));

    //Gcc的内建函数 __builtin_constant_p 用于判断一个值是否为编译时常数,如果参数EXP 的值是常数,函数返回 1,否则返回 0
    if (__builtin_constant_p(extra) && extra == 0) {
        return _flags & FAST_CACHE_ALLOC_MASK16;
    } else {
        size_t size = _flags & FAST_CACHE_ALLOC_MASK;
        // remove the FAST_CACHE_ALLOC_DELTA16 that was added
        // by setFastInstanceSize
        //删除由setFastInstanceSize添加的FAST_CACHE_ALLOC_DELTA16 8个字节
        return align16(size + extra - FAST_CACHE_ALLOC_DELTA16);
    }
}
-
- 跳转至
align16的源码实现,这个方法是16字节对齐算法
- 跳转至
//16字节对齐算法
static inline size_t align16(size_t x) {
    return (x + size_t(15)) & ~size_t(15);
}
calloc 向系统申请开辟内存
通过instanceSize计算的内存大小,向内存中申请 大小 为 size的内存,并赋值给obj,因此 obj是指向内存地址的指针.
obj = (id)calloc(1, size);
obj->initInstanceIsa 类与isa关联
经过calloc可知,内存已经申请好了,类也已经传入进来了,接下来就需要将 类与 地址指针 即isa指针进行关联,其关联的流程图如下所示: 主要过程就是初始化一个isa指针,并将isa指针指向申请的内存地址,在将指针与cls类进行 关联.
init
init是一个构造方法 ,是通过工厂设计(工厂方法模式),主要是用于给用户提供统一的构造方法入口.
类方法init
+ (id)init {
    return (id)self;
}
- 这里能使用id强转的原因,主要还是因为
内存字节对齐后,可以使用类型强转为你所需的类型。
实例方法 init
LGPerson *objc = [[LGPerson alloc] init];
实例init方法源码实现:
- (id)init {
    return _objc_rootInit(self);
}

id
_objc_rootInit(id obj)
{
    // In practice, it will be hard to rely on this function.
    // Many classes do not properly chain -init calls.
    return obj;
}
从源码所得:
- 类方法
init和实例init方法 返回的都是传入的self本身。
id 类型是iOS中一种特殊的动态数据类型.
typedef struct objc_object { Class isa; } *id;- 可以指向任何一个继承了NSObject的对象,可以理解为万能指针。
- 编译器看到id以后,认为是动态数据类型,不在检查类型。
new
+ (id)new {
    return [callAlloc(self, false/*checkNil*/) init];
}
new其实就等价于[alloc init]- 一般开发中不建议使用
new,主要是因为有时会重写init方法做一些自定义的操作,例如initWithXXX,会在这个方法中调用[super init],用new初始化可能会无法走到自定义的initWithXXX部分。
其他
1. 自定义NSObject子类MTPerson为什么会走2次alloc
llvm-project(2.32G) 链接: pan.baidu.com/s/14nATzJ5i… 密码: 3lcq 将llvm用VSCode打开
自定义NSObject子类MTPerson的alloc方法会 先走objc_alloc,然后走alloc。
原因简单总结如下: 第一次是NSObject的alloc,需要去查找sel,以及对应的imp的关系,当前需要查找的是alloc的方法编号。然后才是自定义的子类MTPerson。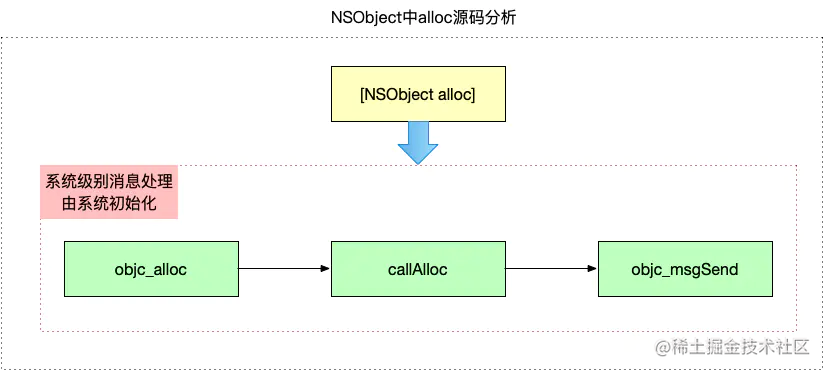
详细解析参考iOS-底层原理 04:NSObject的alloc 源码分析
CodeGen::RValue CGObjCRuntime::GeneratePossiblySpecializedMessageSend(
    CodeGenFunction &CGF,
    ReturnValueSlot Return,
    QualType ResultType,
    Selector Sel,
    llvm::Value *Receiver,
    const CallArgList &Args,
    const ObjCInterfaceDecl *OID,
    const ObjCMethodDecl *Method,
    bool isClassMessage) {

    //先调用tryGenerateSpecializedMessageSend判断是否符合条件 这里面调用了objc_alloc
    if (Optional<llvm::Value *> SpecializedResult =
        tryGenerateSpecializedMessageSend(CGF, ResultType, Receiver, Args,
Sel, Method, isClassMessage)) {
    return RValue::get(SpecializedResult.getValue());
}
    //不满足条件 然后走 alloc
    return GenerateMessageSend(CGF, Return, ResultType, Sel, Receiver, Args, OID,Method);
}

static Optional<llvm::Value *>
tryGenerateSpecializedMessageSend(CodeGenFunction &CGF,
                                    QualType ResultType,
                                    llvm::Value *Receiver,
                                    const CallArgList& Args, Selector Sel,
                                    const ObjCMethodDecl *method,
                                    bool isClassMessage) {
    //...
    switch (Sel.getMethodFamily()) {
    case OMF_alloc:
        if (isClassMessage && Runtime.shouldUseRuntimeFunctionsForAlloc() && ResultType->isObjCObjectPointerType()) {
        // [Foo alloc] -> objc_alloc(Foo) or
        // [self alloc] -> objc_alloc(self)
        if (Sel.isUnarySelector() && Sel.getNameForSlot(0) == "alloc")
            //先调用 objc_alloc
            return CGF.EmitObjCAlloc(Receiver, CGF.ConvertType(ResultType));
    //...

/// Allocate the given objc object.
/// call i8* \@objc_alloc(i8* %value)
llvm::Value *CodeGenFunction::EmitObjCAlloc(llvm::Value *value,
    llvm::Type *resultType) {

    return emitObjCValueOperation(*this,
                                  value,
                                  resultType,
                                  CGM.getObjCEntrypoints().objc_alloc,
                                  "objc_alloc");
}
2. 源码调试不走main里的断点
Build Phases-->Compile Source中,将main文件移至第一位:Build Setting--> 将Enable Hardened Runtime置为NO:
tips
- lldb控制台打印
- bt //打印堆栈
- register read xx //打印寄存器xx
- x aObjc //打印aObjc内存地址 或p/x 以十六进制打印
- 等价于memory read aObjc
- x/4gx aObjc //打印aObjc内存地址 16进制小端模式打印4段
- 默认是int,float或double会做转换 可通过p/x (double)123.5反向验证 是0x405ee00000000000
- 也可以用下面代码正向验证
//将float转16进制
void float2HEX(float f){
    union uuf {float f;char s[4];} uf;
    uf.f = f;
    printf("0x");
    for (int i=3; i>=0; i--) {
        printf("%02x",0xff & uf.s[i]);
    }
    printf("\n");
}

//将double转16进制
void double2HEX(double d){
    union uud {double d;char s[8];} ud;
    ud.d = d;
    printf("0x");
    for (int i=7; i>=0; i--) {
        printf("%02x",0xff & ud.s[i]);
    }
    printf("\n");
 }
- 也可以用下面代码正向验证
- p/t 5 //把5用二进制方式打印出来
- p/c 5 //把5用字符串方式打印出来
- 自定义打印log
#ifdef DEBUG #define LGNSLog(format, ...) printf("%s\n", [[NSString stringWithFormat:format, ## **VA_ARGS**] UTF8String]); #else #define LGNSLog(format, ...); #endif - 编译器优化
- build setting 搜索 optimization level
- 编译器优化作用
- 编译时间
- 链接时间
- 运行时间
- 空闲时间
- debug & release