目录
前言
学完了第一章的内容,上一篇:React入门
下面是第二章的内容:React面向组件编程(上)
一、开发者工具的安装
在谷歌浏览器–>更多工具–>扩展程序–>Chrome网上应用店中安装扩展程序React Developer Tools
安装成功后:

React图标的三种样式及其含义:
- 不亮:当前网页不是用React写的

- 图标是红色,且上面有只小臭虫:开发者模式编写的网页,还未经过打包上线

- 正常的蓝色(比如美团):

并且右键–>检查元素,会发现选项卡里多了两个图标:

- Components: 可以观察当前网页是由哪些组件组成的,组件里又有什么属性
- Profiler: 记录当前网站的性能,比如渲染用了多久,哪一个组件加载最慢,慢的原因是什么
二、函数式组件
定义组件的两种方式:函数式组件和类式组件
// 1. 创建函数式组件
    function MyComponent(){


        console.log(this);  // 此处的this是undefined,因为babel编译后开启了严格模式
        return <h2>我是用函数定义的组件(适用于【简单组件】的定义)</h2>
    }
// 2. 渲染组件到页面
    ReactDOM.render(<MyComponent/>,document.getElementById('test'));
执行了ReactDOM.render(<MyComponent/>...之后,发生了什么?
- React解析组件标签,找到了MyComponent组件
- 发现组件是用函数定义的,随后调用该函数,将返回的虚拟DOM转为真实的DOM,随后呈现在页面中
三个注意点:
- 首字母必须大写
- 函数必须有返回值
- 不能直接写组件名字,要写组件标签
三、复习类相关知识
<script type="text/javascript">
        // 创建一个Person类
        class Person {


            // 构造器方法
            constructor(name,age){


                // 构造器中的this是谁?————类的实例对象
                this.name=name;
                this.age=age;
            }
            // 一般方法
            // 不明白此处为什么不能写function
            speak(){


                // speak方法放在了哪里?————类的原型对象上,供实例使用
                // 通过Person实例调用speak时,speak中的this就是Person实例
                console.log(`我叫${

      this.name},我的年龄是${

      this.age}`);
            }
        }

        // 创建一个Student类,继承于Person类
        class Student extends Person {


            constructor(name,age,grade){


                super(name,age);
                this.grade=grade;
                this.school='尚硅谷' // 不需要接
            }
            // 重写从父类继承过来的方法
            speak(){


                console.log(`我叫${

      this.name},我的年龄是${

      this.age},我读的是${

      this.grade}年级`);
            }
            study(){


                // study方法放在了哪里?————类的原型对象上,供实例使用
                // 通过Student实例调用study时,study中的this就是Student实例
                console.log('我今天也有学习');
            }
        }
    </script>
总结:
- 类中的构造器不是必须写的,要对实例进行一些初始化的操作,如添加指定属性时才写
- 如果B类继承了A类,且B类中写了构造器,那么B类构造器中的super是必须要调用的
- 类中所定义的方法,都是放在了类的原型对象上,供实例使用
四、类式组件
// 1. 创建类式组件
    class MyComponent extends React.Component {


        render(){


            // render方法放在了哪里?————MyComponent的原型对象上,供实例使用
            // render中的this是谁?————MyComponent的实例对象 <=> MyComponent组件实例对象
            console.log('render中的this:',this);
            return <h2>我是用类定义的组件(适用于【复杂组件】的定义)</h2>;
        }
    }

    // 2. 渲染组件到页面
    ReactDOM.render(<MyComponent/>,document.getElementById('test'));
执行了ReactDOM.render(<MyComponent/>...之后,发生了什么?
- React解析组件标签,找到了MyComponent组件
- 发现组件是用类定义的,随后new出来该类的实例,并通过该实例调用到原型上的render方法
- .将render返回的虚拟DOM转为真实的DOM,随后呈现在页面中
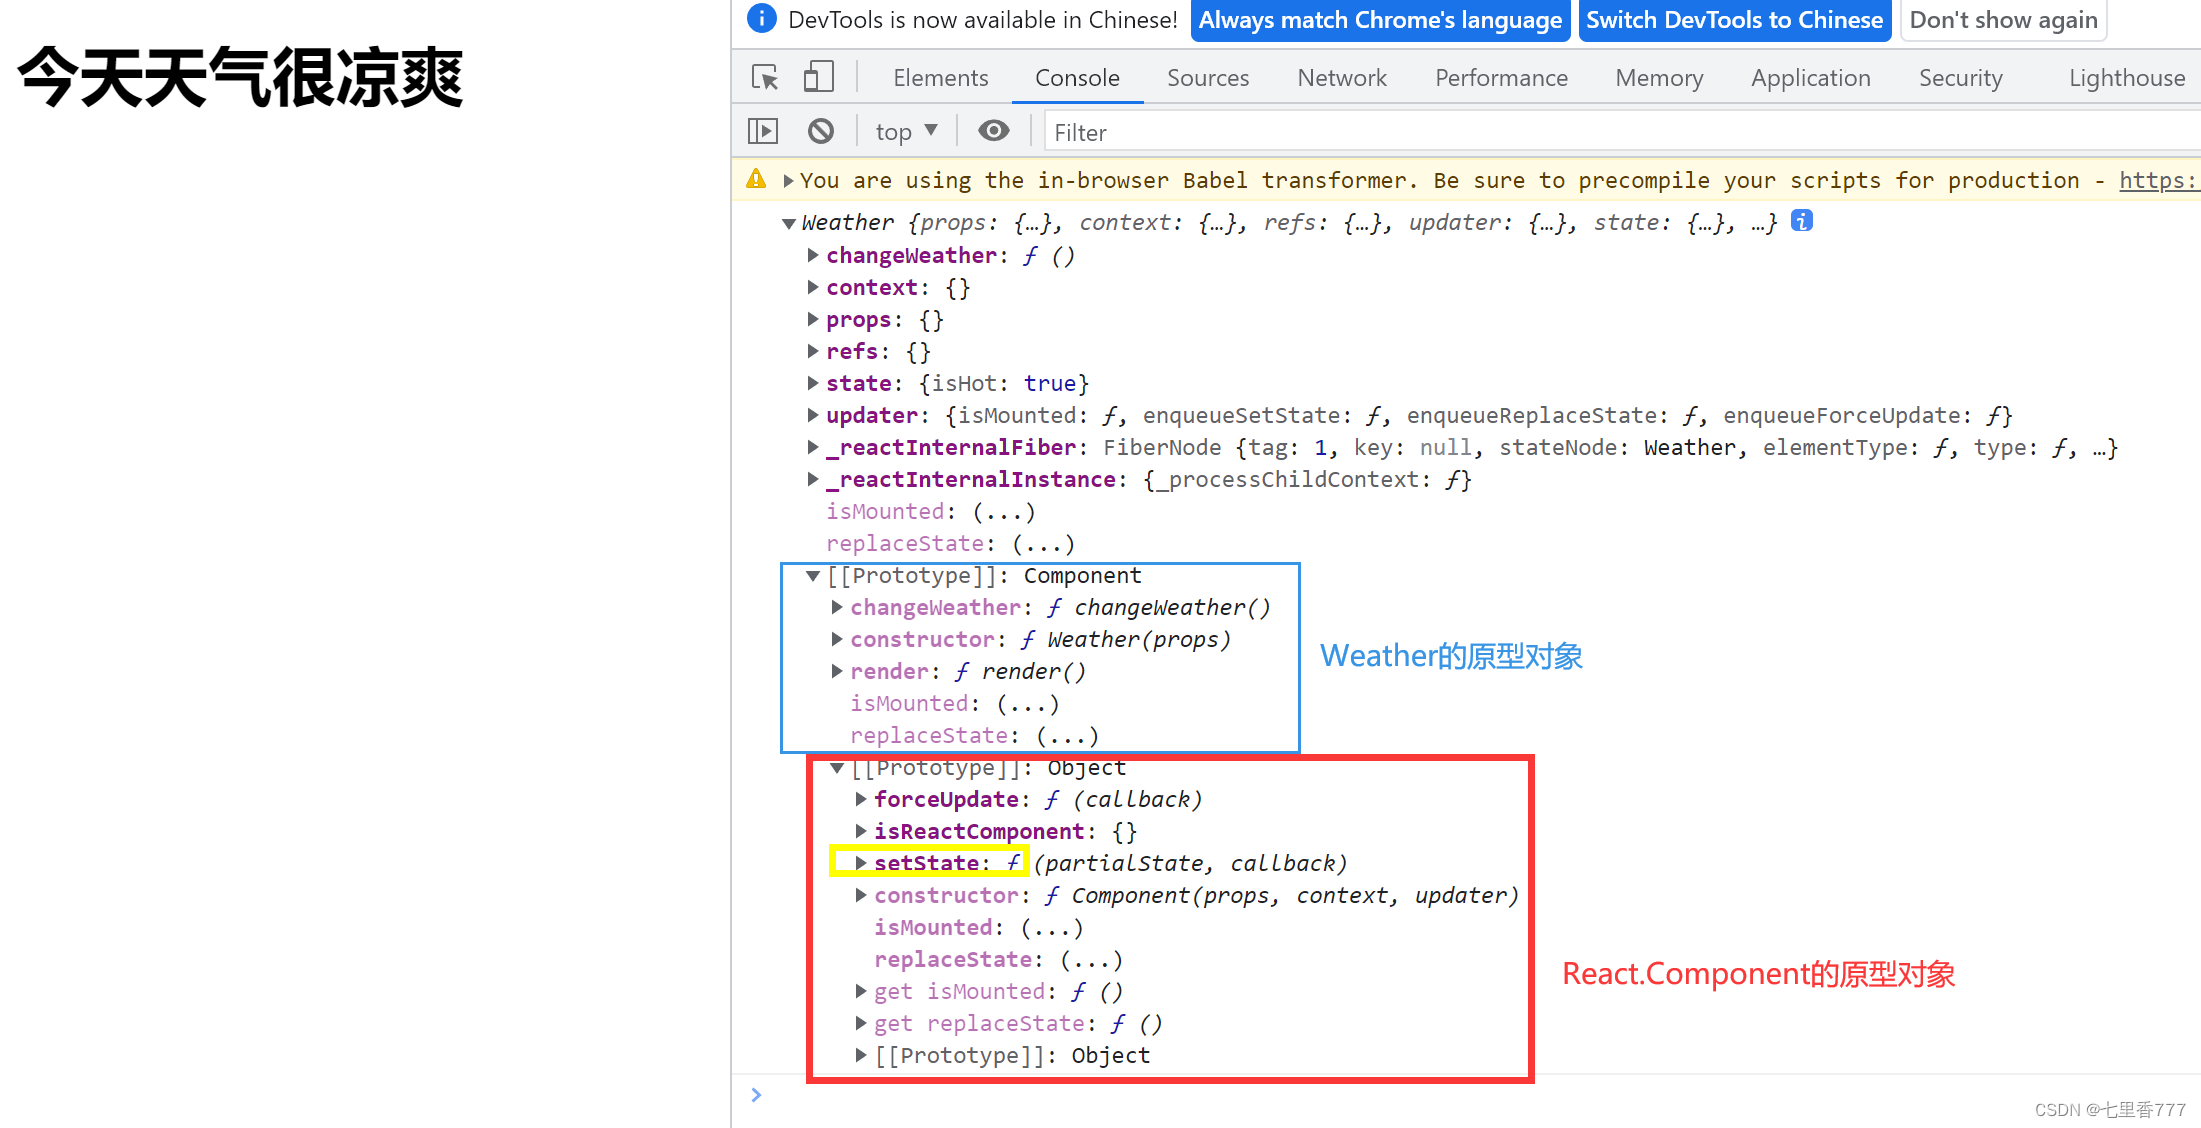
关于MyComponent组件的实例对象:

五、组件实例的三大核心属性1:state
默认显示“今天天气很凉爽”,点击文字切换炎热/凉爽

1、对state的理解
- 简单组件:无state
- 复杂组件:有状态,即state
2、初始化state
constructor(props){


    super(props)
    // 初始化状态
    this.state={

    isHot:true}
   }
3、react中的事件绑定
render(){


            // 读取状态
            const {

    isHot}=this.state  // 解构赋值
            // onClick={demo()} 会立即执行
            return <h1 onClick={

    demo}>今天天气很{

    this.isHot?'炎热':'凉爽'}</h1>;
        }
function demo(){


            console.log('标题被点击了');
        }
4、类中方法中的this
babel开启了严格模式
<script type="text/babel"></script>
类中的方法也默认开启了局部的严格模式
 // 1. 创建组件
    class Weather extends React.Component{


        constructor(props){


            super(props)
            // 初始化状态
            this.state={

    isHot:true}
        }
        render(){


            // 读取状态
            const {

    isHot}=this.state  // 解构赋值
            // onClick={demo()} 会立即执行
            return <h1 onClick={

    changeWeather}>今天天气很{

    this.isHot?'炎热':'凉爽'}</h1>;
        }
        changeWeather(){


            // changeWeather方法放在了哪里?————Weather的原型对象上,供实例使用
            // 由于changeWeather是作为onClick的回调,所以不是通过实例调用的,是直接调用
            // 类中的方法默认开启了局部的严格模式,所以changeWeather中的this为undefined
            console.log(this);

        }
    }

    // 2. 渲染虚拟DOM到页面
    ReactDOM.render(<Weather/>,document.getElementById('test'))
5、解决类中this指向问题
	constructor(props){


            super(props)
            // 初始化状态
            this.state={

    isHot:true}
            // 解决changeWeather中this指向问题
            this.changeWeather=this.changeWeather.bind(this);
        }
6、setState的使用

 class Weather extends React.Component{


        constructor(props){


            super(props)
            this.state={

    isHot:true,wind:'微风'}
            this.changeWeather=this.changeWeather.bind(this);
        }
        render(){


            const {

    isHot,wind}=this.state  // 解构赋值
            return <h1 onClick={

    this.changeWeather}>今天天气很{

    this.isHot?'炎热':'凉爽'},{

    wind}</h1>;
        }
        changeWeather(){


            const isHot=this.state.isHot;
            this.setState({

    isHot:!isHot})
        }
    }
- 构造器: 初始化状态、解决类中this指向问题
- render(): 读取状态、根据状态的值作展示
- changeWeather: 改变状态值
7、state的简写方式
	class Weather extends React.Component{


        // 初始化状态
        state={

    isHot:true,wind:'微风'}

        render(){


            const {

    isHot,wind}=this.state  // 解构赋值
            return <h1 onClick={

    this.changeWeather}>今天天气很{

    this.isHot?'炎热':'凉爽'},{

    wind}</h1>;
        }
        // 自定义方法————要用赋值语句的形式+箭头函数
        changeWeathe=()=>{


            const isHot=this.state.isHot;
            this.setState({

    isHot:!isHot})
        }
    }
8、总结state
- state是组件对象最重要的属性,其值是对象
- 组件被称为“状态机”,通过更新组件的state来更新对应的页面显示(重新渲染组件)
- 组件中render方法中的this为组件实例对象
- 组件自定义的方法中this为undefined,如何解决?
a) 在constructor中强制绑定this: 通过函数对象的bind()
b) 箭头函数 (要写成赋值语句)
六、组件实例的三大核心属性2:props
1、props的基本使用
从组件外部往里读数据,数据是动态传进来的。
// 1. 创建组件
    class Person extends React.Component {


        render(){


            const {

    name,gender,age}=this.props;
            return (
                <ul>
                    <li>姓名:{

    name}</li>
                    <li>性别:{

    gender}</li>
                    <li>年龄:{

    age}</li>
                </ul>
            )
        }
    }

    // 2. 渲染虚拟DOM到页面
    ReactDOM.render(<Person name="tom" age="19" gender="男"/>,document.getElementById('test1'));
    ReactDOM.render(<Person name="tony" age="29" gender="男"/>,document.getElementById('test2'));
    ReactDOM.render(<Person name="jerry" age="39" gender="女"/>,document.getElementById('test3'));
2、批量传递props
又名批量传递标签属性
const p={

    name:'jerry',age:39,gender:'女'};
console.log('@',...p)  // babel+react核心库 可以让 ... 展开对象,但不能随意使用,只能在标签体内使用
ReactDOM.render(<Person {

    ...p}/>,document.getElementById('test3'));
关于展开运算符(...):mdn–>JavaScript–>表达式和运算符–>展开语法(Spread syntax)–>构造字面量对象时使用展开语法
3、对props进行限制
需求: 自定义用来显示一个人员信息的组件
限制:
- 姓名必须指定,且为字符串类型;
- 性别为字符串类型,如果性别没有指定,默认为男
- 年龄为字符串类型,且为数字类型,默认值为18
// 对标签属性进行类型、必要性的限制
    Person.propTypes={


        //  name:React.PropTypes.string   15.xxx版本  16版本之后已弃用
        name:PropTypes.string.isRequired,  // 限制name必传,且为字符串
        gender:PropTypes.string,   // 限制gender为字符串
        age:PropTypes.number,  // 限制age为数值
        speak:PropTypes.func,  // 限制speak为函数
    }
    // 指定标签属性默认值
    Person.defaultProps={


        gender:'女',  // gender默认值为女
        age:18   // age默认值为18
    }
4、props的简写方式
把对标签属性的限制以及指定默认值放进类里面:给类自身加东西,前面加上static
class Person extends React.Component {


        // 对标签属性进行类型、必要性的限制
        static propTypes={


        //  name:React.PropTypes.string   15.xxx版本  16版本之后已弃用
        name:PropTypes.string.isRequired,  // 限制name必传,且为字符串
        gender:PropTypes.string,   // 限制gender为字符串
        age:PropTypes.number,  // 限制age为数值
        speak:PropTypes.func,  // 限制speak为函数
        }

        // 指定标签属性默认值
        static defaultProps={


        gender:'女',  // gender默认值为女
        age:18   // age默认值为18
        }
        render(){


            const {

    name,gender,age}=this.props;

            // props是只读的
            // this.props.name='jack'  此行代码会报错,因为props是只读的
            // {age+1}  此处不是修改,是运算
            return (
                <ul>
                    <li>姓名:{

    name}</li>
                    <li>性别:{

    gender}</li>
                    <li>年龄:{

    age+1}</li>
                </ul>
            )
        }
    }
5、类式组件中的构造器与props
React官方文档–>搜索constructor–>
搜索结果–>

总之,构造器能不写就不写
6、函数式组件使用props
函数式组件没有实例,所以不能this.props,但函数有个特点,可以接收参数,所以把props作为参数传进去即可
// 函数特点:可以传递/接收参数,所以可以用props
    function Person(props){

       // 此处props是个对象
        const{

    name,age,gender}=props;
        return (
                <ul>
                    <li>姓名:{

    name}</li>
                    <li>性别:{

    gender}</li>
                    <li>年龄:{

    age+1}</li>
                </ul>
            )
    }
7、总结props
理解:
- 每个组件对象都会有props(properties的简写)属性
- 组件标签的所有属性都保存在props中
作用:
- 通过标签属性从组件外向组件内传递变化的数据
- 注意:组件内部不要修改props数据
七、组件实例的三大核心属性3:refs
组件内的标签可以定义ref属性来标识自己,相当与标签的id
1、字符串形式的ref(官方已不推荐使用)
需求: 自定义组件, 功能说明如下:
- 点击按钮, 提示第一个输入框中的值
- 当第2个输入框失去焦点时, 提示这个输入框中的值
class Demo extends React.Component {
// 展示左侧输入框的数据
showData=()=>{
// const input1=document.getElementById('input1'); 原始写法
// alert(input1.value);
const {
input1}=this.refs;
alert(input1.value);
}
// 展示右侧输入框的数据
showData2=()=>{
const {
input2}=this.refs;
alert(input2.value);
}
render(){
return (
// <input id='input1' type="text" placeholder="点击按钮提示数据"/> 原始写法
<div>
<input ref="input1" type="text" placeholder="点击按钮提示数据"/>
<button onClick={
this.showData}>点我提示左边数据</button>
<input ref="input2" onBlur={
this.showData2} type="text" placeholder="失去焦点提示数据"/>
</div>
)
}
}
2、回调形式的ref
官方不推荐使用字符串形式的ref:
React官方文档–> –>
–> –>
–> –>存在一些问题 效率不高
回调函数满足:①是你定义的函数 ②你没调用 ③函数最终执行了
ref={c=>this.input1=c} 是回调函数形式
class Demo extends React.Component {
// 展示左侧输入框的数据
showData=()=>{
const {
input1}=this; // 从实例自身就能取到
alert(input1.value);
}
// 展示右侧输入框的数据
showData2=()=>{
const {
input2}=this;
alert(input2.value);
}
render(){
return (
<div>
<input ref={
c=>this.input1=c} type="text" placeholder="点击按钮提示数据"/>
<button onClick={
this.showData}>点我提示左边数据</button>
<input ref={
c=>this.input2=c} onBlur={
this.showData2} type="text" placeholder="失去焦点提示数据"/>
</div>
)
}
}
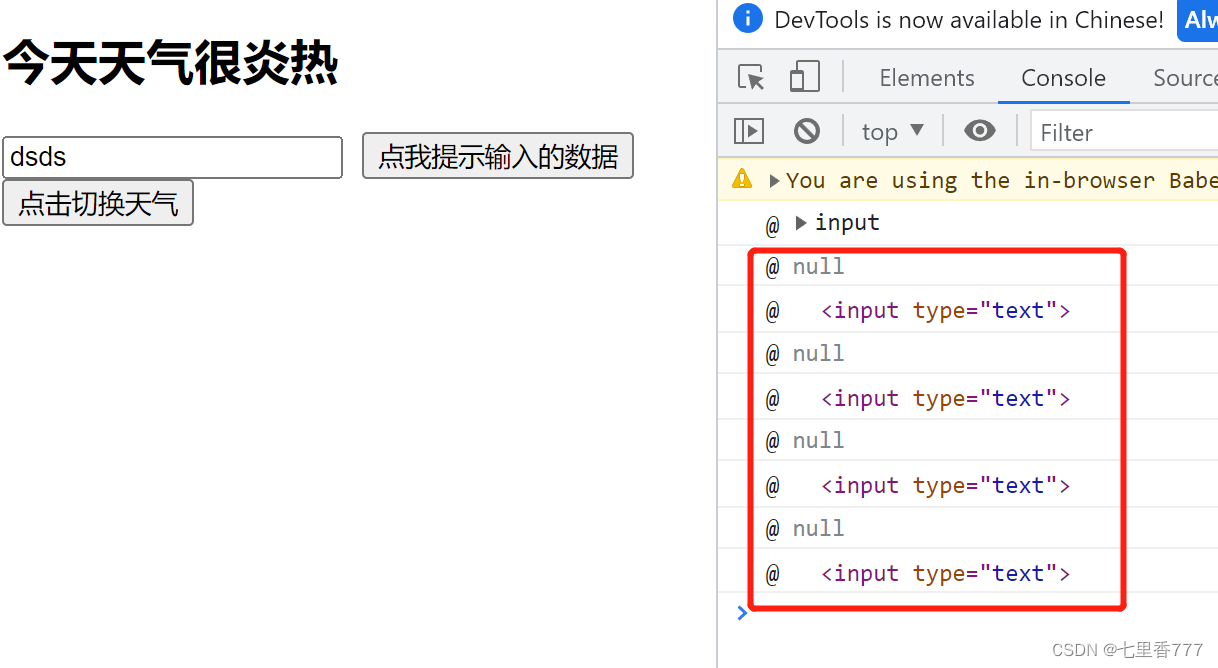
3、回调ref中调用次数的问题
 –>官方文档

放在实例身上:
<input ref={

    this.saveInput} type="text"/><br/><br/>
saveInput=(c)=>{


            this.input1=c;
            console.log('@',c);
        }
4、createRef的使用
注意:
- React.createRef本身是个函数,调用后可以返回一个容器,该容器可以存储被ref所标识的节点
- 该容器是“专人专用的”,一个容器只能放一个节点,否则后面的会把前面的顶掉
- 是官方推荐的写法
class Demo extends React.Component {
myRef=React.createRef() // 把myRef放在实例自身上了
myRef2=React.createRef()
// 展示左侧输入框的数据
showData=()=>{
alert(this.myRef.current.value);
}
// 展示右侧输入框的数据
showData2=()=>{
alert(this.myRef2.current.value);
}
render(){
return (
<div>
<input ref={
this.myRef} type="text" placeholder="点击按钮提示数据"/>
<button onClick={
this.showData}>点我提示左边数据</button>
<input ref={
this.myRef2} onBlur={
this.showData2} type="text" placeholder="点击按钮提示数据"/>
</div>
)
}
}
5、总结ref
- 字符串形式
- 回调函数形式
- createRef
八、React中的事件处理
(1). 通过onXxx属性指定事件处理函数(注意大小写)
a. React使用的是自定义事件(合成事件), 而不是使用的原生DOM事件 ———— 为了更好的兼容性
b. React中的事件是通过事件委托方式处理的(委托给组件最外层的元素) ———— 为了更高效 (事件委托的原理:事件冒泡)
(2)通过event.target得到发生事件的DOM元素对象 ———— 官网上说勿过度使用Ref(当发生事件的元素正好是要操作的元素时可以省略ref )
// 失去焦点的是input框,获取的是input框的值
<input onBlur={

    this.showData2} type="text" placeholder="点击按钮提示数据"/>
showData2=(event)=>{


            alert(event.target.value);
        }
写在后面
下面是第三章的内容:React面向组件编程(下)