Nginx
文章目录
1.Nginx 的简介
Nginx 是高性能的 HTTP 和反向代理的服务器,处理高并发能力是十分强大的,能经受高负载的考验,有报告表明能支持高达 50000 个并发连接数。
- 正向代理
- 反向代理
- 动静分离
2.Nginx 相关概念(正向和反向代理)
正向代理:需要在客户端配置代理服务器进行指定网站访问

反向代理,其实客户端对代理是无感知的,因为客户端不需要任何配置就可以访问,我们只需要将请求发送到反向代理服务器,由反向代理服务器去选择目标服务器获取数据后,在返回给客户端,此时反向代理服务器和目标服务器对外就是一个服务器,暴露的是代理服务器地址,隐藏了真实服务器 IP 地址。

3.Nginx 相关概念(负载均衡和动静分离)
3.1.负载均衡
客户端发送多个请求到服务器,服务器处理请求,有一些可能要与数据库进行交互,服务器处理完毕后,再将结果返回给客户端。
这种架构模式对于早期的系统相对单一,并发请求相对较少的情况下是比较适合的,成本也低。但是随着信息数量的不断增长,访问量和数据量的飞速增长,以及系统业务的复杂度增加,这种架构会造成服务器相应客户端的请求日益缓慢,并发量特别大的时候,还容易造成服务器直接崩溃。很明显这是由于服务器性能的瓶颈造成的问题,那么如何解决这种情况呢?
我们首先想到的可能是升级服务器的配置,比如提高 CPU 执行频率,加大内存等提高机器的物理性能来解决此问题,但是我们知道摩尔定律的日益失效,硬件的性能提升已经不能满足日益提升的需求了。最明显的一个例子,天猫双十一当天,某个热销商品的瞬时访问量是极其庞大的,那么类似上面的系统架构,将机器都增加到现有的顶级物理配置,都是不能够满足需求的。那么怎么办呢?
上面的分析我们去掉了增加服务器物理配置来解决问题的办法,也就是说纵向解决问题的办法行不通了,那么横向增加服务器的数量呢?这时候集群的概念产生了,单个服务器解决不了,我们增加服务器的数量,然后将请求分发到各个服务器上,将原先请求集中到单个服务器上的情况改为将请求分发到多个服务器上,将负载分发到不同的服务器,也就是我们所说的负载均衡

3.2.动静分离
为了加快网站的解析速度,可以把动态页面和静态页面由不同的服务器来解析,加快解析速度。降低原来单个服务器的压力。
4.Nginx 在 Linux 系统安装
4.1.准备工作
(1)打开Xshell,使用Xshell远程连接工具连接Linux操作系统
(2)到nginx官网下载
http://nginx.org/en/download.html
4.2.开始进行nginx安装x
(1)安装 pcre 依赖
第一步 联网下载 pcre 压缩文件依赖
https://netix.dl.sourceforge.net/project/pcre/pcre/8.40/pcre-8.40.tar.gz

第二步 解压压缩文件
使用命令
tar –zxvf pcre-8.40.tar.gz
第三步进入pcre-8.40文件夹执行./configure 完成后,并在该目录下目录下执行 make,最后执行 make install(或
make && make install)
查看pcre版本号:pcre-config --version
(2)安装 openssl 、zlib 、 gcc 依赖
yum -y install make zlib zlib-devel gcc-c++ libtool openssl openssl-devel
(3)安装 nginx
使用命令解压
[root@ecs-218164 src]# ls
debug  kernels  pcre-8.40  pcre-8.40.tar.gz
[root@ecs-218164 src]# ls
debug  kernels  nginx-1.18.0.tar.gz  pcre-8.40  pcre-8.40.tar.gz
[root@ecs-218164 src]# tar -zxvf nginx-1.18.0.tar.gz
执行./configure
[root@ecs-218164 nginx-1.18.0]# ls
auto  CHANGES  CHANGES.ru  conf  configure  contrib  html  LICENSE  man  README  src
[root@ecs-218164 nginx-1.18.0]# ./configure
执行make && make install
[root@ecs-218164 nginx-1.18.0]# make && make install
安装成功之后,在usr多出来一个文件夹 local/nginx,在nginx中有sbin有启动脚本
进入目录/usr/local/nginx/sbin/nginx启动服务
./nginx[root@ecs-218164 sbin]# ./nginx
查看进程
[root@ecs-218164 sbin]# ps -ef | grep nginx
root     30170     1  0 16:35 ?        00:00:00 nginx: master process ./nginx
nobody   30171 30170  0 16:35 ?        00:00:00 nginx: worker process
root     30218 22627  0 16:40 pts/0    00:00:00 grep --color=auto nginx
如果修改了nginx配置,需要重启nginx:
cd /usr/local/nginx/sbin
./nginx -s reload
![[外链图片转存失败,源站可能有防盗链机制,建议将图片保存下来直接上传(img-JMA0ODIU-1657689270034)(https://www.superbed.cn/item/62cbe492f54cd3f937bdf100)]](https://img-blog.csdnimg.cn/0958dcc9555649e08f9715f305104795.png)
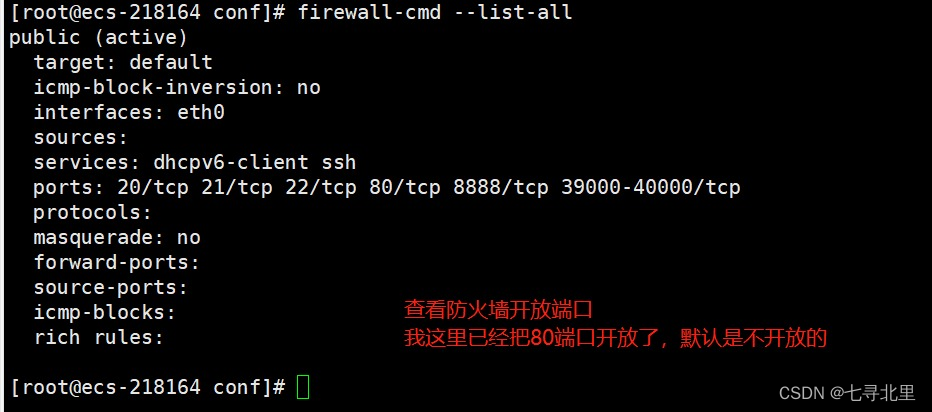
4.3.关闭防火墙 开放 80 端口
在windows 系统中访问 linux 中 nginx,默认不能访问的,因为防火墙问题
(1)关闭防火墙
(2)开放访问的端口号,80 端口
查看开放的端口号
firewall-cmd --list-all
设置开放的端口号:firewall-cmd --add-service=端口号/tcp –permanent
firewall-cmd --add-port=80/tcp --permanent
重启防火墙
firewall-cmd –reload
5.Nginx的常用的命令
1.使用nginx操作命令前提条件:必须进入到nginx的目录
[root@ecs-218164 conf]# cd /usr/local/nginx/sbin/
[root@ecs-218164 sbin]#
2.查看nginx版本号
[root@ecs-218164 sbin]# ./nginx -v
nginx version: nginx/1.18.0
3.启动nginx
[root@ecs-218164 sbin]# ./nginx
[root@ecs-218164 sbin]# ps -ef | grep nginx
root     30388     1  0 17:05 ?        00:00:00 nginx: master process ./nginx
nobody   30389 30388  0 17:05 ?        00:00:00 nginx: worker process
root     30391 22627  0 17:05 pts/0    00:00:00 grep --color=auto nginx
4.关闭nginx
[root@ecs-218164 sbin]# ps -ef | grep nginx
root     30170     1  0 16:35 ?        00:00:00 nginx: master process ./nginx
nobody   30277 30170  0 16:46 ?        00:00:00 nginx: worker process
root     30378 22627  0 17:02 pts/0    00:00:00 grep --color=auto nginx
[root@ecs-218164 sbin]# ./nginx -s stop
[root@ecs-218164 sbin]# ps -ef | grep nginx
root     30386 22627  0 17:04 pts/0    00:00:00 grep --color=auto nginx

这时再访问 ip:80 显示无法访问此网站
5.重新加载nginx
如果修改了nginx的配置文件,必须要重新加载nginx
[root@ecs-218164 sbin]# ./nginx -s reload
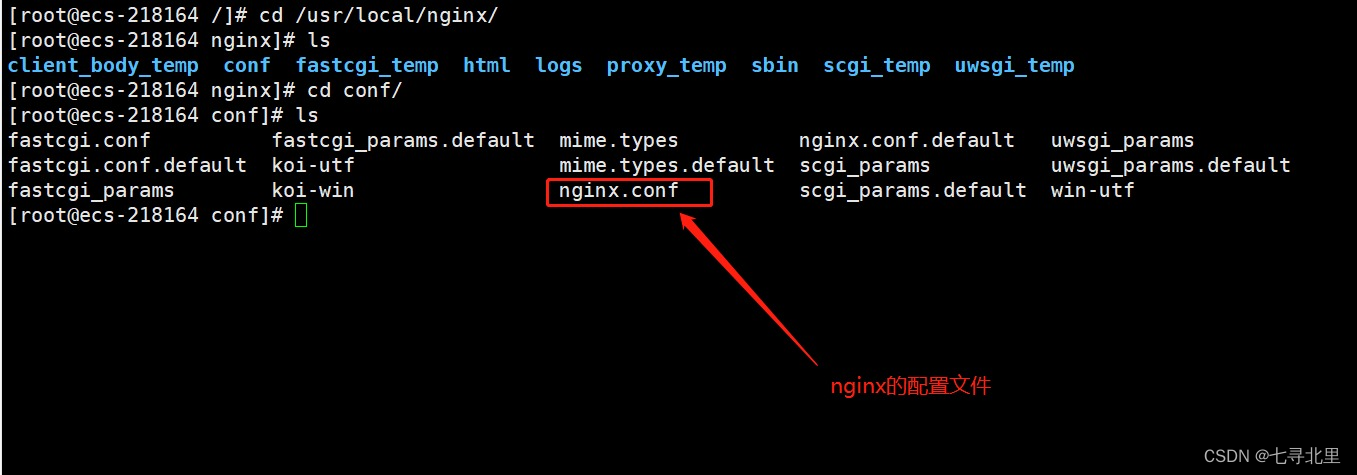
6.Nginx的配置文件
6.1.nginx配置文件的位置
[root@ecs-218164 /]# cd /usr/local/nginx/
[root@ecs-218164 nginx]# ls
client_body_temp  conf  fastcgi_temp  html  logs  proxy_temp  sbin  scgi_temp  uwsgi_temp
[root@ecs-218164 nginx]# cd conf/
[root@ecs-218164 conf]# ls
fastcgi.conf          fastcgi_params.default  mime.types          nginx.conf.default   uwsgi_params
fastcgi.conf.default  koi-utf                 mime.types.default  scgi_params          uwsgi_params.default
fastcgi_params        koi-win                 nginx.conf          scgi_params.default  win-utf
[root@ecs-218164 conf]#
6.2.nginx配置文件的组成

第一部分:全局块
从配置文件开始到 events 块之间的内容,主要会设置一些影响 Nginx 服务器整体运行的配置指令,主要包括
- 配置运行 Nginx 服务器的用户(组)、
- 允许生成的 worker process 数,
- 进程 PID 存放路径、
- 日志存放路径和类型
- 配置文件的引入
- …
比如上面第一行配置的:
worker_processes 1;
这是 Nginx 服务器并发处理服务的关键配置,worker_processes 值越大,可以支持的并发处理量也越多,但是会受到硬件、软件等设备的制约。
第二部分:events 块
events {
    worker_connections  1024;
}
上述例子就表示每个 work process 支持的最大连接数为 1024.
events 块涉及的指令主要影响 Nginx 服务器与用户的网络连接,常用的设置包括是否开启对多 work process 下的网络连接进行序列化,是否允许同时接收多个网络连接,选取哪种事件驱动模型来处理连接请求,每个 work process 可以同时支持的最大连接数等。
这部分的配置对 Nginx 的性能影响较大,在实际中应该灵活配置。
第三部分:http 块
http {
    include       mime.types;
    default_type  application/octet-stream;

    sendfile        on;

    keepalive_timeout  65;

    server {
        listen       80;
        server_name  localhost;

        location / {
            root   html;
            index  index.html index.htm;
        }

        error_page   500 502 503 504  /50x.html;
        location = /50x.html {
            root   html;
        }

    }

}
这算是 Nginx 服务器配置中最频繁的部分,代理、缓存和日志定义等绝大多数功能和第三方模块的配置都在这里。需要注意的是: http 块也可以包括:
- http 全局块、
- server 块。
http 全局块
http 全局块配置的指令包括文件引入、 MIME-TYPE 定义、日志自定义、连接超时时间、单链接请求数上限等
server 块
这块和虚拟主机有密切关系,虚拟主机从用户角度看,和单一独立的硬件主机是完全一样的,该技术的产生是为了节省互联网服务器硬件成本。
每个 http 块可以包括多个 server 块,而每个 server 块就相当于一个虚拟主机。
而每个 server 块也分为:
- 全局 server 块,
- 多个 locaton 块。
全局 server 块
最常见的配置是本虚拟机主机的监听配置和本虚拟主机的名称或 IP 配置。
location 块
一个 server 块可以配置多个 location 块。
这块的主要作用是基于 Nginx 服务器接收到的请求字符串(例如 server_name/uri-string),对虚拟主机名称(也可以是 IP 别名)之外的字符串(例如 前面的 /uri-string)进行匹配,对特定的请求进行处理。
地址定向、数据缓存和应答控制等功能,还有许多第三方模块的配置也在这里进行。
7.Nginx 配置实例-反向代理实例一
7.1.实现效果
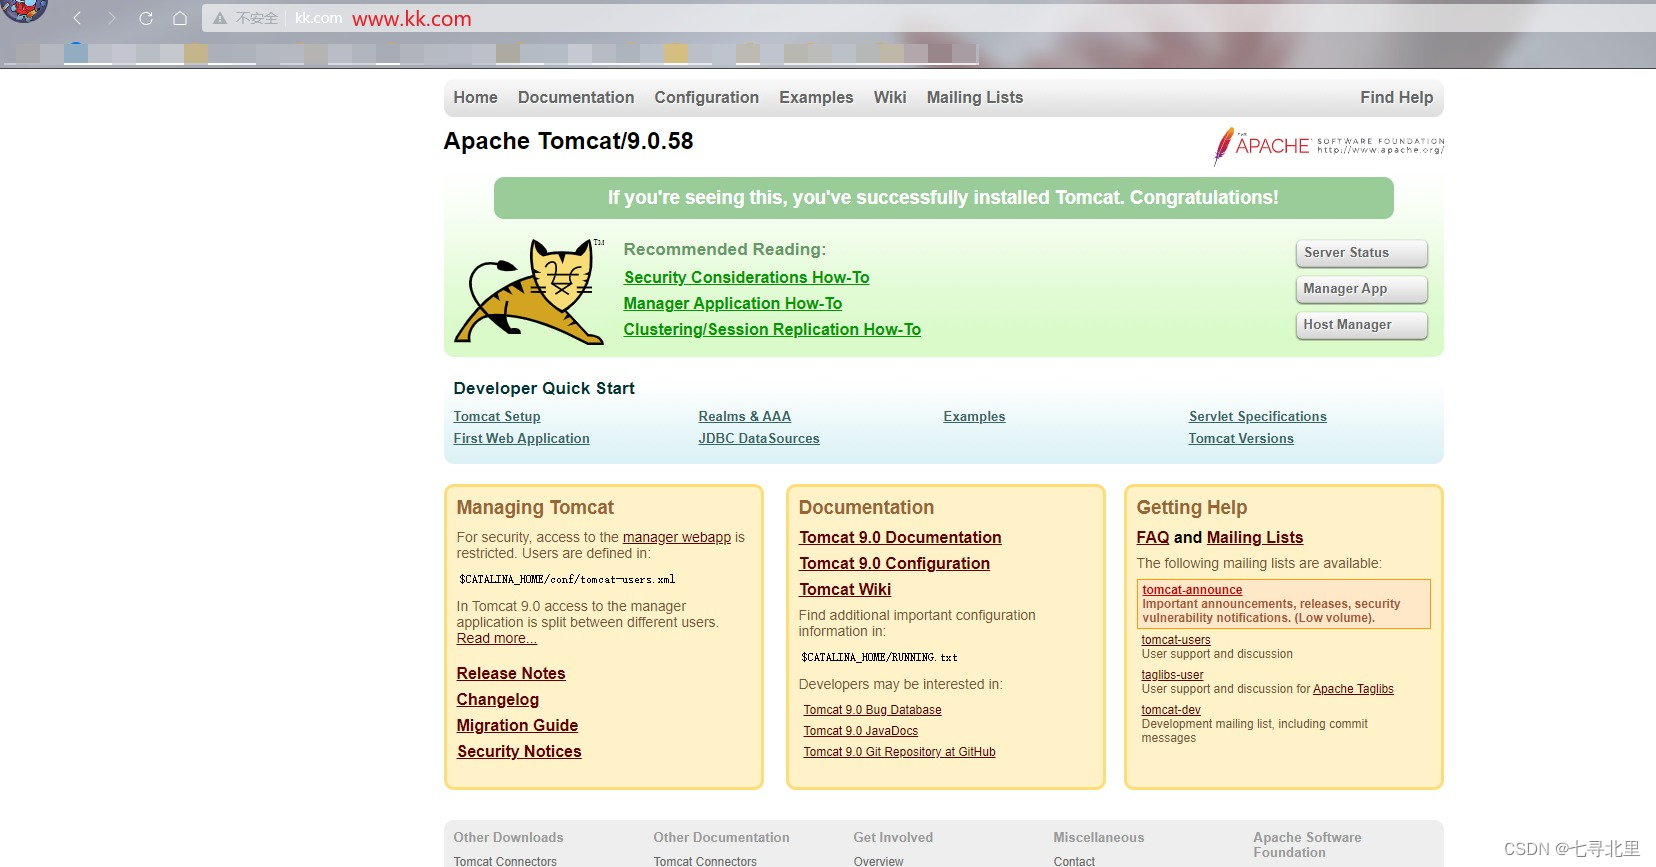
打开浏览器,在浏览器地址栏输入地址 www.kk.com,跳转到linux系统 tomcat 主页面中
7.2.准备工作
下载tomcat
https://archive.apache.org/dist/tomcat/tomcat-9/v9.0.58/bin/
apache-tomcat-9.0.58.tar.gz
讲tomcat9.x放入/usr/src目录
[root@ecs-218164 src]# ls
apache-tomcat-9.0.58.tar.gz  debug  kernels  nginx-1.18.0  nginx-1.18.0.tar.gz  pcre-8.40  pcre-8.40.tar.gz
解压
[root@ecs-218164 src]# tar -zvxf apache-tomcat-9.0.58.tar.gz
运行tomcat需要jdk环境
yum install -y java-1.8.0-openjdk.x86_64

[root@ecs-218164 src]# yum install -y java-1.8.0-openjdk.x86_64
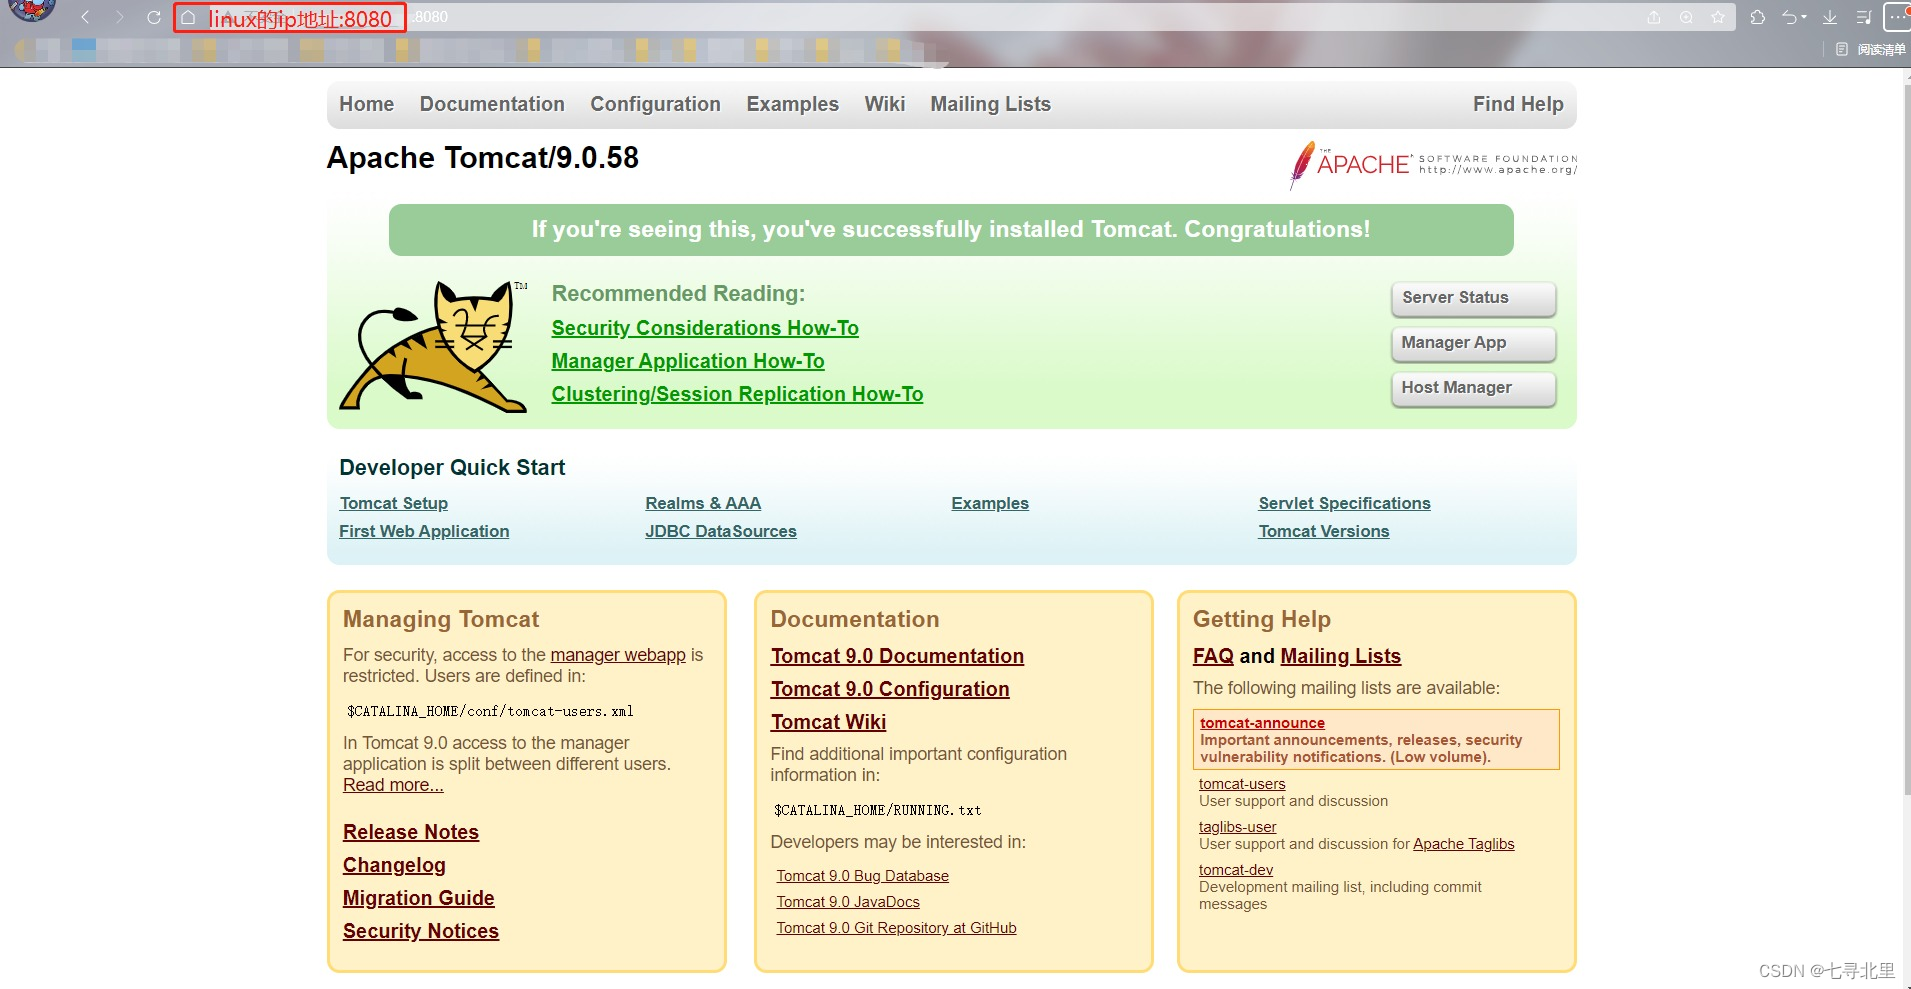
1.在linux中安装 tomcat,使用默认端口号
[root@ecs-218164 src]# cd apache-tomcat-9.0.58

[root@ecs-218164 apache-tomcat-9.0.58]# ls
bin  BUILDING.txt  conf  CONTRIBUTING.md  lib  LICENSE  logs  NOTICE  README.md  RELEASE-NOTES  RUNNING.txt  temp  webapps  work

[root@ecs-218164 apache-tomcat-9.0.58]# cd bin/

[root@ecs-218164 bin]# ls
bootstrap.jar       ciphers.sh                    daemon.sh     setclasspath.bat  startup.sh            version.bat
catalina.bat        commons-daemon.jar            digest.bat    setclasspath.sh   tomcat-juli.jar       version.sh
catalina.sh         commons-daemon-native.tar.gz  digest.sh     shutdown.bat      tomcat-native.tar.gz
catalina-tasks.xml  configtest.bat                makebase.bat  shutdown.sh       tool-wrapper.bat
ciphers.bat         configtest.sh                 makebase.sh   startup.bat       tool-wrapper.sh

[root@ecs-218164 bin]# ./startup.sh
Using CATALINA_BASE:   /usr/src/apache-tomcat-9.0.58
Using CATALINA_HOME:   /usr/src/apache-tomcat-9.0.58
Using CATALINA_TMPDIR: /usr/src/apache-tomcat-9.0.58/temp
Using JRE_HOME:        /usr
Using CLASSPATH:       /usr/src/apache-tomcat-9.0.58/bin/bootstrap.jar:/usr/src/apache-tomcat-9.0.58/bin/tomcat-juli.jar
Using CATALINA_OPTS:
Tomcat started.

[root@ecs-218164 bin]# ps -ef | grep tomcat
root     31532     1 15 20:06 pts/0    00:00:02 /usr/bin/java -Djava.util.logging.config.file=/usr/src/apache-tomcat-9.0.58/conf/logging.properties -Djava.util.logging.manager=org.apache.juli.ClassLoaderLogManager -Djdk.tls.ephemeralDHKeySize=2048 -Djava.protocol.handler.pkgs=org.apache.catalina.webresources -Dorg.apache.catalina.security.SecurityListener.UMASK=0027 -Dignore.endorsed.dirs= -classpath /usr/src/apache-tomcat-9.0.58/bin/bootstrap.jar:/usr/src/apache-tomcat-9.0.58/bin/tomcat-juli.jar -Dcatalina.base=/usr/src/apache-tomcat-9.0.58 -Dcatalina.home=/usr/src/apache-tomcat-9.0.58 -Djava.io.tmpdir=/usr/src/apache-tomcat-9.0.58/temp org.apache.catalina.startup.Bootstrap start
root     31562 31242  0 20:07 pts/0    00:00:00 grep --color=auto tomcat
查看日志
[root@ecs-218164 bin]# cd ../
[root@ecs-218164 apache-tomcat-9.0.58]# cd logs/
[root@ecs-218164 logs]# ls
catalina.2022-07-11.log  host-manager.2022-07-11.log  localhost_access_log.2022-07-11.txt
catalina.out             localhost.2022-07-11.log     manager.2022-07-11.log
[root@ecs-218164 logs]# tail -f catalina.out
11-Jul-2022 20:06:55.060 INFO [main] org.apache.catalina.startup.HostConfig.deployDirectory Deploying web application directory [/usr/src/apache-tomcat-9.0.58/webapps/ROOT]
11-Jul-2022 20:06:55.087 INFO [main] org.apache.catalina.startup.HostConfig.deployDirectory Deployment of web application directory [/usr/src/apache-tomcat-9.0.58/webapps/ROOT] has finished in [26] ms
11-Jul-2022 20:06:55.087 INFO [main] org.apache.catalina.startup.HostConfig.deployDirectory Deploying web application directory [/usr/src/apache-tomcat-9.0.58/webapps/host-manager]
11-Jul-2022 20:06:55.118 INFO [main] org.apache.catalina.startup.HostConfig.deployDirectory Deployment of web application directory [/usr/src/apache-tomcat-9.0.58/webapps/host-manager] has finished in [31] ms
11-Jul-2022 20:06:55.119 INFO [main] org.apache.catalina.startup.HostConfig.deployDirectory Deploying web application directory [/usr/src/apache-tomcat-9.0.58/webapps/docs]
11-Jul-2022 20:06:55.130 INFO [main] org.apache.catalina.startup.HostConfig.deployDirectory Deployment of web application directory [/usr/src/apache-tomcat-9.0.58/webapps/docs] has finished in [11] ms
11-Jul-2022 20:06:55.130 INFO [main] org.apache.catalina.startup.HostConfig.deployDirectory Deploying web application directory [/usr/src/apache-tomcat-9.0.58/webapps/manager]
11-Jul-2022 20:06:55.152 INFO [main] org.apache.catalina.startup.HostConfig.deployDirectory Deployment of web application directory [/usr/src/apache-tomcat-9.0.58/webapps/manager] has finished in [22] ms
11-Jul-2022 20:06:55.155 INFO [main] org.apache.coyote.AbstractProtocol.start Starting ProtocolHandler ["http-nio-8080"]
11-Jul-2022 20:06:55.166 INFO [main] org.apache.catalina.startup.Catalina.start Server startup in [674] milliseconds
2.对外开放访问的端口
firewall-cmd --add-port=8080/tcp --permanent

firewall-cmd --reload
查看已经开放的端口号
firewall-cmd --list-all
[root@ecs-218164 logs]# firewall-cmd --add-port=8080/tcp --permanent
success
[root@ecs-218164 logs]# firewall-cmd --reload
success
[root@ecs-218164 logs]# firewall-cmd --list-all
public (active)
  target: default
  icmp-block-inversion: no
  interfaces: eth0
  sources:
  services: dhcpv6-client ssh
  ports: 20/tcp 21/tcp 22/tcp 80/tcp 8888/tcp 39000-40000/tcp 8080/tcp
  protocols:
  masquerade: no
  forward-ports:
  source-ports:
  icmp-blocks:
  rich rules:

[root@ecs-218164 logs]#
3.在 windows 系统中通过浏览器访问 tomcat 服务器
7.3.访问过程分析
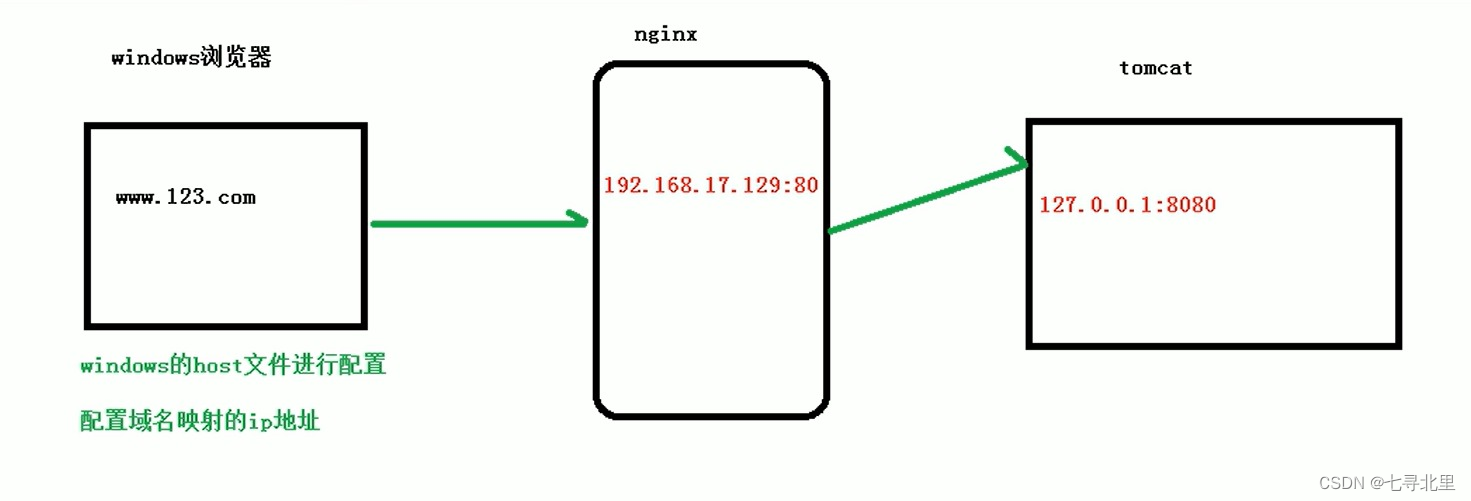
7.4.具体配置
第一步 在windows系统的host文件中进行域名和ip对应关系的配置
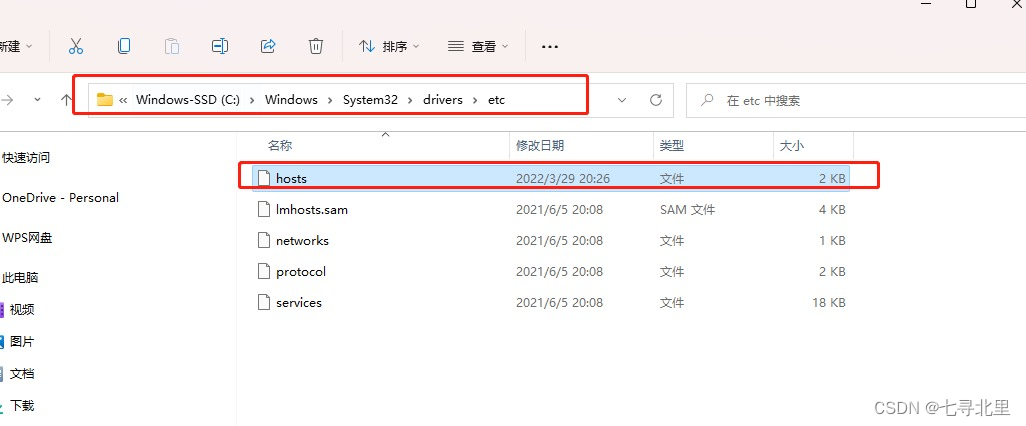
在hosts文件中添加以下内容(我这里使用www.kk.com)

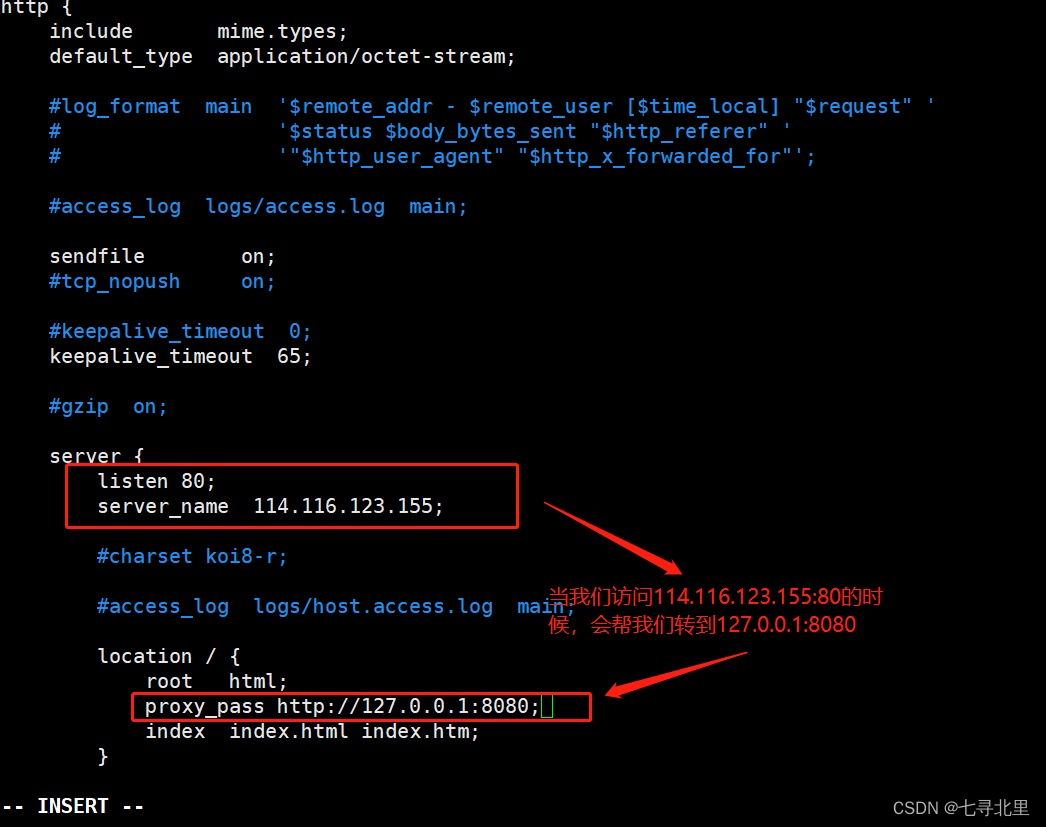
第二步 在nginx进行请求转发的配置(反向)
第三步 最终测试
总结:
当我们在浏览器访问www.kk.com的时候,先是在windows中查找是否有这个地址(如果没有采取cdn找)
但是我们这里有,所以当浏览器访问www.kk.com的时候会映射到114.116.123.155,也就是linux中访问nginx的地址,因为我们在nginx的配置文件中使用了proxy_pass http://127.0.0.1:8080,所以当访问114.116.123.155(114.116.123.155:80)的时候会映射到127.0.0.1:8080,这里的127.0.0.1代表本地ip地址,也就是114.116.123.155:8080
www.kk.com -> 114.116.123.155(114.116.123.155:80) -> 114.116.123.155:8080
8.Nginx 配置实例-反向代理实例二
8.1.实现效果
使用nginx反向代理,根据访问的路径跳转到不同端口的服务中
如:
nginx 监听端口为 9001,
访问 http://192.168.17.129:9001/edu/ 直接跳转到 127.0.0.1:8080
访问 http://192.168.17.129:9001/vod/ 直接跳转到 127.0.0.1:8081
8.2.准备工作
1.关闭之前开启的tomcat端口
[root@ecs-218164 tomcat8080]# ps -ef | grep tomcat
root     31532     1  0 20:06 pts/0    00:00:12 /usr/bin/java -Djava.util.logging.config.file=/usr/src/apache-tomcat-9.0.58/conf/logging.properties -Djava.util.logging.manager=org.apache.juli.ClassLoaderLogManager -Djdk.tls.ephemeralDHKeySize=2048 -Djava.protocol.handler.pkgs=org.apache.catalina.webresources -Dorg.apache.catalina.security.SecurityListener.UMASK=0027 -Dignore.endorsed.dirs= -classpath /usr/src/apache-tomcat-9.0.58/bin/bootstrap.jar:/usr/src/apache-tomcat-9.0.58/bin/tomcat-juli.jar -Dcatalina.base=/usr/src/apache-tomcat-9.0.58 -Dcatalina.home=/usr/src/apache-tomcat-9.0.58 -Djava.io.tmpdir=/usr/src/apache-tomcat-9.0.58/temp org.apache.catalina.startup.Bootstrap start
root     32211 31242  0 21:40 pts/0    00:00:00 grep --color=auto tomcat
[root@ecs-218164 tomcat8080]# kill -9  31532
[root@ecs-218164 tomcat8080]# ps -ef | grep tomcat
root     32218 31242  0 21:40 pts/0    00:00:00 grep --color=auto tomcat
2.在 /usr/src 目录下创建两个文件夹
[root@ecs-218164 src]# mkdir tomcat8080
[root@ecs-218164 src]# mkdir tomcat8081
[root@ecs-218164 src]# ls
apache-tomcat-9.0.58         debug    nginx-1.18.0         pcre-8.40         tomcat8080
apache-tomcat-9.0.58.tar.gz  kernels  nginx-1.18.0.tar.gz  pcre-8.40.tar.gz  tomcat8081
3.分别在两个文件夹中传入tomcat压缩包
[root@ecs-218164 src]# cd tomcat8080
[root@ecs-218164 tomcat8080]# ls
[root@ecs-218164 tomcat8080]# ls
apache-tomcat-9.0.58.tar.gz
[root@ecs-218164 tomcat8080]# cd ../
[root@ecs-218164 src]# cd tomcat8081
[root@ecs-218164 tomcat8081]# ls
apache-tomcat-9.0.58.tar.gz
4.分别在解压文件夹中传入tomcat压缩包
[root@ecs-218164 tomcat8080]# tar -zxvf apache-tomcat-9.0.58.tar.gz
[root@ecs-218164 tomcat8081]# tar -zxvf apache-tomcat-9.0.58.tar.gz

[root@ecs-218164 tomcat8081]# ls
apache-tomcat-9.0.58  apache-tomcat-9.0.58.tar.gz
[root@ecs-218164 tomcat8081]# cd ../
[root@ecs-218164 src]# cd tomcat8080
[root@ecs-218164 tomcat8080]# ls
apache-tomcat-9.0.58  apache-tomcat-9.0.58.tar.gz
5.启动端口为8080的tomcat
[root@ecs-218164 tomcat8080]# ls
apache-tomcat-9.0.58  apache-tomcat-9.0.58.tar.gz
[root@ecs-218164 tomcat8080]# cd apache-tomcat-9.0.58
[root@ecs-218164 apache-tomcat-9.0.58]# ls
bin  BUILDING.txt  conf  CONTRIBUTING.md  lib  LICENSE  logs  NOTICE  README.md  RELEASE-NOTES  RUNNING.txt  temp  webapps  work
[root@ecs-218164 apache-tomcat-9.0.58]# cd bin/
[root@ecs-218164 bin]# ls
bootstrap.jar       ciphers.sh                    daemon.sh     setclasspath.bat  startup.sh            version.bat
catalina.bat        commons-daemon.jar            digest.bat    setclasspath.sh   tomcat-juli.jar       version.sh
catalina.sh         commons-daemon-native.tar.gz  digest.sh     shutdown.bat      tomcat-native.tar.gz
catalina-tasks.xml  configtest.bat                makebase.bat  shutdown.sh       tool-wrapper.bat
ciphers.bat         configtest.sh                 makebase.sh   startup.bat       tool-wrapper.sh
[root@ecs-218164 bin]# ./startup.sh
Using CATALINA_BASE:   /usr/src/tomcat8080/apache-tomcat-9.0.58
Using CATALINA_HOME:   /usr/src/tomcat8080/apache-tomcat-9.0.58
Using CATALINA_TMPDIR: /usr/src/tomcat8080/apache-tomcat-9.0.58/temp
Using JRE_HOME:        /usr
Using CLASSPATH:       /usr/src/tomcat8080/apache-tomcat-9.0.58/bin/bootstrap.jar:/usr/src/tomcat8080/apache-tomcat-9.0.58/bin/tomcat-juli.jar
Using CATALINA_OPTS:
Tomcat started.
[root@ecs-218164 bin]#
6.进去tomcat8081文件夹,修改端口为8081
[root@ecs-218164 src]# cd tomcat8081
[root@ecs-218164 tomcat8081]# cd apache-tomcat-9.0.58
[root@ecs-218164 apache-tomcat-9.0.58]# ls
bin BUILDING.txt conf CONTRIBUTING.md lib LICENSE logs NOTICE README.md RELEASE-NOTES RUNNING.txt temp webapps work
[root@ecs-218164 apache-tomcat-9.0.58]# cd conf/
[root@ecs-218164 conf]# ls
catalina.policy context.xml jaspic-providers.xsd server.xml tomcat-users.xsd
catalina.properties jaspic-providers.xml logging.properties tomcat-users.xml web.xml
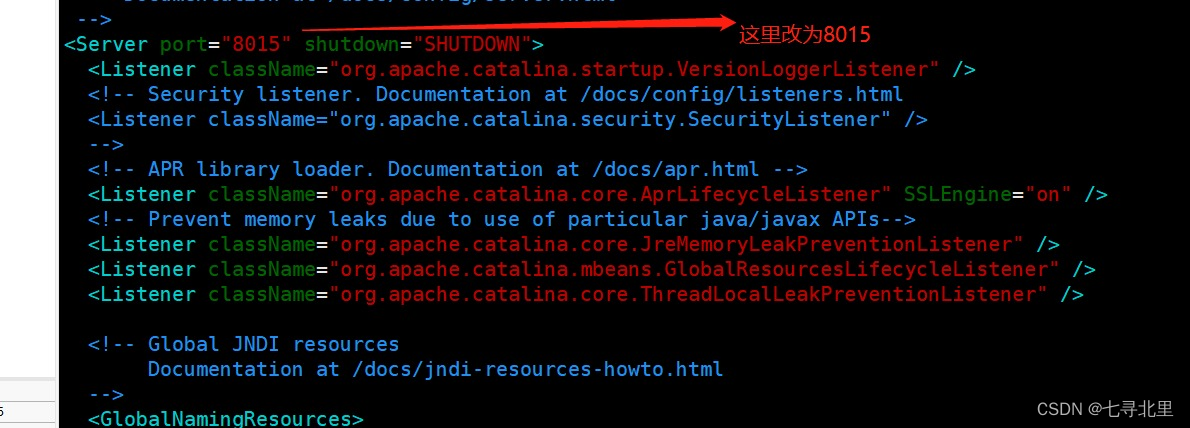
[root@ecs-218164 conf]# vim server.xml
[root@ecs-218164 conf]#
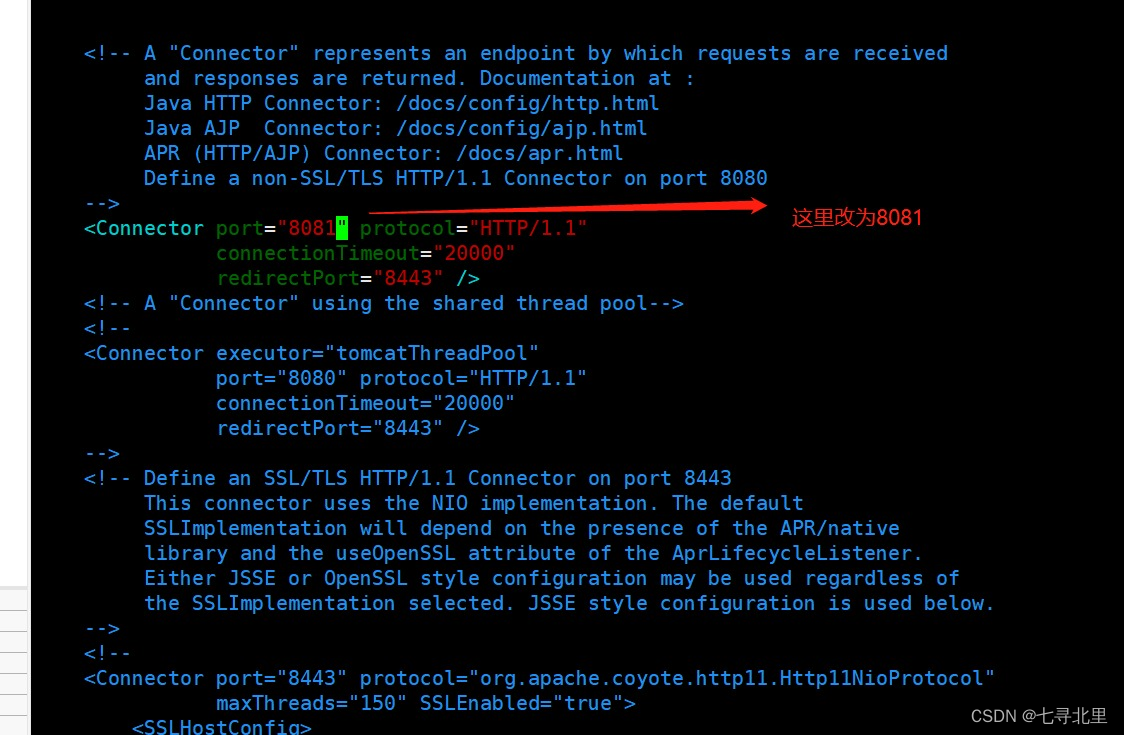
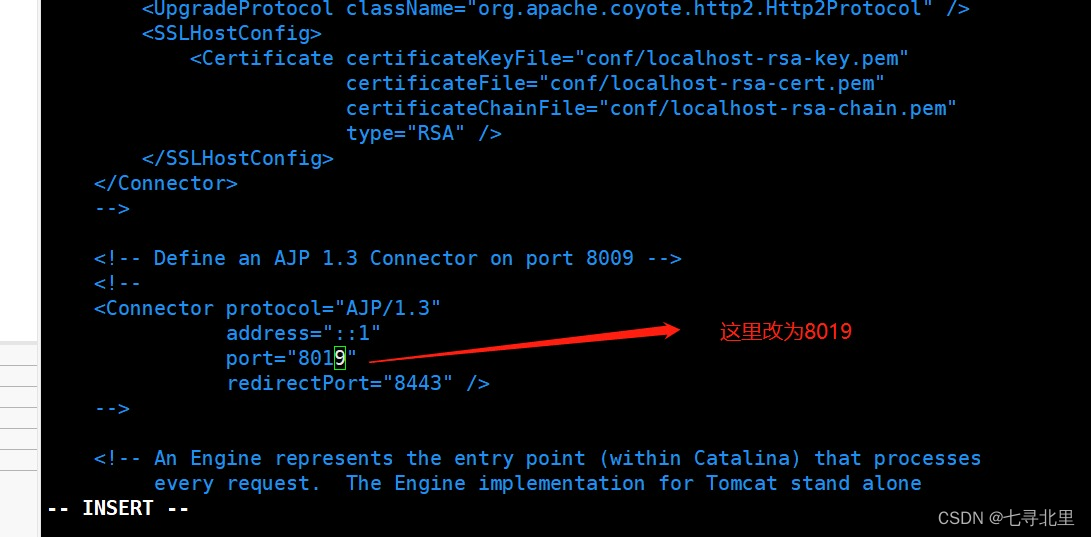
7.启动端口为8081的tomcat
[root@ecs-218164 conf]# cd ../
[root@ecs-218164 apache-tomcat-9.0.58]# ls
bin  BUILDING.txt  conf  CONTRIBUTING.md  lib  LICENSE  logs  NOTICE  README.md  RELEASE-NOTES  RUNNING.txt  temp  webapps  work
[root@ecs-218164 apache-tomcat-9.0.58]# cd bin/
[root@ecs-218164 bin]# ./startup.sh
Using CATALINA_BASE:   /usr/src/tomcat8081/apache-tomcat-9.0.58
Using CATALINA_HOME:   /usr/src/tomcat8081/apache-tomcat-9.0.58
Using CATALINA_TMPDIR: /usr/src/tomcat8081/apache-tomcat-9.0.58/temp
Using JRE_HOME:        /usr
Using CLASSPATH:       /usr/src/tomcat8081/apache-tomcat-9.0.58/bin/bootstrap.jar:/usr/src/tomcat8081/apache-tomcat-9.0.58/bin/tomcat-juli.jar
Using CATALINA_OPTS:
Tomcat started.
注意:设置完8081之后,需要开放端口8081
[root@ecs-218164 bin]# firewall-cmd --add-port=8081/tcp --permanent
success
[root@ecs-218164 bin]# firewall-cmd --reload
success
[root@ecs-218164 bin]# firewall-cmd --list-all
public (active)
  target: default
  icmp-block-inversion: no
  interfaces: eth0
  sources:
  services: dhcpv6-client ssh
      ports: 20/tcp 21/tcp 22/tcp 80/tcp 8888/tcp 39000-40000/tcp 8080/tcp 8081/tcp
  protocols:
  masquerade: no
  forward-ports:
  source-ports:
  icmp-blocks:
  rich rules:
[root@ecs-218164 bin]#
注意:如果是购买的服务器,还需要这里配置规则

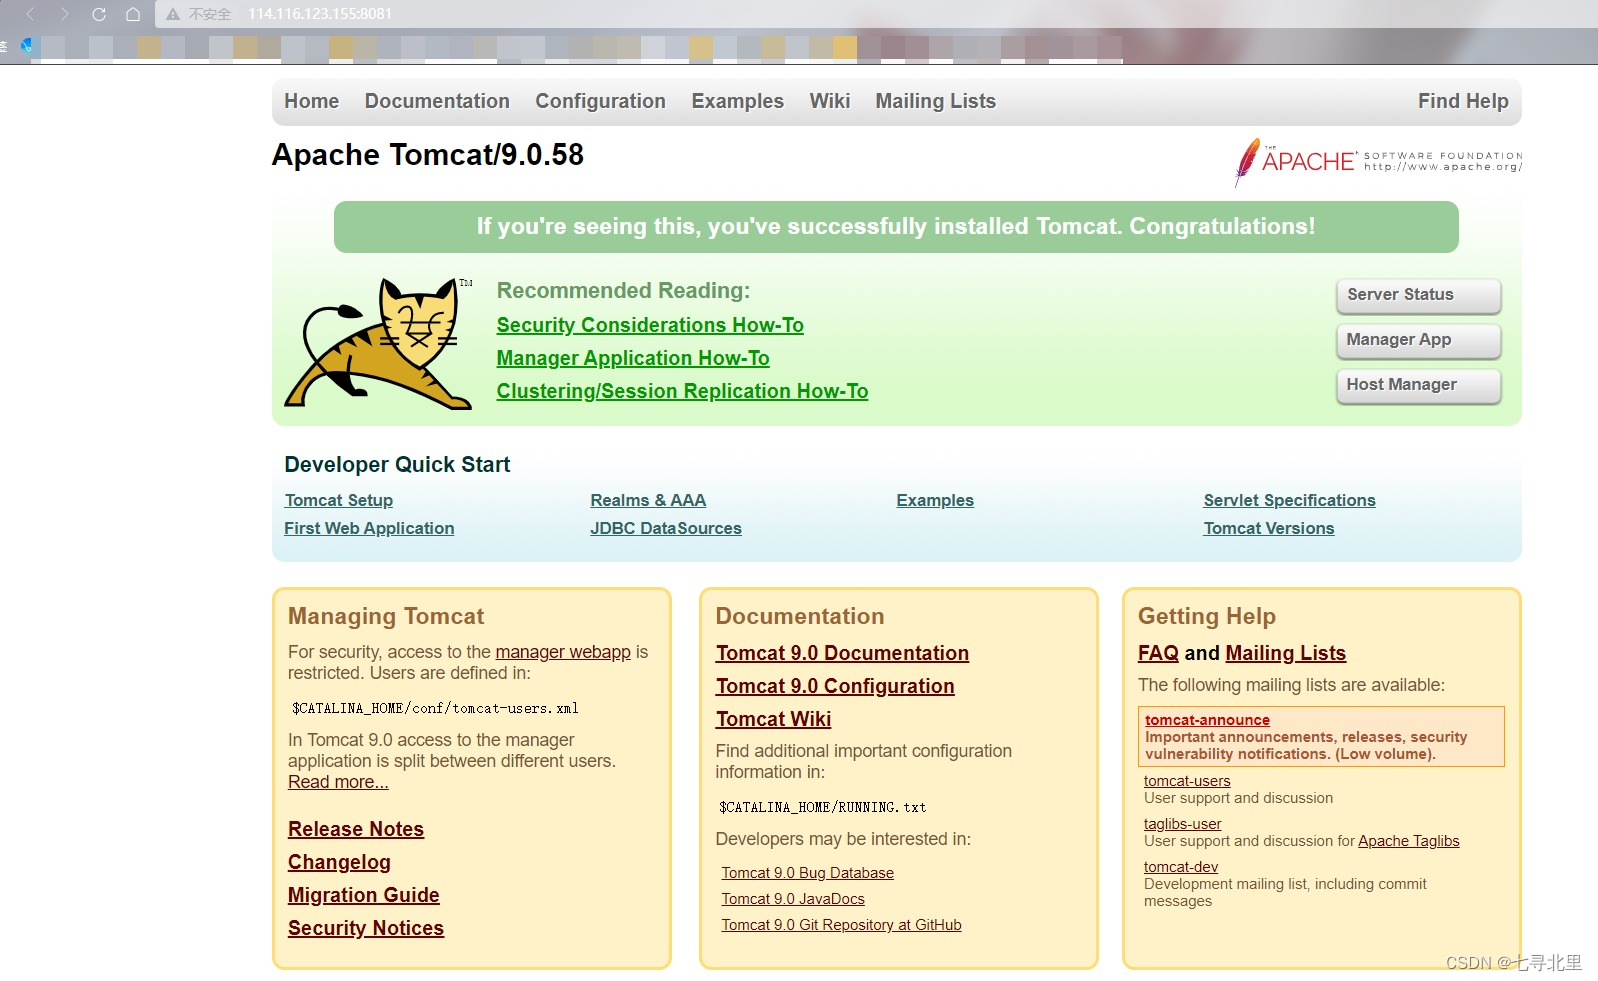
8.测试访问
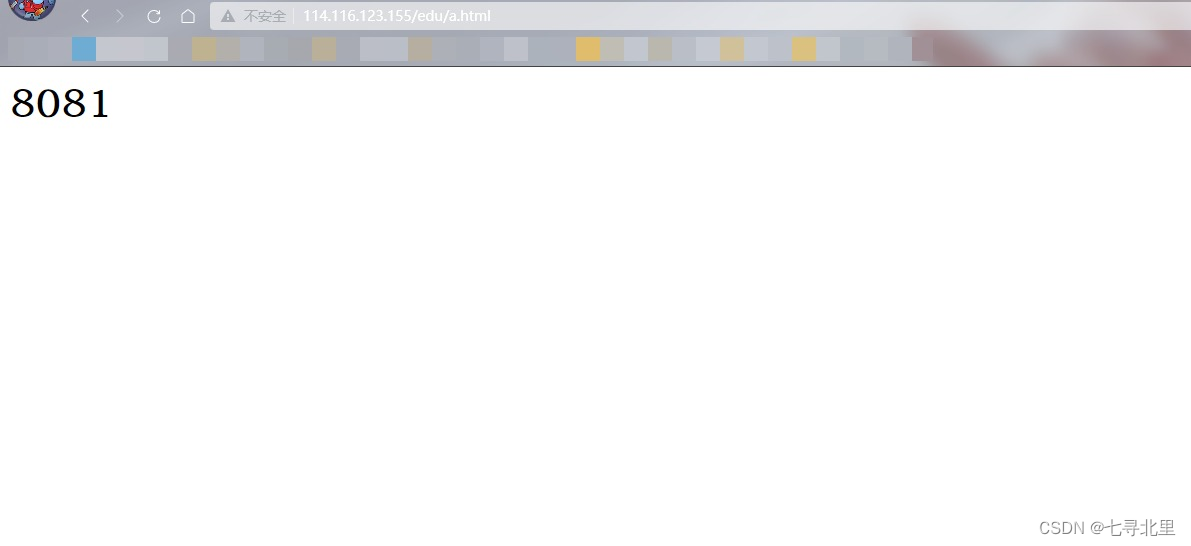
8080
![[外链图片转存失败,源站可能有防盗链机制,建议将图片保存下来直接上传(img-E6PUObtd-1657689270042)(https://www.superbed.cn/item/62ccedd1f54cd3f937ea0f73)]](https://img-blog.csdnimg.cn/4115c86c9377402f84f05d75cf1bc1fa.png)
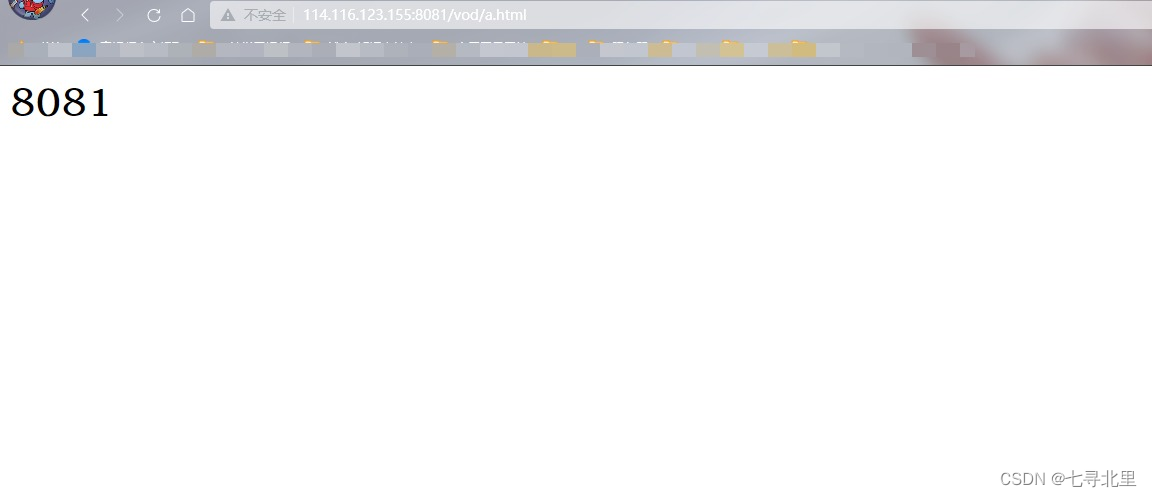
8081
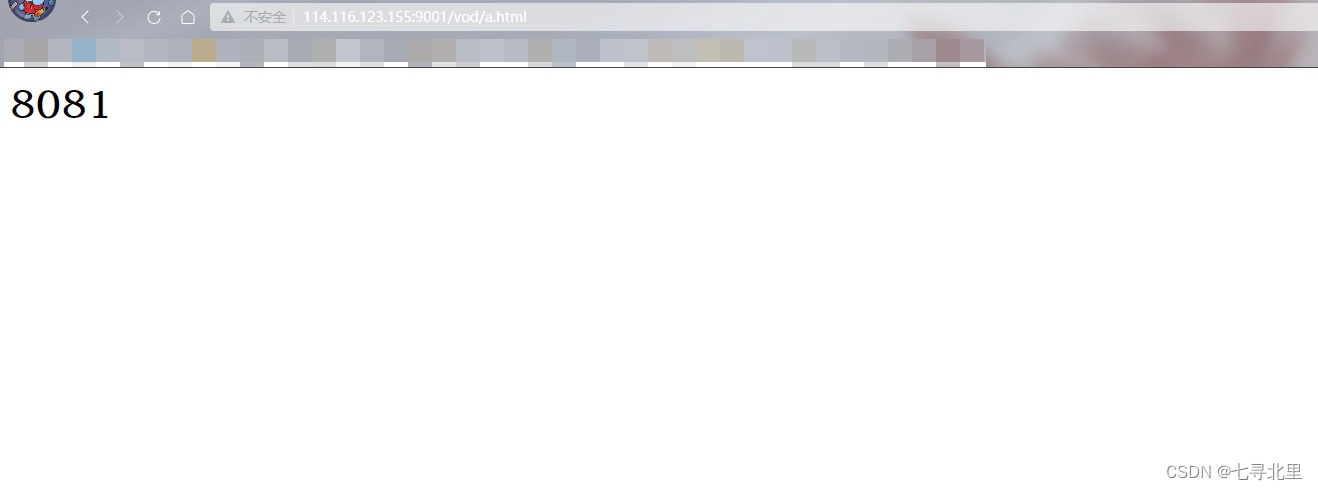
在/usr/src/tomcat8080/apache-tomcat-9.0.58/webapps/创建edu,并且把a.html放入edu中
在/usr/src/tomcat8081/apache-tomcat-9.0.58/webapps/创建vod,并且把a.html放入vod中
a.html
808*
测试访问
http://114.116.123.155:8080/edu/a.html

http://114.116.123.155:8081/vod/a.html
8.3.具体配置
1.找到nginx配置文件,进行反向代理配置
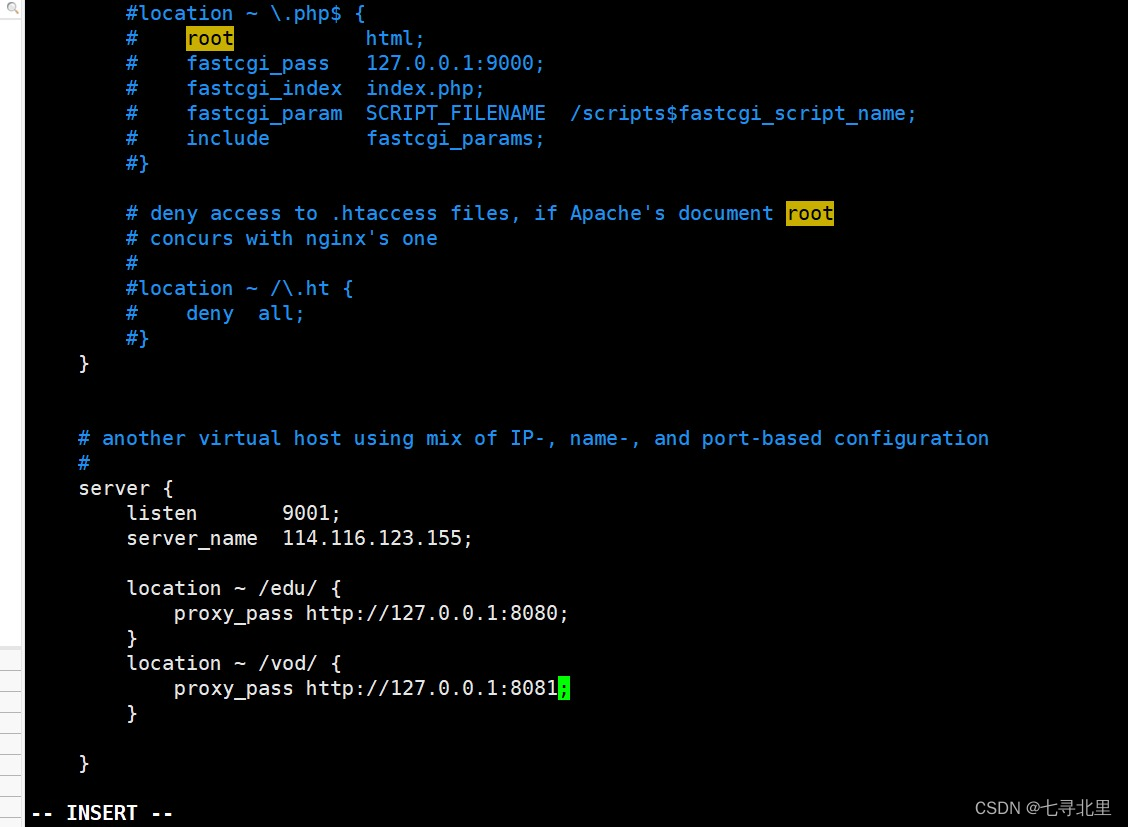
注意:防火墙需要开放9001端口,linux服务要配置9001规则
[root@ecs-218164 conf]# firewall-cmd --add-port=9001/tcp --permanent
success
[root@ecs-218164 conf]# firewall-cmd --reload
success
[root@ecs-218164 conf]# firewall-cmd --list-all
public (active)
  target: default
  icmp-block-inversion: no
  interfaces: eth0
  sources:
  services: dhcpv6-client ssh
  ports: 20/tcp 21/tcp 22/tcp 80/tcp 8888/tcp 39000-40000/tcp 8080/tcp 8081/tcp 9090/tcp 9001/tcp
  protocols:
  masquerade: no
  forward-ports:
  source-ports:
  icmp-blocks:
  rich rules:

2.重新加载配置并重新启动nginx
[root@ecs-218164 sbin]# ./nginx -s reload
[root@ecs-218164 sbin]# ./nginx -s stop
[root@ecs-218164 sbin]# ./nginx
3.最终测试
http://114.116.123.155:9001/edu/a.html

http://114.116.123.155:9001/vod/a.html
location 指令说明 该指令用于匹配 URL。
语法如下:

- = :用于不含正则表达式的 uri 前,要求请求字符串与 uri 严格匹配,如果匹配成功,就停止继续向下搜索并立即处理该请求。
- ~:用于表示 uri 包含正则表达式,并且区分大小写。
- ~*:用于表示 uri 包含正则表达式,并且不区分大小写。
- ^~:用于不含正则表达式的 uri 前,要求 Nginx 服务器找到标识 uri 和请求字符串匹配度最高的 location 后,立即使用此 location 处理请求,而不再使用 location 块中的正则 uri 和请求字符串做匹配。
注意:如果 uri 包含正则表达式,则必须要有 ~ 或者 ~\* 标识。
总结:
当我们使用114.116.123.155:9001/edu/a.html (114.116.123.155:9001/vod/a.html) 的时候会通过反向代理proxy_pass跳转到http://127.0.0.1:8080/edu/a.html (http://127.0.0.1:8081/edu/a.html) 也就是
http://114.116.123.155:8080/edu/a.html (http://114.116.123.155:9001/edu/a.html)
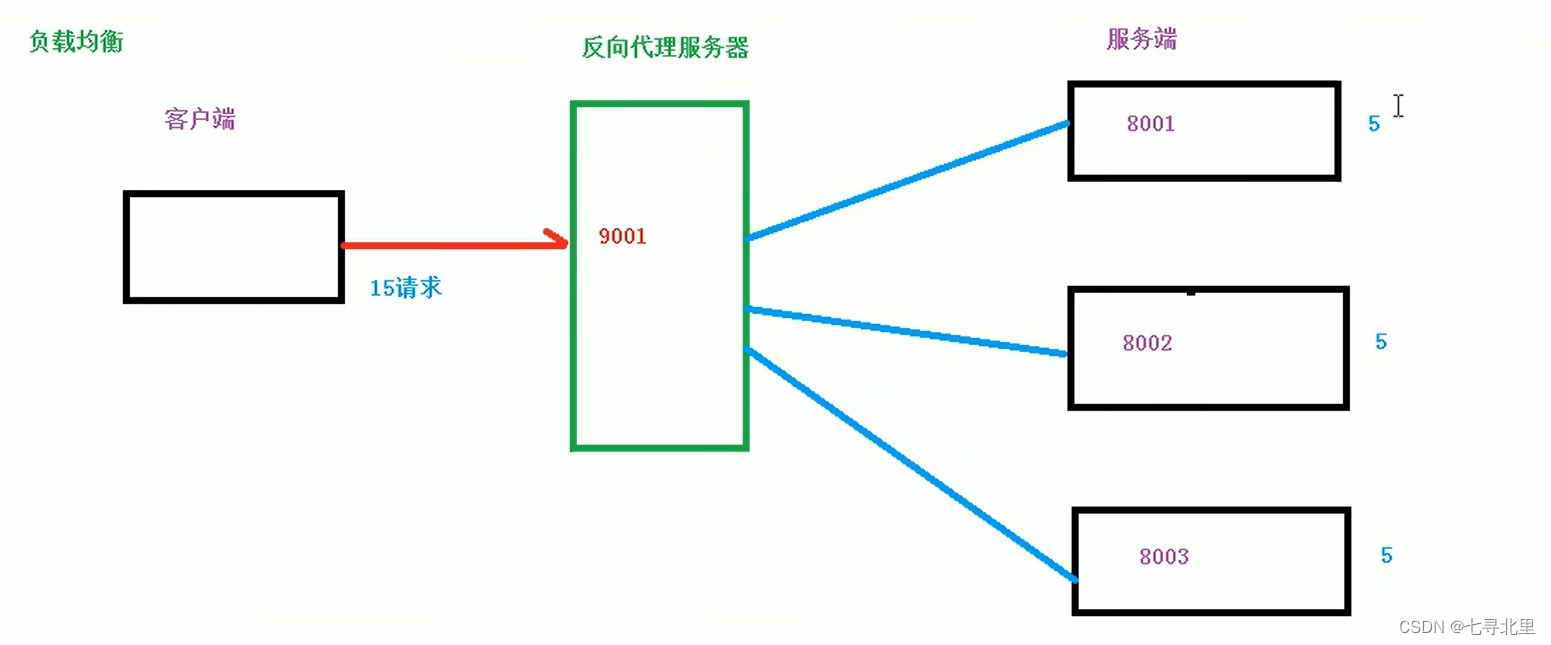
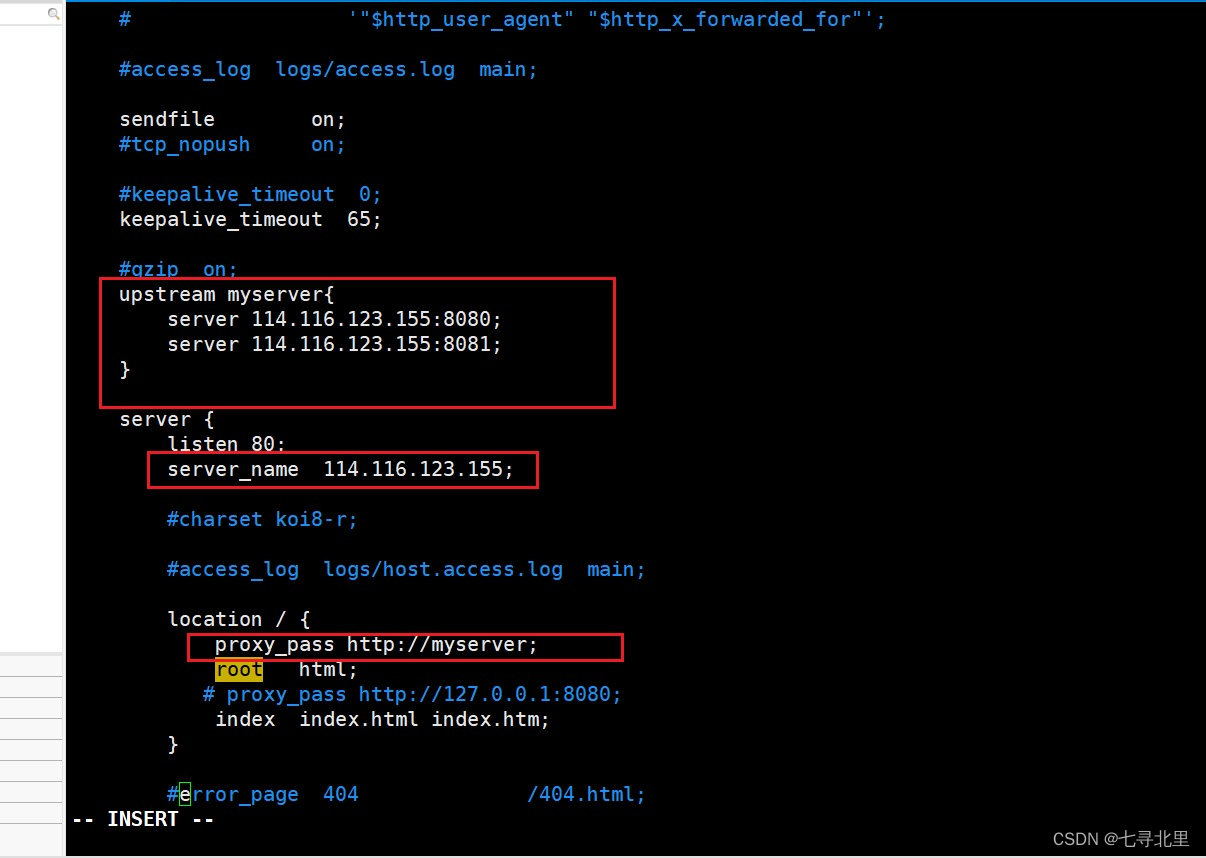
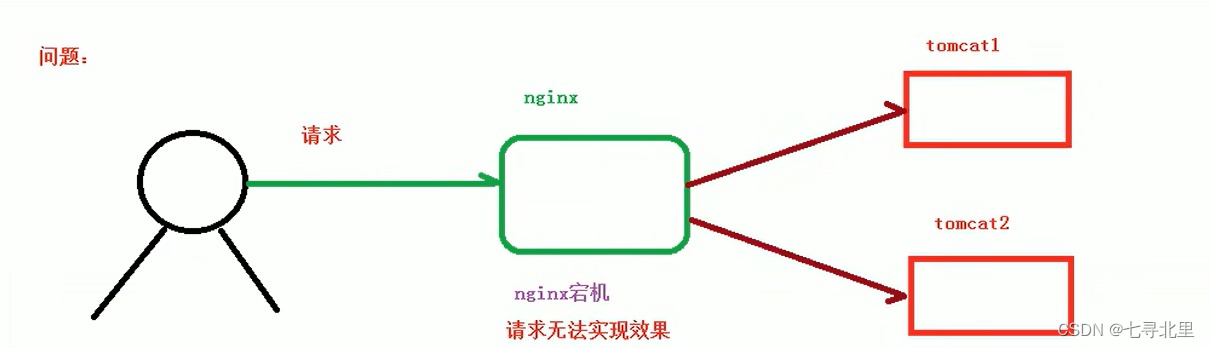
9.Nginx配置实例 负载均衡
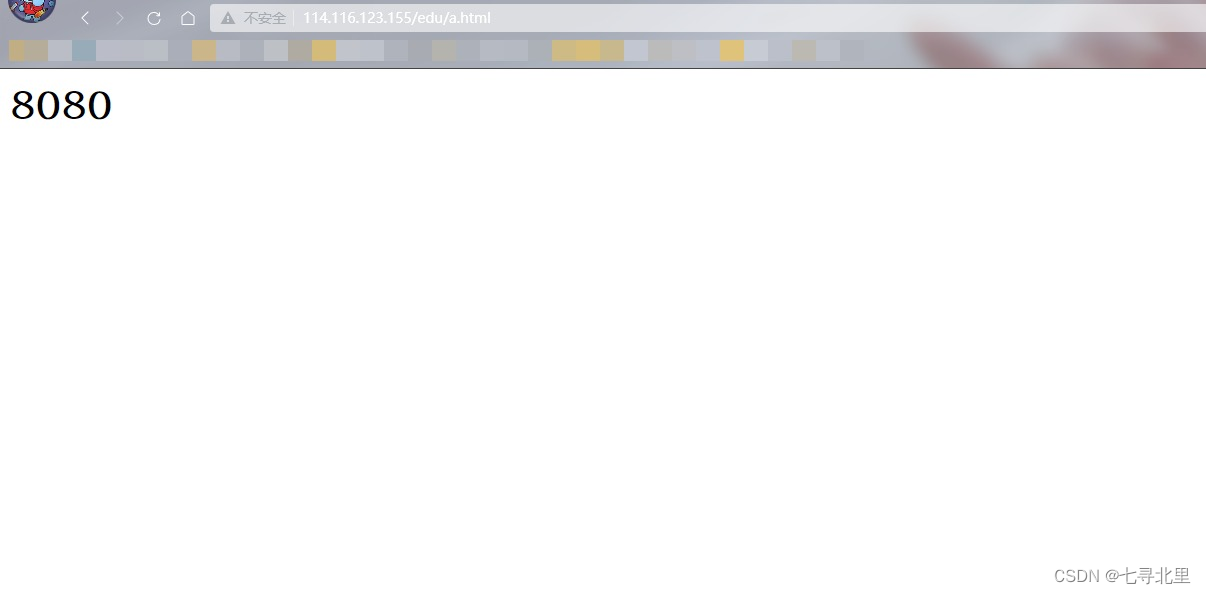
9.1.实现效果
浏览器地址栏输入 http://114.116.123.155/edu/a.html,负载均衡效果,平均分到8080和8081端口中
9.2.准备工作
1.准备两台Tomcat服务器,分别是8080、8081
2.在两台tomcat里面webapps目录中,创建名称是edu文件夹,在edu文件夹中创建页面a.html,用于测试
这里需要注意,在两台的tomcat的webapps目录中,均需要创建名称是edu文件夹,在edu文件夹中创建页面a.html
9.3.具体配置
在nginx的配置文件中进行负载均衡的配置
9.4.分配策略
随着互联网信息的爆炸性增长,负载均衡(load balance)已经不再是一个很陌生的话题,顾名思义,负载均衡即是将负载分摊到不同的服务单元,既保证服务的可用性,又保证响应足够快,给用户很好的体验。快速增长的访问量和数据流量催生了各式各样的负载均衡产品,很多专业的负载均衡硬件提供了很好的功能,但却价格不菲,这使得负载均衡软件大受欢迎, nginx 就是其中的一个,在 linux 下有 Nginx、LVS、Haproxy 等等服务可以提供负载均衡服务,而且 Nginx 提供了几种分配方式(策略):
9.4.1.轮询(默认)
每个请求按时间顺序逐一分配到不同的后端服务器,如果后端服务器 down 掉,能自动剔除。
9.4.2.weight
weight 代表权,重默认为 1,权重越高被分配的客户端越多
指定轮询几率,weight 和访问比率成正比,用于后端服务器性能不均的情况。 例如:

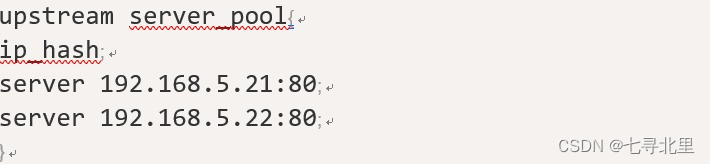
9.4.3.ip_hash
每个请求按访问 ip 的 hash 结果分配,这样每个访客固定访问一个后端服务器,可以解决 session 的问题。例如:
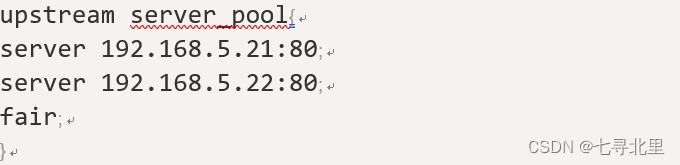
9.4.4.fair(第三方)
按后端服务器的响应时间来分配请求,响应时间短的优先分配。
总结:
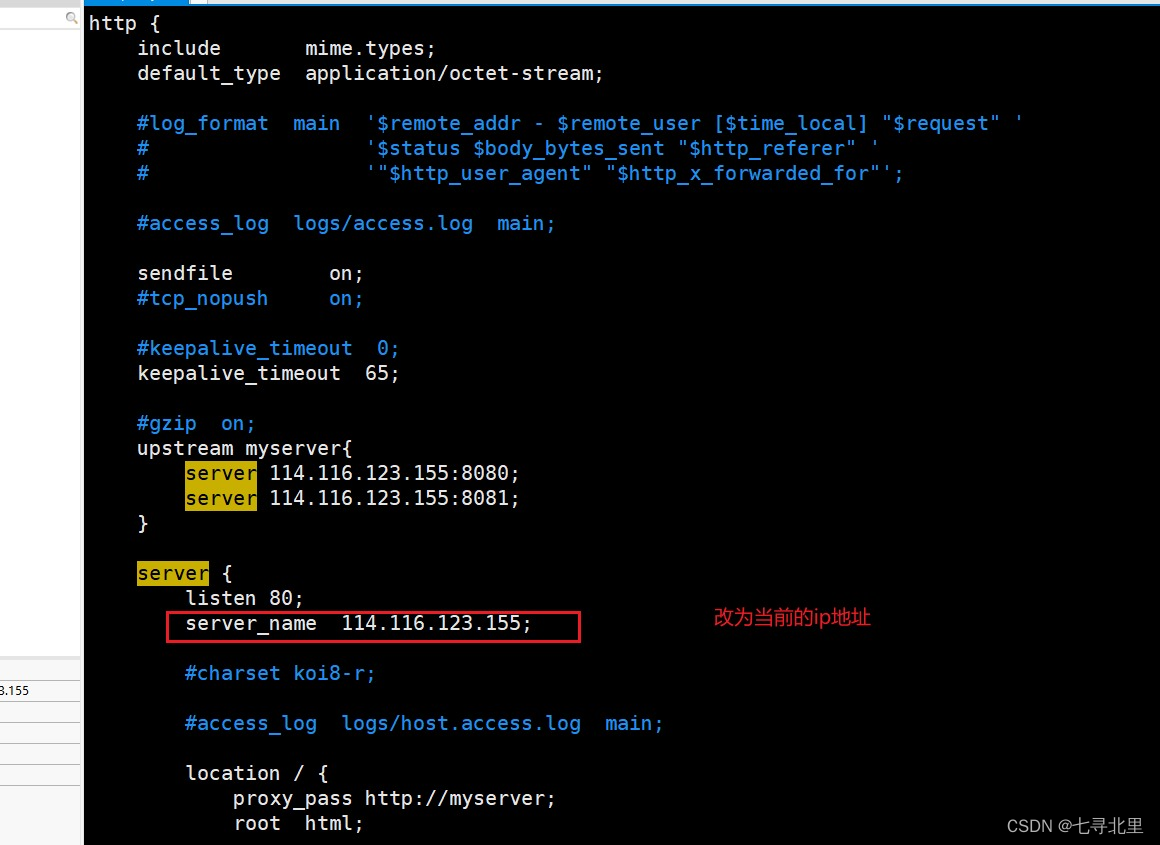
当我们访问114.116.123.155/edu/a.html的时候,会通过proxy_pass http://myserver反向代理到upstream myserver中进行负载均衡分配,即114.116.123.155:8080/edu/a.html或114.116.123.155:8081/edu/a.html或
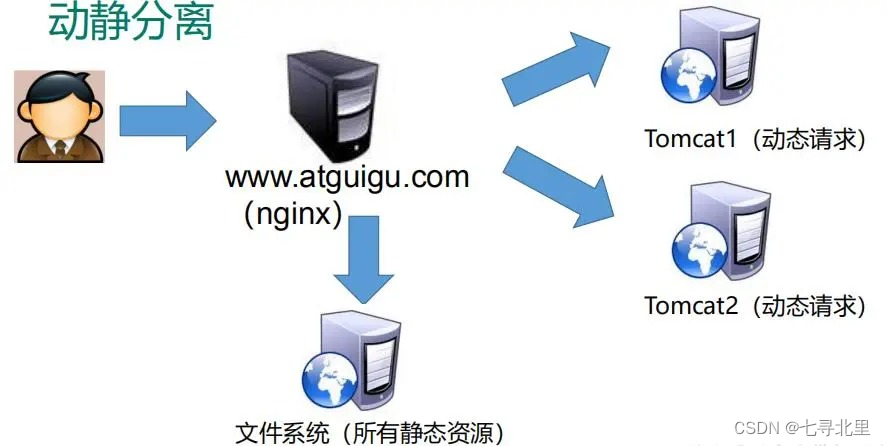
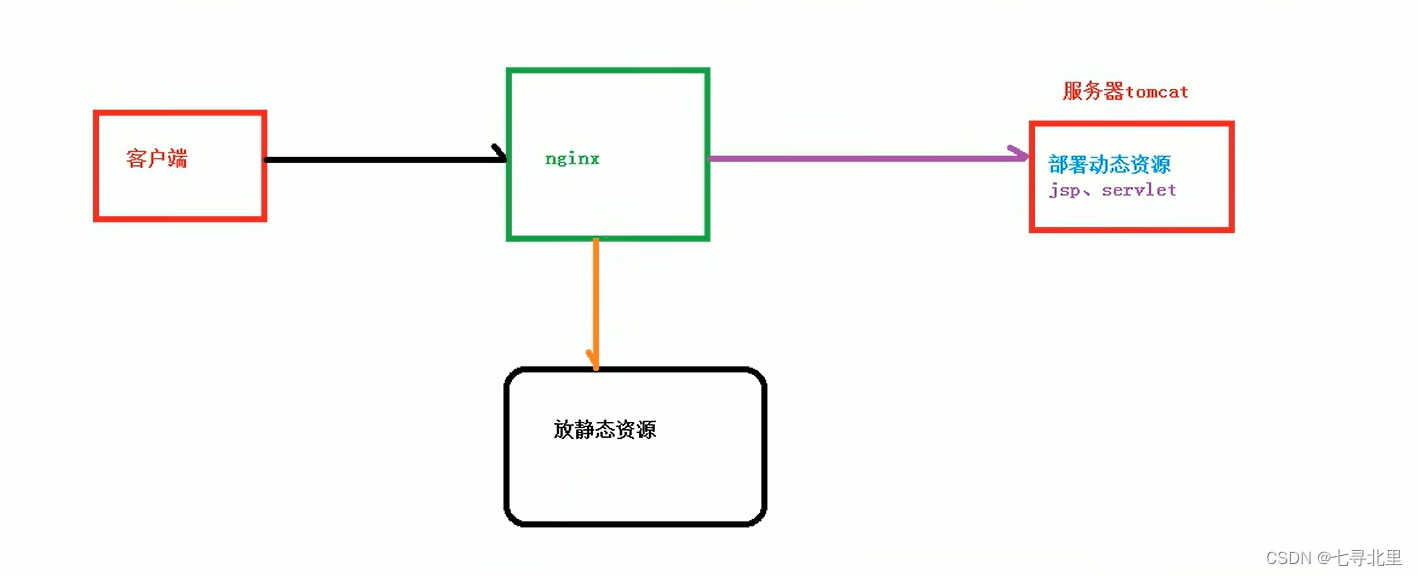
10.Nginx配置实例 动静分离
10.1.动静分离的介绍
Nginx 动静分离简单来说就是把动态跟静态请求分开,不能理解成只是单纯的把动态页面和静态页面物理分离。严格意义上说应该是动态请求跟静态请求分开,可以理解成使用 Nginx 处理静态页面,Tomcat 处理动态页面。动静分离从目前实现角度来讲大致分为两种,
一种是纯粹把静态文件独立成单独的域名,放在独立的服务器上,也是目前主流推崇的方案;
另外一种方法就是动态跟静态文件混合在一起发布,通过 nginx 来分开。
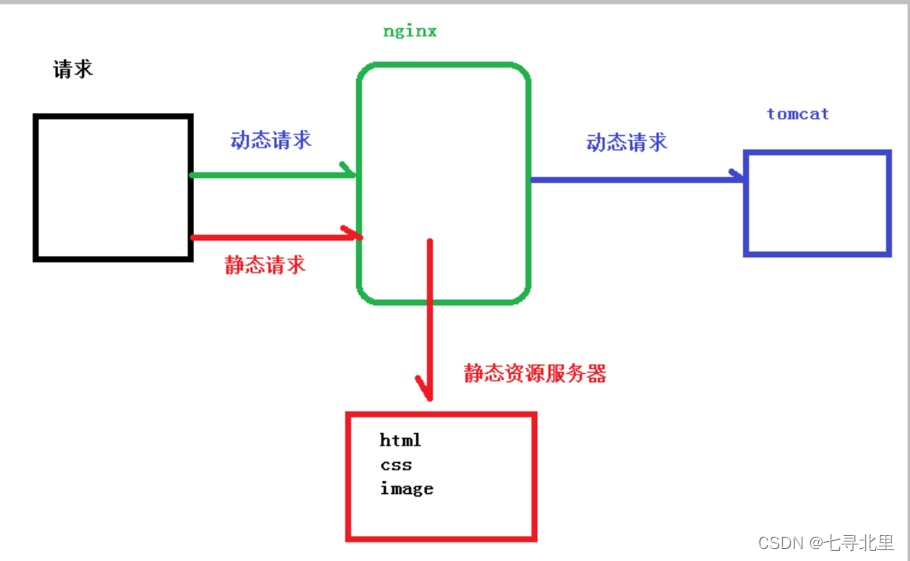
通过 location 指定不同的后缀名实现不同的请求转发。通过 expires 参数设置,可以使浏览器缓存过期时间,减少与服务器之前的请求和流量。具体 Expires 定义:是给一个资源设定一个过期时间,也就是说无需去服务端验证,直接通过浏览器自身确认是否过期即可,所以不会产生额外的流量。此种方法非常适合不经常变动的资源。(如果经常更新的文件,不建议使用 Expires 来缓存),我这里设置 3d,表示在这 3 天之内访问这个 URL,发送一个请求,比对服务器该文件最后更新时间没有变化,则不会从服务器抓取,返回状态码304,如果有修改,则直接从服务器重新下载,返回状态码 200。
10.2.准备工作
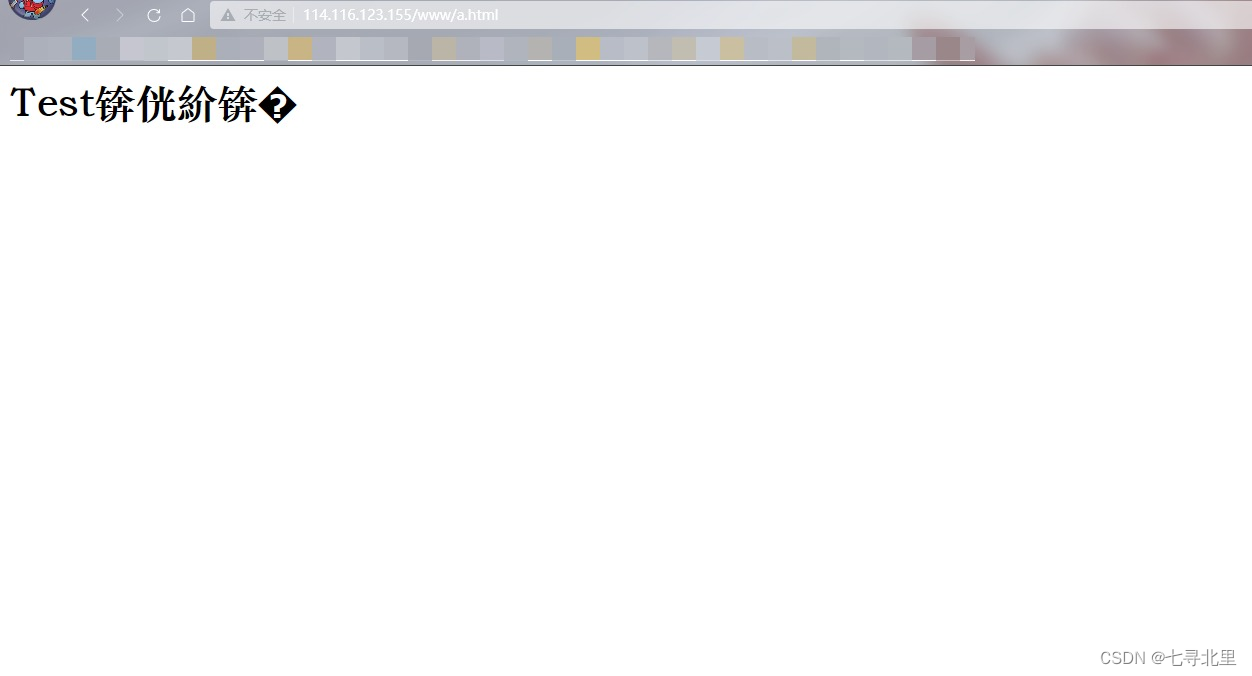
在linux系统中准备静态资源,用于进行访问
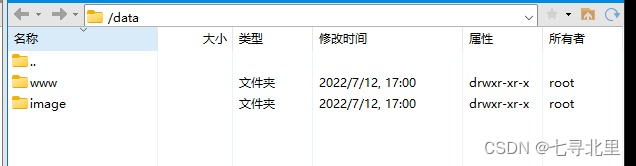
在www文件夹中放入a.html
Test!!!
在image放入一张图片
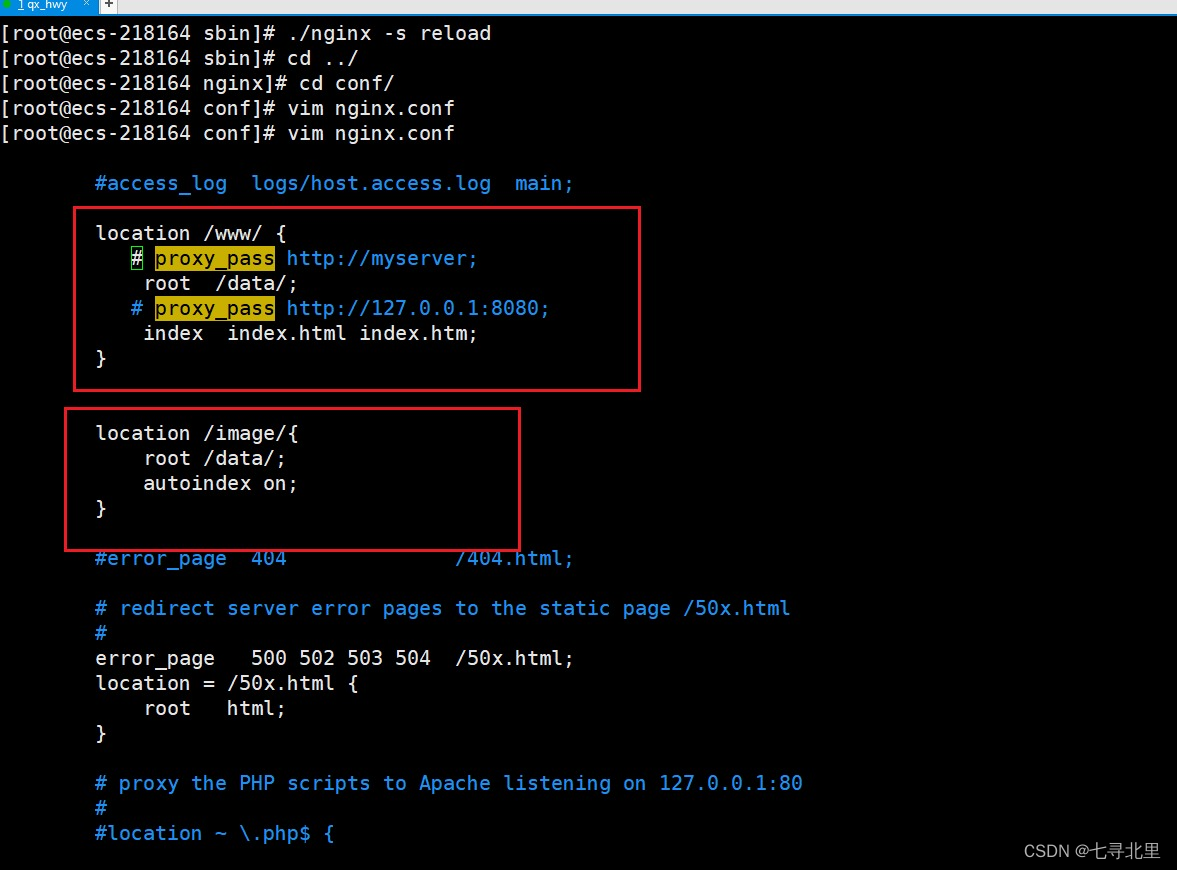
10.3.具体配置
在nginx配置文件中进行配置
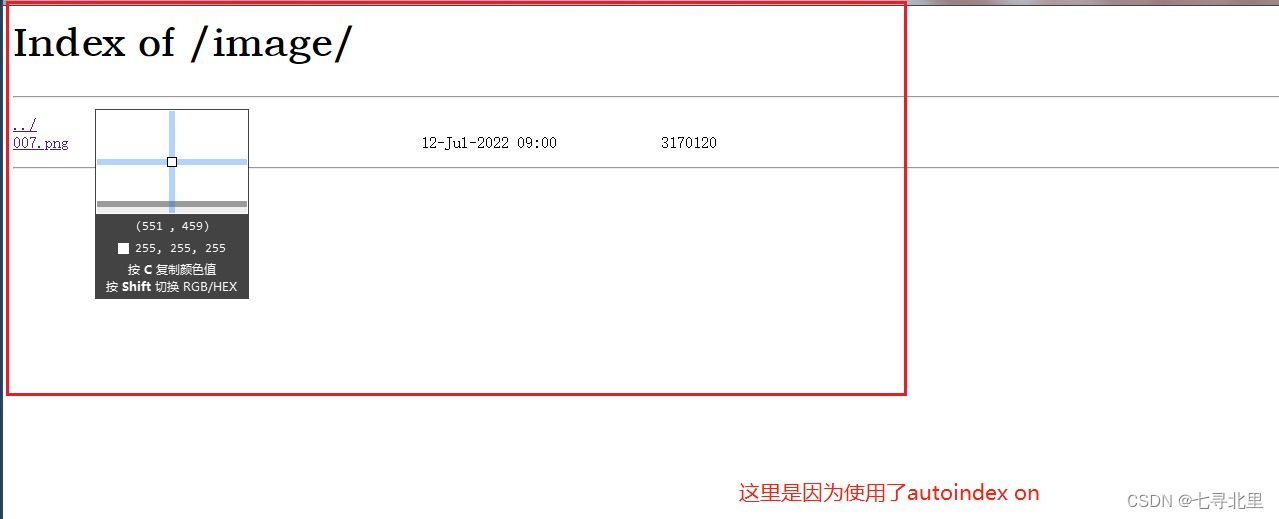
10.4.最终测试
浏览器中输入地址
http://114.116.123.155/image/007.png

http://114.116.123.155/www/a.html
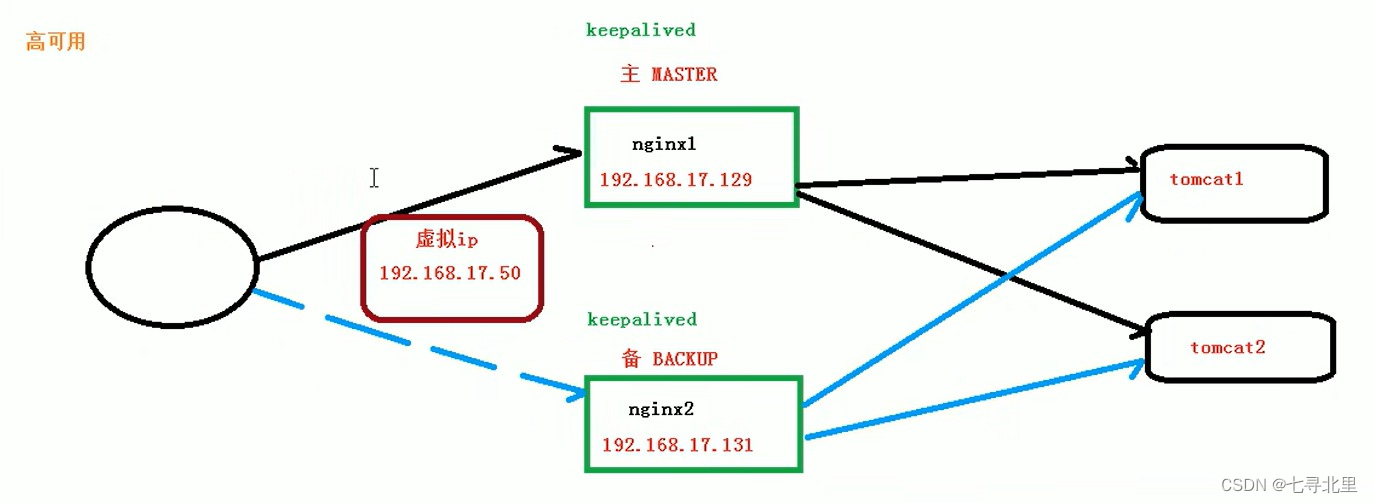
11.Nginx搭建 高可用集群
11.1.什么是高可用(Keepalived+Nginx 高可用集群(主从模式))
服务器挂掉了,系统依旧可以正常完成请求
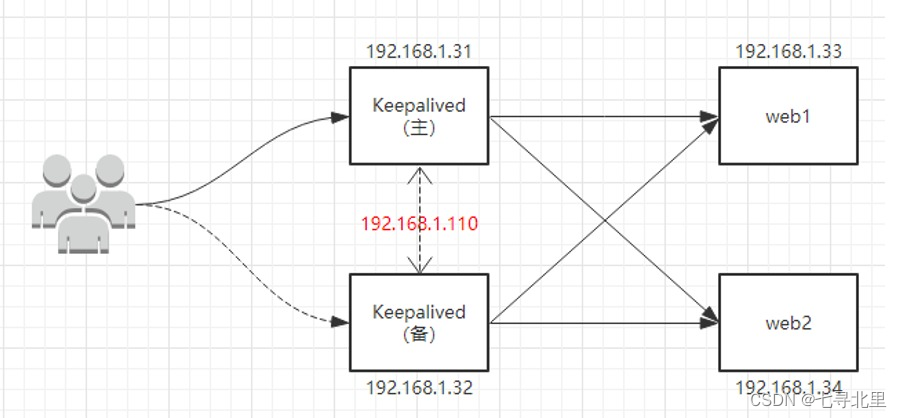
11.2.配置高可用的准备工作
11.2.1.需要两台nginx服务器
114.116.123.* 8.142.44.*
在另外一台服务器(8.142.44.*)安装nignx
[root@Agustletmen local]# ls
aegis  bin  btjdk  bttomcat  curl  etc  games  include  lib  lib64  libexec  libiconv  man  openssl  sbin  share  src

[root@Agustletmen local]# yum -y install make zlib zlib-devel gcc-c++ libtool openssl openssl-devel

Loaded plugins: fastestmirror
Loading mirror speeds from cached hostfile
base                                                                                                                     | 3.6 kB  00:00:00
epel                                                                                                                     | 4.7 kB  00:00:00
extras                                                                                                                   | 2.9 kB  00:00:00
updates                                                                                                                  | 2.9 kB  00:00:00
Package 1:make-3.82-24.el7.x86_64 already installed and latest version
Package zlib-1.2.7-20.el7_9.x86_64 already installed and latest version
Package zlib-devel-1.2.7-20.el7_9.x86_64 already installed and latest version
Package gcc-c++-4.8.5-44.el7.x86_64 already installed and latest version
Package libtool-2.4.2-22.el7_3.x86_64 already installed and latest version
Package 1:openssl-1.0.2k-25.el7_9.x86_64 already installed and latest version
Package 1:openssl-devel-1.0.2k-25.el7_9.x86_64 already installed and latest version
Nothing to do

[root@Agustletmen local]# pcre-config --version
8.32

[root@Agustletmen local]# cd /usr/src/
[root@Agustletmen src]# ls
debug  kernels
[root@Agustletmen src]# ls
debug  kernels  nginx-1.18.0.tar.gz
[root@Agustletmen src]# tar -zxvf nginx-1.18.0.tar.gz
...

[root@Agustletmen src]# ls
debug  kernels  nginx-1.18.0  nginx-1.18.0.tar.gz
[root@Agustletmen src]# cd nginx-1.18.0
[root@Agustletmen nginx-1.18.0]# ./configure
...

[root@Agustletmen nginx-1.18.0]# make && make install
...
注意:这里需要在服务器中配置规则开放80端口,并且查看防火墙中是否放行该端口
[root@Agustletmen sbin]# firewall-cmd --list-all
public
  target: default
  icmp-block-inversion: no
  interfaces:
  sources:
  services: dhcpv6-client ssh
  ports: 20/tcp 21/tcp 22/tcp 80/tcp 443/tcp 8888/tcp 39000-40000/tcp 8080/tcp 8080/udp 8081/tcp 8081/udp 8082/tcp 8082/udp
  protocols:
  masquerade: no
  forward-ports:
  source-ports:
  icmp-blocks:
  rich rules:
我这里已经开放,若没有开放则执行以下命令
firewall-cmd --add-port=80/tcp --permanent
重启防火墙
firewall-cmd -reload
11.2.2.两台服务器需要安装keepalived
分别在两台服务器中的 /usr/src目录下安装keepalived
[root@ecs-218164 nginx]# cd ..
[root@ecs-218164 local]# cd /usr/src/
[root@ecs-218164 src]# yum install keepalived -y
...

[root@ecs-218164 src]# rpm -q -a keepalived  # 查看是否成功安装
keepalived-1.3.5-19.el7.x86_64
keepalived的安装位置
[root@ecs-218164 src]# cd /etc/
[root@ecs-218164 etc]# ls
...

[root@ecs-218164 etc]# cd keepalived/
[root@ecs-218164 keepalived]# ls
keepalived.conf
11.3.完成高可用配置(主从配置)
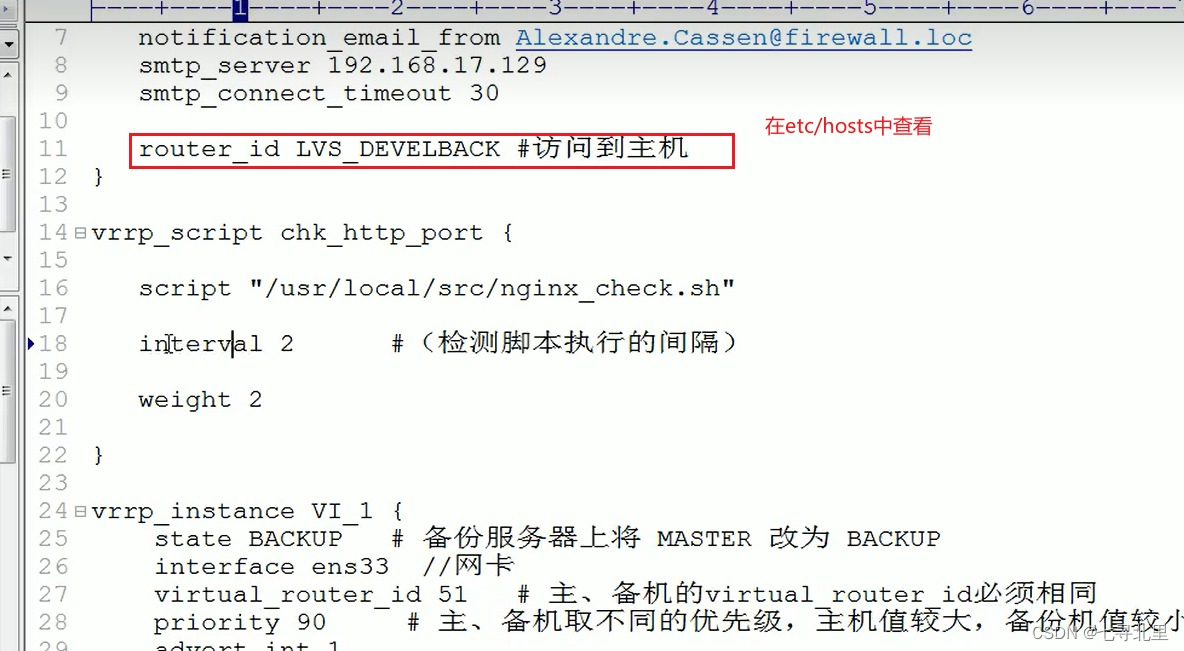
1.修改/etc/keepalived/keepalived.conf配置文件
global_defs {

notification_email {

[email protected]

[email protected]

[email protected]

}

notification_email_from [email protected]

smtp_server 192.168.17.129

smtp_connect_timeout 30

router_id LVS_DEVEL

}

vrrp_script chk_http_port {
script "/usr/local/src/nginx_check.sh"

interval 2	#(检测脚本执行的间隔)

weight 2

}

vrrp_instance VI_1 {

state BACKUP	# 备份服务器上将 MASTER 改为 BACKUP

interface ens33	# 网卡 我这里服务器是(eth0)

virtual_router_id 51	# 主、备机的 virtual_router_id 必须相同

priority 100	# 主、备机取不同的优先级,主机值较大,备份机值较小

advert_int 1

authentication {

auth_type PASS


auth_pass 1111

}

virtual_ipaddress {

192.168.17.50 # VRRP H 虚拟地址

}

}
2.在/usr/local/src添加检测脚本
#!/bin/bash
A=`ps -C nginx –no-header |wc -l`
if [ $A -eq 0 ];
    then /usr/local/nginx/sbin/nginx
    sleep 2
    if [ `ps -C nginx --no-header |wc -l` -eq 0 ];
    	then killall keepalived
    fi
 fi
3.把两台服务器上nginx和keepalived启动
启动nginx
systemctl start nginx
启动keepalived
systemctl start keepalived.service
[root@ecs-218164 /]# cd /usr/local/nginx/sbin/
[root@ecs-218164 sbin]# ./nginx -s stop
[root@ecs-218164 sbin]# ./nginx
[root@ecs-218164 sbin]# systemctl start keepalived.service

[root@ecs-218164 sbin]# ps -ef | grep keepalived
root     13334     1  0 11:42 ?        00:00:00 /usr/sbin/keepalived -D
root     13335 13334  0 11:42 ?        00:00:00 /usr/sbin/keepalived -D
root     13336 13334  0 11:42 ?        00:00:00 /usr/sbin/keepalived -D
root     13347 12896  0 11:43 pts/0    00:00:00 grep --color=auto keepalived
[root@Agustletmen sbin]# cd /usr/local/nginx/sbin/
[root@Agustletmen sbin]# ./nginx -s  stop
[root@Agustletmen sbin]# ./nginx
[root@Agustletmen sbin]# systemctl start keepalived.service
[root@Agustletmen sbin]# ps -ef | grep keepalived
root      1623     1  0 11:44 ?        00:00:00 /usr/sbin/keepalived -D
root      1624  1623  0 11:44 ?        00:00:00 /usr/sbin/keepalived -D
root      1625  1623  0 11:44 ?        00:00:00 /usr/sbin/keepalived -D
root      1647 28123  0 11:44 pts/0    00:00:00 grep --color=auto keepalived
11.4.最终测试
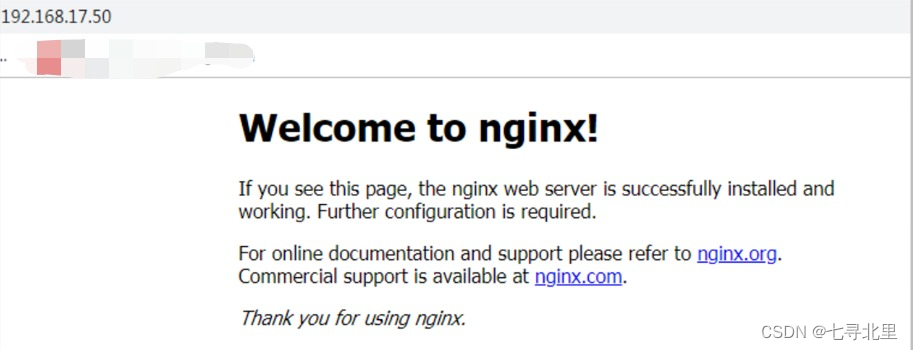
1.在浏览器地址栏输入 虚拟ip 114.116.123.50
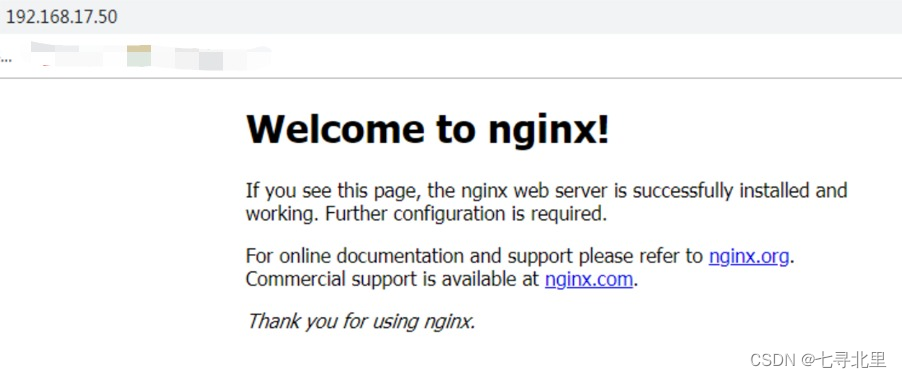
把主服务器(114.116.123.155) nginx和keepalived停止,在输入114.116.123.50
[root@ecs-218164 sbin]# ./nginx -s stop
[root@ecs-218164 sbin]# systemctl stop keepalived.service
注意:
12.Nginx原理及优化参数配置
12.1.master和worker
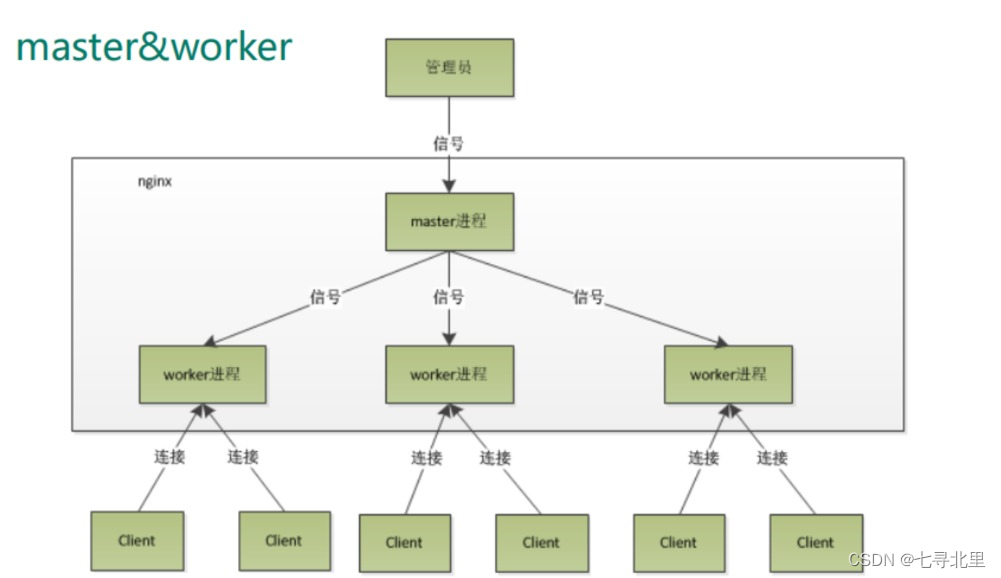
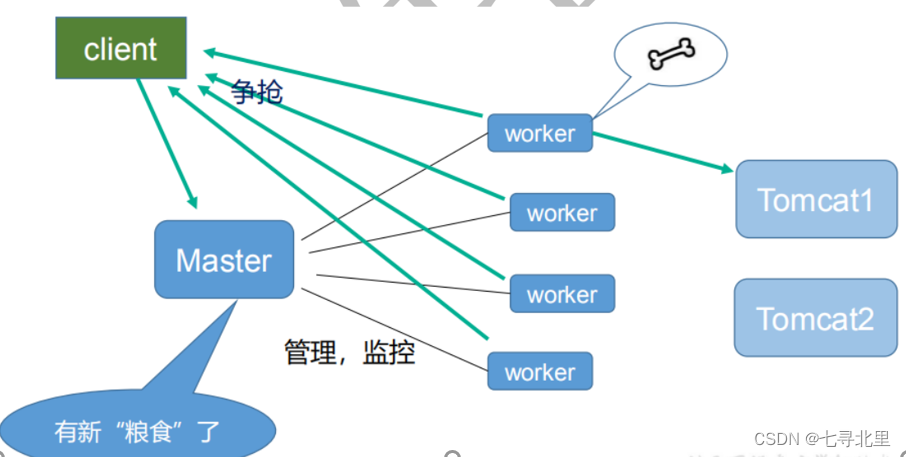
12.2.worker如何进行工作
12.3.一个master和多个woker有好处
首先,对于每个 worker 进程来说,独立的进程,不需要加锁,所以省掉了锁带来的开销,同时在编程以及问题查找时,也会方便很多。其次,采用独立的进程,可以让互相之间不会影响,一个进程退出后,其它进程还在工作,服务不会中断,master 进程则很快启动新的 worker 进程。当然,worker 进程的异常退出,肯定是程序有 bug 了,异常退出,会导致当前 worker 上的所有请求失败,不过不会影响到所有请求,所以降低了风险。
- 可以使用nginx –s reload热部署,利用nginx进行热部署操作
- 每个woker是独立的进程,如果有其中的一个woker出现问题,其他woker独立的,继续进行争抢,实现请求过程,不会造成服务中断
12.4.设置多少个worker合适
Nginx 同 redis 类似都采用了 io 多路复用机制,每个 worker 都是一个独立的进程,但每个进程里只有一个主线程,通过异步非阻塞的方式来处理请求, 即使是千上万个请求也不在话下。每个 worker 的线程可以把一个 cpu 的性能发挥到极致。所以 worker 数和服务器的 cpu 数相等是最为适宜的。设少了会浪费 cpu,设多了会造成 cpu 频繁切换上下文带来的损耗。
设置worker 数量: worker_processes 4 work 绑定 cpu(4 work 绑定 4cpu)。
12.5.连接数worker_connection
这个值是表示每个 worker 进程所能建立连接的最大值,所以,一个 nginx 能建立的最大连接数,应该是 worker_connections * worker_processes。当然,这里说的是最大连接数,对于 HTTP 请 求 本 地 资 源来 说 , 能 够 支 持 的 最大 并 发 数 量 是 worker_connections * worker_processes,如果是支持 http1.1 的浏览器每次访问要占两个连接,所以普通的静态访问最大并发数是: worker_connections * worker_processes /2,而如果是 HTTP 作 为反向代理来说,最大并发数量应该是 worker_connections *worker_processes/4。因为作为反向代理服务器,每个并发会建立与客户端的连接和与后端服务的连接,会占用两个连接。
第一个:发送请求,占用了woker 的几个连接数?
答案:2或者4个
第二个:nginx有一个master,有四个woker,每个woker支持最大的连接数1024,支持的最大并发数是多少?
1.普通的静态访问最大并发数是: worker_connections * worker_processes(4*1024) /2,
2.而如果是HTTP作为反向代理来说,最大并发数量应该是
12.2.worker如何进行工作
[外链图片转存中…(img-eyv7zAgR-1657689270059)]
12.3.一个master和多个woker有好处
首先,对于每个 worker 进程来说,独立的进程,不需要加锁,所以省掉了锁带来的开销,同时在编程以及问题查找时,也会方便很多。其次,采用独立的进程,可以让互相之间不会影响,一个进程退出后,其它进程还在工作,服务不会中断,master 进程则很快启动新的 worker 进程。当然,worker 进程的异常退出,肯定是程序有 bug 了,异常退出,会导致当前 worker 上的所有请求失败,不过不会影响到所有请求,所以降低了风险。
- 可以使用nginx –s reload热部署,利用nginx进行热部署操作
- 每个woker是独立的进程,如果有其中的一个woker出现问题,其他woker独立的,继续进行争抢,实现请求过程,不会造成服务中断
12.4.设置多少个worker合适
Nginx 同 redis 类似都采用了 io 多路复用机制,每个 worker 都是一个独立的进程,但每个进程里只有一个主线程,通过异步非阻塞的方式来处理请求, 即使是千上万个请求也不在话下。每个 worker 的线程可以把一个 cpu 的性能发挥到极致。所以 worker 数和服务器的 cpu 数相等是最为适宜的。设少了会浪费 cpu,设多了会造成 cpu 频繁切换上下文带来的损耗。
设置worker 数量: worker_processes 4 work 绑定 cpu(4 work 绑定 4cpu)。
12.5.连接数worker_connection
这个值是表示每个 worker 进程所能建立连接的最大值,所以,一个 nginx 能建立的最大连接数,应该是 worker_connections * worker_processes。当然,这里说的是最大连接数,对于 HTTP 请 求 本 地 资 源来 说 , 能 够 支 持 的 最大 并 发 数 量 是 worker_connections * worker_processes,如果是支持 http1.1 的浏览器每次访问要占两个连接,所以普通的静态访问最大并发数是: worker_connections * worker_processes /2,而如果是 HTTP 作 为反向代理来说,最大并发数量应该是 worker_connections *worker_processes/4。因为作为反向代理服务器,每个并发会建立与客户端的连接和与后端服务的连接,会占用两个连接。
第一个:发送请求,占用了woker 的几个连接数?
答案:2或者4个
第二个:nginx有一个master,有四个woker,每个woker支持最大的连接数1024,支持的最大并发数是多少?
1.普通的静态访问最大并发数是: worker_connections * worker_processes(4*1024) /2,
2.而如果是HTTP作为反向代理来说,最大并发数量应该是
worker_connections * worker_processes(4*1024)/4。