NDK20b FFmpeg4.2.2 编译和集成
1 ffmpeg
wget https://ffmpeg.org/releases/ffmpeg-4.2.2.tar.bz2 --no-check-certificate
tar -jxvf ffmpeg-4.2.2.tar.bz2
2 NDK20b
 wget https://dl.google.com/android/repository/android-ndk-r20b-linux-x86_64.zip
 unizp android-ndk-r20b-linux-x86_64.zip
3 build_android.sh
#!/bin/bash

export NDK=/root/workspace/android-ndk-r20b #这里配置先你的 NDK 路径
TOOLCHAIN=$NDK/toolchains/llvm/prebuilt/linux-x86_64


function build_android
{

./configure \
--prefix=$PREFIX \
--enable-neon  \
--enable-hwaccels  \
--enable-gpl   \
--disable-postproc \
--disable-debug \
--enable-small \
--enable-jni \
--enable-mediacodec \
--enable-decoder=h264_mediacodec \
--enable-static \
--enable-shared \
--disable-doc \
--enable-ffmpeg \
--disable-ffplay \
--disable-ffprobe \
--disable-avdevice \
--disable-doc \
--disable-symver \
--cross-prefix=$CROSS_PREFIX \
--target-os=android \
--arch=$ARCH \
--cpu=$CPU \
--cc=$CC \
--cxx=$CXX \
--enable-cross-compile \
--sysroot=$SYSROOT \
--extra-cflags="-Os -fpic $OPTIMIZE_CFLAGS" \
--extra-ldflags="$ADDI_LDFLAGS"

make clean
make -j16
make install

echo "============================ build android arm64-v8a success =========================="

}

#arm64-v8a
ARCH=arm64
CPU=armv8-a
API=21
CC=$TOOLCHAIN/bin/aarch64-linux-android$API-clang
CXX=$TOOLCHAIN/bin/aarch64-linux-android$API-clang++
SYSROOT=$NDK/toolchains/llvm/prebuilt/linux-x86_64/sysroot
CROSS_PREFIX=$TOOLCHAIN/bin/aarch64-linux-android-
PREFIX=$(pwd)/android/$CPU
OPTIMIZE_CFLAGS="-march=$CPU"

build_android
./build_android.sh
编译成功后会在 android 目录下生成对应六个模块的静态库和动态库。
另外,若要编译成 32 位的库,则需修改对应的编译脚本:
#armv7-a
ARCH=arm
CPU=armv7-a
API=21
CC=$TOOLCHAIN/bin/armv7a-linux-androideabi$API-clang
CXX=$TOOLCHAIN/bin/armv7a-linux-androideabi$API-clang++
SYSROOT=$NDK/toolchains/llvm/prebuilt/linux-x86_64/sysroot
CROSS_PREFIX=$TOOLCHAIN/bin/arm-linux-androideabi-
PREFIX=$(pwd)/android/$CPU
OPTIMIZE_CFLAGS="-mfloat-abi=softfp -mfpu=vfp -marm -march=$CPU "
4 FFmpeg 集成
基于上节编译好的 FFmpeg 静态库,我们在 Android Studio 上进行简单的集成测试。
 我们可以按照上图所示,将 FFmpeg 各个模块的静态库和头文件放置到指定目录下,实现一个获取各个模块版本信息的 jni 。
#include <cstdio>
#include <cstring>
#include "util/LogUtil.h"
#include "jni.h"

//由于 FFmpeg 库是 C 语言实现的,告诉编译器按照 C 的规则进行编译
extern "C" {
#include <libavcodec/version.h>
#include <libavcodec/avcodec.h>
#include <libavformat/version.h>
#include <libavutil/version.h>
#include <libavfilter/version.h>
#include <libswresample/version.h>
#include <libswscale/version.h>
};

#ifdef __cplusplus
extern "C" {
#endif
/*
 * Class:     com_byteflow_learnffmpeg_media_FFMediaPlayer
 * Method:    native_GetFFmpegVersion
 * Signature: ()Ljava/lang/String;
 */
JNIEXPORT jstring JNICALL Java_com_byteflow_learnffmpeg_media_FFMediaPlayer_native_1GetFFmpegVersion
        (JNIEnv *env, jclass cls)
{
    char strBuffer[1024 * 4] = {0};
    strcat(strBuffer, "libavcodec : ");
    strcat(strBuffer, AV_STRINGIFY(LIBAVCODEC_VERSION));
    strcat(strBuffer, "\nlibavformat : ");
    strcat(strBuffer, AV_STRINGIFY(LIBAVFORMAT_VERSION));
    strcat(strBuffer, "\nlibavutil : ");
    strcat(strBuffer, AV_STRINGIFY(LIBAVUTIL_VERSION));
    strcat(strBuffer, "\nlibavfilter : ");
    strcat(strBuffer, AV_STRINGIFY(LIBAVFILTER_VERSION));
    strcat(strBuffer, "\nlibswresample : ");
    strcat(strBuffer, AV_STRINGIFY(LIBSWRESAMPLE_VERSION));
    strcat(strBuffer, "\nlibswscale : ");
    strcat(strBuffer, AV_STRINGIFY(LIBSWSCALE_VERSION));
    strcat(strBuffer, "\navcodec_configure : \n");
    strcat(strBuffer, avcodec_configuration());
    strcat(strBuffer, "\navcodec_license : ");
    strcat(strBuffer, avcodec_license());
    LOGCATE("GetFFmpegVersion\n%s", strBuffer);
    return env->NewStringUTF(strBuffer);
}

#ifdef __cplusplus
}
#endif
Java 层的调用逻辑:
package com.byteflow.learnffmpeg.media;

public class FFMediaPlayer {
    static {
        System.loadLibrary("learn-ffmpeg");
    }

    public static String GetFFmpegVersion() {
        return native_GetFFmpegVersion();
    }

    private static native String native_GetFFmpegVersion();
}

public class MainActivity extends AppCompatActivity {

    @Override
    protected void onCreate(Bundle savedInstanceState) {
        super.onCreate(savedInstanceState);
        setContentView(R.layout.activity_main);
        ((TextView)findViewById(R.id.text_view)).setText(FFMediaPlayer.GetFFmpegVersion());
    }
}
CMakeLists.txt 构建脚本:
# Sets the minimum version of CMake required to build the native library.
cmake_minimum_required(VERSION 3.4.1)

set(CMAKE_CXX_FLAGS "${CMAKE_CXX_FLAGS} -std=gnu++11")

set(jnilibs ${CMAKE_SOURCE_DIR}/../jniLibs)
set(libname learn-ffmpeg)

include_directories(
        include
        ${CMAKE_SOURCE_DIR}/util
)

link_directories(
        ${jnilibs}/${ANDROID_ABI})

file(GLOB src-files
        ${CMAKE_SOURCE_DIR}/*.cpp)

add_library( # Sets the name of the library.
             ${libname}

             # Sets the library as a shared library.
             SHARED

             # Provides a relative path to your source file(s).
             ${src-files}
        )

set(third-party-libs
        avformat
        avcodec
        avfilter
        swresample
        swscale
        avutil
        )

set(native-libs
        android
        EGL
        GLESv3
        OpenSLES
        log
        m
        z
        )

target_link_libraries( # Specifies the target library.
                       ${libname}

                       # Links the target library to the log library
                       # included in the NDK.
                       ${log-lib}
                       ${third-party-libs}
                       ${native-libs}
                       )
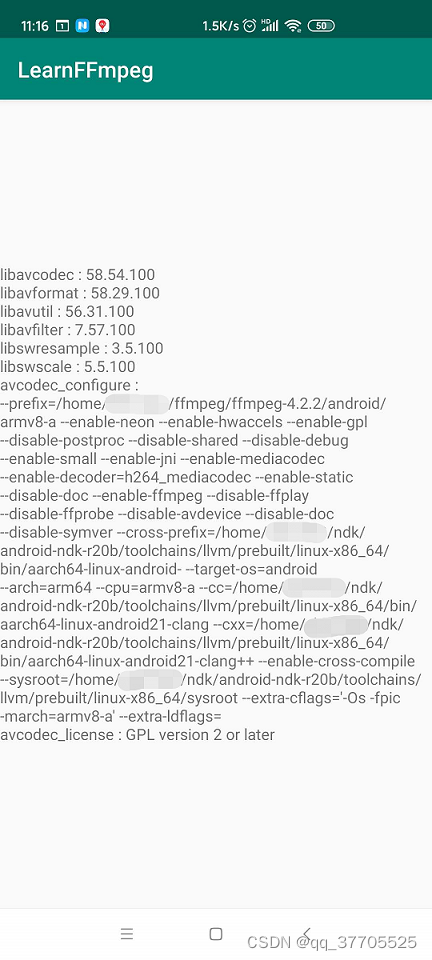
编译完成后,运行 App 获取 FFmpeg 各个模块版本和编译配置信息。
https://blog.csdn.net/leixiaohua1020
https://juejin.im/post/5e1eace16fb9a02fec66474e