Receiver
前面我们提到 Thanos 有 Sidecar 和 Receiver 两种不同的架构模式,前面已经学习了 Sidecar 模式,接下来我们再来了解下 Receiver 模式是如何工作的。
我们知道 Sidecar 是在每一个 Prometheus 的实例旁边添加一个 sidecar 组件来上传数据,但是数据上传并不是实时的,而是每 2h 上传一个数据块,所以远程存储的数据并不是实时的,Prometheus 需要各自持久化部分数据,这也是现在使用的 Sidecar 模式的弊端,但这并非是 Thanos 团队引入 Receiver 的决定性因素。
Receiver is only recommended for uses for whom pushing is the only viable solution, for example, analytics use cases or cases where the data ingestion must be client initiated, such as software as a service type environments.
按照文档中的说法,Receiver 只推荐用于多租户以及 Prometheus 配置受限的场景下,比如:
- 租户使用某些 SaaS 服务对集群进行监控,如 Openshift Operator 部署的 Prometheus
- 由于安全或权限问题,监控团队无法在被监控集群中配置 Sidecar
- 被监控集群部署的是非容器化部署的 Prometheus
这是因为 Receiver 会暂存多个 Prometheus 实例的 TSDB,当数据量较大时可能会发生 OOM,另外根据 官方文档,开启远程写入还将增加 Prometheus 约 25% 的内存使用。我们并非一定要在 Receiver 和 Sidecar 之间做出抉择,比如 Lastpass 就采用 Sidecar 与 Receiver 混合部署的方式,可以参考文档 Adopting Thanos at Lastpass。
Thanos Receiver 组件可以接收来自任何 Prometheus 实例的 remote write 远程写入请求,并将数据存储在其receiver本地 TSDB 中,同样我们也可以选择将这些 TSDB 块定期上传到对象存储中,此外 Receiver 同样也暴露了 Store API 接口,这样 Thanos Querier 组件也是可以实时查询接收到的指标的,不需要再去通过 Sidecar 获取最新的数据。(热数据去receiver里面去查,历史数据会去对象存储当中获取)
多租户
Thanos Receiver 组件也支持多租户,通过 remote write 请求的 HTTP Header(通过参数--receive.tenant-header="THANOS-TENANT"配置)获取租户的 ID,为了防止数据库级别的数据泄露,每个租户都有一个单独的 TSDB 实例,数据成功提交到租户的 TSDB,就代表 remote write 请求成功了。指标会被添加标签 tenant_id(通过参数--receive.tenant-label-name="tenant_id"配置)来标识指标的所属租户。
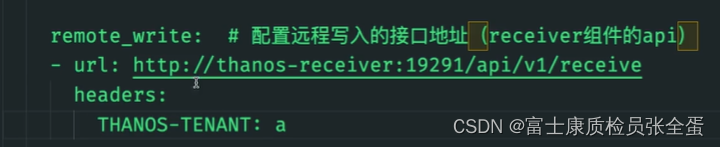
我们可以在 Prometheus 中通过如下所示配置在 remote_write 请求中附加 Header:
remote_write:
  - url: http://tenants:19291/api/v1/receive
    headers:
      THANOS-TENANT: a
如果希望实现多个 Receiver 的负载均衡和数据复制,则需要借助配置文件(通过--receive.hashrings-file=<path>参数指定)将多个 Receiver 组成哈希环,配置文件如下所示:
[
  {
    "hashring": "tenant-a",
    "endpoints": [
      "tenant-a-1.thanos.local:19291/api/v1/receive",
      "tenant-a-2.thanos.local:19291/api/v1/receive"
    ],
    "tenants": ["tenant-a"]
  },
  {
    "hashring": "tenants-b-c",
    "endpoints": [
      "tenant-b-c-1.thanos.local:19291/api/v1/receive",
      "tenant-b-c-2.thanos.local:19291/api/v1/receive"
    ],
    "tenants": ["tenant-b", "tenant-c"]
  },
  {
    "hashring": "soft-tenants",
    "endpoints": ["http://soft-tenants-1.thanos.local:19291/api/v1/receive"]
  }
]
上面这个配置文件表示租户 ID 为 a 的写请求,将由 tenant-a-1 与 tenant-a-2 这两个 Receiver 进行处理,租户 ID 为 b 或 c 的写请求,将由 tenant-b-c-1、tenant-b-c-2 这两个 Receiver 处理,没有配置 THANOS-TENANT header 或其值不为 a、b、c 之一的写请求,则由 soft-tenants-1 这个 Receiver 处理。(如果不是a b c 这三个租户ID,或者压根就不带有租户ID,那么会走软租户)
这里涉及到两个概念:硬租户与软租户。
Soft tenancy:如果哈希环配置文件中未显式指定租户,则任何租户均被视为有效匹配。所有未设置 HTTP Header 或租户 ID 与其他哈希环不匹配的租户写请求,都将被分配给该哈希环。相应的 Receiver 将会为指标添加默认租户标签和值(可通过参数–receive.default-tenant-id指定)。Hard tenancy:所有的 remote write 请求必须通过 HTTP Header 显式地指定租户 ID,请求将进入匹配到的哈希环进行处理。
注意:remote write 请求可以发送给一组 Receiver 中任意一个,但是最终请求会交由匹配到的 Receiver 进行处理。所以可以在 Receiver 前面添加负载均衡器来随机分发请求实现 Receiver 的负载均衡。
安装
用于创建 Thanos Receiver 的资源清单如下所示:
# thanos-receiver.yaml
apiVersion: apps/v1
kind: StatefulSet
metadata:
  labels:
    app: thanos-receiver
  name: thanos-receiver
  namespace: kube-mon
spec:
  selector:
    matchLabels:
      app: thanos-receiver
  serviceName: thanos-receiver
  replicas: 3 #节点数量
  template:
    metadata:
      labels:
        app: thanos-receiver
        thanos-store-api: "true"  //receiver是实现了store-api的,这样就可以在query组件中查询
    spec:
      affinity:
        podAntiAffinity:
          preferredDuringSchedulingIgnoredDuringExecution:
            - weight: 100
              podAffinityTerm:
                topologyKey: kubernetes.io/hostname
                labelSelector:
                  matchExpressions:
                    - key: app
                      operator: In
                      values:
                        - thanos-receiver
      containers:
        - name: thanos-receiver
          image: thanosio/thanos:v0.25.1
          args:
            - receive
            - --grpc-address=0.0.0.0:10901
            - --http-address=0.0.0.0:10902
            - --remote-write.address=0.0.0.0:19291 # 提供给 prometheus 的 remote_write 端口
            - --receive.replication-factor=3 # 副本数,详细解释参考https://thanos.io/tip/proposals-done/201812-thanos-remote-receive.md/#:~:text=--receive.replication-factor=3
            - --objstore.config-file=/etc/secret/thanos.yaml # 对象存储配置文件
            - --tsdb.path=/var/thanos/receiver # 本地tsdb路径
            - --tsdb.retention=1d # 热数据的保存时间
            - --label=receive_replica="$(NAME)" # 用于过滤重复数据的标签
            - --receive.local-endpoint=$(NAME).thanos-receiver:10901 # 节点endpoint,hashring 中记录的节点host需要与此处保持一致
            - --receive.hashrings-file=/var/lib/thanos-receive/hashring.json # hashring文件,用于记录集群节点
          ports:
            - containerPort: 10901
              name: grpc
            - containerPort: 10902
              name: http
            - containerPort: 19291
              name: remote-write
          env:
            - name: NAME
              valueFrom:
                fieldRef:
                  fieldPath: metadata.name
          livenessProbe:
            failureThreshold: 8
            httpGet:
              path: /-/healthy
              port: 10902
              scheme: HTTP
            periodSeconds: 30
          readinessProbe:
            failureThreshold: 20
            httpGet:
              path: /-/ready
              port: 10902
              scheme: HTTP
            periodSeconds: 5
          volumeMounts:
            - mountPath: /var/thanos/receiver
              name: data
              readOnly: false
            - name: hashring-config
              mountPath: /var/lib/thanos-receive
            - name: object-storage-config
              mountPath: /etc/secret
              readOnly: false
      volumes:
        - name: object-storage-config
          secret:
            secretName: thanos-objectstorage
        - name: hashring-config
          configMap:
            name: hashring-config
  volumeClaimTemplates:
    - metadata:
        name: data
      spec:
        accessModes:
          - ReadWriteOnce
        storageClassName: longhorn
        resources:
          requests:
            storage: 2Gi
---
apiVersion: v1
kind: Service
metadata:
  name: thanos-receiver
  namespace: kube-mon
spec:
  clusterIP: None
  ports:
    - name: grpc
      port: 10901
      targetPort: 10901
    - name: http
      port: 10902
      targetPort: 10902
    - name: remote-write
      port: 19291
      targetPort: 19291
  selector:
    app: thanos-receiver
由于 Thanos Receiver 同样会将数据同步到对象存储,所以同样将对象存储的配置挂载到容器中,通过 --objstore.config-file 参数指定配置文件路径,为了能够直接对接到 Store 组件,同样这里为 Pod 添加一个 thanos-store-api: "true" 的标签即可(Service 会进行自动关联)被 query 组件服务发现。
Thanos Receiver 支持将接收到的时间序列复制到同一哈希环中的其他 Receiver,复制因子通过在 Receiver 上设置一个标志来控制,并指示应该存储在哈希环中的任何时间序列的最大副本数。如果 Thanos Receiver 接收到的写入请求中的任何时间序列未成功写入至少 (REPLICATION_FACTOR + 1)/2 个节点,则 Receiver 会以错误响应,例如,要尝试存储每个时间序列的 3 个副本并确保每个时间序列成功写入目标哈希环中的至少 2 个 Thanos Receiver,所以需要配置 --receive.replication-factor=3 参数。(复制因子相当于副本数)
此外 Thanos Receiver 本地同样有数据,所以也需要做持久化。
通过参数 --label=receive_replica="$(NAME)" 指定用于重复过滤的标签为 receive_replica,这样我们同样需要在 query 组件参数中添加该标签 --query.replica-label=receive_replica 用于查询的时候去重:(和sidecar一样,这里有三个副本,数据上传上来就带有同样这个标签 --label=receive_replica=xxxx),在query里面去查询的时候就需要去重,去重基于receive_replica这个标签。
- --receive.local-endpoint=$(NAME).thanos-receiver:10901 # 节点endpoint,hashring 中记录的节点host需要与此处保持一致(pod dns的地址)如果是多租户模式,那么可以按照上面的形式根据租户的id,指定写到哪个endpoint里面,由于,没有配置多租户,这里配置endpoint就行了。
"tenant-a-1.thanos.local:19291/api/v1/receive",

args:
  - query
  - --log.level=debug
  - --query.replica-label=replica
  - --query.replica-label=receive_replica # 添加该参数
  # Discover local store APIs using DNS SRV.
  - --store=dnssrv+thanos-store-gateway:10901
- --query.replica-label=replica 之前sidecar指定的是根据这个标签去重,但是使用receiver模式就使用下面的标签去重
- --query.replica-label=receive_replica # 添加该参数
- --label=receive_replica="$(NAME)" # 用于过滤重复数据的标签
最后一个比较重要的参数就是 --receive.hashrings-file=/var/lib/thanos-receive/hashring.json,用来指定 hashring 文件,该文件用于记录集群节点,这里我们通过一个 ConfigMap 挂载到容器中去,资源清单如下所示:(配置hash环)
# thanos-receiver-hashring.yaml
apiVersion: v1
kind: ConfigMap
metadata:
  name: hashring-config
  namespace: kube-mon
data:
  hashring.json: |-
    [
      {
        "endpoints": [
            "thanos-receiver-0.thanos-receiver:10901",
            "thanos-receiver-1.thanos-receiver:10901",
            "thanos-receiver-2.thanos-receiver:10901"
        ]
      }
    ]
其中的 endpoints 用来记录所有 Receiver 节点的 host 地址的。然后直接应用上面的资源清单即可:
☸ ➜ kubectl apply -f https://p8s.io/docs/thanos/manifests/thanos-receiver-hashring.yaml
☸ ➜ kubectl apply -f https://p8s.io/docs/thanos/manifests/thanos-receiver.yaml
☸ ➜ kubectl get pods -n kube-mon -l app=thanos-receiver
NAME                READY   STATUS    RESTARTS   AGE
thanos-receiver-0   1/1     Running   0          100s
thanos-receiver-1   1/1     Running   0          89s
thanos-receiver-2   1/1     Running   0          72s
此外要记得为 Querier 组件添加 - --query.replica-label=receive_replica 参数,由于我们添加了 thanos-store-api: "true" 参数,所以会自动被 Store 发现,我们可以在查询前端页面验证 Store 组件,正常就会包含上面我们新增的 3 各 Receiver:
配置
由于现在我们已经使用了 Receiver 模式了,只需要 Prometheus 将数据以 remote write 的形式传入 Receiver 即可,所以可以将 Sidecar 组件停掉了,现在我们的 Prometheus 变成了近乎无状态的了,只需要 Prometheus 应用本身,然后加上 remote write 地址即可,在 Prometheus 配置文件中新增远程写的接口地址:
- --remote-write.address=0.0.0.0:19291 # 提供给 prometheus 的 remote_write 端口# prometheus-config1.yaml
apiVersion: v1
kind: ConfigMap
metadata:
name: prometheus-config
namespace: kube-mon
data:
prometheus.yaml.tmpl: | # 注意这里的名称是 prometheus.yaml.tmpl
global:
scrape_interval: 15s
scrape_timeout: 15s
external_labels:
cluster: ydzs-test
replica: $(POD_NAME) # 每个 Prometheus 有一个唯一的标签
rule_files: # 报警规则文件配置
- /etc/prometheus/rules/*rules.yaml
# 指定 remote write 地址
remote_write:
- url: http://thanos-receiver:19291/api/v1/receive
# ...... 省略其他配置
- url: http://thanos-receiver:19291/api/v1/receive 配置远程写入的接口地址,这个就是receiver组件的api,这样就对接到3个pod当中的任意1个。如果是多租户这里需要加上header。这样的话就相当于当前Prometheus租户id为a的这样一个租户,如果还有其他Prometheus可以再单独标记租户id,然后就会根据哈希环的配置,根据租户配置的id,将数据写到哪个receiver里面。
在配置文件中通过 remote_write.url 来指定远程写入接口地址。正常现在也不需要 Sidecar 容器了,这里我们为了用一个 StatefulSet 来运行两个 Prometheus 副本,可以借助 Sidecar 来帮我们渲染 prometheus.yaml.tmpl 模板文件(因为 Prometheus 本身是不支持环境变量替换的),这里的 Sidecar 仅作渲染用,同样需要去掉 thanos-store-api: "true" 标签,因为不需要直接对接 Store 了,修改后的资源清单文件如下所示:
# thanos-sidecar1.yaml
apiVersion: apps/v1
kind: StatefulSet
metadata:
  name: prometheus
  namespace: kube-mon
  labels:
    app: prometheus
spec:
  serviceName: prometheus
  replicas: 2
  selector:
    matchLabels:
      app: prometheus
      thanos-store-api: "true"
  template:
    metadata:
      labels:
        app: prometheus
        thanos-store-api: "true"
    spec:
      serviceAccountName: prometheus
      affinity:
        podAntiAffinity:
          preferredDuringSchedulingIgnoredDuringExecution:
            - weight: 100
              podAffinityTerm:
                topologyKey: kubernetes.io/hostname
                labelSelector:
                  matchExpressions:
                    - key: app
                      operator: In
                      values:
                        - prometheus
      volumes:
        - name: prometheus-config
          configMap:
            name: prometheus-config
        - name: prometheus-rules
          configMap:
            name: prometheus-rules
        - name: prometheus-config-shared
          emptyDir: {}
      initContainers:
        - name: fix-permissions
          image: busybox:stable
          command: [chown, -R, "nobody:nobody", /prometheus]
          volumeMounts:
            - name: data
              mountPath: /prometheus
      containers:
        - name: prometheus
          image: prom/prometheus:v2.34.0
          imagePullPolicy: IfNotPresent
          args:
            - "--config.file=/etc/prometheus-shared/prometheus.yaml"
            - "--storage.tsdb.path=/prometheus"
            - "--storage.tsdb.retention.time=6h"
            - "--storage.tsdb.no-lockfile"
            - "--storage.tsdb.min-block-duration=2h" # Thanos处理数据压缩
            - "--storage.tsdb.max-block-duration=2h"
            - "--web.enable-admin-api" # 通过一些命令去管理数据
            - "--web.enable-lifecycle" # 支持热更新  localhost:9090/-/reload 加载
          ports:
            - name: http
              containerPort: 9090
          volumeMounts:
            - name: prometheus-config-shared
              mountPath: /etc/prometheus-shared/
            - name: prometheus-rules
              mountPath: /etc/prometheus/rules
            - name: data
              mountPath: /prometheus
        - name: thanos
          image: thanosio/thanos:v0.25.1
          imagePullPolicy: IfNotPresent
          args:
            - sidecar
            - --log.level=debug
            - --reloader.config-file=/etc/prometheus/prometheus.yaml.tmpl
            - --reloader.config-envsubst-file=/etc/prometheus-shared/prometheus.yaml
            - --reloader.rule-dir=/etc/prometheus/rules/
          env:
            - name: POD_NAME
              valueFrom:
                fieldRef:
                  fieldPath: metadata.name
          volumeMounts:
            - name: prometheus-config-shared
              mountPath: /etc/prometheus-shared/
            - name: prometheus-config
              mountPath: /etc/prometheus
            - name: prometheus-rules
              mountPath: /etc/prometheus/rules
  volumeClaimTemplates: # 由于prometheus每2h生成一个TSDB数据块,所以还是需要保存本地的数据
    - metadata:
        name: data
        labels:
          app: prometheus
      spec:
        storageClassName: longhorn # 不要用nfs存储
        accessModes:
          - ReadWriteOnce
        resources:
          requests:
            storage: 2Gi
重新更新上面两个资源清单文件:
☸ ➜ kubectl apply -f https://p8s.io/docs/thanos/manifests/prometheus-config1.yaml
☸ ➜ kubectl apply -f https://p8s.io/docs/thanos/manifests/thanos-sidecar1.yaml
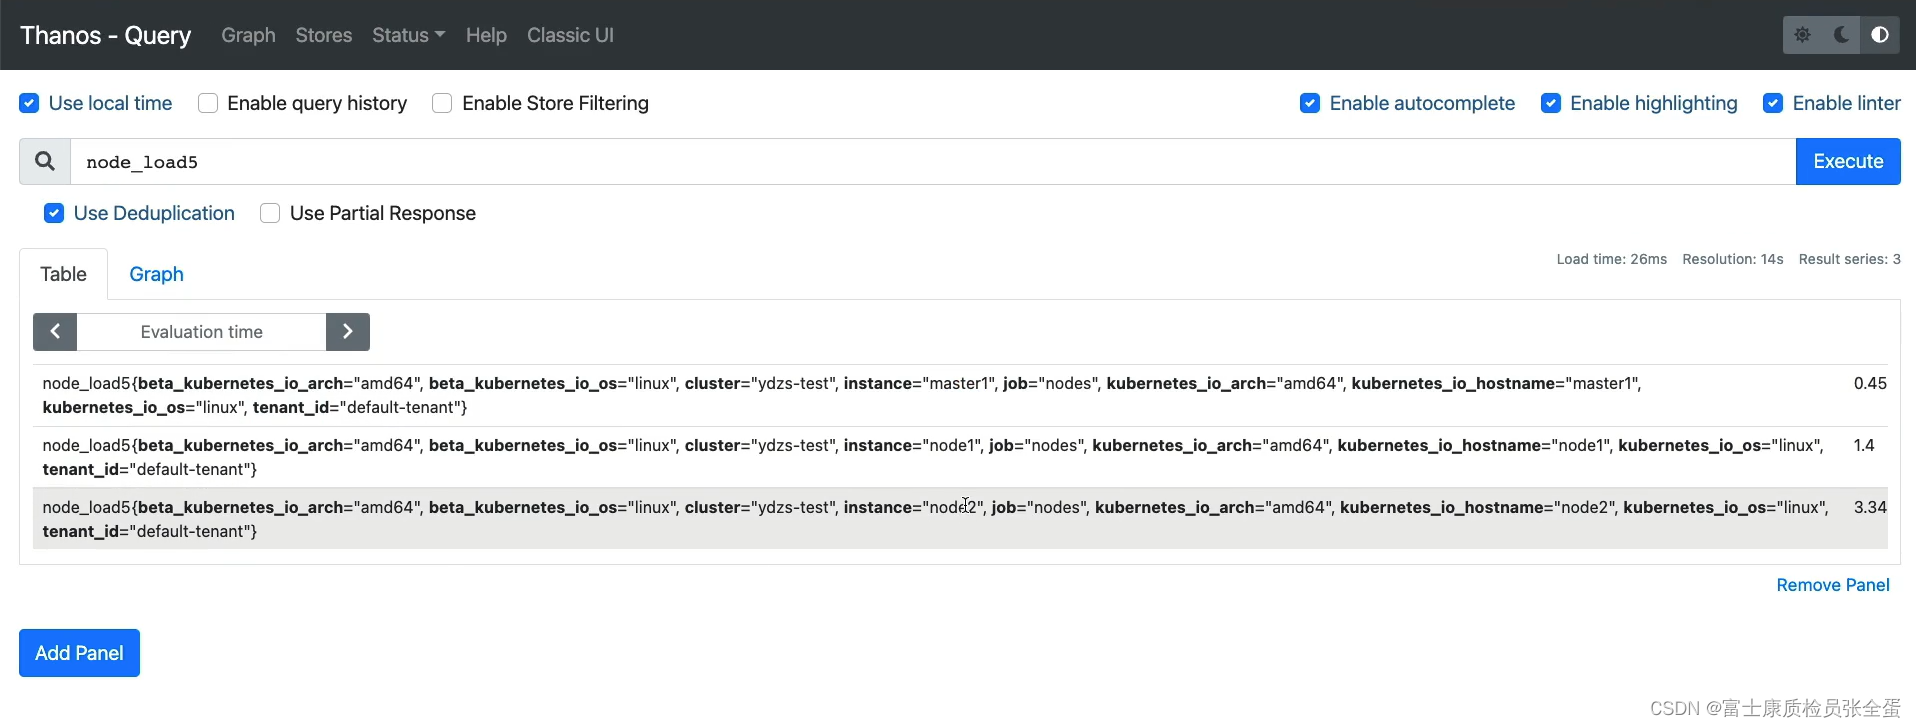
更新后 Prometheus 就会将数据远程写入到 Thanos Receiver 组件中去,然后 Receiver 也会定时将数据上传到对象存储中,而 Receiver 实现了 Store API,所以也可以直接通过 Query 组件查询获取到数据,这样最新的数据就会从 Receiver 组件中获取,而历史的数据就可以去 Store 对象存储中获取了。现在我们这 Query 中去查询数据就可以获取到最新的指标数据,由于配置了去重,所以查询出来的数据也会自动去重:(可以看到数据去重了,这里还包括租户id)

(也可以根据Prometheus的标签replica去重,而不是根据receiver当中的标签去去重,或者可以根据这两个标签去重)
没去重

去重之后

由于我们这里暂时只有一个集群,所以没有演示 Receiver 的多租户模式。