1 前言
Input 是 Unity3D 中用于人机交互的工具类,用户可以调用其 GetKey、GetMousePosition、GetMouseButton、GetAxis、GetButton 等方法获取键盘和鼠标的状态信息,再通过这些状态信息控制游戏对象,从而实现人机交互。
1)键盘输入
// 按住按键
public static bool GetKey(KeyCode key)
// 按下按键
public static bool GetKeyDown(KeyCode key)
// 抬起按键
public static bool GetKeyUp(KeyCode key)
KeyCode 的取值有:
A~Z
F1~F15
// 键盘顶部的数字
Alpha0~Alpha9
Left、RightArrow、UpArrow、DownArrow
LeftCtrl、LeftShift、LeftAlt、LeftWindows、RightCtrl、RightShift、RightAlt、RightWindows
Tab、Space、Backspace、Return
// 加号、减号、星号、斜杠、反斜杠、左括号、右括号、小于号、大于号、等于号、上尖号
Plus、Minus、Asterisk、Slash、Backslash、LeftBracket、RightBracket、Less、Greater、Equals、Caret
// 逗号、点号、问号、分号、冒号、单引号、反引号、双引号、感叹号
Comma、Period、Question、Semicolon、Colon、Quote、BackQuote、DoubleQuote、Exclaim
// @符号、$符号、&符号、下划线
At、Dollar、Ampersand、Underscore
Insert、Delete、Home、End、PageUp、PageDown、Print
CapsLock、Numlock、ScrollLock
Keypad0~Keypad9、KeypadPeriod
KeypadPlus、KeypadMinus、KeypadMultiply、KeypadDivide
KeypadEquals、KeypadEnter
// 鼠标左键、鼠标右键、鼠标中间
Mouse0、Mouse1、Mouse2
2)鼠标输入
// 按住鼠标
public static bool GetMouseButton(int button)
// 按下鼠标
public static bool GetMouseButtonDown(int button)
// 抬起鼠标
public static bool GetMouseButtonUp(int button)
// 鼠标坐标
Vector3 position = Input.mousePosition
说明:button 取值为 0、1、2,分别表示鼠标左键、右键、中键。
3)虚拟轴输入
在【Edit→Project Settings→Input】中可以打开 InputManager 配置界面,用户可以在此配置虚拟轴信息。
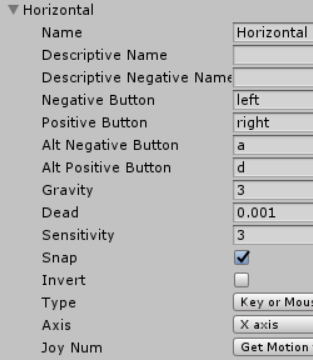


// 按左右箭头或A、D键,hor在-1~1之间变化
float hor = Input.GetAxis("Horizontal");
// 按上下箭头或W、S键,hor在-1~1之间变化
float ver = Input.GetAxis("Vertical");
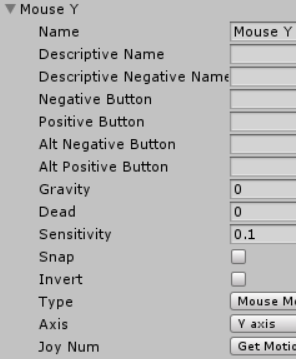
// 获取鼠标在水平方向上的移动
float mouseX = Input.GetAxis("Mouse X");
// 获取鼠标在竖直方向上的移动
float mouseY = Input.GetAxis("Mouse Y");4)虚拟按键输入
InputManager 配置界面配置虚拟按键,如下:

// 按住虚拟按键
public static bool GetButton(string buttonName)
// 按下虚拟按键
public static bool GetButtonDown(string buttonName)
// 抬起虚拟按键
public static bool GetButtonUp(string buttonName)
// 按以上配置,按住Q键或鼠标左键返回true,表示开火了
bool fire = Input.GetButton("Fire");
2 应用
本节将实现坦克对战游戏。
1)实现需求
- 绘制2个坦克,一个表示己方,一个表示敌方;
- 用户可以通过上下箭头按键控制己方坦克前后移动,通过左右箭头按键控制己方坦克左右移动或左右转向;
- 用户可以通过鼠标左键发射炮弹;
- 敌方坦克可以自动转向瞄准己方坦克,但是有延时,转向先快后慢,延时插值系数为 0.6;
- 敌方坦克瞄准己方坦克后(允许有5°误差),自动开炮,开炮间隔需要大于1秒。
2)创建游戏对象
游戏对象的 Transform 组件参数如下:
| name | type | position | Rotation | scale | Color/Texture |
| MyTank | Empty | (0, 0.25, -5) | (0, 0, 0) | (1, 1, 1) | —— |
| Button | Cube | (0, 0, 0) | (0, 0, 0) | (2, 0.5, 2) | #228439FF |
| Top | Cube | (0, 0.5, 0) | (0, 0, 0) | (1, 0.5, 1) | #228439FF |
| Gun | Cylinder | (0, 0, 1.5) | (90, 0, 0) | (0.2, 1, 0.4) | #228439FF |
| FirePoint | Empty | (0, 1.15, 0) | (0, 0, 0) | (1, 1, 1) | —— |
| MyBullet | Sphere | (0, 0, -2) | (0, 0, 0) | (0.2, 0.2, 0.2) | #82EA4FFF |
| Plane | Plane | (0, 0, 0) | (0, 0, 0) | (10, 10, 10) | GrassRockyAlbedo |
| EnemyTank | Empty | (0, 0.25, 5) | (0, 180, 0) | (1, 1, 1) | 15D3F9FF |
| EnemyBullet | Sphere | (0, 0, 2) | (0, 0, 0) | (0.2, 0.2, 0.2) | #4C55F8FF |
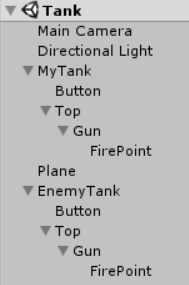
说明: EnemyTank 由 MyTank复制而来,只是修改了它自己及其子对象的颜色属性;EnemyBullet 由 MyBullet 复制而来,然后修改了颜色属性;将 MyBullet 和 EnemyBullet 拖拽至 Assets 窗口的 Resources/Prefabs 目录下,生成预设体(prefab),再删除 Hierarchy 窗口下 MyBullet 和 EnemyBullet 对象。
游戏对象的层级结构如下:
游戏界面如下:

3)脚本组件
MyTank.cs
using UnityEngine;

public class MyTank : MonoBehaviour {
	private Transform firePoint; // 开火点
	private GameObject bulletPrefab; // 炮弹预设体

	void Start() {
		firePoint = transform.Find("Top/Gun/FirePoint");
		bulletPrefab = (GameObject) Resources.Load("Prefabs/MyBullet");
		Debug.Log(bulletPrefab);
	}

	void Update () {
		float hor = Input.GetAxis("Horizontal");
        float ver = Input.GetAxis("Vertical");
		move(hor, ver);
		if (Input.GetMouseButtonDown(0)) { // 开炮
			GameObject bullet = Instantiate(bulletPrefab, firePoint.position, Quaternion.identity); // 通过预设体创建炮弹
			bullet.GetComponent<Bullet>().setMoveDir(transform.forward); // 设置炮弹飞出方向
		}
	}

	private void move(float hor, float ver) {
		// 移动方案一:上下箭头控制前后移动,左右箭头控制左右移动
		// transform.Translate(hor * Time.deltaTime * 3, 0, ver * Time.deltaTime * 3);

		// 移动方案二:上下箭头控制前后移动,左右箭头控制左右拐弯
		transform.Translate(0, 0, ver * Time.deltaTime * 3);
		transform.Rotate(Vector3.up * hor * Time.deltaTime * 120f);
	}
}
说明:MyTank.cs 脚本组件挂载在 MyTank 游戏对象上。
EnemyTank.cs
using UnityEngine;

public class EnemyTank : MonoBehaviour {
	private Transform target; // 目标
	private Transform top; // 炮头
	private Transform firePoint; // 开火点
	private GameObject bulletPrefab; // 炮弹预设体
	private float fireInternal = 0; // 开炮间隔

	void Start () {
		target = GameObject.Find("MyTank/Top").transform;
		top = transform.Find("Top");
		firePoint = transform.Find("Top/Gun/FirePoint");
		bulletPrefab = (GameObject) Resources.Load("Prefabs/EnemyBullet");
	}

	void Update () {
		Quaternion dir = Quaternion.LookRotation(target.position - top.position);
		top.rotation = Quaternion.Lerp(top.rotation, dir, Time.deltaTime * 0.6f); // 敌军转向己方
		float angle = Vector3.Angle(target.position - top.position, top.forward);
		if (angle < 5 && fireInternal > 1) {
			GameObject bullet = Instantiate(bulletPrefab, firePoint.position, Quaternion.identity); // 通过预设体创建炮弹
			bullet.GetComponent<Bullet>().setMoveDir(top.forward); // 设置炮弹飞出方向
			fireInternal = 0;
		}
		fireInternal += Time.deltaTime;
	}
}
说明:EnemyTank.cs 脚本组件挂载在 EnemyTank 游戏对象上。
Bullet.cs
using UnityEngine;

public class Bullet : MonoBehaviour {
	private Vector3 moveDir; // 炮弹飞出方向

	void Start () {
		Destroy(gameObject, 2); // 2秒后自动销毁
	}

	void Update () {
		if (moveDir != null) {
			transform.Translate(moveDir * Time.deltaTime * 6);
		}
	}

	public void setMoveDir(Vector3 dir) {
		moveDir = dir;
	}
}
说明:Bullet.cs 脚本组件挂载在 MyBullet 和 EnemyBullet 预设体上。
4)运行效果
左右箭头按键控制己方坦克左右移动
左右箭头按键控制己方坦克左右转向
