使用webpack打包TS
一、配置
1.新建入口js
src/main.ts
document.write("帅哥,看过来")
2.新建index页面
public/index.html
<!DOCTYPE html>
<html lang="en">
  <head>
    <meta charset="UTF-8" />
    <meta http-equiv="X-UA-Compatible" content="IE=edge" />
    <meta name="viewport" content="width=device-width, initial-scale=1.0" />
    <title>webpack & TS</title>
  </head>
  <body></body>
</html>
3.新建build/webpack.config.js
webpack相关配置
const {

     CleanWebpackPlugin } = require('clean-webpack-plugin')
const HtmlWebpackPlugin = require('html-webpack-plugin')
const path = require('path')

const isProd = process.env.NODE_ENV === 'production' // 是否生产环境

function resolve(dir) {


  return path.resolve(__dirname, '..', dir)
}

module.exports = {


  // 模式: 生产 开发
  mode: isProd ? 'production' : 'development',
  // 配置模块的入口
  entry: {


    // 统一的主入口目录
    app: './src/main.ts'
  },

  // 打包后的内容放到dist中,文件名为entry内的 —— app + 8位hash值 + .js
  output: {


    path: resolve('dist'),
    filename: '[name].[contenthash:8].js'
  },

  module: {


    rules: [
      // 针对src内的ts和tsx文件进行编译处理操作
      {


        test: /\.tsx?$/,
        use: 'ts-loader',
        include: [resolve('src')]
      }
    ]
  },

  plugins: [
    // 清理以前打包的js
    new CleanWebpackPlugin({


    }),

    // 这里是针对public内的html进行打包
    new HtmlWebpackPlugin({


      template: './public/index.html'
    })
  ],

  resolve: {


    // 针对这些文件进行处理(引入'.ts', '.tsx', '.js'可以不写扩展名)
    extensions: ['.ts', '.tsx', '.js']
  },
  // 代码问题,提示信息
  devtool: isProd ? 'cheap-module-source-map' : 'cheap-module-eval-source-map',

  // 启动后在浏览器的 对应主机名 对应端口打开
  devServer: {


    host: 'localhost', // 主机名
    stats: 'errors-only', // 打包日志输出输出错误信息
    port: 8081,
    open: true
  },
}
4.命令行创建package.json文件
在node开发中使用npm init会生成一个pakeage.json文件,用来记录这个项目的详细信息的,如: 项目开发中用到的包,以及项目的详细信息等。便于版本迭代和项目移植。在误删了某个依赖包或项目移植后,可以使用
npm install 根据package.json安装依赖。
npm init -y
npm init --yes|-y :作用同npm init,可以偷懒不用一直按enter。
5.生成ts自动编译配置文件
tsc --init
初始化ts自动编译为js(内容不做修改)
6.下载相关依赖包
npm i -D typescript@4.0.5
npm i -D webpack@4.41.5 webpack-cli@3.3.10
npm i -D webpack-dev-server@3.10.2
npm i -D html-webpack-plugin@4.5.0 clean-webpack-plugin@3.0.0
npm i -D ts-loader@8.0.11
npm i -D cross-env@7.0.2
// 下方命令, 对html打包 清除打包内容
npm i -D html-webpack-plugin clean-webpack-plugin
7.配置打包命令
在 package.json 的scripts内配置打包命令
dev是生产环境
build是开发环境
"dev": "cross-env NODE_ENV=development webpack-dev-server --config build/webpack.config.js",
"build": "cross-env NODE_ENV=production webpack --config build/webpack.config.js"
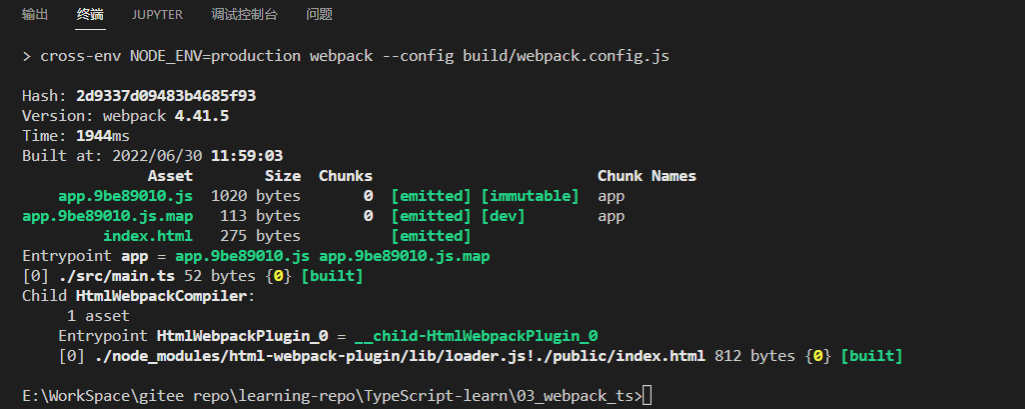
8.运行和打包
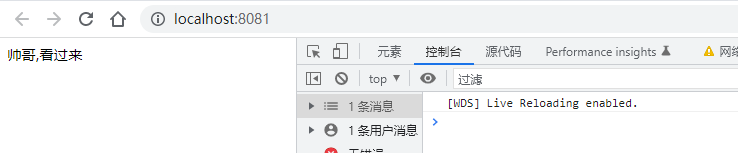
npm run dev
npm run build
运行结果
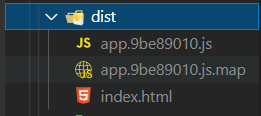
打包结果: